
Resource Manage는 앱에서 리소스를 가져오고 만들고 관리하고 사용할 수 있는 도구 창입니다. 도구 창을 열려면 메뉴에서 View > Tool Windows > Resource Manager를 선택하거나 왼쪽 사이드바에서 Resource Manager를 선택합니다.
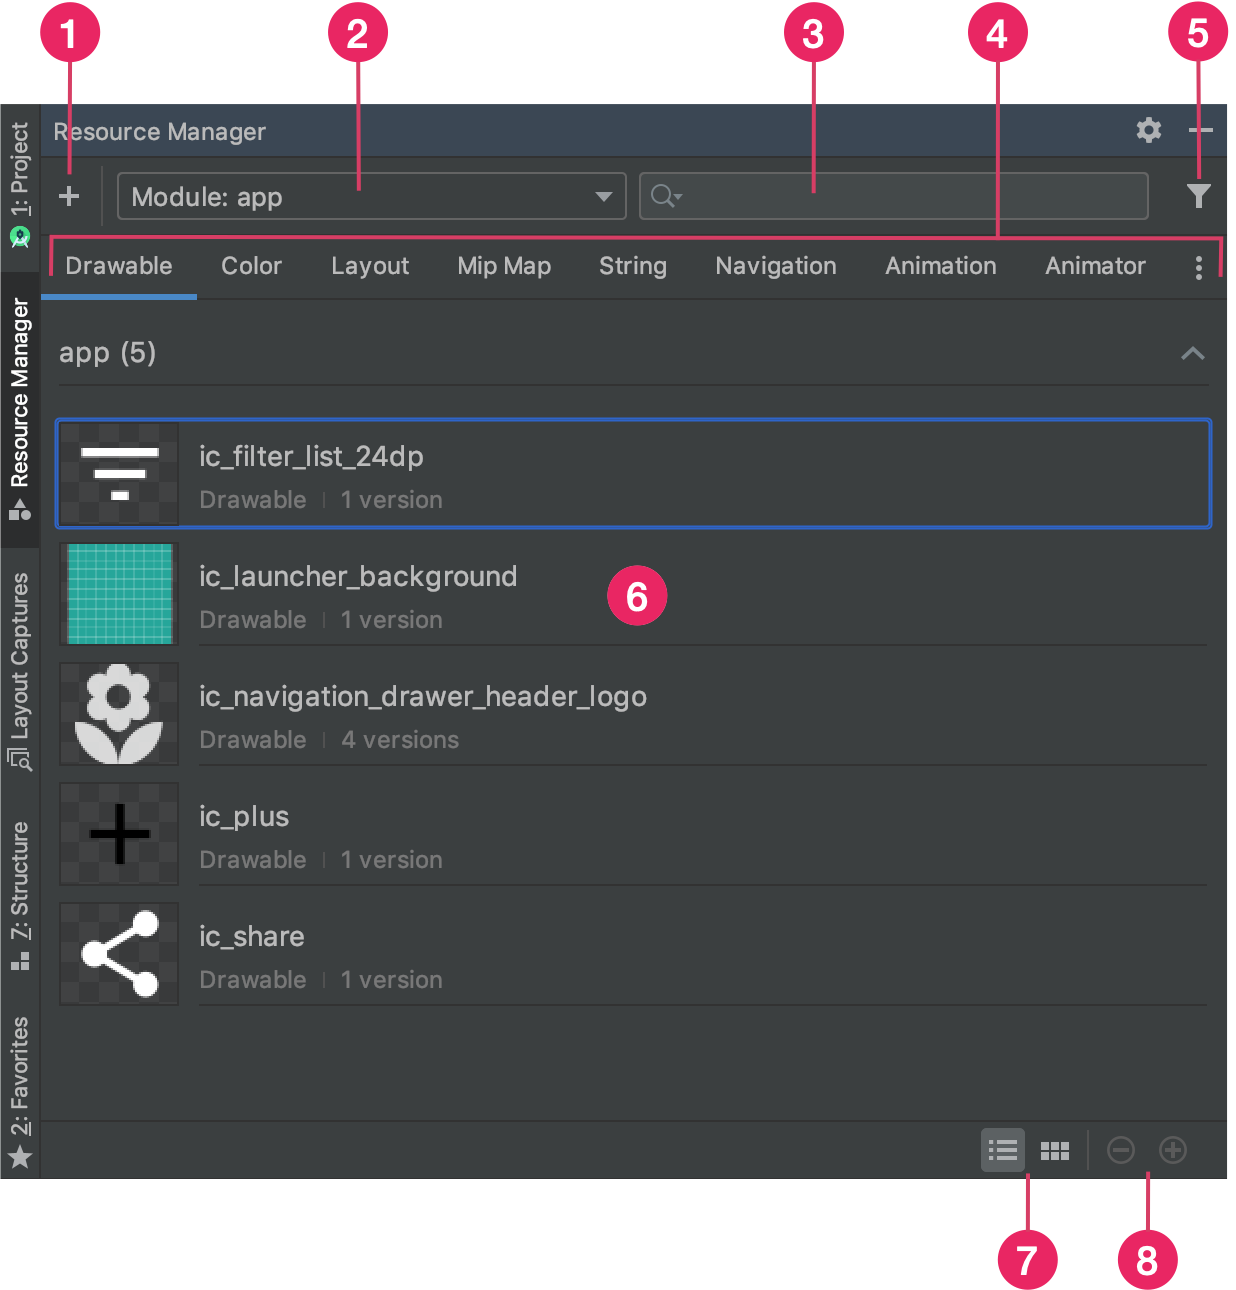
그림 1. Resource Manager 도구 창
- Add
 를 클릭하여 프로젝트에 새로운 리소스를 추가합니다. 이미지 애셋, 벡터 애셋, 글꼴, 리소스 파일, 값을 추가하거나 프로젝트로 드로어블을 가져올 수 있습니다.
- 모듈을 선택하여 해당 모듈과 관련된 리소스를 확인합니다.
- 검색창을 사용하여 프로젝트의 모든 모듈에서 리소스를 검색합니다.
- Resource Manager에서 유형에 따라 리소스를 표시합니다.
이 탭을 사용해 리소스 유형 간에 전환합니다. 더보기 아이콘
 을 클릭하여 추가 리소스 유형을 표시합니다.
 - 필터 버튼을 사용하여 로컬 종속 모듈, 외부 라이브러리, Android 프레임워크에서 표시된 리소스를 필터링합니다. 필터를 사용하여 테마 속성을 표시할 수도 있습니다.
- 기본 콘텐츠 영역에서 리소스를 미리 봅니다. 리소스를 마우스 오른쪽 버튼으로 클릭하면 리소스의 이름을 바꾸고 앱에서 리소스가 사용되는 곳을 검색할 수 있는 컨텍스트 메뉴가 표시됩니다.
- 이 버튼을 클릭하면 리소스를 타일 또는 목록 형식으로 볼 수 있습니다.
- 이 버튼을 클릭하면 리소스의 미리보기 크기를 변경할 수 있습니다.
이러한 기능 외에도 Resource Manager는 대량의 드로어블을 한 번에 프로젝트로 가져올 수 있는 기능을 제공합니다. 일괄적으로 가져오는 방법은 다음과 같습니다.
- SVG 파일을 포함한 이미지 파일을 Resource Manager로 직접 드래그합니다.
- Import Drawables 마법사를 사용합니다.
자세한 내용은 프로젝트로 드로어블 가져오기 섹션을 참고하세요.
자세한 정보를 보려면 Resource Manager에서 리소스를 더블클릭합니다. 여러 버전의 리소스가 있는 경우 이 상세 뷰에는 그림 2와 같이 관련 한정자와 함께 각 버전이 표시됩니다. 여기에서 특정 버전을 더블클릭하여 편집기 창에서 열 수 있습니다.
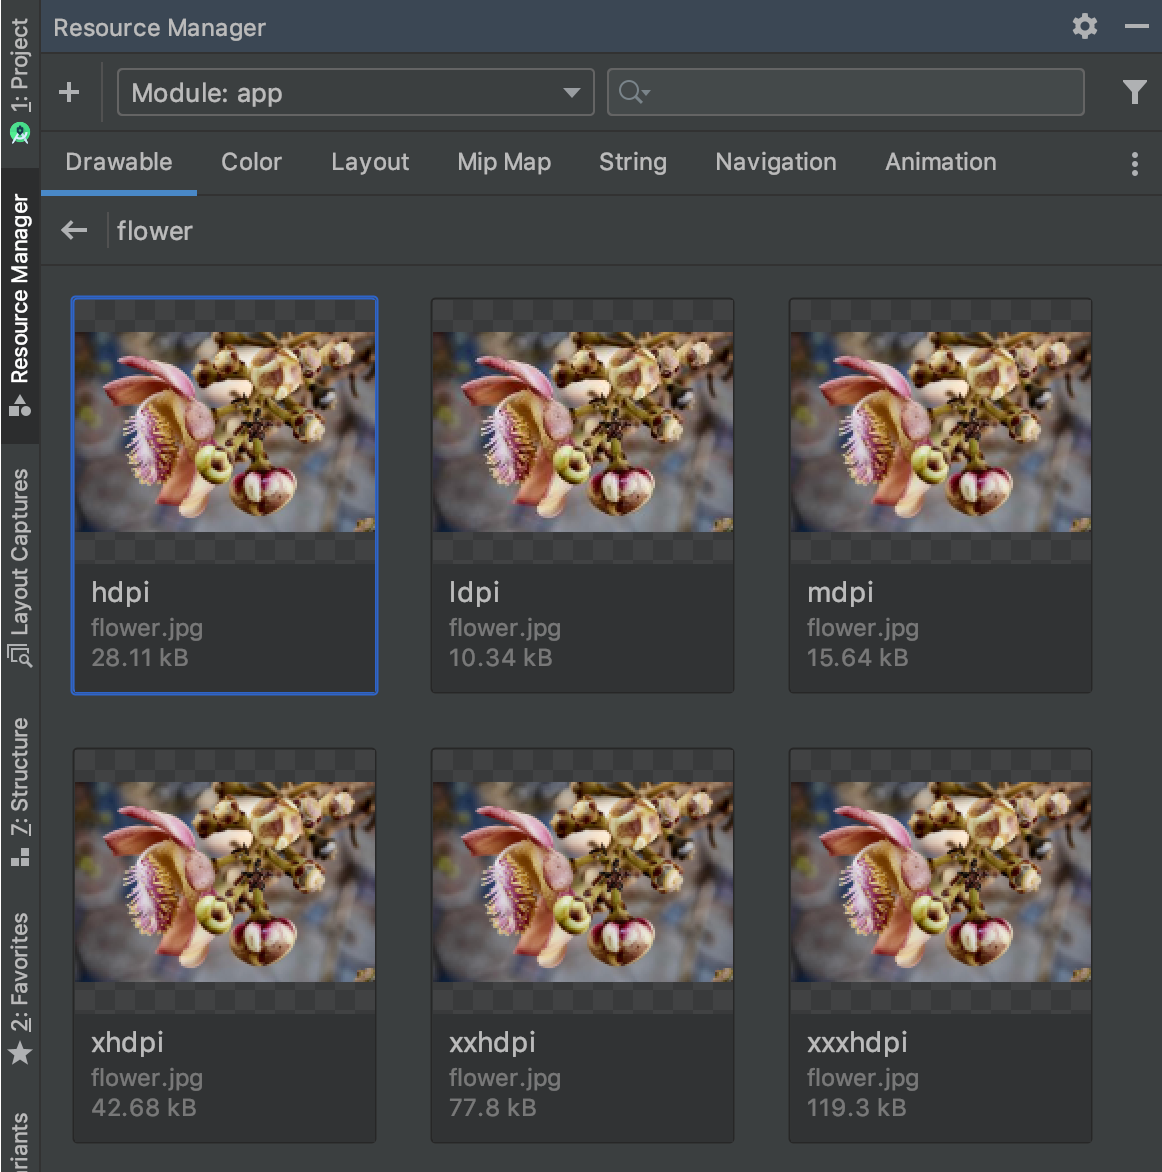
그림 2. 다양한 화면 밀도의 이미지 리소스 버전을 보여주는 Resource Manager
프로젝트로 드로어블 가져오기
Resource Manager를 사용하여 이미지 리소스를 프로젝트로 가져올 수 있습니다. 지원되는 이미지 유형 목록은 이미지 지원을 참고하세요.
이미지 리소스를 프로젝트로 가져오려면 다음 단계를 따르세요.
이미지를 Android 스튜디오의 Resource Manager 창으로 직접 드래그합니다.
- 또는 다음 방법을 이용할 수도 있습니다.
- 더하기 아이콘(+)을 클릭합니다.
- 그림 3과 같이 Import Drawables를 선택합니다.
- 가져올 파일 및 폴더를 선택합니다.
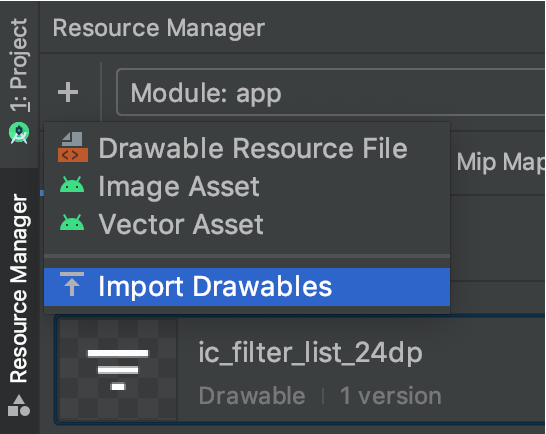
그림 3. 메뉴에서 Import Drawables 선택
- 또는 다음 방법을 이용할 수도 있습니다.
그림 4와 같이 Import drawables 대화상자가 나타납니다. 이 대화상자에는 가져올 리소스의 목록이 표시됩니다. 리소스 미리보기 위에 있는 상자를 클릭하여 리소스 이름을 변경할 수 있습니다.
동일한 리소스를 여러 버전으로 제공하는 경우 다음 섹션에 설명된 대로 각 리소스가 지원하는 특정 구성을 설명하는 기기 구성 한정자를 추가합니다.
예를 들어 여러 화면 밀도에 동일한 리소스를 여러 버전으로 제공하는 경우 각 버전에 밀도 한정자를 추가할 수 있습니다. 이름과 한정자가 동일한 리소스가 2개 이상 있는 경우 1개의 버전만 가져옵니다.
리소스 한정자에 관한 자세한 내용은 대체 리소스 제공을 참고하세요.
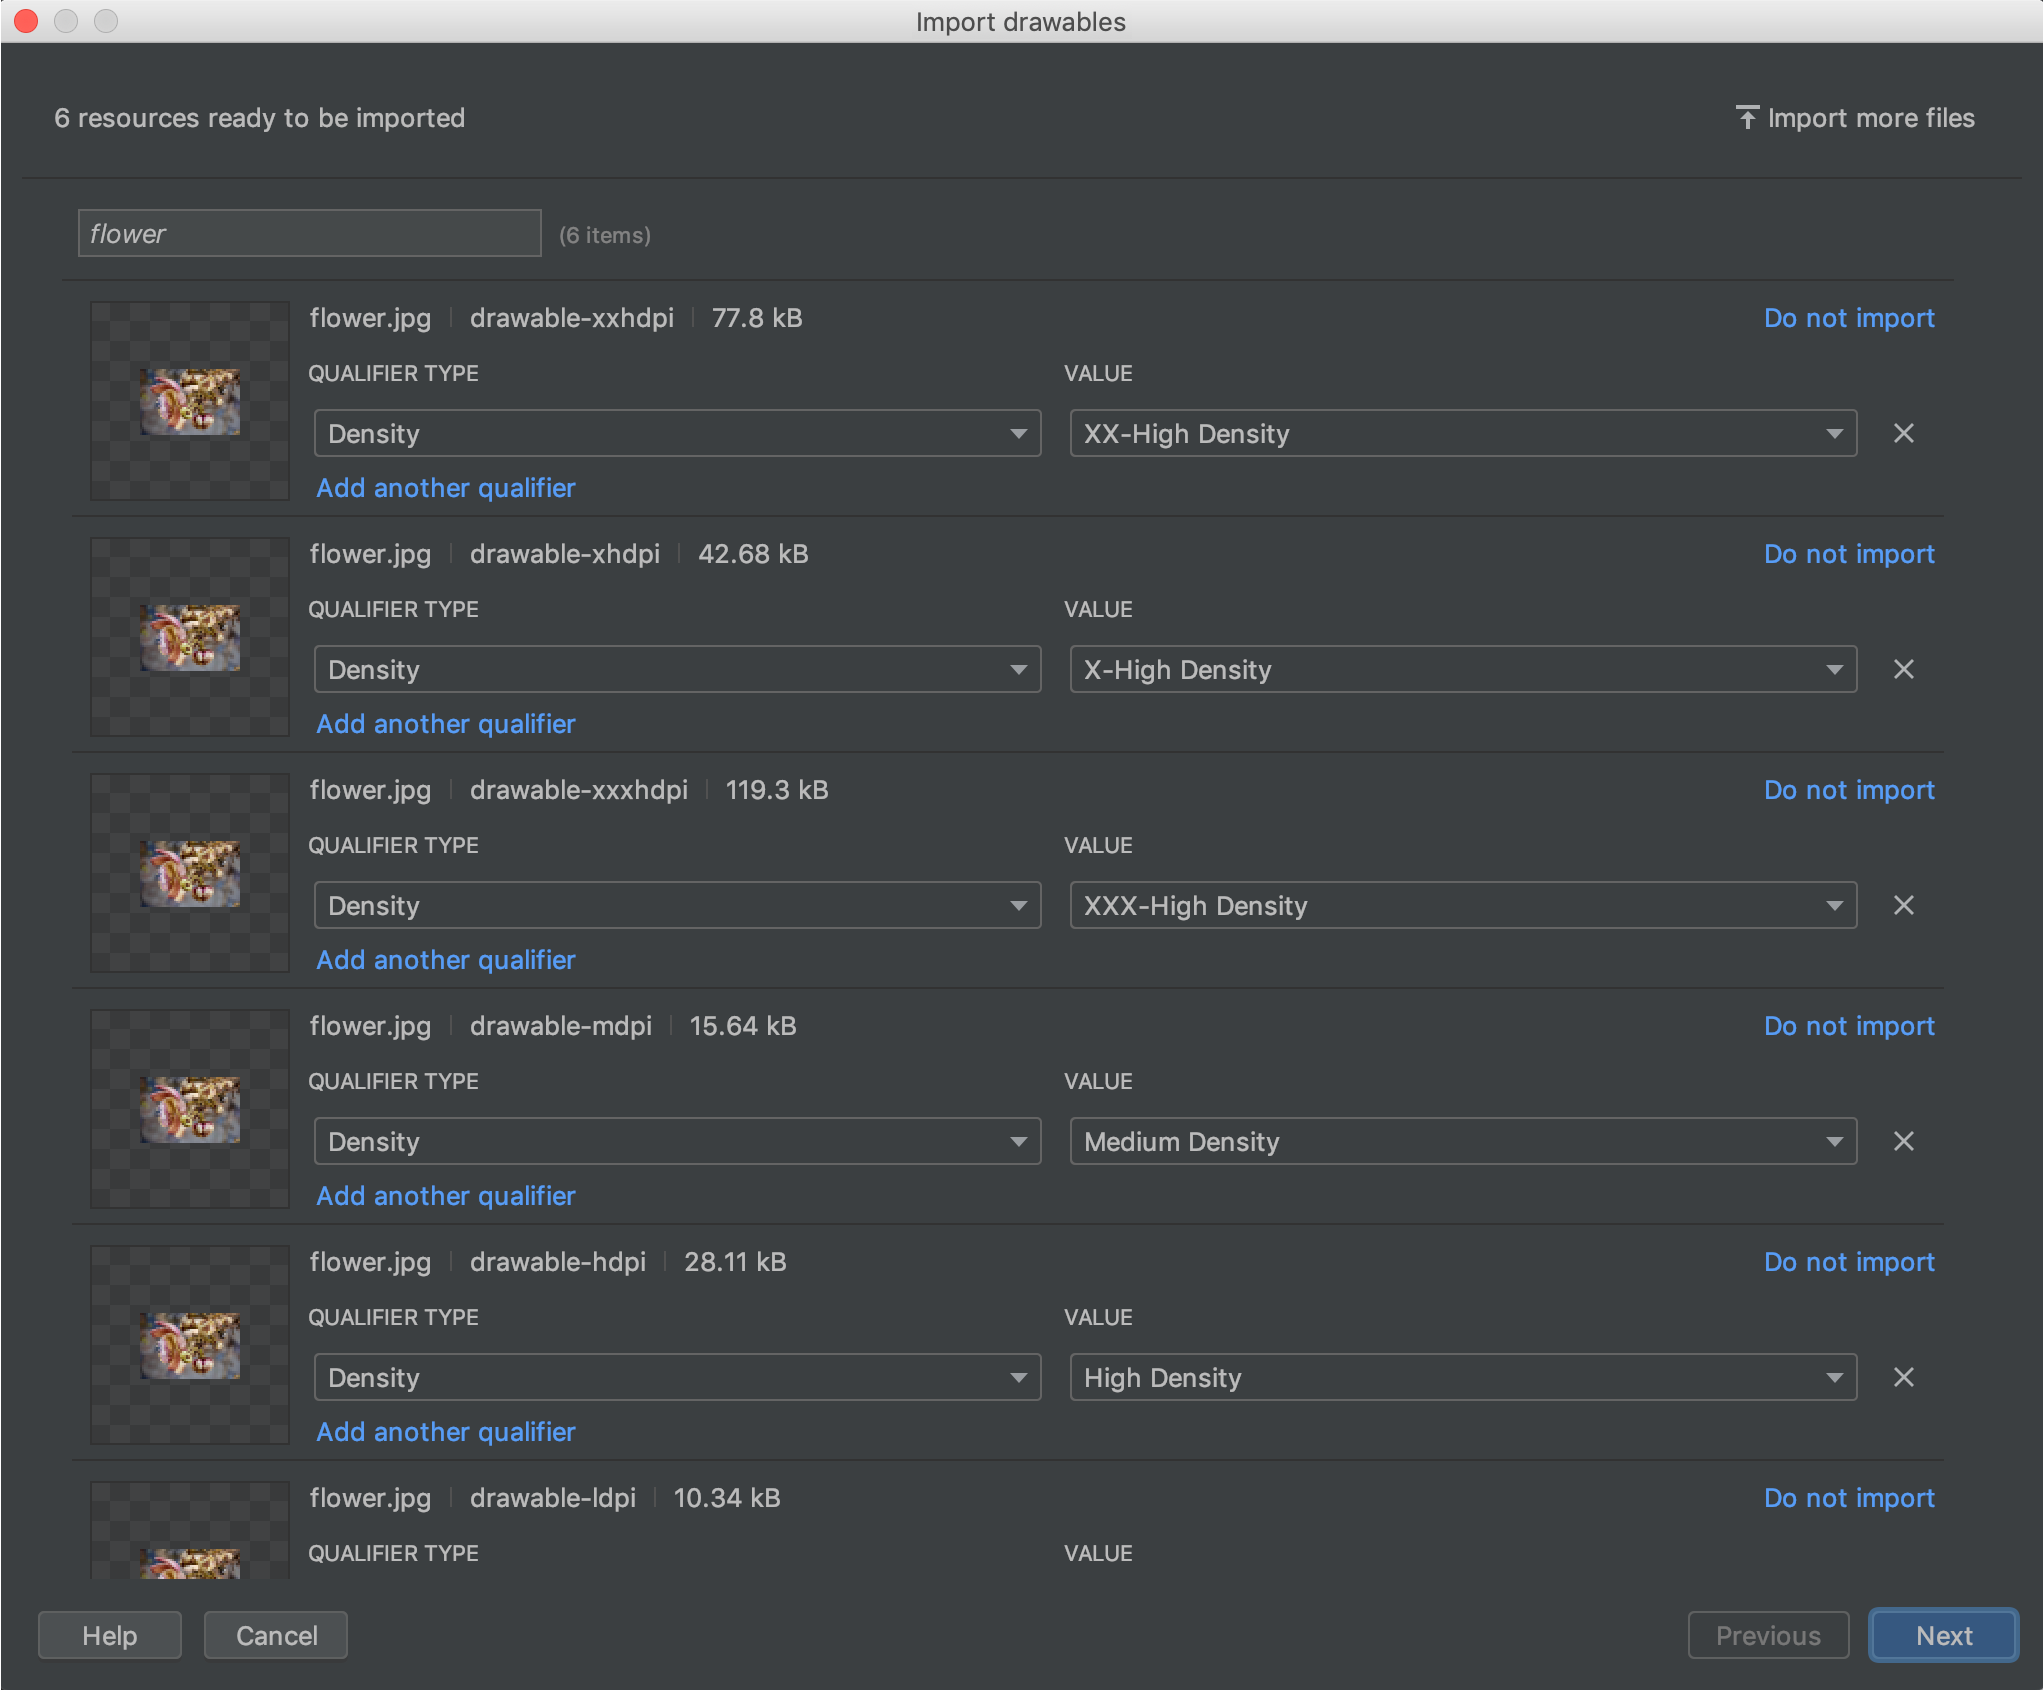
그림 4. Import Drawables 대화상자
리소스 이름을 지정하고 필요한 한정자를 추가한 후 Next를 클릭합니다.
다음 화면에는 가져올 리소스의 요약이 표시됩니다. 가져올 준비가 되면 Import를 클릭합니다.
그림 5와 같이 이제 리소스를 프로젝트에서 사용할 준비가 된 것을 Resource Manager 창에서 알 수 있습니다.
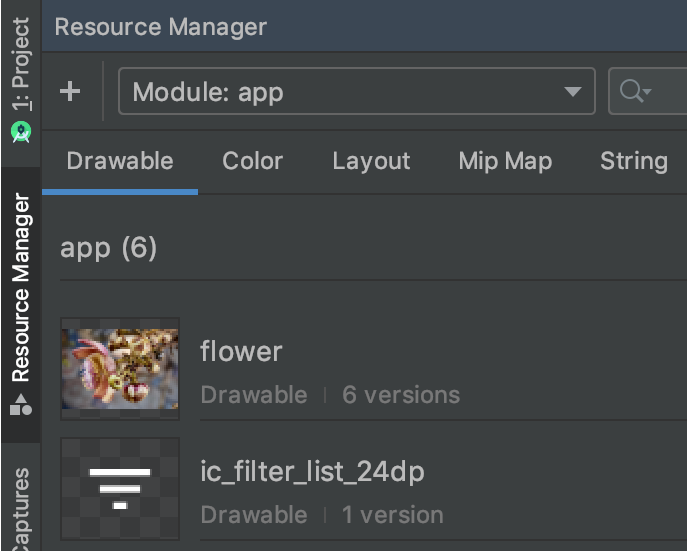
그림 5. Resource Manager에 가져온 이미지가 표시됨
드로어블 밀도 자동 파싱
파일이나 폴더를 가져올 때 경로에 밀도 한정자가 포함된 경우 Resource Manager는 가져오는 과정에서 밀도 한정자를 자동 적용합니다. Resource Manager에서는 Android의 밀도 한정자와 iOS의 배율을 모두 파싱할 수 있습니다.
이 표에는 Android 및 iOS에서 지원되는 다양한 밀도를 표시하는 방식이 나열되어 있습니다.
| 밀도 | Android 밀도 한정자 | iOS 배율 |
|---|---|---|
| 저밀도(약 120dpi) | ldpi |
지원되지 않음 |
| 중밀도(약 160dpi) | mdpi |
원래의 배율 |
| 고밀도(약 240dpi) | hdpi |
지원되지 않음 |
| 초고밀도(약 320dpi) | xhdpi |
@2x |
| 초초고밀도(약 480dpi) | xxhdpi |
@3x |
| 초초초고밀도(약 640dpi) | xxxhdpi |
@4x |
다음은 입력 경로가 가져오기 후 리소스 경로로 변환되는 방식을 보여주는 몇 가지 예시입니다.
- Android 밀도 한정자:
hdpi - 입력 경로: /UserFolder/icon1/hdpi/icon.png
리소스 경로: <projectFolder>/<moduleFolder> /src/main/res/drawable-hdpi/icon.png - Android 밀도 한정자:
xxhdpi - 입력 경로: /UserFolder/icon1/abc-xxhdpi/icon.png
리소스 경로: <projectFolder>/<moduleFolder> /src/main/res/drawable-xxhdpi/icon.png - iOS 배율: @2x
- 입력 경로: /UserFolder/icon1/icon@2x.png
리소스 경로: <projectFolder>/<moduleFolder> /src/main/res/drawable-xhdpi/icon.png - iOS 배율: @2x
- 입력 경로: /UserFolder/icon1/icon@2x_alternate.png
리소스 경로: <projectFolder>/<moduleFolder> /src/main/res/drawable-xhdpi/icon_alternate.png
다양한 픽셀 밀도를 가진 기기를 지원하는 방법에 관한 자세한 내용은 다양한 픽셀 밀도 지원을 참고하세요.
Jetpack Compose에서 리소스 사용
Jetpack Compose로 빌드할 때는 최적화된 API를 사용하여 Kotlin 코드에서 리소스에 직접 액세스하여 UI 로직과 리소스 참조가 동기화된 상태로 유지됩니다.
- 이미지:
Image컴포저블 내에서painterResource(id = R.drawable.your_image)를 사용합니다. - 문자열:
stringResource(id = R.string.your_string)를 사용하여 현지화된 UI 텍스트를 가져옵니다. - 색상:
colorResource(id = R.color.your_color)를 사용하여 테마 정의 색상을 적용합니다.
리소스 관리자는 이러한 ID가 올바르게 생성되도록 하여 Compose UI 계층 구조에서 애셋을 원활하게 참조할 수 있도록 합니다.
동적 글꼴 로드, 구성별 리소스, Compose별 리소스 라이브러리 등 고급 리소스 처리에 관한 자세한 내용은 Compose의 리소스 문서를 참고하세요.