Resource Manager によるアプリの UI リソースの管理
コレクションでコンテンツを整理
必要に応じて、コンテンツの保存と分類を行います。
Resource Manager は、アプリ内のリソースをインポート、作成、管理、使用するためのツール ウィンドウです。ツール ウィンドウを開くには、メニューから [View] > [Tool Windows] > [Resource Manager] を選択するか、左側のバーから [Resource Manager] を選択します。
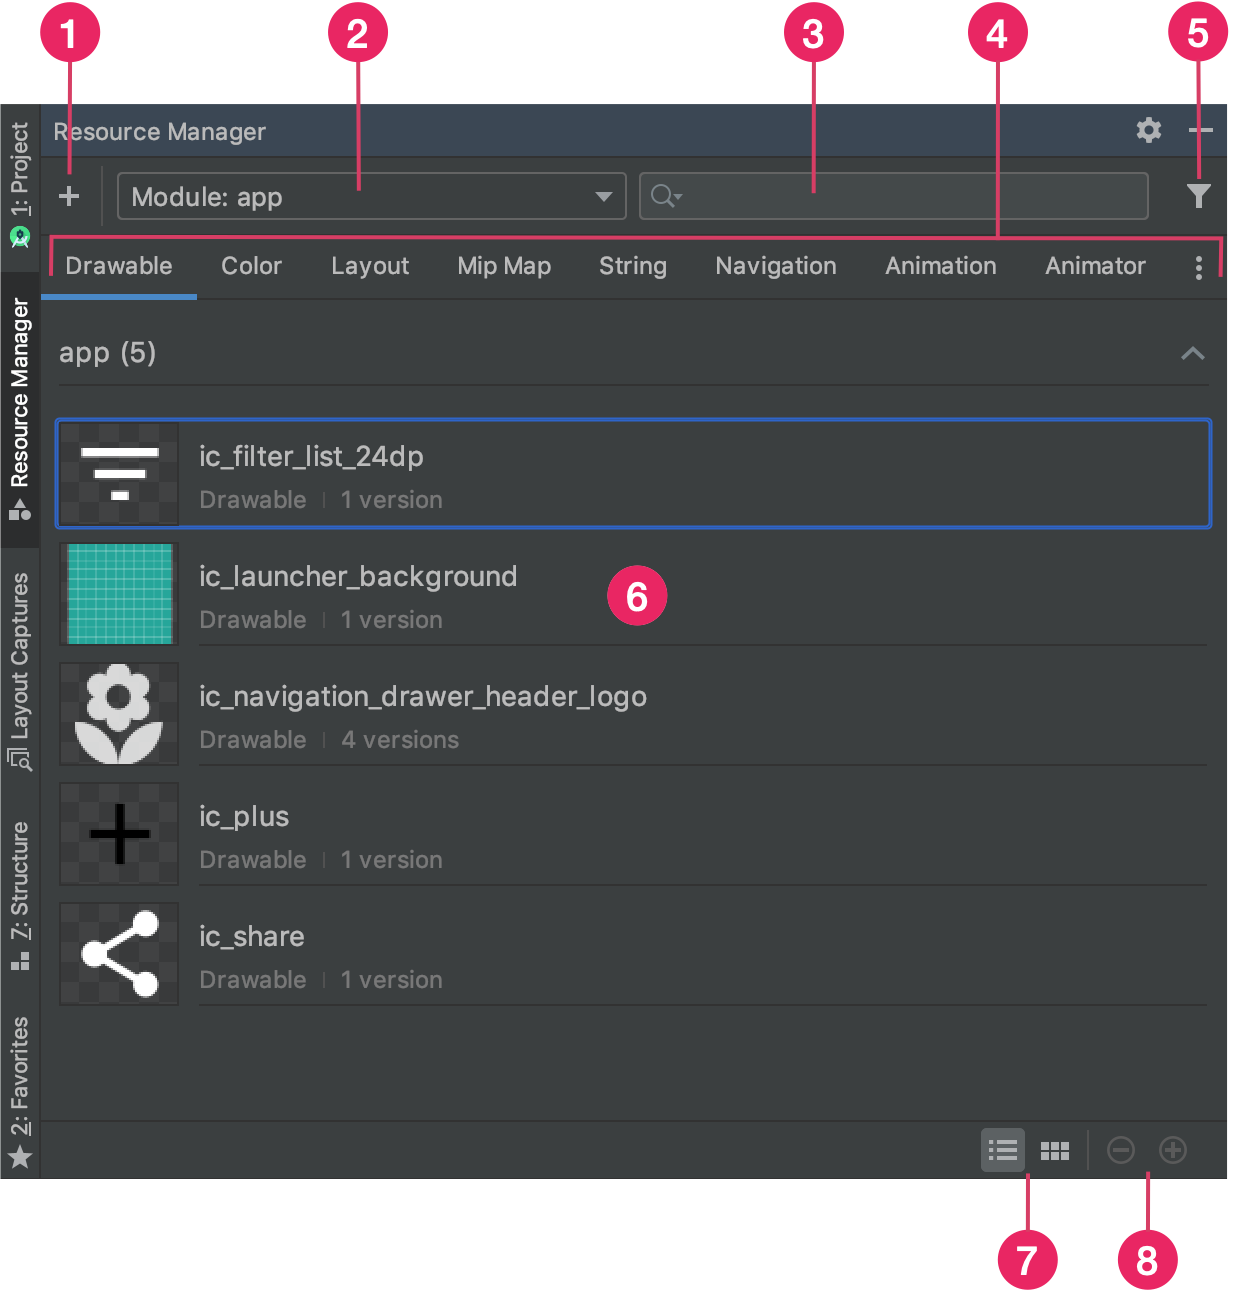
図 1. [Resource Manager] ツール ウィンドウ。
- 追加アイコン
をクリックすると、新しいリソースをプロジェクトに追加できます。画像アセット、ベクター アセット、フォント、リソース ファイル、リソース値を追加できるほか、プロジェクトにドローアブルをインポートすることもできます。
- モジュールを選択すると、そのモジュールに固有のリソースが表示されます。
- 検索バーを使用して、プロジェクト内のすべてのモジュールのリソースを検索できます。
- Resource Manager のタイプに従ってリソースを表示します。リソースタイプの切り替えは、ここにあるタブで行います。追加のリソースタイプを表示するには、オーバーフロー アイコン
をクリックします。
- フィルタボタンを使用すると、ローカルの依存モジュール、外部ライブラリ、Android フレームワークから表示するリソースをフィルタできます。フィルタを使用してテーマ属性を表示することもできます。
- メイン コンテンツ領域でリソースをプレビューします。リソースを右クリックするとコンテキスト メニューが表示されます。このメニューから、リソースの名前の変更や、アプリ内でのリソース使用箇所の検索などが行えます。
- このボタンにより、リソースの表示形式(タイルまたはリスト)を選択できます。
- このボタンにより、リソースのプレビュー サイズを変更できます。
これらの機能に加えて、Resource Manager ではドローアブルをプロジェクトに一括インポートすることもできます。一括インポートは次のいずれかの方法で行えます。
- 画像ファイル(SVG ファイルを含む)を Resource Manager に直接ドラッグする。
- [Import Drawables] ウィザードを使用する。
詳しくは、ドローアブルをプロジェクトにインポートするをご覧ください。
詳細情報を表示するには、Resource Manager でリソースをダブルクリックします。リソースに複数のバージョンがある場合は、図 2 に示すように、すべてのバージョンが対応する修飾子とともに詳細ビューに表示されます。ここで特定のバージョンをダブルクリックすると、エディタ ウィンドウで開くことができます。
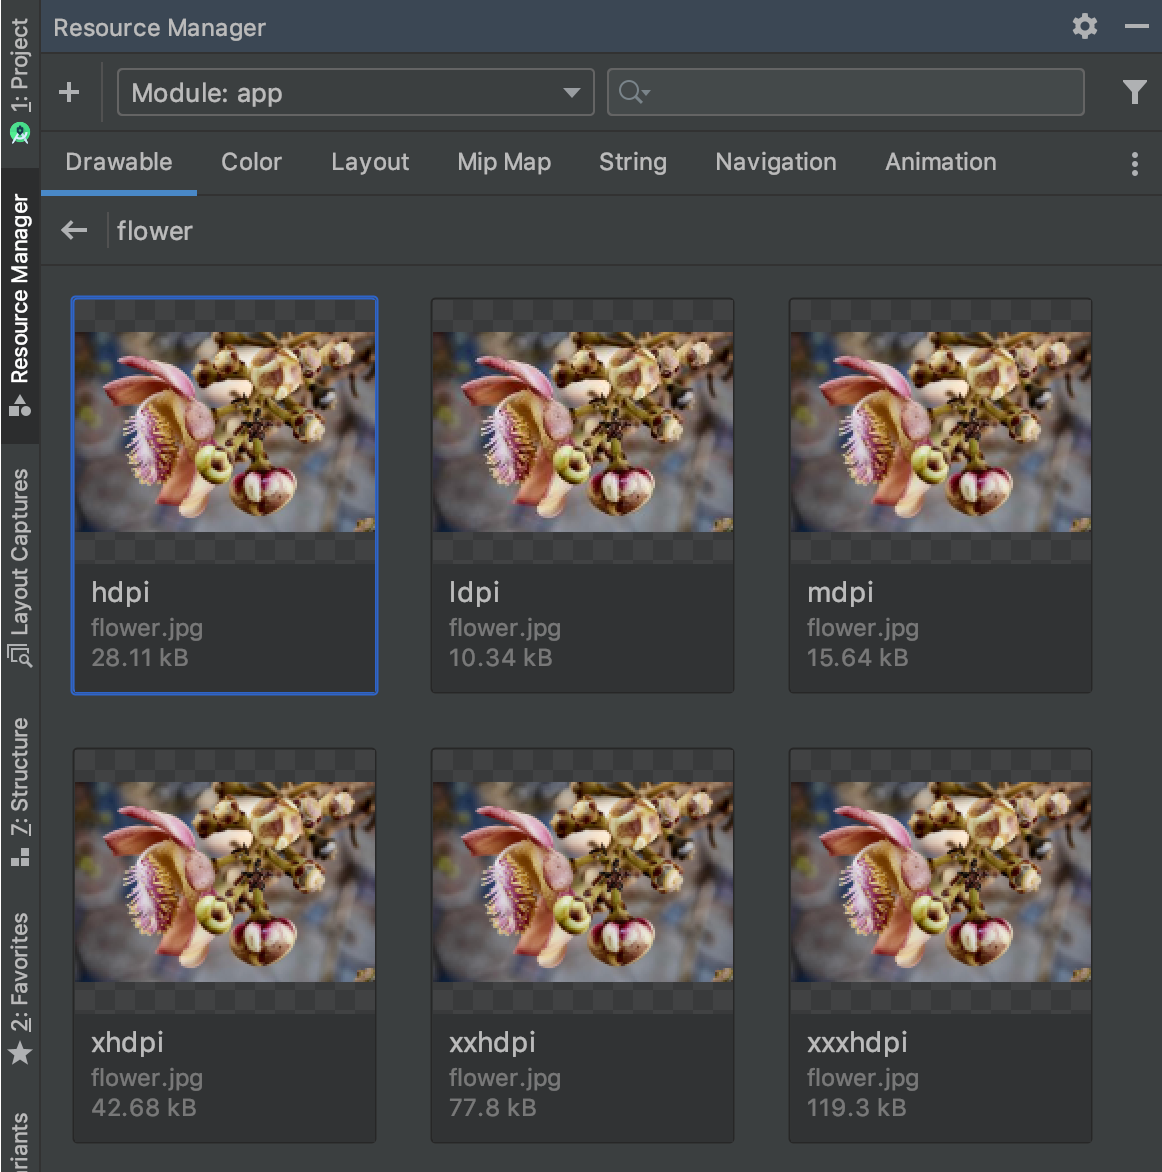
図 2. Resource Manager で、さまざまな画面密度用の画像リソースのバージョンを表示する。
プロジェクトへのドローアブルのインポート
Resource Manager を使って、画像リソースをプロジェクトにインポートできます。サポートされている画像タイプの一覧については、画像のサポートをご覧ください。
画像リソースをプロジェクトにインポートする手順は次のとおりです。
Android Studio の [Resource Manager] ウィンドウに画像を直接ドラッグします。
- または、次の操作を行います。
- プラスアイコン(+)をクリックします。
- 図 3 に示すように、[Import Drawables] を選択します。
- インポートするファイルとフォルダを選択します。
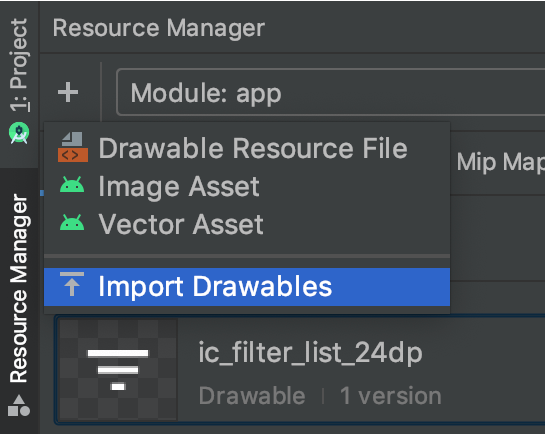
図 3. メニューから [Import Drawables] を選択します。
図 4 に示すように、[Import drawables] ダイアログが表示されます。このダイアログにはインポートするリソースの一覧が表示されます。リソースの名前を変更するには、リソースのプレビューの上にあるテキスト ボックスをクリックします。
同じリソースの複数のバージョンを用意する場合は、以下のセクションで後述するように、各リソースがサポートする特定の設定を記述したデバイス設定修飾子を追加します。
たとえば、さまざまな画面密度用に同じリソースの複数のバージョンを用意する場合は、各バージョンに [Density] 修飾子を追加します。同じ名前と修飾子を持つリソースが複数ある場合には、1 つのバージョンのみがインポートされます。
リソース修飾子の詳細については、代替リソースを提供するをご覧ください。

図 4. [Import drawables] ダイアログ
リソースの名前を変更し、必要な修飾子を追加したら、[Next] をクリックします。
次の画面に、インポートしようとしているリソースの概要が表示されます。インポートする準備ができたら、[Import] をクリックします。
これで、図 5 に示すように、[Resource Manager] ウィンドウにリソースが表示され、プロジェクトで使用できるようになります。
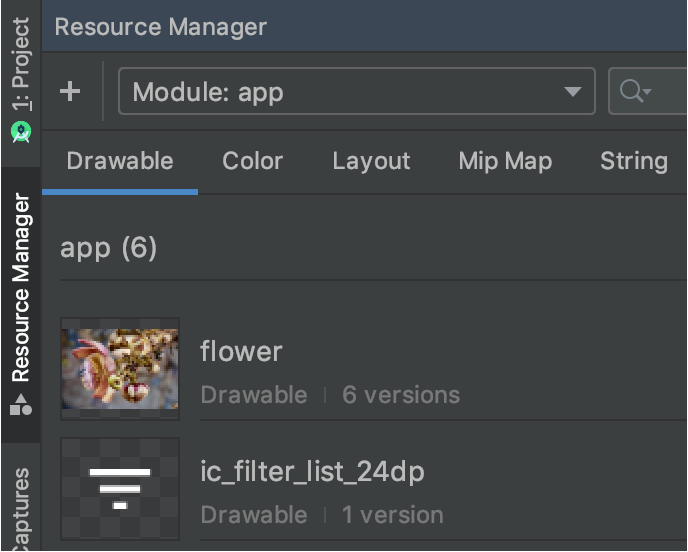
図 5. インポートした画像が Resource Manager に表示されます。
ドローアブル密度の自動解析
ファイルまたはフォルダをインポートする際、そのパスに密度修飾子が含まれている場合は、インポートの一環としてその密度修飾子が自動的に適用されます。Resource Manager では、Android の密度修飾子と iOS のスケール ファクタの両方の解析が可能です。
次の表に、Android と iOS でサポートされているさまざまな密度の表現を示します。
密度 |
Android 密度修飾子 |
iOS スケール ファクタ |
低密度(~120 dpi) |
ldpi |
未対応 |
中密度(~160 dpi) |
mdpi |
基になるスケール |
高密度(~240 dpi) |
hdpi |
未対応 |
超高密度(~320 dpi) |
xhdpi |
@2x |
超超高密度(~480 dpi) |
xxhdpi |
@3x |
超超超高密度(~640 dpi) |
xxxhdpi |
@4x |
入力パスからリソースパスへのインポートによる変換の例を次に示します。
- Android 密度修飾子:
hdpi
- 入力パス: /UserFolder/icon1/hdpi/icon.png
リソースパス: <projectFolder>/<moduleFolder>
/src/main/res/drawable-hdpi/icon.png
- Android 密度修飾子:
xxhdpi
- 入力パス: /UserFolder/icon1/abc-xxhdpi/icon.png
リソースパス: <projectFolder>/<moduleFolder>
/src/main/res/drawable-xxhdpi/icon.png
- iOS スケール ファクタ: @2x
- 入力パス: /UserFolder/icon1/icon@2x.png
リソースパス: <projectFolder>/<moduleFolder>
/src/main/res/drawable-xhdpi/icon.png
- iOS スケール ファクタ: @2x
- 入力パス: /UserFolder/icon1/icon@2x_alternate.png
リソースパス: <projectFolder>/<moduleFolder>
/src/main/res/drawable-xhdpi/icon_alternate.png
各種のピクセル密度を持つデバイスのサポートについては、各種のピクセル密度をサポートするをご覧ください。
ドローアブルをレイアウトにドラッグする
ドローアブルを Resource Manager から直接レイアウトにドラッグできます。アニメーション 1 に示すように、リソースをレイアウトにドラッグすると、Resource Manager によってそのドローアブルに対応する ImageView
が作成されます。

アニメーション 1.デザインビュー内のレイアウトにドローアブルをドラッグする。
アニメーション 2 に示すように、レイアウトの XML に直接ドラッグすることもできます。

アニメーション 2。テキストビュー内のレイアウトにドローアブルをドラッグする。
[Text] タブのレイアウトにドローアブルをドラッグする場合、配置する場所によって生成されるコードは次のように異なります。
- ドローアブルを空白の領域にドラッグすると、Resource Manager によって対応する
ImageView
が生成されます。
- ドローアブルをレイアウトの XML の属性上にドラッグすると、Resource Manager によってその属性値がドローアブルへの参照に置き換えられます。他のリソースタイプについても、XML の属性上にドラッグして属性値を置き換えることができます。
- ドローアブルを既存の
ImageView
要素上にドラッグすると、Resource Manager によって対応するソース属性が置き換えられます。
このページのコンテンツやコードサンプルは、コンテンツ ライセンスに記載のライセンスに従います。Java および OpenJDK は Oracle および関連会社の商標または登録商標です。
最終更新日 2025-07-27 UTC。
[[["わかりやすい","easyToUnderstand","thumb-up"],["問題の解決に役立った","solvedMyProblem","thumb-up"],["その他","otherUp","thumb-up"]],[["必要な情報がない","missingTheInformationINeed","thumb-down"],["複雑すぎる / 手順が多すぎる","tooComplicatedTooManySteps","thumb-down"],["最新ではない","outOfDate","thumb-down"],["翻訳に関する問題","translationIssue","thumb-down"],["サンプル / コードに問題がある","samplesCodeIssue","thumb-down"],["その他","otherDown","thumb-down"]],["最終更新日 2025-07-27 UTC。"],[],[],null,["# Manage your app's UI resources with Resource Manager\n\nResource Manager is a tool window for importing, creating, managing, and\nusing resources in your app. To open the tool window, select\n**View \\\u003e Tool Windows \\\u003e Resource Manager** from the menu or select\n**Resource Manager** in the left side bar.\n\n**Figure 1.** The Resource Manager tool window.\n\n1. Click **Add** to add a new resource to your project. You can add image assets, vector assets, fonts, or resource files and values, or you can [import drawables](#import) into your project.\n2. Select a module to view resources specific to that module.\n3. Search for a resource across all modules in your project using the search bar.\n4. Display your resources according to [type](/guide/topics/resources/available-resources) in the Resource Manager. Use these tabs to switch between resource types. Click the overflow icon to show additional resource types.\n5. Filter the displayed resources from local dependent modules, external libraries, and the Android framework using the filter button. You can also use the filter to show theme attributes.\n6. Preview your resources in the main content area. Right-click a resource to see a context menu where you can rename the resource and search your app for where the resource is used.\n7. Click these buttons to view your resources as either tiles or lists.\n8. Click these buttons to change the preview size of your resources.\n\nIn addition to these features, the Resource Manager provides a\nway to bulk-import drawables into your project. To bulk-import, you can either:\n\n- Drag your image files---including SVG files---directly onto the Resource Manager.\n- Use the **Import Drawables** wizard.\n\nFor more information, see the [Import drawables into your project](#import)\nsection.\n\nTo see more detailed information, double-click a resource in Resource\nManager. If you have multiple versions of a resource, this detailed view\ndisplays each version along with any associated qualifiers, as shown in\nfigure 2. From here, you can double-click a specific version to open it\nin an editor window.\n\n**Figure 2.** The Resource Manager showing versions of an image resource for\ndifferent screen densities.\n\nImport drawables into your project\n----------------------------------\n\nYou can use the Resource Manager to import image resources into your project.\nFor a list of supported image types, see\n[Image support](/guide/topics/media/media-formats#image-formats).\n\nTo import image resources into your project, do the following:\n\n1. Drag your images directly onto the **Resource Manager** window in\n Android Studio.\n\n - Alternatively, you can:\n 1. Click the plus icon (**+**).\n 2. Choose **Import Drawables**, as shown in figure 3.\n 3. Select the files and folders that you want to import.\n\n **Figure 3.** Select **Import Drawables** from the menu.\n2. The **Import drawables** dialog appears, as shown in figure 4. This dialog\n displays a list of the resources you're importing. You can rename resources\n by clicking the text box above a resource's preview.\n\n If you're providing multiple versions of the same resource, add\n [device configuration qualifiers](#automatic-parsing), as described in the\n following section, that describe the\n specific configuration that each resource supports.\n\n For example, if you're providing multiple versions of the same resource for\n different screen densities, you can add a **Density** qualifier for each\n version. Note that if two or more resources have the same name and\n qualifiers, only one version is imported.\n\n For more information on resource qualifiers, see\n [Providing alternative resources](/guide/topics/resources/providing-resources#AlternativeResources).\n\n **Figure 4.** The **Import drawables** dialog.\n\n Once you've named your resources and added any necessary qualifiers, click\n **Next**.\n3. The next screen shows a summary of the resources you're importing. When\n you're ready to import, click **Import**.\n\nIn the **Resource Manager** window, your resources are now ready for you to use\nin your project, as shown in figure 5.\n\n**Figure 5.** The Resource Manager now shows your imported images.\n\n### Automatically parse drawable densities\n\nWhen you import a file or folder and its path contains a density qualifier,\nthe Resource Manager automatically applies the density qualifier as part of the\nimport. The Resource Manager can parse both Android's density qualifiers and\niOS's scale factors.\n\nThis table lists how different supported densities are represented for\nAndroid and iOS:\n\n| Density | Android density qualifier | iOS scaling factor |\n|--------------------------------------------|---------------------------|--------------------|\n| Low-density (\\~120 dpi) | `ldpi` | not supported |\n| Medium-density (\\~160 dpi) | `mdpi` | original scale |\n| High-density (\\~240 dpi) | `hdpi` | not supported |\n| Extra-high-density (\\~320 dpi) | `xhdpi` | @2x |\n| Extra-extra-high-density (\\~480 dpi) | `xxhdpi` | @3x |\n| Extra-extra-extra-high-density (\\~640 dpi) | `xxxhdpi` | @4x |\n\nHere are some examples of how input paths translate to resource paths after\nimport:\n\nAndroid density qualifier: `hdpi`\n: **Input path:** /UserFolder/icon1/***hdpi*** /icon.png \n\n **Resource path:** *\\\u003cprojectFolder\\\u003e* /*\\\u003cmoduleFolder\\\u003e* /src/main/res/***drawable-hdpi***/icon.png\n\nAndroid density qualifier: `xxhdpi`\n: **Input path:** /UserFolder/icon1/abc-***xxhdpi*** /icon.png \n\n **Resource path:** *\\\u003cprojectFolder\\\u003e* /*\\\u003cmoduleFolder\\\u003e* /src/main/res/***drawable-xxhdpi***/icon.png\n\niOS scaling factor: @2x\n: **Input path:** /UserFolder/icon1/icon***@2x*** .png \n\n **Resource path:** *\\\u003cprojectFolder\\\u003e* /*\\\u003cmoduleFolder\\\u003e* /src/main/res/***drawable-xhdpi***/icon.png\n\niOS scaling factor: @2x\n: **Input path:** /UserFolder/icon1/icon***@2x*** _alternate.png \n\n **Resource path:** *\\\u003cprojectFolder\\\u003e* /*\\\u003cmoduleFolder\\\u003e* /src/main/res/***drawable-xhdpi***/icon_alternate.png\n\nFor more information on supporting devices with different pixel densities, see\n[Support different pixel densities](/training/multiscreen/screendensities).\n\nDrag drawables into your layout\n-------------------------------\n\nYou can drag drawables from the Resource Manager directly onto a\nlayout. When you drag a resource onto a layout, the Resource Manager creates a\ncorresponding `ImageView` for that drawable, as shown in animation 1:\n\n**Animation 1.** Drag drawables onto a layout in **Design**\nview.\n\nYou can also drag directly onto the XML of the layout, as shown in\nanimation 2:\n\n**Animation 2.** Drag drawables onto a layout in **Text** view.\n\nWhen dragging a drawable onto a layout in the **Text** tab, the generated code\ndiffers depending on where you place the drawable in the layout:\n\n- If you drag a drawable onto a blank area, the Resource Manager generates a corresponding `ImageView`.\n- If you drag a drawable onto any attribute in the layout XML, the Resource Manager replaces that attribute value with a reference to the drawable. You can also drag any other resource type onto an XML attribute to replace the attribute value.\n- If you drag a drawable onto an existing `ImageView` element, the Resource Manager replaces the corresponding source attribute."]]