WebP는 Google에서 제공하는 이미지 파일 형식으로, 손실이 있는 압축(예: JPEG)과 투명도(예: PNG)를 제공하지만 JPEG나 PNG보더 더 나은 압축을 제공할 수 있습니다. 손실이 있는 WebP 이미지는 Android 4.0(API 수준 14) 이상에서 지원되며 손실이 없고 투명한 WebP 이미지는 Android 4.3(API 수준 18) 이상에서 지원됩니다.
이 페이지에서는 이미지를 WebP 형식으로 변환하는 방법과 WebP 이미지를 PNG 형식으로 변환하는 방법을 보여줍니다.
올바른 이미지 형식을 선택하여 다운로드 속도를 높이는 방법에 관한 자세한 내용은 이미지 다운로드 크기 줄이기를 참고하세요.
WebP로 이미지 변환
Android 스튜디오에서 PNG, JPG, BMP 또는 정적 GIF 이미지를 WebP 형식으로 변환할 수 있습니다.
개별 이미지 또는 이미지 폴더를 변환할 수 있습니다.
이미지 또는 이미지 폴더를 변환하려면 다음 단계를 진행하세요.
이미지 파일 또는 이미지 파일이 포함된 폴더를 마우스 오른쪽 버튼으로 클릭한 다음 Convert to WebP를 클릭합니다.
Converting Images to WebP 대화상자가 열립니다. 기본 설정은 현재 모듈의 minSdkVersion 설정에 따라 달라집니다.
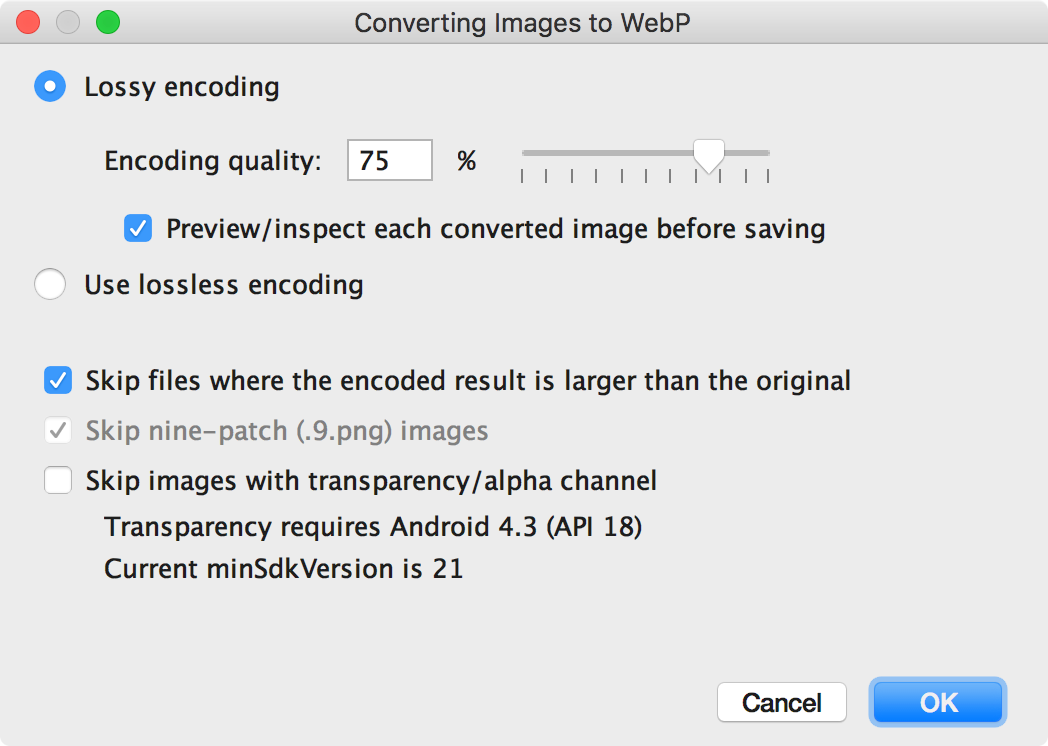
그림 1. Converting Images to WebP 대화상자
손실 있는 인코딩 또는 손실 없는 인코딩을 선택합니다.
손실 없는 인코딩은 minSdkVersion이 18 이상으로 설정된 경우에만 사용할 수 있습니다.
손실 있는 인코딩을 선택하는 경우 인코딩 품질을 설정하고 변환된 각 이미지를 저장하기 전에 미리 볼지 여부를 선택합니다.
인코딩된 버전이 원본보다 큰 파일 또는 투명도나 알파 채널이 있는 파일은 변환을 건너뛰도록 선택할 수도 있습니다. Android 스튜디오에서는 minSdkVersion이 18 이상으로 설정된 경우에만 투명한 WebP 이미지를 만들 수 있으므로 minSdkVersion이 18 미만인 경우 Skip images with transparency/alpha channel 체크박스가 자동으로 선택됩니다.
참고: 9-패치 파일은 WebP 이미지로 변환할 수 없습니다. 변환기 도구는 항상 9-패치 이미지를 자동으로 건너뜁니다.
OK를 클릭하여 변환을 시작합니다.
이미지를 2개 이상 변환하는 경우 변환은 한 단계로 진행되며 실행취소하면 변환한 모든 이미지를 한꺼번에 되돌릴 수 있습니다.
손실 없는 변환을 선택한 경우 변환이 즉시 이루어집니다. 변환된 이미지는 원래 위치에 배치됩니다. 손실이 있는 변환을 선택한 경우 계속해서 다음 단계로 진행합니다.
손실 있는 변환을 선택하고 변환된 각 이미지를 저장하기 전에 미리 보도록 선택한 경우 Android 스튜디오에서는 변환 중에 각 이미지가 표시되므로 변환 결과를 검사할 수 있습니다. 미리보기 단계에서 그림 2와 같이 각 이미지의 품질 설정을 개별적으로 조정할 수 있습니다.
변환된 이미지를 미리 보지 않도록 선택한 경우 Android 스튜디오에서는 이 단계를 건너뛰고 이미지를 즉시 변환합니다.
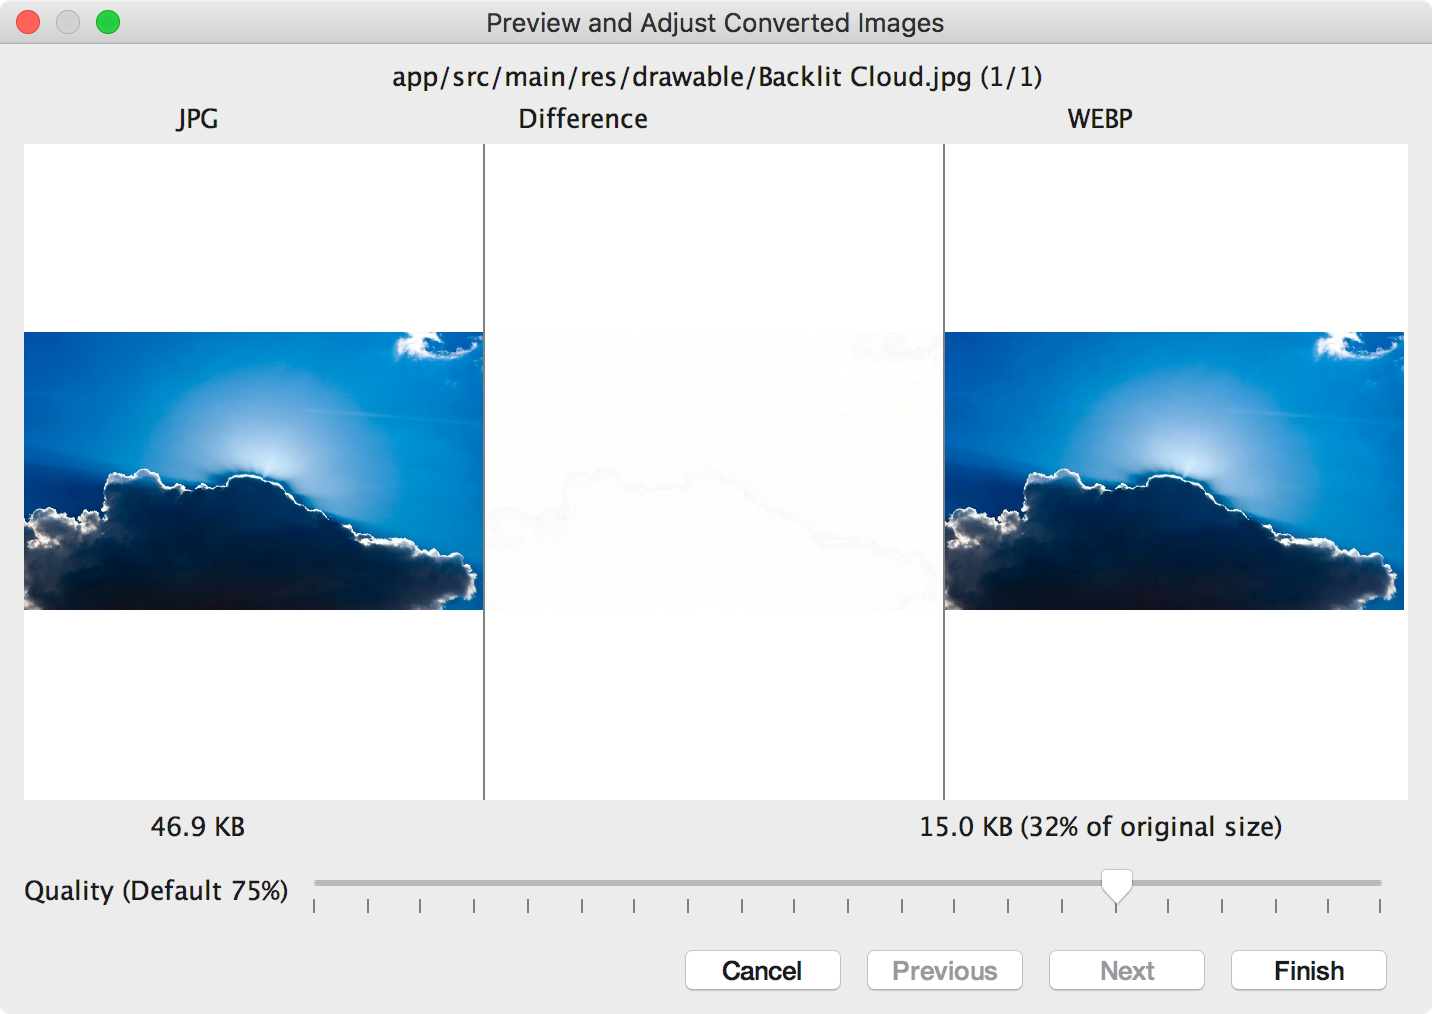
그림 2. 75% 품질 수준으로 JPG 이미지의 WebP 형식 변환 미리보기
그림 2에서 왼쪽은 원본 JPG 이미지이고 오른쪽은 손실 있는 인코딩된 WebP 이미지입니다. 대화상자에는 원본 이미지와 변환된 이미지의 파일 크기가 표시됩니다. 슬라이더를 왼쪽이나 오른쪽으로 드래그하여 품질 설정을 변경하면서 인코딩된 이미지와 파일 크기가 어떻게 달라지는지 즉시 확인할 수 있습니다.
중간 영역에는 원본 이미지와 인코딩된 이미지의 픽셀 차이가 표시됩니다. 그림 2와 같이 품질을 75%로 설정하면 두 이미지 간에 차이가 거의 없습니다. 그림 3에서는 동일한 이미지를 품질을 0%로 설정하여 인코딩한 결과를 보여줍니다.
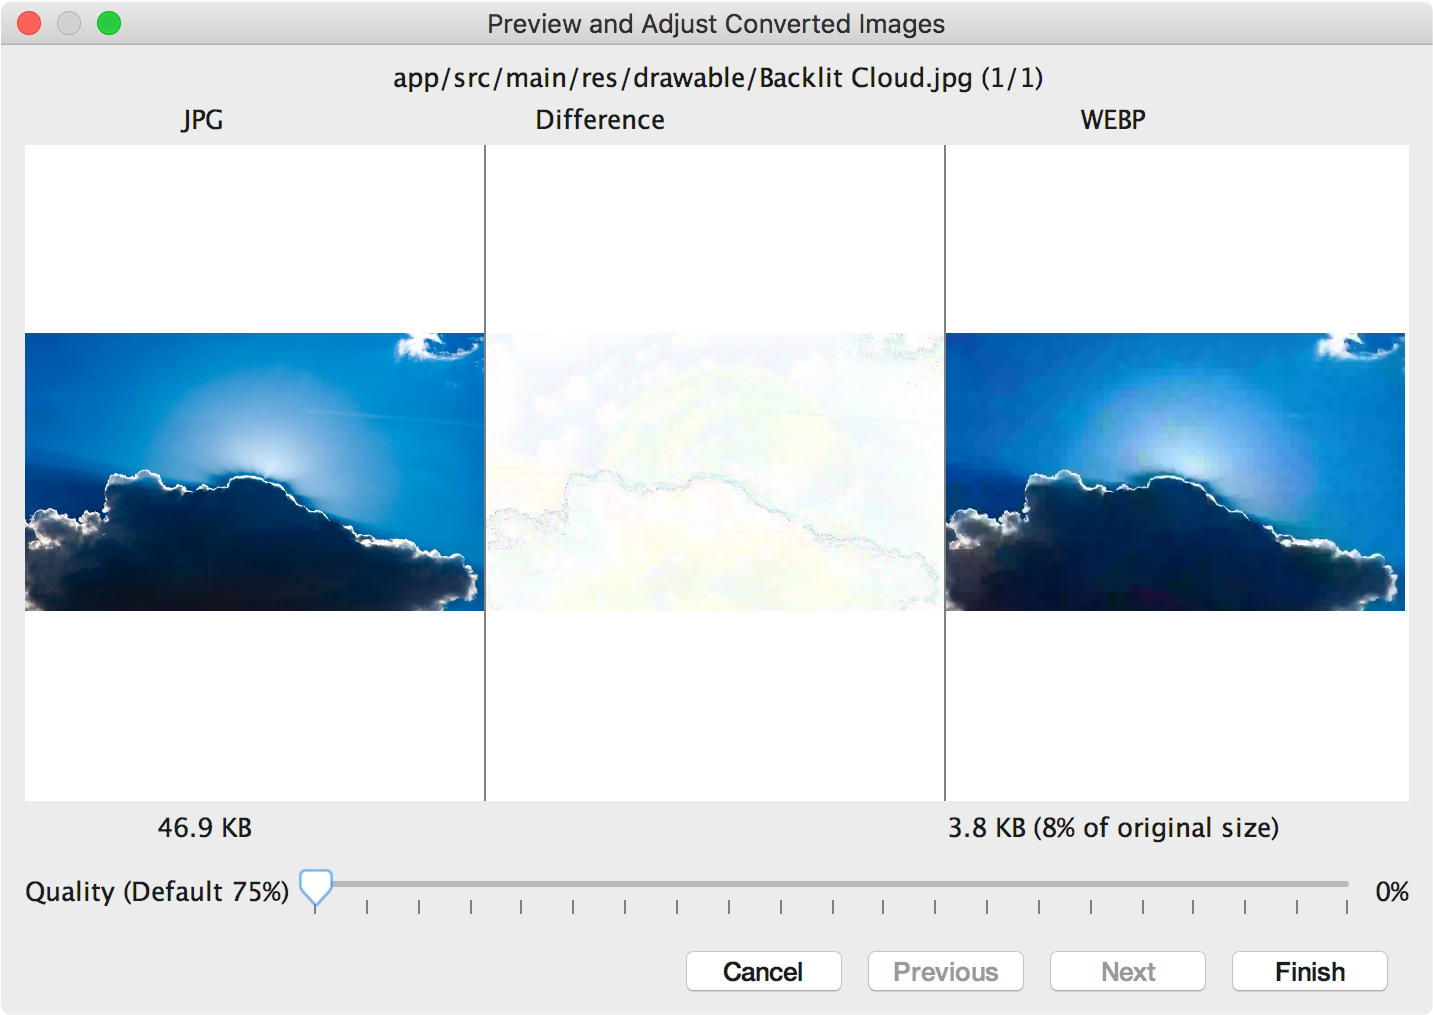
그림 3. 0% 품질 수준으로 JPG 이미지의 WebP 형식 변환 미리보기
참고: 품질을 100% 로 설정하고 minSdkVersion을 18 이상으로 설정하면 Android 스튜디오가 대신 손실 없는 인코딩으로 자동 전환됩니다.
검토할 각 이미지의 품질 설정을 선택합니다. 이미지를 2개 이상 변환하는 경우 Next를 클릭하여 다음 이미지로 이동합니다.
Finish를 클릭합니다. 변환된 이미지는 원래 위치에 배치됩니다.
WebP 이미지를 PNG로 변환
프로젝트의 WebP 이미지를 다른 목적으로 사용하려는 경우(예: WebP를 지원하지 않는 브라우저에서 이미지를 올바르게 표시해야 하는 웹페이지) Android 스튜디오를 사용하여 WebP 이미지를 PNG 형식으로 변환할 수 있습니다.
WebP 이미지를 PNG로 변환하려면 다음 단계를 진행하세요.
Android 스튜디오에서 WebP 이미지를 마우스 오른쪽 버튼으로 클릭한 후 Convert to PNG를 클릭합니다.
변환 후 원본 WebP 파일을 삭제할지, 아니면 새 PNG 파일뿐만 아니라 원본 WebP 파일도 보관할지 묻는 대화상자가 나타납니다.
원본 WebP 파일을 삭제하려면 Yes를 클릭하고 PNG 파일뿐 아니라 WebP 파일도 보관하려면 No를 클릭합니다. 이미지가 즉시 변환됩니다.
이 페이지에 나와 있는 콘텐츠와 코드 샘플에는 콘텐츠 라이선스에서 설명하는 라이선스가 적용됩니다. 자바 및 OpenJDK는 Oracle 및 Oracle 계열사의 상표 또는 등록 상표입니다.
최종 업데이트: 2025-07-27(UTC)
[[["이해하기 쉬움","easyToUnderstand","thumb-up"],["문제가 해결됨","solvedMyProblem","thumb-up"],["기타","otherUp","thumb-up"]],[["필요한 정보가 없음","missingTheInformationINeed","thumb-down"],["너무 복잡함/단계 수가 너무 많음","tooComplicatedTooManySteps","thumb-down"],["오래됨","outOfDate","thumb-down"],["번역 문제","translationIssue","thumb-down"],["샘플/코드 문제","samplesCodeIssue","thumb-down"],["기타","otherDown","thumb-down"]],["최종 업데이트: 2025-07-27(UTC)"],[],[],null,["# Create WebP images\n\n[WebP](https://developers.google.com/speed/webp/) is an image file format from\nGoogle that provides lossy compression (like JPEG) as well as transparency (like\nPNG) but can provide better compression than either JPEG or PNG. Lossy WebP\nimages are supported in Android 4.0 (API level 14) and higher, and lossless and\ntransparent WebP images are supported in Android 4.3 (API level 18) and higher.\nThis page shows how to convert images to WebP format and how to convert WebP\nimages to PNG format.\n| **Note:** Because support for lossless and transparent WebP images is only available in Android 4.3 and higher, your project must declare a `minSdkVersion` of 18 or higher to create lossless or transparent WebP images using Android Studio.\n\nFor more information about\nselecting the correct image format to improve download speed, see [Reduce image\ndownload sizes](/topic/performance/network-xfer#webp).\n\nConvert images to WebP\n----------------------\n\nAndroid Studio can convert PNG, JPG, BMP, or static GIF images to WebP format.\nYou can convert individual images or folders of images.\n\nTo convert an image or folder of images, proceed as follows:\n\n1. Right-click an image file or a folder containing image files, and then click **Convert to WebP**.\n2. The **Converting Images to WebP** dialog opens. The default settings\n depend on the `minSdkVersion` setting for the current module.\n\n \u003cbr /\u003e\n\n **Figure 1.** The Converting Images to WebP dialog.\n3.\n Select either lossy or lossless encoding.\n\n Lossless encoding is only available if your `minSdkVersion` is set to 18 or higher.\n\n If you select lossy encoding, set the encoding quality and choose whether\n to preview each converted image before saving.\n\n\n You can also choose to skip the conversion of any files where the encoded\n version would be larger than the original or any files with transparency\n or an alpha channel. Because Android Studio only lets you\n create transparent WebP images if your `minSdkVersion` is set\n to 18 or higher, the **Skip images with transparency/alpha channel**\n checkbox is automatically selected if your `minSdkVersion`\n is lower than 18.\n\n\n **Note:** 9-patch files can't be converted to WebP images. The\n converter tool always automatically skips 9-patch images.\n4. Click **OK** to begin the conversion.\n\n If you are converting more than\n one image, the conversion is a single step, and can be undone to revert all\n the images you converted at once.\n\n If you selected lossless conversion, the conversion happens\n immediately. Your images are converted in their original\n location. If you selected lossy conversion, continue to the next step.\n5.\n If you selected lossy conversion and you chose to\n preview each converted image before saving, Android Studio\n shows you each image during the conversion so you can inspect the\n conversion result. During\n the preview step, you can adjust the quality setting for each image\n individually, as shown in figure 2.\n\n If you did not choose to preview the converted images, Android\n Studio skips this step and converts your images immediately.\n **Figure 2.** Previewing the conversion of a JPG image to WebP format at 75% quality.\n\n\n Figure 2 shows the original JPG image on the left and the lossy-encoded\n WebP image on the right. The dialog shows the file size for the original\n and the converted image. You can drag the slider left or right\n to change the quality setting and immediately see the effect on the\n encoded image and the file size.\n\n\n The middle area shows the pixels that differ between the original image\n and the encoded image. In figure 2, with the quality set to 75%, there's\n almost no difference between the two images. Figure 3 shows the same image\n encoded with the quality set to 0%.\n **Figure 3.** Previewing the conversion of a JPG image to WebP format at 0% quality.\n\n **Note:** If you set the quality to 100% and the\n `minSdkVersion` is set to 18 or higher, Android Studio\n automatically switches to lossless encoding instead.\n\n Select a quality setting for each image you review. If you are converting\n more than one image, click **Next** to advance to the next image.\n6. Click **Finish**. Your images are converted in their original location.\n\nConvert WebP images to PNG\n--------------------------\n\nIf you want to use a WebP image from your project for another purpose---for\nexample, in a web page that needs to correctly display images in a browser\nwithout WebP support---you can use Android Studio to convert WebP images to PNG\nformat.\n\nTo convert a WebP image to PNG, proceed as follows:\n\n1. Right-click a WebP image in Android Studio, and then click **Convert to\n PNG**.\n2. A dialog appears, asking whether you would like to\n delete the original WebP file after conversion or keep the original WebP\n file as well as the new PNG file.\n\n Click **Yes** to delete the original WebP file or **No**\n to retain the WebP file in addition to the PNG file. Your image is converted\n immediately."]]