تنظيم صفحاتك في مجموعات
يمكنك حفظ المحتوى وتصنيفه حسب إعداداتك المفضّلة.
WebP هو تنسيق لملفات الصور تقدّمه Google ويوفر ضغطًا مع فقدان البيانات (مثل JPEG) بالإضافة إلى الشفافية (مثل PNG)، ولكنه يمكنه تقديم ضغط أفضل من JPEG أو PNG. يمكن استخدام صور WebP ذات الصور المفقودة في Android 4.0 (المستوى 14 لواجهة برمجة التطبيقات) والإصدارات الأحدث، كما يمكن استخدام صور WebP الشفافة بدون فقدان البيانات في الإصدار Android 4.3 (المستوى 18 من واجهة برمجة التطبيقات) والإصدارات الأحدث.
تعرض هذه الصفحة كيفية تحويل الصور إلى تنسيق WebP وكيفية تحويل صور WebP إلى تنسيق PNG.
minSdkVersion
ولمزيد من المعلومات حول اختيار تنسيق الصورة الصحيح لتحسين سرعة التنزيل، يُرجى الاطّلاع على تقليل أحجام تنزيل الصور.
تحويل الصور إلى تنسيق WebP
يمكن لـ "استوديو Android" تحويل صور بتنسيق PNG أو JPG أو BMP أو صور GIF ثابتة إلى تنسيق WebP.
يمكنك تحويل صور فردية أو مجلدات من الصور.
لتحويل صورة أو مجلد صور، اتبع الخطوات التالية:
انقر بزر الماوس الأيمن على ملف صورة أو مجلد يحتوي على ملفات صور، ثم انقر على التحويل إلى WebP.
يتم فتح مربع الحوار تحويل الصور إلى تنسيق WebP. تعتمد الإعدادات التلقائية
على الإعداد minSdkVersion للوحدة الحالية.
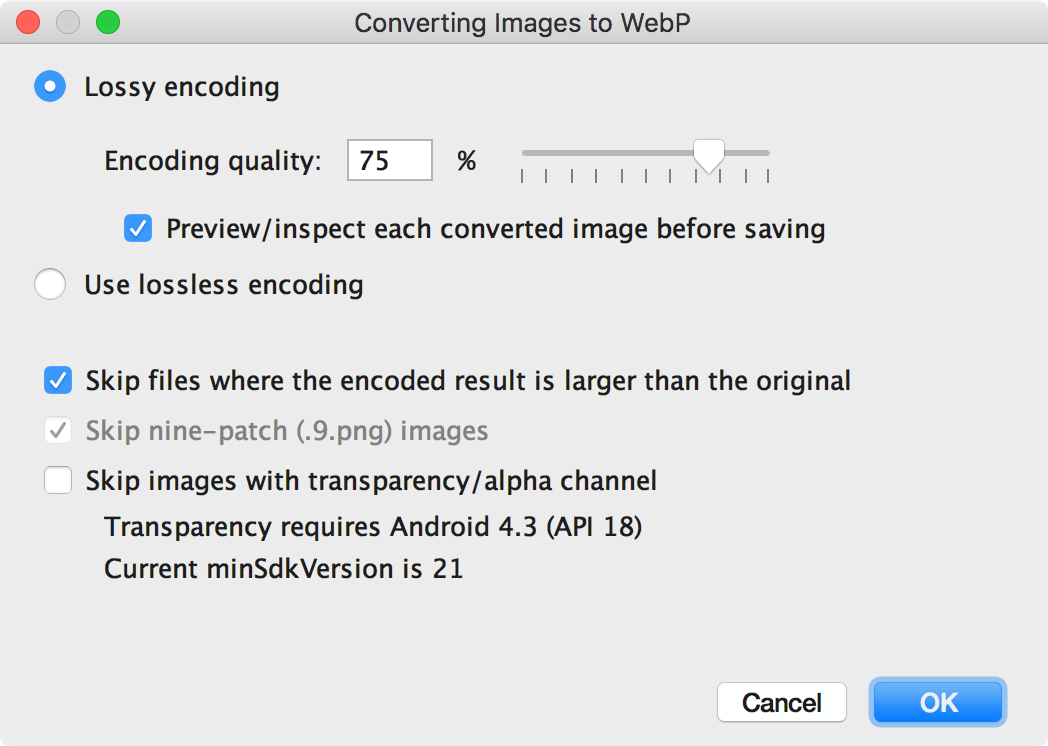
الشكل 1. مربّع حوار "تحويل الصور إلى تنسيق WebP".
اختَر إما الترميز مع فقدان البيانات أو الترميز بدون فقدان البيانات.
لا يتوفّر الترميز بدون فقدان البيانات
إلا إذا تم ضبط minSdkVersion على 18 أو أعلى.
إذا اخترت الترميز مع فقدان البيانات، اضبط جودة الترميز واختَر ما إذا كنت تريد
معاينة كل صورة محوَّلة قبل الحفظ.
ويمكنك أيضًا تخطّي تحويل أي ملفات تكون فيها النسخة المرمّزة أكبر من النسخة الأصلية أو أي ملفات فيها شفافية أو قناة ألفا. بما أنّ "استوديو Android" يتيح لك
إنشاء صور شفافة بتنسيق WebP فقط إذا تم ضبط minSdkVersion
على 18 سنة أو أعلى، سيتم تلقائيًا وضع علامة في مربّع الاختيار تخطّي الصور ذات الشفافية/قناة ألفا
إذا كانت قيمة minSdkVersion
أقل من 18.
ملاحظة: لا يمكن تحويل الملفات المكوَّنة من 9 رموز تصحيح إلى صور WebP. تتخطّى أداة التحويل دائمًا الصور المكوَّنة من 9 تصحيحات تلقائيًا.
انقر على حسنًا لبدء الإحالة الناجحة.
إذا كنت تحوّل أكثر من
صورة واحدة، تكون عملية التحويل خطوة واحدة، ويمكن التراجع عن هذا الإجراء لإرجاع جميع
الصور التي تم تحويلها دُفعة واحدة.
إذا اختَرت الإحالة الناجحة بدون فقدان البيانات، ستحدث
الإحالة الناجحة على الفور. تم تحويل صورك في موقعها
الأصلي. إذا اخترت إحالة ناجحة بدون بيانات، انتقِل إلى الخطوة التالية.
إذا اخترت إحالة ناجحة مع فقدان البيانات واخترت
معاينة كل صورة محوَّلة قبل الحفظ، سيعرض لك "استوديو Android"
كل صورة أثناء الإحالة الناجحة حتى تتمكّن من فحص
نتيجة الإحالة الناجحة. أثناء خطوة المعاينة، يمكنك ضبط إعدادات الجودة لكل صورة على حدة، كما هو موضّح في الشكل 2.
إذا لم تختر معاينة الصور التي تم تحويلها، يتخطّى "استوديو Android" هذه الخطوة ويحوّل الصور على الفور.
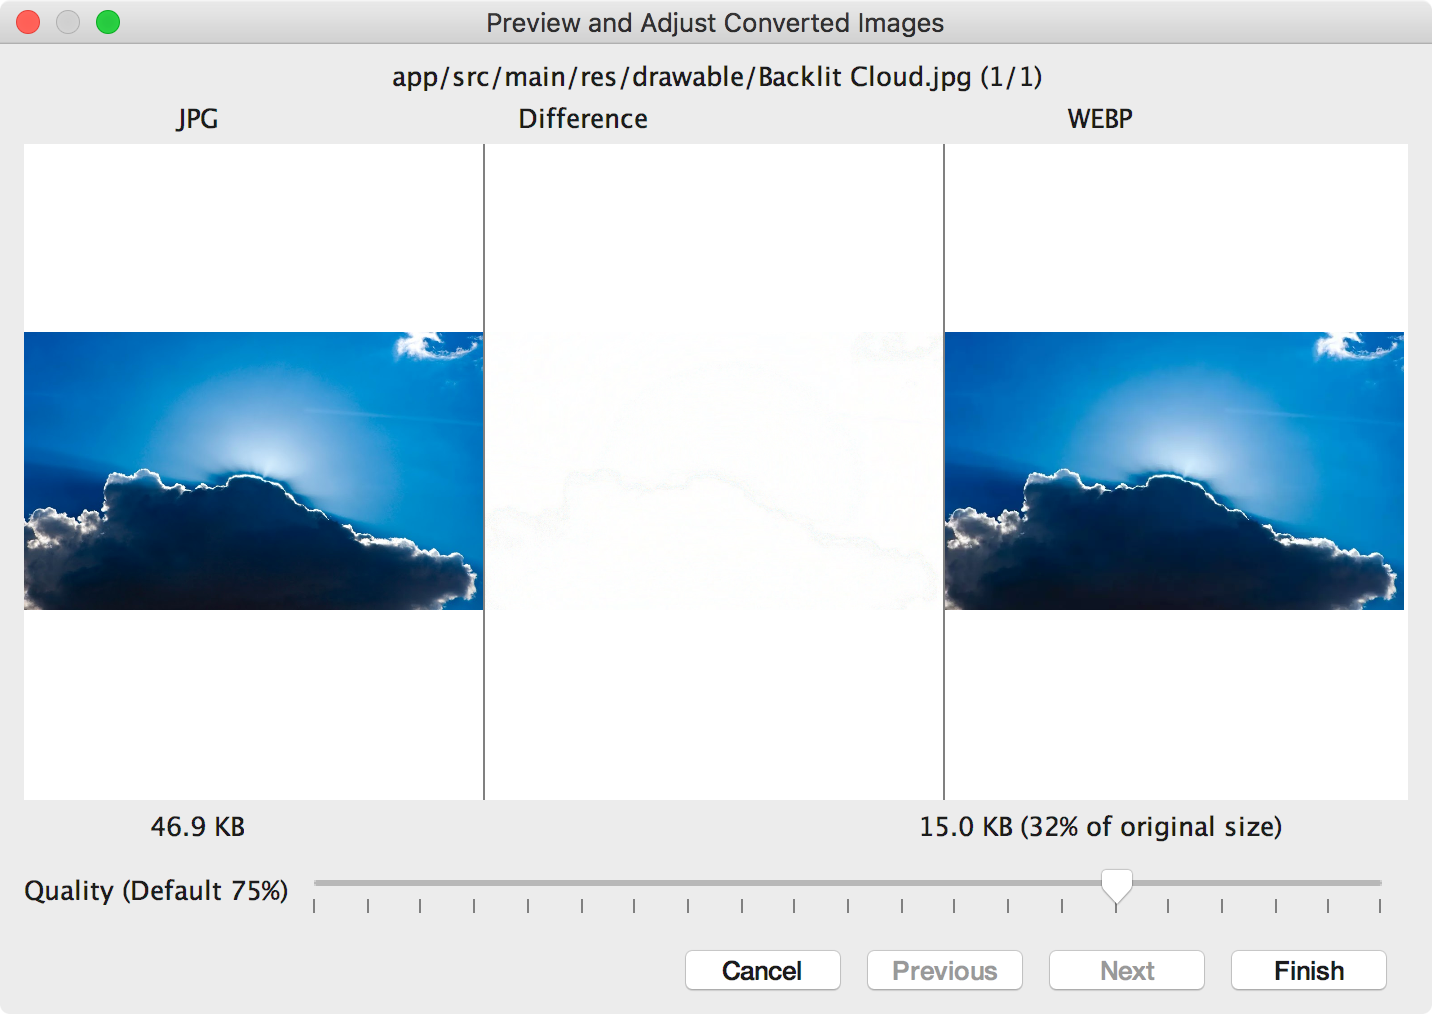
الشكل 2. معاينة تحويل صورة JPG إلى تنسيق WebP
بجودة 75%.
يعرض الشكل 2 صورة JPG الأصلية على اليسار وصورة WebP ذات الترميز مع فقدان البيانات على اليمين. يعرض مربّع الحوار حجم الملف للصورة الأصلية
والصورة المحوَّلة. يمكنك سحب شريط التمرير إلى اليسار أو اليمين
لتغيير إعدادات الجودة والاطّلاع فورًا على التأثير
على الصورة المشفّرة وحجم الملف.
تُظهر المنطقة الوسطى وحدات البكسل التي تختلف بين الصورة الأصلية والصورة المشفرة. في الرسم 2، عندما تكون جودة الصورتَين مضبوطة على %75، لا يوجد فرق تقريبًا بين الصورتَين. يوضّح الشكل 3 الصورة نفسها مرمّزة بجودة 0%.
الشكل 3. معاينة تحويل صورة JPG إلى تنسيق WebP
بجودة 0%.
ملاحظة: إذا ضبطت الجودة على 100% وضبطت قيمة
minSdkVersion على 18 أو أعلى، سيتحوّل "استوديو Android"
تلقائيًا إلى ترميز بدون فقدان البيانات بدلاً من ذلك.
اختَر أحد إعدادات الجودة لكل صورة تراجعها. إذا كنت تحوّل
أكثر من صورة واحدة، انقر على التالي للانتقال إلى الصورة التالية.
انقر على إنهاء. تم تحويل صورك في موقعها
الأصلي.
تحويل صور WebP إلى صور بتنسيق PNG
إذا كنت تريد استخدام صورة WebP من مشروعك لغرض آخر، مثلاً في صفحة ويب تحتاج إلى عرض الصور بشكل صحيح في متصفّح بدون إتاحة WebP، يمكنك استخدام "استوديو Android" لتحويل صور WebP إلى تنسيق PNG.
لتحويل صورة بتنسيق WebP إلى صورة بتنسيق PNG، اتّبِع الخطوات التالية:
انقر بزر الماوس الأيمن على صورة WebP في "استوديو Android"، ثم انقر على التحويل إلى
ملف PNG.
سيظهر مربّع حوار يسألك عما إذا كنت تريد حذف ملف WebP الأصلي بعد التحويل أو الاحتفاظ بملف WebP الأصلي بالإضافة إلى ملف PNG الجديد.
انقر على Yes (نعم) لحذف ملف WebP الأصلي أو على لا
للاحتفاظ بملف WebP بالإضافة إلى ملف PNG. يتم تحويل الصورة
على الفور.
يخضع كل من المحتوى وعيّنات التعليمات البرمجية في هذه الصفحة للتراخيص الموضحّة في ترخيص استخدام المحتوى. إنّ Java وOpenJDK هما علامتان تجاريتان مسجَّلتان لشركة Oracle و/أو الشركات التابعة لها.
تاريخ التعديل الأخير: 2025-07-27 (حسب التوقيت العالمي المتفَّق عليه)
[[["يسهُل فهم المحتوى.","easyToUnderstand","thumb-up"],["ساعَدني المحتوى في حلّ مشكلتي.","solvedMyProblem","thumb-up"],["غير ذلك","otherUp","thumb-up"]],[["لا يحتوي على المعلومات التي أحتاج إليها.","missingTheInformationINeed","thumb-down"],["الخطوات معقدة للغاية / كثيرة جدًا.","tooComplicatedTooManySteps","thumb-down"],["المحتوى قديم.","outOfDate","thumb-down"],["ثمة مشكلة في الترجمة.","translationIssue","thumb-down"],["مشكلة في العيّنات / التعليمات البرمجية","samplesCodeIssue","thumb-down"],["غير ذلك","otherDown","thumb-down"]],["تاريخ التعديل الأخير: 2025-07-27 (حسب التوقيت العالمي المتفَّق عليه)"],[],[],null,["# Create WebP images\n\n[WebP](https://developers.google.com/speed/webp/) is an image file format from\nGoogle that provides lossy compression (like JPEG) as well as transparency (like\nPNG) but can provide better compression than either JPEG or PNG. Lossy WebP\nimages are supported in Android 4.0 (API level 14) and higher, and lossless and\ntransparent WebP images are supported in Android 4.3 (API level 18) and higher.\nThis page shows how to convert images to WebP format and how to convert WebP\nimages to PNG format.\n| **Note:** Because support for lossless and transparent WebP images is only available in Android 4.3 and higher, your project must declare a `minSdkVersion` of 18 or higher to create lossless or transparent WebP images using Android Studio.\n\nFor more information about\nselecting the correct image format to improve download speed, see [Reduce image\ndownload sizes](/topic/performance/network-xfer#webp).\n\nConvert images to WebP\n----------------------\n\nAndroid Studio can convert PNG, JPG, BMP, or static GIF images to WebP format.\nYou can convert individual images or folders of images.\n\nTo convert an image or folder of images, proceed as follows:\n\n1. Right-click an image file or a folder containing image files, and then click **Convert to WebP**.\n2. The **Converting Images to WebP** dialog opens. The default settings\n depend on the `minSdkVersion` setting for the current module.\n\n \u003cbr /\u003e\n\n **Figure 1.** The Converting Images to WebP dialog.\n3.\n Select either lossy or lossless encoding.\n\n Lossless encoding is only available if your `minSdkVersion` is set to 18 or higher.\n\n If you select lossy encoding, set the encoding quality and choose whether\n to preview each converted image before saving.\n\n\n You can also choose to skip the conversion of any files where the encoded\n version would be larger than the original or any files with transparency\n or an alpha channel. Because Android Studio only lets you\n create transparent WebP images if your `minSdkVersion` is set\n to 18 or higher, the **Skip images with transparency/alpha channel**\n checkbox is automatically selected if your `minSdkVersion`\n is lower than 18.\n\n\n **Note:** 9-patch files can't be converted to WebP images. The\n converter tool always automatically skips 9-patch images.\n4. Click **OK** to begin the conversion.\n\n If you are converting more than\n one image, the conversion is a single step, and can be undone to revert all\n the images you converted at once.\n\n If you selected lossless conversion, the conversion happens\n immediately. Your images are converted in their original\n location. If you selected lossy conversion, continue to the next step.\n5.\n If you selected lossy conversion and you chose to\n preview each converted image before saving, Android Studio\n shows you each image during the conversion so you can inspect the\n conversion result. During\n the preview step, you can adjust the quality setting for each image\n individually, as shown in figure 2.\n\n If you did not choose to preview the converted images, Android\n Studio skips this step and converts your images immediately.\n **Figure 2.** Previewing the conversion of a JPG image to WebP format at 75% quality.\n\n\n Figure 2 shows the original JPG image on the left and the lossy-encoded\n WebP image on the right. The dialog shows the file size for the original\n and the converted image. You can drag the slider left or right\n to change the quality setting and immediately see the effect on the\n encoded image and the file size.\n\n\n The middle area shows the pixels that differ between the original image\n and the encoded image. In figure 2, with the quality set to 75%, there's\n almost no difference between the two images. Figure 3 shows the same image\n encoded with the quality set to 0%.\n **Figure 3.** Previewing the conversion of a JPG image to WebP format at 0% quality.\n\n **Note:** If you set the quality to 100% and the\n `minSdkVersion` is set to 18 or higher, Android Studio\n automatically switches to lossless encoding instead.\n\n Select a quality setting for each image you review. If you are converting\n more than one image, click **Next** to advance to the next image.\n6. Click **Finish**. Your images are converted in their original location.\n\nConvert WebP images to PNG\n--------------------------\n\nIf you want to use a WebP image from your project for another purpose---for\nexample, in a web page that needs to correctly display images in a browser\nwithout WebP support---you can use Android Studio to convert WebP images to PNG\nformat.\n\nTo convert a WebP image to PNG, proceed as follows:\n\n1. Right-click a WebP image in Android Studio, and then click **Convert to\n PNG**.\n2. A dialog appears, asking whether you would like to\n delete the original WebP file after conversion or keep the original WebP\n file as well as the new PNG file.\n\n Click **Yes** to delete the original WebP file or **No**\n to retain the WebP file in addition to the PNG file. Your image is converted\n immediately."]]