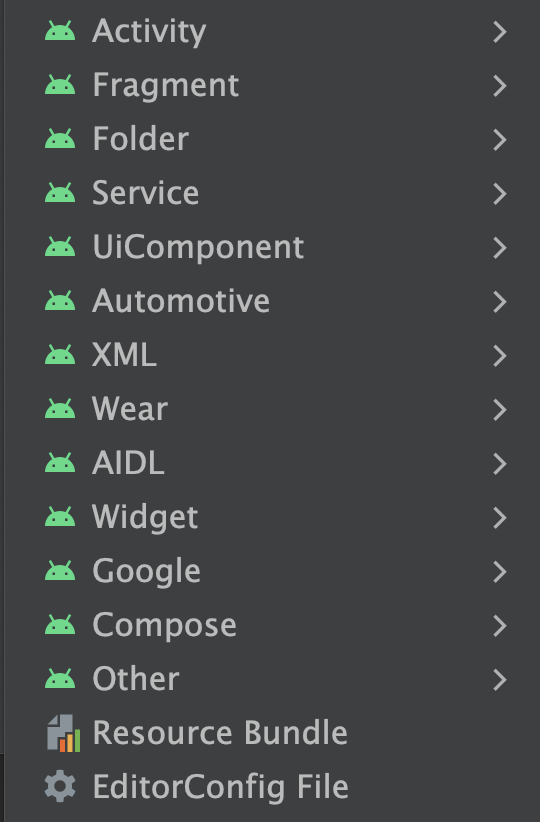
Android Studio 也為各種應用程式模組類型提供範本,包括 Wear OS、Android TV 和 Cloud App Engine。您可以在新增專案元件時,瀏覽適用於不同模組類型的範本。此外,還有一些範本是針對特定 API 的模組和作業,例如 Google AdMob 廣告和 Google 地圖。
使用 Gemini API 範本,建構可透過 Google AI SDK 實作生成式 AI 的應用程式。
步驟 1:以 AI 的「New Project」範本為基礎建構
啟動 Android Studio,然後使用「File」>「New Project」開啟新專案。
選取「Gemini API Starter」範本。
在「New Project」畫面中選擇 Gemini API 範本。
步驟 2:產生 API 金鑰
在精靈的下一個步驟中,選擇專案名稱和位置後,請提供 API 金鑰,以驗證 Gemini API。如果沒有 Gemini API 金鑰,請按一下精靈提供的連結,前往 Google AI Studio 並要求新金鑰。完成後,請將新的 API 金鑰複製回精靈。按一下「Finish」。
Gemini API 範本的新專案精靈。將 API 金鑰複製並貼到「新專案」精靈。
步驟 3:開始製作原型
Android Studio 會自動設定專案,並連線至 Gemini API,簡化您的工作流程。按一下「執行」,即可在 Android Emulator 中查看程式碼的執行情況。這個應用程式會提供硬式編碼提示,要求模型「為我總結下列文字」;您可以直接在程式碼中編輯或擴充提示,修改模型可執行的動作。如要進一步瞭解如何建立提示,請參閱 Google AI Studio 說明文件。
開始使用 Gemini API 製作原型。
瞭解詳情
如要進一步瞭解 Android 適用的 Google AI SDK,請參閱 Android 適用的 Google AI SDK 快速入門指南。
如需更多程式碼範例,您可以透過「File」>「New」>「Import Sample」將生成式 AI 程式碼範例匯入 Android Studio,然後搜尋「Generative AI Sample」。
[[["容易理解","easyToUnderstand","thumb-up"],["確實解決了我的問題","solvedMyProblem","thumb-up"],["其他","otherUp","thumb-up"]],[["缺少我需要的資訊","missingTheInformationINeed","thumb-down"],["過於複雜/步驟過多","tooComplicatedTooManySteps","thumb-down"],["過時","outOfDate","thumb-down"],["翻譯問題","translationIssue","thumb-down"],["示例/程式碼問題","samplesCodeIssue","thumb-down"],["其他","otherDown","thumb-down"]],["上次更新時間:2025-08-10 (世界標準時間)。"],[],[],null,["# Add code from a template\n\nAndroid Studio provides code templates that follow the Android design and\ndevelopment best practices to get you on the right track to creating\nbeautiful, functional apps. You can use templates to create new app modules,\nindividual activities, or other specific Android project components.\n\nSome templates provide starter code for common usage contexts, such as\nnavigation drawers or login screens. You can choose from these app module\nand activity templates when you first [create your project](/studio/projects/create-project),\nwhen you [add a new app module within an existing project](/studio/projects/add-app-module),\nor when you add a new activity within an app module.\n\nIn addition to activities, you can also add other Android project components\nto an existing app using templates. These templates include both code\ncomponents, such as services and fragments, and non-code components, such as\nfolders and XML files.\n\nThis page discusses how to add Android project components like activities to\nyour project and describes the commonly used activity templates available in\nAndroid Studio. Note that most templates depend on the [Android Support\nLibrary](/tools/support-library/features) to include user interface principles based on [Material Design](/design/material).\n\nAdd a project component\n-----------------------\n\n**Figure 1** . The templates menu, accessible through the\n**File** \\\u003e **New** menu or by right-clicking in the\n**Project** window.\n\nAndroid Studio groups templates by the type of component that they add, such\nas an **Activity** or an **XML** file, as shown in figure 1.\n\nTo add an Android project component using a template, use the **Project**\nwindow. Right-click on the\nfolder in which you want to add the new component, and select **New**. Based\non what components can be added to the folder you clicked on, you then see a\nlist of template types like those shown in figure 1.\n\nWhen you select the template you want to add, a corresponding wizard window\nappears and asks for the component's configuration information, such as its\nname. After you enter the configuration information, Android Studio creates\nand opens the files for your new component. It also runs a Gradle build to\nsync your project.\n\nSelect an activity template\n---------------------------\n\n**Figure 2**. The Empty Compose Activity template.\n\nOne of the most common uses of templates is adding new activities to an\nexisting app module. There are templates for creating screens for logging\ninto an account, presenting a list of items with details, or scrolling\nthrough a long block of text.\n\nAndroid Studio also provides templates for a variety of different app module\ntypes, including Wear OS, Android TV, and Cloud App Engine. You can view\ntemplates for these different module types when [adding a project component](#FindTemplates).\nTemplates also exist for more API-specific modules and activities, such as\nGoogle AdMobs Ads and Google Maps.\n\nOne of the most commonly used templates is the Empty Compose Activity\ntemplate, which creates an empty activity with a sample composable and a\npreview of the composable. It lets you to start from scratch when building\nyour app module or activity.\n\nUse the Gemini API template\n---------------------------\n\n| **Note:** The Gemini API template has been temporarily removed starting in Android Studio Narwhal \\| 2025.1.1. To use the template, download a previous version of Android Studio, which still supports the template, from the [Android Studio\n| download archive](/studio/archive) as a temporary workaround.\n\nUse the Gemini API template to build an application that implements\nGenerative AI using the [Google AI SDK](http://ai.google.dev/tutorials/android_quickstart?utm_source=android&utm_medium=referral).\n\n### Step 1: Build on the New Project template for AI\n\nStart Android Studio and open a new project using **File \\\u003e New Project** .\nSelect the **Gemini API Starter** template.\nChoose the Gemini API template on the **New Project** screen.\n\n### Step 2: Generate the API key\n\nIn the next step of the wizard, after you choose a project name and location,\nprovide an API key for authentication to the Gemini API. If you don't have a\nGemini API key, click the link provided in the wizard to navigate to\n[Google AI Studio](https://makersuite.google.com/app/apikey) and request a\nnew key. Once completed, copy your new API key back into the wizard. Click\n**Finish**.\nNew Project wizard for the Gemini API template. Copy and paste the API key into the New Project wizard.\n\n### Step 3: Start prototyping\n\nAndroid Studio automatically sets up a project for you with a connection to\nthe Gemini API, simplifying your workflow. Click **Run** to see the code in\naction in the Android Emulator. The app comes with a hard-coded prompt\nasking the model to \"Summarize the following text for me\"; you can edit or\nexpand the prompt directly in the code to modify what it can do. You can\nlearn more about creating prompts in the [Google AI Studio documentation](https://ai.google.dev/gemini-api/docs/ai-studio-quickstart).\nStart prototyping with Gemini APIs. **Important:** Remember, your API key is a secret! Don't share it with anyone, and it is strongly recommended that you don't check in an API key into your version control. The Gemini API Starter template stores the API key in a `local.properties` file (which is located in your project's root directory, but excluded from version control) and uses the [Secrets Gradle plugin](https://github.com/google/secrets-gradle-plugin) for Android to read the API key as a build configuration variable.\n\n### Learn more\n\nLearn more about the Google AI SDK for Android by reviewing the Google AI SDK\nfor Android [quick start guide](http://ai.google.dev/tutorials/android_quickstart?utm_source=android&utm_medium=referral).\nAnd for even more code samples, you can import the Generative AI code sample\ninto Android Studio through **File \\\u003e New \\\u003e Import Sample** and searching for\n**Generative AI Sample**.\nImport Generative AI Sample Wizard.\n\nTry out Gemini's chat, text, and multi-modal capabilities in the sample app.\n\n\u003cbr /\u003e\n\nGemini's chat, text and multi-modal capabilities. c\n\n\u003cbr /\u003e"]]