Mit Sammlungen den Überblick behalten
Sie können Inhalte basierend auf Ihren Einstellungen speichern und kategorisieren.
Zum Kompilieren und Debuggen von nativem Code für Ihre App benötigen Sie die folgenden Komponenten:
Das Android Native Development Kit (NDK): eine Reihe von Tools, mit denen Sie C- und C++-Code mit Android verwenden können.
CMake: Ein externes Build-Tool, das zusammen mit Gradle zum Erstellen Ihrer nativen Bibliothek verwendet wird. Sie benötigen diese Komponente nicht, wenn Sie nur „ndk-build“ verwenden möchten.
LLDB: Der Debugger, den Android Studio zum Debuggen von nativem Code verwendet. LLDB wird standardmäßig zusammen mit Android Studio installiert.
Auf dieser Seite wird beschrieben, wie Sie diese Komponenten automatisch oder manuell mit Android Studio oder dem sdkmanager-Tool herunterladen und installieren.
NDK und CMake automatisch installieren
Mit dem Android-Gradle-Plug-in 4.2.0 und höher können das erforderliche NDK und CMake automatisch installiert werden, wenn Sie Ihr Projekt zum ersten Mal erstellen und die entsprechenden Lizenzen im Voraus akzeptiert wurden.
Wenn Sie die Lizenzbedingungen bereits gelesen haben und ihnen zustimmen, können Sie die Lizenzen in Skripts mit dem folgenden Befehl vorab akzeptieren:
Wenn Sie das NDK installieren, wählt Android Studio das neueste verfügbare NDK aus. Für die meisten Projekte reicht die Installation dieser Standardversion des NDK aus.
Wenn für Ihr Projekt jedoch eine oder mehrere bestimmte Versionen des NDK erforderlich sind, können Sie bestimmte Versionen herunterladen und konfigurieren. So können Sie reproduzierbare Builds für Projekte erstellen, die jeweils von einer bestimmten Version des NDK abhängen. Android Studio installiert alle Versionen des NDK im Verzeichnis android-sdk/ndk/.
So installieren Sie CMake und das Standard-NDK in Android Studio:
Klicken Sie bei geöffnetem Projekt auf Tools > SDK Manager.
Klicke auf den Tab SDK Tools.
Klicken Sie die Kästchen NDK (Side by side) und CMake an.
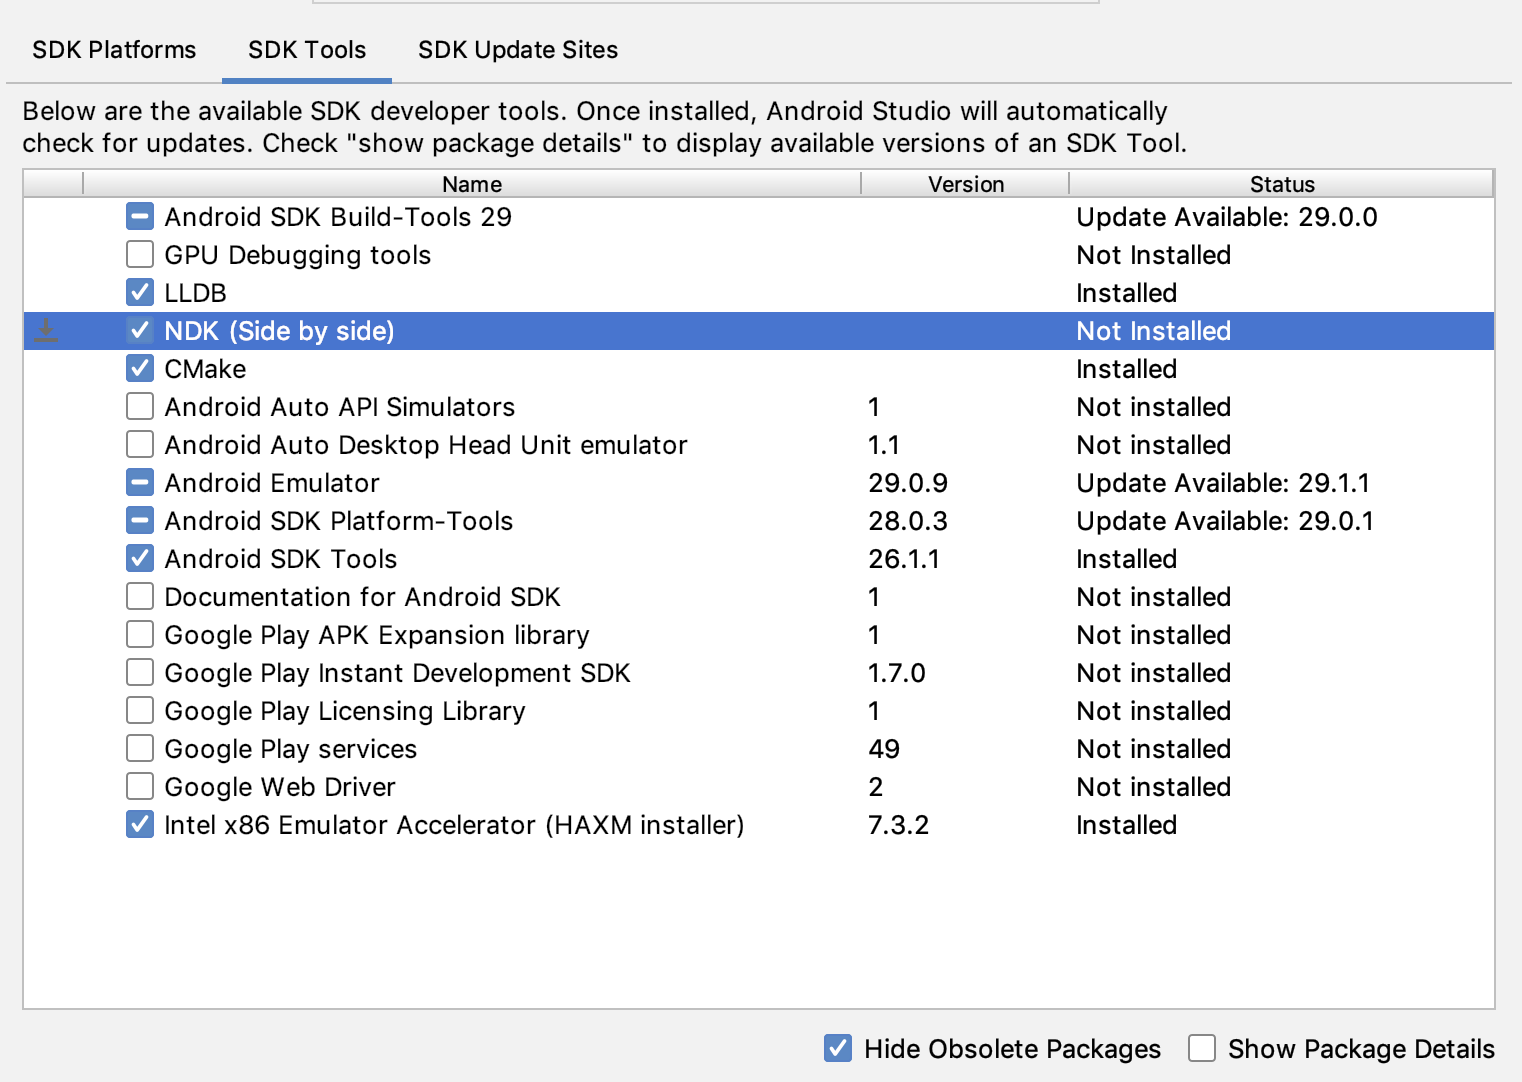
Abbildung 1. Das Fenster SDK Tools mit der Option NDK (Side by side)
Klicken Sie auf OK.
In einem Dialogfeld wird angezeigt, wie viel Speicherplatz das NDK-Paket auf der Festplatte belegt.
Klicken Sie auf OK.
Klicken Sie nach Abschluss der Installation auf Fertigstellen.
Ihr Projekt synchronisiert die Build-Datei automatisch und führt einen Build aus.
Beheben Sie alle Fehler, die auftreten.
Bestimmte Version von CMake konfigurieren
Der SDK Manager enthält die geforkte Version 3.6.0 von CMake und Version 3.10.2. Projekte, für die keine bestimmte CMake-Version festgelegt ist, werden mit CMake 3.10.2 erstellt. Wenn Sie die CMake-Version festlegen möchten, fügen Sie der Datei build.gradle Ihres Moduls Folgendes hinzu:
Wenn Sie eine CMake-Version verwenden möchten, die nicht im SDK Manager enthalten ist, gehen Sie so vor:
Laden Sie CMake von der offiziellen CMake-Website herunter und installieren Sie es.
Geben Sie in der Datei build.gradle Ihres Moduls die CMake-Version an, die von Gradle verwendet werden soll.
Fügen Sie entweder den Pfad zur CMake-Installation der Umgebungsvariablen PATH hinzu oder fügen Sie ihn in die Datei local.properties Ihres Projekts ein, wie unten gezeigt. Wenn Gradle die in der Datei build.gradle angegebene Version von CMake nicht finden kann, wird ein Build-Fehler ausgegeben.
# If you set this property, Gradle no longer uses PATH to find CMake.
cmake.dir = "path-to-cmake"</pre>
Wenn Sie das Ninja-Build-System noch nicht auf Ihrer Workstation installiert haben, rufen Sie die offizielle Ninja-Website auf und laden Sie die neueste Version von Ninja für Ihr Betriebssystem herunter und installieren Sie sie.
Fügen Sie der Umgebungsvariable PATH auch den Pfad zur Ninja-Installation hinzu.
Bestimmte Version des NDK installieren
So installieren Sie eine bestimmte Version des NDK:
Klicken Sie bei geöffnetem Projekt auf Tools > SDK Manager.
Klicke auf den Tab SDK Tools.
Aktivieren Sie das Kästchen Paketdetails anzeigen.
Aktivieren Sie das Kästchen NDK (Side by side) und die Kästchen darunter, die den NDK-Versionen entsprechen, die Sie installieren möchten. Android Studio installiert alle Versionen des NDK im Verzeichnis android-sdk/ndk/.
installieren.
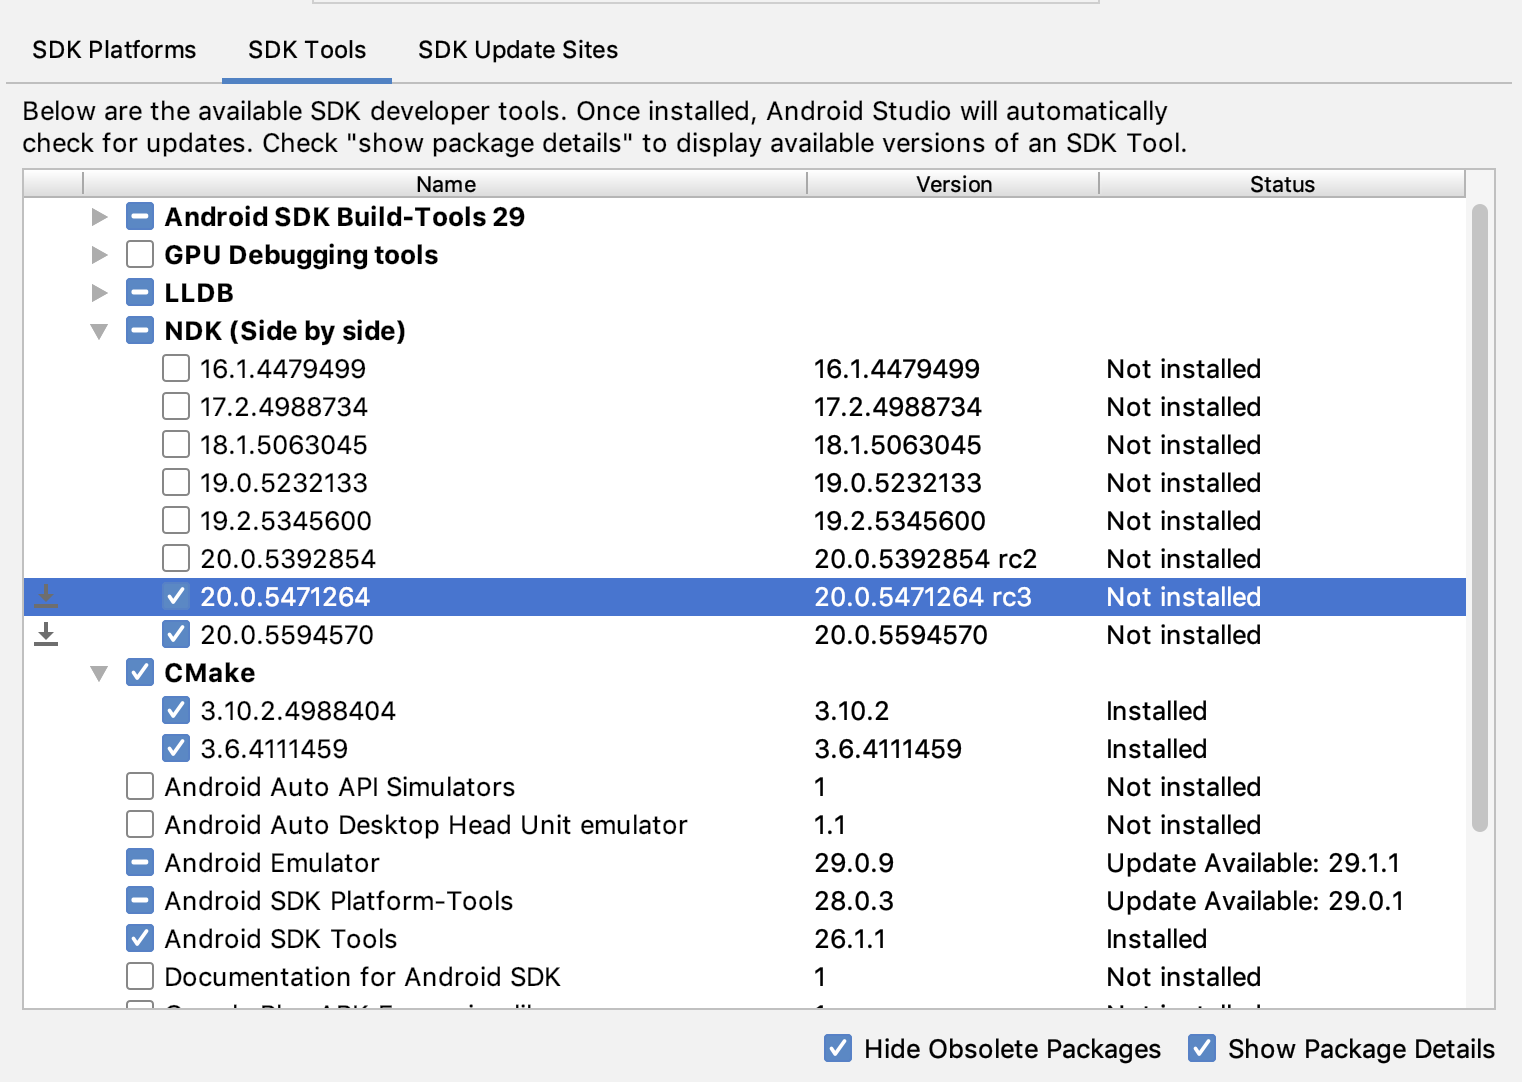
Abbildung 2. Das Fenster SDK Tools mit den Optionen für NDK (Side by side)
Klicken Sie auf OK.
In einem Dialogfeld wird angezeigt, wie viel Speicherplatz das NDK-Paket bzw. die NDK-Pakete belegen.
Klicken Sie auf OK.
Klicken Sie nach Abschluss der Installation auf Fertigstellen.
Ihr Projekt synchronisiert die Build-Datei automatisch und führt einen Build aus.
Beheben Sie alle Fehler, die auftreten.
Konfigurieren Sie jedes Modul mit der Version des NDK, die es verwenden soll. Wenn Sie Android Studio 3.6 oder höher verwenden und die Version nicht angeben, wählt das Android-Gradle-Plug-in eine Version aus, die bekanntermaßen kompatibel ist.
Bestimmte Versionen des NDK in Ihrem Projekt konfigurieren
Möglicherweise müssen Sie die Version des NDK in Ihrem Projekt konfigurieren, wenn einer der folgenden Punkte zutrifft:
Ihr Projekt wird übernommen und Sie müssen bestimmte Versionen des NDK und des Android Gradle-Plug-ins (AGP) verwenden. Weitere Informationen finden Sie unter NDK für das Android-Gradle-Plug-in konfigurieren.
Sie haben mehrere Versionen des NDK installiert und möchten eine bestimmte Version verwenden. Geben Sie in diesem Fall die Version mit dem Attribut android.ndkVersion in der Datei build.gradle des Moduls an, wie im folgenden Codebeispiel gezeigt.
Vor der Veröffentlichung wird jede AGP-Version gründlich mit der zu diesem Zeitpunkt aktuellen stabilen NDK-Version getestet. Diese NDK-Version wird zum Erstellen Ihrer Projekte verwendet, wenn Sie in der Datei build.gradle keine NDK-Version angeben. Die Standard-NDK-Version für verschiedene Versionen von AGP ist in den AGP-Versionshinweisen und früheren AGP-Versionshinweisen dokumentiert.
Alle Inhalte und Codebeispiele auf dieser Seite unterliegen den Lizenzen wie im Abschnitt Inhaltslizenz beschrieben. Java und OpenJDK sind Marken oder eingetragene Marken von Oracle und/oder seinen Tochtergesellschaften.
Zuletzt aktualisiert: 2025-08-27 (UTC).
[[["Leicht verständlich","easyToUnderstand","thumb-up"],["Mein Problem wurde gelöst","solvedMyProblem","thumb-up"],["Sonstiges","otherUp","thumb-up"]],[["Benötigte Informationen nicht gefunden","missingTheInformationINeed","thumb-down"],["Zu umständlich/zu viele Schritte","tooComplicatedTooManySteps","thumb-down"],["Nicht mehr aktuell","outOfDate","thumb-down"],["Problem mit der Übersetzung","translationIssue","thumb-down"],["Problem mit Beispielen/Code","samplesCodeIssue","thumb-down"],["Sonstiges","otherDown","thumb-down"]],["Zuletzt aktualisiert: 2025-08-27 (UTC)."],[],[],null,["To compile and debug native code for your app, you need the following components:\n\n- The Android Native Development Kit (NDK): a set of tools that allows you to use C and C++ code with Android.\n- CMake: an external build tool that works alongside Gradle to build your native library. You do not need this component if you only plan to use ndk-build.\n- LLDB: the debugger Android Studio uses to debug native code. By default, LLDB will be installed alongside Android Studio.\n\nThis page describes how to install these components automatically, or by using\nAndroid Studio or the `sdkmanager` tool to download and install them manually.\n\nInstall NDK and CMake automatically\n\nAndroid Gradle Plugin 4.2.0+ can automatically install the required NDK and CMake\nthe first time you build your project if their licenses have been accepted in advance.\nIf you've already read and agree to the license terms, then you can pre-accept\nthe licenses in scripts with the following command: \n\n yes | ${sdk}/cmdline-tools/latest/bin/sdkmanager --licenses\n\nInstall the NDK and CMake\n\nWhen you install the NDK, Android Studio selects the latest available NDK. For\nmost projects, installing this default version of the NDK is sufficient.\nIf your project needs one or more specific versions of the NDK, though, you can\n[download and configure specific versions](#specific-version). Doing so helps\nyou ensure reproducible builds across projects that each depend on a specific\nversion of the NDK. Android Studio installs all versions of the NDK in the\n\u003cvar translate=\"no\"\u003eandroid-sdk\u003c/var\u003e`/ndk/` directory.\n\nTo install CMake and the default NDK in Android Studio, do the following:\n\n1. With a project open, click **Tools \\\u003e SDK Manager**.\n\n2. Click the **SDK Tools** tab.\n\n3. Select the **NDK (Side by side)** and **CMake** checkboxes.\n\n\n **Figure 1.** The **SDK Tools** window showing the **NDK (Side by side)**\n option\n | **Note:** If you have an NDK installed in the `ndk-bundle` folder, it appears in the list with the label **NDK** . If you are using Android Gradle plugin 3.5.0 or later, you can select this checkbox or clear it. Clearing the checkbox uninstalls the NDK, freeing up disk space, and causes the checkbox to disappear from the list. If you uninstall the legacy NDK, remove the `ndk.dir` value, which is now deprecated, from your projects' `local.properties` files.\n4. Click **OK**.\n\n A dialog box tells you how much space the NDK package consumes on disk.\n5. Click **OK**.\n\n6. When the installation is complete, click **Finish**.\n\n7. Your project automatically syncs the build file and performs a build.\n Resolve any errors that occur.\n\nConfigure a specific version of CMake\n\nThe SDK Manager includes the 3.6.0 forked version of\nCMake and version 3.10.2. Projects that don't set a\nspecific CMake version are built with CMake 3.10.2. To\nset the CMake version, add the following to your module's `build.gradle` file: \n\nGroovy \n\n```groovy\nandroid {\n ...\n externalNativeBuild {\n cmake {\n ...\n version \"\u003cvar translate=\"no\"\u003ecmake-version\u003c/var\u003e\"\n }\n }\n}\n```\n\nKotlin \n\n```kotlin\nandroid {\n ...\n externalNativeBuild {\n cmake {\n ...\n version = \"\u003cvar translate=\"no\"\u003ecmake-version\u003c/var\u003e\"\n }\n }\n}\n```\n\nIf you want to use a CMake version that is not included by the\nSDK Manager, follow these steps:\n\n1. Download and install [CMake](https://cmake.org/download/) from the official CMake website.\n2. Specify the CMake version you want Gradle to use in your module's `build.gradle` file.\n3. Either add the path to the CMake installation to your `PATH` environment\n variable or include it in your project's `local.properties` file, as\n shown. If Gradle is unable to find the version of CMake you specified in\n your `build.gradle` file, you get a build error.\n\n # If you set this property, Gradle no longer uses PATH to find CMake.\n cmake.dir = \"\u003cvar translate=\"no\"\u003epath-to-cmake\u003c/var\u003e\"\u003c/pre\u003e\n\n4. If you don't already have the Ninja build system installed on your\n workstation, go to the [official Ninja website](https://ninja-build.org/),\n and download and install the latest version of Ninja available for your OS.\n Make sure to also add the path to the Ninja installation to your\n `PATH` environment variable.\n\nInstall a specific version of the NDK\n\nTo install a specific version of the NDK, do the following:\n\n1. With a project open, click **Tools \\\u003e SDK Manager**.\n\n2. Click the **SDK Tools** tab.\n\n3. Select the **Show Package Details** checkbox.\n\n4. Select the **NDK (Side by side)** checkbox and the checkboxes below it that\n correspond to the NDK versions you want to install. Android Studio installs\n all versions of the NDK in the \u003cvar translate=\"no\"\u003eandroid-sdk\u003c/var\u003e`/ndk/`\n directory.\n\n | **Note:** Preview releases (for example, canary and beta) of the NDK do not show up in this list unless you [change the update channel](/studio/preview/install-preview#change_your_update_channel) for Android Studio. You can [install an Android Studio preview](/studio/preview/install-preview) side-by-side with the stable version.\n\n\n **Figure 2.** The **SDK Tools** window showing the **NDK (Side by side)**\n options\n | **Note:** If you have an NDK installed in the `ndk-bundle` folder, it appears in the list with the label **NDK** . If you are using Gradle version 3.5 or later, you can select this checkbox or clear it. Clearing it uninstalls the NDK installed, freeing up disk space, and cause the checkbox to disappear from the list. If you uninstall the legacy NDK, remove the `ndk.dir` value, which is now deprecated, from your projects' `local.properties` files.\n5. Click **OK**.\n\n A dialog box tells you how much space the NDK package(s) consumes.\n6. Click **OK**.\n\n7. When the installation is complete, click **Finish**.\n\n8. Your project automatically syncs the build file and performs a build.\n Resolve any errors that occur.\n\n9. [Configure each module](#apply-specific-version) with the version of the NDK\n you want it to use. When using Android Studio 3.6 or higher, if you do not\n specify the version, the Android Gradle plugin chooses a version that it is\n known to be compatible with.\n\nConfigure specific versions of the NDK in your project\n\nYou may need to configure the version of the NDK in your project if one of the\nfollowing is true:\n\n- Your project is inherited and you need to use specific versions of the NDK and the Android Gradle plugin (AGP). For more information, see [Configure the NDK for the Android Gradle plugin](/studio/projects/configure-agp-ndk).\n- You have multiple versions of the NDK installed and you want to use a specific\n one. In this case, specify the version using the `android.ndkVersion`\n property in the module's `build.gradle` file, as shown in the following code\n sample.\n\n Groovy \n\n ```groovy\n android {\n ndkVersion \"\u003cvar translate=\"no\"\u003emajor\u003c/var\u003e.\u003cvar translate=\"no\"\u003eminor\u003c/var\u003e.\u003cvar translate=\"no\"\u003ebuild\u003c/var\u003e\" // e.g., ndkVersion \"21.3.6528147\"\n }\n ```\n\n Kotlin \n\n ```kotlin\n android {\n ndkVersion = \"\u003cvar translate=\"no\"\u003emajor\u003c/var\u003e.\u003cvar translate=\"no\"\u003eminor\u003c/var\u003e.\u003cvar translate=\"no\"\u003ebuild\u003c/var\u003e\" // e.g., ndkVersion \"21.3.6528147\"\n }\n ```\n\nDefault NDK version per AGP version\n\nBefore release, each AGP version is thoroughly tested with the latest stable NDK\nrelease at that time. This NDK version is used to build your projects if you\ndon't specify an NDK version in the `build.gradle` file. The default NDK version\nfor different versions of AGP are documented in the\n[AGP release notes](/build/releases/gradle-plugin#compatibility) and\n[AGP past release notes](/build/releases/past-releases)."]]