向您的项目添加 C 和 C++ 代码
使用集合让一切井井有条
根据您的偏好保存内容并对其进行分类。
将 C 和 C++ 代码置于项目模块的 cpp
目录中,以将其添加到您的 Android 项目中。在您构建项目时,这些代码会编译到一个可由 Gradle 与您的应用打包在一起的原生库中。然后,Java 或 Kotlin 代码即可通过 Java 原生接口 (JNI) 调用原生库中的函数。如需详细了解如何使用 JNI 框架,请参阅 Android 的 JNI 提示。
Android Studio 支持适用于跨平台项目的 CMake。Android Studio 还支持 ndk-build
,它比 CMake 速度更快,但仅支持 Android。目前不支持在同一模块中同时使用 CMake 和 ndk-build
。
如需将现有的 ndk-build
库导入您的 Android Studio 项目,请了解如何将 Gradle 关联到原生库项目。
本页将向您介绍如何设置 Android Studio 以支持必要的构建工具、如何创建新项目并让其支持 C/C++,以及如何向您的项目添加新的 C/C++ 文件。
如果您想要将原生代码添加到现有项目,请按以下步骤操作:
-
创建新的原生源代码文件,并将这些文件添加到您的 Android Studio 项目中。
- 如果您已经拥有原生代码或想要导入预构建原生库,请跳过此步骤。
-
配置 CMake 以将原生源代码构建入库。如果您要导入并关联预构建库或平台库,则必须使用此构建脚本。
- 如果现有的原生库已有
CMakeLists.txt
构建脚本,或者使用 ndk-build
并包含 Android.mk
构建脚本,请跳过此步骤。
-
提供 CMake 或
ndk-build
脚本文件的路径,以配置 Gradle。Gradle 使用构建脚本将源代码导入您的 Android Studio 项目并将原生库打包到应用中。
配置完项目后,使用 JNI 框架通过 Java 或 Kotlin 代码访问原生函数。如需构建和运行应用,请点击 Run 图标
。
注意:如果现有项目使用的是已废弃的 ndkCompile
工具,请改为使用 CMake 或 ndk-build
。
下载 NDK 和构建工具
如需为您的应用编译和调试原生代码,您需要以下组件:
-
Android 原生开发套件 (NDK):一个工具集,让您能够在 Android 应用中使用 C 和 C++ 代码。NDK 会提供平台库,让您能够管理原生 activity 和访问实体设备组件,例如传感器和触控输入。
-
CMake:一款外部构建工具,可与 Gradle 搭配使用来构建原生库。如果您只计划使用
ndk-build
,则无需此组件。
-
LLDB:Android Studio 中用于调试原生代码的调试程序。
如需了解如何安装这些组件,请参阅安装及配置 NDK 和 CMake。
创建支持 C/C++ 的新项目
创建支持原生代码的新项目的流程与创建任何其他 Android Studio 项目的流程类似,但需要执行一个额外的步骤:
- 在向导的 Choose your project 部分中,选择 Native C++ 项目类型。
-
点击 Next。
-
填写向导下一部分中的所有其他字段。
-
点击 Next。
-
在向导的 Customize C++ Support 部分中,您可以使用 C++ Standard 字段自定义项目。
-
使用下拉列表选择您想要使用哪种 C++ 标准化。选择 Toolchain Default,将使用默认的 CMake 设置。
-
点击 Finish。
在 Android Studio 完成新项目的创建后,请从 Android Studio 左侧打开 Project 窗格,然后从菜单中选择 Android 视图。如图 1 所示,Android Studio 会添加 cpp 组:
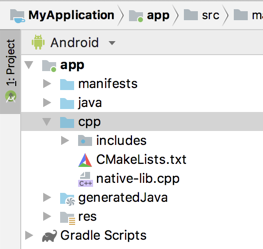
图 1. 原生源代码和外部构建脚本的 Android 视图组。
注意:此视图并未反映磁盘上的实际文件层次结构,而是将相似的文件归为一组,以便简化项目导航。
在 cpp 组中,您可以找到项目中的所有原生源代码文件、头文件、CMake 或 ndk-build
的构建脚本,以及项目中的预构建库。对于新项目,Android Studio 会创建一个示例 C++ 源代码文件 native-lib.cpp
,并将其置于应用模块的 src/main/cpp/
目录中。此示例代码提供了一个简单的 C++ 函数 stringFromJNI()
,它会返回字符串 "Hello from C++"
。如需了解如何向项目添加其他源代码文件,请参阅介绍如何创建新的原生源代码文件的部分。
与 build.gradle
文件指示 Gradle 如何构建应用一样,CMake 和 ndk-build
需要构建脚本才能确定如何构建您的原生库。对于新项目,Android Studio 会创建 CMake 构建脚本 CMakeLists.txt
,并将其置于模块的根目录中。如需详细了解此构建脚本的内容,请参阅配置 CMake。
构建和运行示例应用
点击 Run 图标
后,Android Studio 会构建并启动一个应用,此应用会在您的 Android 设备或模拟器上显示文字“Hello from C++”。下面的概览介绍了在构建和运行示例应用时会发生的事件:
- Gradle 调用您的外部构建脚本
CMakeLists.txt
。
- CMake 按照构建脚本中的命令将 C++ 源代码文件
native-lib.cpp
编译到共享对象库中,并将其命名为 libnative-lib.so
。Gradle 随后会将其打包到应用中。
- 在运行时,应用的
MainActivity
会使用 System.loadLibrary()
加载原生库。现在,应用就可以使用库的原生函数 stringFromJNI()
了。
-
MainActivity.onCreate()
调用 stringFromJNI()
,后者会返回 "Hello from C++"
,并使用它来更新 TextView
。
如需验证 Gradle 是否会将原生库打包到应用中,请使用 APK 分析器:
-
依次选择 Build > Build Bundles(s) / APK(s) > Build APK(s)。
- 依次选择 Build > Analyze APK。
- 从
app/build/outputs/
目录中选择 APK 或 AAB,然后点击 OK。
- 如图 2 所示,您可以在 APK 分析器窗口中的
lib/<ABI>/
下看到 libnative-lib.so
。
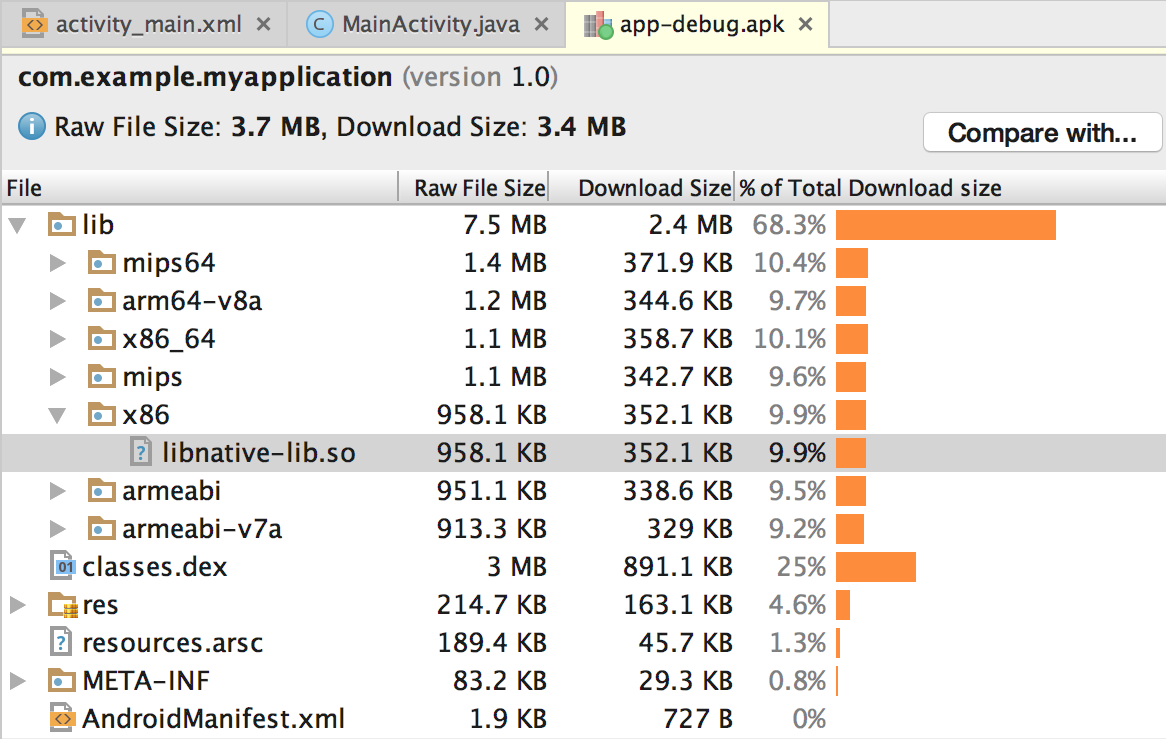
图 2. 使用 APK 分析器查找原生库。
提示:如果您想要利用其他使用了原生代码的 Android 应用进行实验,请依次点击 File > New > Import Sample,然后从 Ndk 列表中选择一个示例项目。
创建新的 C/C++ 源代码文件
如需将新的 C/C++ 源代码文件添加到现有项目,请按以下步骤操作:
- 如果您的应用的主源代码集内还没有
cpp/
目录,请按如下所示的方法创建一个:
- 打开 Android Studio 左侧的 Project 窗格,然后从菜单中选择 Project 视图。
- 依次选择 your-module > src。
- 右键点击 main 目录,然后依次选择 New > Directory。
- 输入
cpp
作为目录名称,然后点击 OK。
- 右键点击
cpp/
目录,然后依次选择 New > C/C++ Source File。
- 为您的源代码文件输入一个名称,例如
native-lib
。
- 从 Type 菜单中,选择源代码文件的文件扩展名,例如
.cpp
。
- 点击 Edit File Types 图标
,向菜单中添加其他文件类型,例如 .cxx
或 .hxx
。在弹出的 New File Extensions 对话框中,从 Source Extension 和 Header Extension 菜单中选择其他文件扩展名,然后点击 OK。
- 如需创建头文件,请勾选 Create an relevantheader 复选框。
- 点击 OK。
向项目中添加新的 C/C++ 文件后,您仍需要配置 CMake 以将这些文件包含在原生库中。
其他资源
如需详细了解如何在应用中支持 C/C++ 代码,请使用以下资源。
Codelab
本页面上的内容和代码示例受内容许可部分所述许可的限制。Java 和 OpenJDK 是 Oracle 和/或其关联公司的注册商标。
最后更新时间 (UTC):2025-08-21。
[[["易于理解","easyToUnderstand","thumb-up"],["解决了我的问题","solvedMyProblem","thumb-up"],["其他","otherUp","thumb-up"]],[["没有我需要的信息","missingTheInformationINeed","thumb-down"],["太复杂/步骤太多","tooComplicatedTooManySteps","thumb-down"],["内容需要更新","outOfDate","thumb-down"],["翻译问题","translationIssue","thumb-down"],["示例/代码问题","samplesCodeIssue","thumb-down"],["其他","otherDown","thumb-down"]],["最后更新时间 (UTC):2025-08-21。"],[],[],null,["# Add C and C++ code to your project\n\nAdd C and C++ code to your Android project by placing the code into a\n`cpp` directory in your project module. When you build your project, this\ncode is compiled into a native library that Gradle can package with your app.\nYour Java or Kotlin code can then call functions in your native library\nthrough the Java Native Interface (JNI). To learn more about using the JNI\nframework, read [JNI tips for\nAndroid](/training/articles/perf-jni).\n\nAndroid Studio supports CMake, which is useful for cross-platform projects.\nAndroid Studio also supports [`ndk-build`](/ndk/guides/ndk-build), which\ncan be faster than CMake but only supports Android. Using both CMake and\n`ndk-build` in the same module is not currently supported.\n\nTo import an existing `ndk-build` library into your Android Studio\nproject, learn how to\n[link Gradle to your native library project](/studio/projects/gradle-external-native-builds).\n\nThis page shows you how to [set up Android Studio](#download-ndk) with the\nnecessary build tools, [create a new project](#new-project) with C/C++\nsupport, and [add new C/C++ files](#create-sources) to your project.\n\n\nIf instead you want to add native code to an existing project,\nfollow these steps:\n\n1. [Create new native source files](#create-sources) and add the files to your Android Studio project.\n - Skip this step if you already have native code or want to import a prebuilt native library.\n2. [Configure CMake](/studio/projects/configure-cmake) to build your native source code into a library. This build script is required if you are importing and linking against prebuilt or platform libraries.\n - If you have an existing native library that already has a `CMakeLists.txt` build script or uses `ndk-build` and includes an [`Android.mk`](/ndk/guides/android_mk) build script, skip this step.\n3. [Configure\n Gradle](/studio/projects/gradle-external-native-builds) by providing a path to your CMake or `ndk-build` script file. Gradle uses the build script to import source code into your Android Studio project and package your native library into the app.\n\n\nOnce you configure your project, access your native functions from\nJava or Kotlin code using the [JNI framework](http://docs.oracle.com/javase/7/docs/technotes/guides/jni/spec/jniTOC.html). To build and run your app,\nclick **Run** .\n\n\n**Note:** If your existing project uses the deprecated\n`ndkCompile` tool, migrate to using either CMake or\n`ndk-build`.\n\nDownload the NDK and build tools\n--------------------------------\n\n\nTo compile and debug native code for your app, you need the following\ncomponents:\n\n- [The Android Native Development Kit\n (NDK)](/ndk): a toolset that lets you use C and C++ code with Android. NDK provides platform libraries that let you manage native activities and access physical device components, such as sensors and touch input.\n- [CMake](https://cmake.org/): an external build tool that works alongside Gradle to build your native library. You don't need this component if you only plan to use `ndk-build`.\n- [LLDB](http://lldb.llvm.org/): the debugger in Android Studio that [debugs native code](/studio/debug).\n\n\nFor information on installing these components, see [Install and configure the NDK and CMake](/studio/projects/install-ndk).\n\nCreate a new project with C/C++ support\n---------------------------------------\n\n\nTo create a new project with support for native code, the process is similar to\n[creating any other Android\nStudio project](/studio/projects/create-project), but with an additional step:\n\n1. In the **Choose your project** section of the wizard, select the **Native C++** project type.\n2. Click **Next**.\n3. Complete all other fields in the next section of the wizard.\n4. Click **Next**.\n5. In the **Customize C++ Support** section of the wizard, you can customize your project with the **C++ Standard** field.\n - Use the drop-down list to select which standardization of C++ you want to use. Selecting **Toolchain\n Default** uses the default CMake setting.\n6. Click **Finish**.\n\n\nAfter Android Studio finishes creating your new project, open the\n**Project** pane from the left side of the IDE and select the\n**Android** view from the menu. As shown in figure 1, Android\nStudio adds the **cpp** group:\n\n\n**Figure 1.** Android view groups for your native sources\nand external build scripts.\n\n\n**Note:** This view does not reflect the actual file hierarchy\non disk, but groups similar files to simplify navigating your project.\n\n\nThe **cpp** group is where you can find all the native\nsource files, headers, build scripts for CMake or `ndk-build`, and prebuilt\nlibraries that are a part of your project. For new projects, Android Studio\ncreates a sample C++ source file, `native-lib.cpp`, and places it\nin the `src/main/cpp/` directory of your app module. This sample\ncode provides a simple C++ function, `stringFromJNI()`, that\nreturns the string `\"Hello from C++\"`. Learn how to add additional\nsource files to your project in the section about how to\n[create new native source files](#create-sources).\n\nSimilar to how `build.gradle` files instruct Gradle how to build\nyour app, CMake and `ndk-build` require a build script to know how to build\nyour native library. For new projects, Android Studio creates a CMake build\nscript,`CMakeLists.txt`, and places it in your module's root directory.\nTo learn more about the contents of this build script, read\n[Configure CMake](/studio/projects/configure-cmake).\n\n### Build and run the sample app\n\n\nWhen you click **Run** , Android Studio\nbuilds and launches an app that displays the text \"Hello from C++\" on your\nAndroid device or emulator. The following overview describes the events that\noccur to build and run the sample app:\n\n1. Gradle calls on your external build script, `CMakeLists.txt`.\n2. CMake follows commands in the build script to compile a C++ source file, `native-lib.cpp`, into a shared object library and names it `libnative-lib.so`. Gradle then packages it into the app.\n3. During runtime, the app's `MainActivity` loads the native library using [`System.loadLibrary()`](/reference/java/lang/System#loadLibrary(java.lang.String)). The library's native function, `stringFromJNI()`, is now available to the app.\n4. `MainActivity.onCreate()` calls `stringFromJNI()`, which returns `\"Hello from C++\"` and uses it to update the [`TextView`](/reference/android/widget/TextView).\n\n\nTo verify that Gradle packages the native library in the app, use the\n[APK Analyzer](/studio/debug/apk-analyzer):\n\n1. Select **Build \\\u003e Build Bundles(s) / APK(s) \\\u003e Build APK(s)**.\n2. Select **Build \\\u003e Analyze APK**.\n3. Select the APK or AAB from the `app/build/outputs/` directory and click **OK**.\n4. As shown in figure 2, you can see `libnative-lib.so` in the APK Analyzer window under `lib/\u003cABI\u003e/`.\n\n\n **Figure 2.** Locate a native library using the APK\n Analyzer.\n\n\n**Tip:** If you want to experiment with other Android apps that\nuse native code, click **File \\\u003e New \\\u003e Import Sample** and\nselect a sample project from the **Ndk** list.\n\nCreate new C/C++ source files\n-----------------------------\n\n\nTo add new C/C++ source files to an existing project, proceed as follows:\n\n1. If you don't already have a `cpp/` directory in the main source set of your app, create one as follows:\n 1. Open the **Project** pane in the left side of the IDE and select the **Project** view from the menu.\n 2. Navigate to **\u003cvar translate=\"no\"\u003eyour-module\u003c/var\u003e \\\u003e src**.\n 3. Right-click on the **main** directory and select **New \\\u003e\n Directory**.\n 4. Enter `cpp` as the directory name and click **OK**.\n2. Right-click the `cpp/` directory and select **New \\\u003e\n C/C++ Source File**.\n3. Enter a name for your source file, such as `native-lib`.\n4. From the **Type** menu, select the file extension for your source file, such as `.cpp`.\n - Click **Edit File Types** to add other file types to the menu, such as `.cxx` or `.hxx`. In the **New File Extensions** dialog box that pops up, select another file extension from the **Source Extension** and **Header Extension** menus and click **OK**.\n5. To create a header file, select the **Create an\n associated header** checkbox.\n6. Click **OK**.\n\n\u003cbr /\u003e\n\nAfter you add new C/C++ files to you project, you still need to\n[configure CMake](/studio/projects/configure-cmake) to include the files in\nyour native library.\n\nAdditional resources\n--------------------\n\nTo learn more about supporting C/C++ code in your app, try the following\nresource.\n\n### Codelabs\n\n- [Create Hello-CMake with Android Studio](https://codelabs.developers.google.com/codelabs/android-studio-cmake/) This codelab shows you how to use the Android Studio CMake template to start Android NDK project development."]]