การตรวจหาความหน่วงของ UI
จัดทุกอย่างให้เป็นระเบียบอยู่เสมอด้วยคอลเล็กชัน
บันทึกและจัดหมวดหมู่เนื้อหาตามค่ากำหนดของคุณ
Android แสดงผล UI โดยการสร้างเฟรมจากแอปและแสดงบน
หน้าจอ หากแอปแสดงผล UI ช้า ระบบจะ
บังคับให้ข้ามเฟรม เมื่อเกิดเหตุการณ์นี้ ผู้ใช้จะเห็นภาพกะพริบซ้ำๆ
บนหน้าจอ ซึ่งเรียกว่าความหน่วง
โดยปกติแล้ว เมื่อเกิดการกระตุก มักเป็นเพราะการชะลอความเร็วหรือการบล็อกการเรียกแบบอะซิงโครนัส
ในเทรด UI (ในแอปส่วนใหญ่จะเป็นเทรดหลัก) คุณใช้การติดตามระบบ
เพื่อระบุตำแหน่งที่เกิดปัญหาได้
ตรวจหาความกระตุกใน Android 12 ขึ้นไป
สำหรับอุปกรณ์ที่ใช้ Android 12 (API ระดับ 31) ขึ้นไป ระบบจะแสดงการติดตามที่บันทึกไว้ในแทร็กเฟรมกระตุกใต้แผงจอแสดงผลใน CPU Profiler
หากต้องการตรวจหาการกระตุก ให้ทำดังนี้
ใน Android Studio ให้เลือกมุมมอง > หน้าต่างเครื่องมือ > โปรไฟล์เลอร์ หรือคลิกโปรไฟล์
ในแถบเครื่องมือ
หากได้รับแจ้งจากกล่องโต้ตอบเลือกเป้าหมายการติดตั้งใช้งาน ให้เลือกอุปกรณ์ที่จะติดตั้งใช้งานแอปเพื่อทำการโปรไฟล์ หากคุณเชื่อมต่ออุปกรณ์ผ่าน USB
แต่ไม่เห็นอุปกรณ์ในรายการ ให้ตรวจสอบว่าคุณได้เปิดใช้การแก้ไขข้อบกพร่อง USB แล้ว
คลิกที่ใดก็ได้ในไทม์ไลน์ CPU เพื่อเปิด CPU Profiler
เลือกการติดตามระบบจากเมนูการกำหนดค่าใน CPU Profiler แล้ว
คลิกบันทึก หลังจากโต้ตอบกับแอปเสร็จแล้ว ให้คลิกหยุด
คุณควรเห็นแทร็กเฟรมที่กระตุกในส่วนแสดง โดยค่าเริ่มต้น
Profiler จะแสดงเฉพาะเฟรมที่กระตุกเป็นรายการที่ควรตรวจสอบ ภายในเฟรมที่กระตุกแต่ละเฟรม ส่วนสีแดงจะไฮไลต์ระยะเวลาที่เฟรมใช้เกิน
กำหนดเวลาการแสดงผล

เมื่อพบเฟรมที่กระตุก ให้คลิกเฟรมนั้น หรือจะกด M เพื่อ
ปรับการซูมเพื่อโฟกัสที่เฟรมที่เลือกก็ได้ เหตุการณ์ที่เกี่ยวข้องจะไฮไลต์ในเทรดเหล่านี้ ได้แก่ เทรดหลัก RenderThread และการทำงานของ GPU เสร็จสมบูรณ์
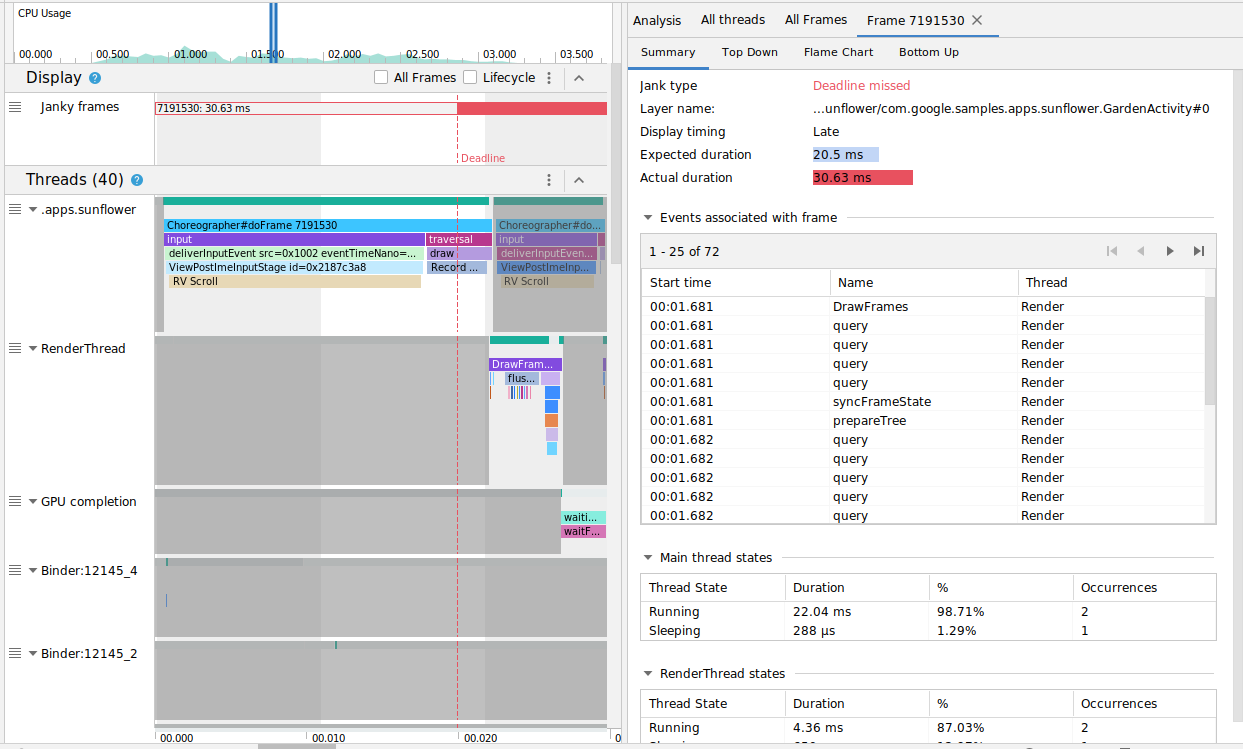
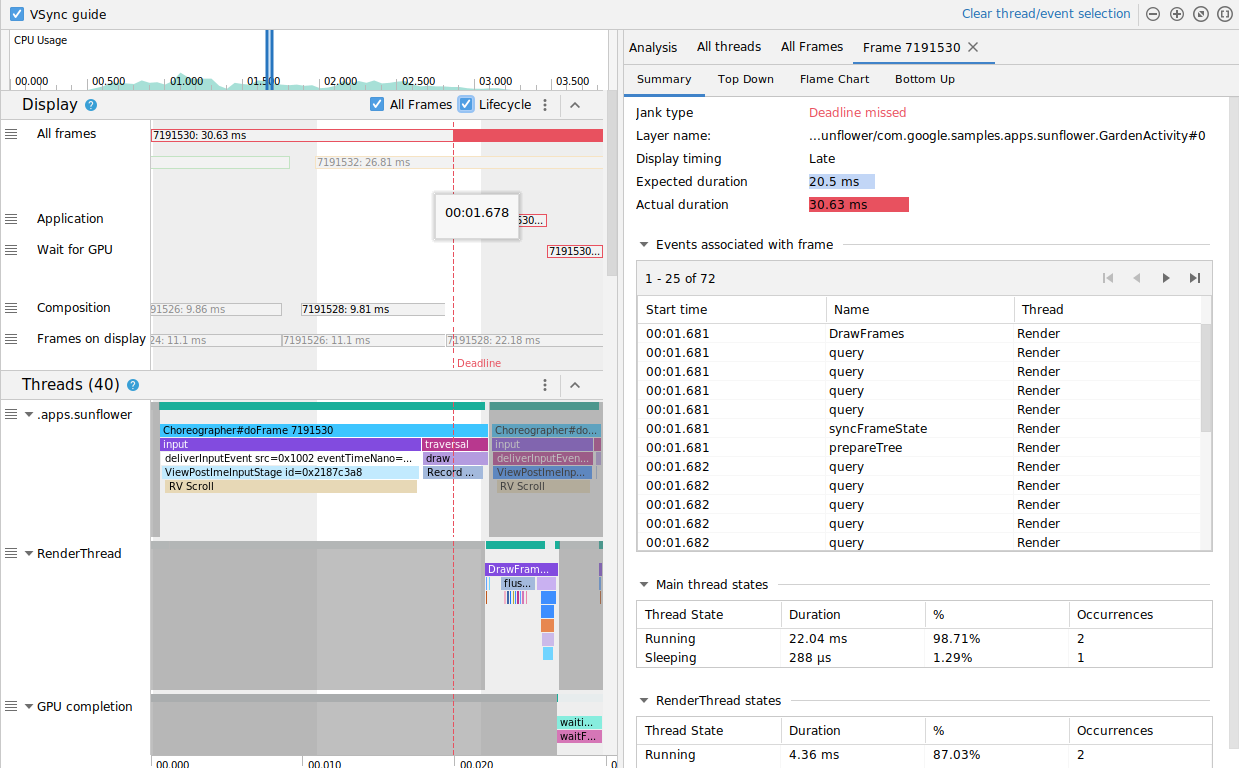
คุณเลือกดูเฟรมทั้งหมดหรือรายละเอียดเวลาในการแสดงผลได้โดย
สลับช่องทําเครื่องหมายเฟรมทั้งหมดและวงจรตามลําดับ
ตรวจหาความหน่วงใน Android 11
สำหรับอุปกรณ์ที่ใช้ Android 11 (API ระดับ 30) ระบบจะแสดงการติดตามที่บันทึกไว้ในส่วนวงจรของเฟรมใน CPU Profiler

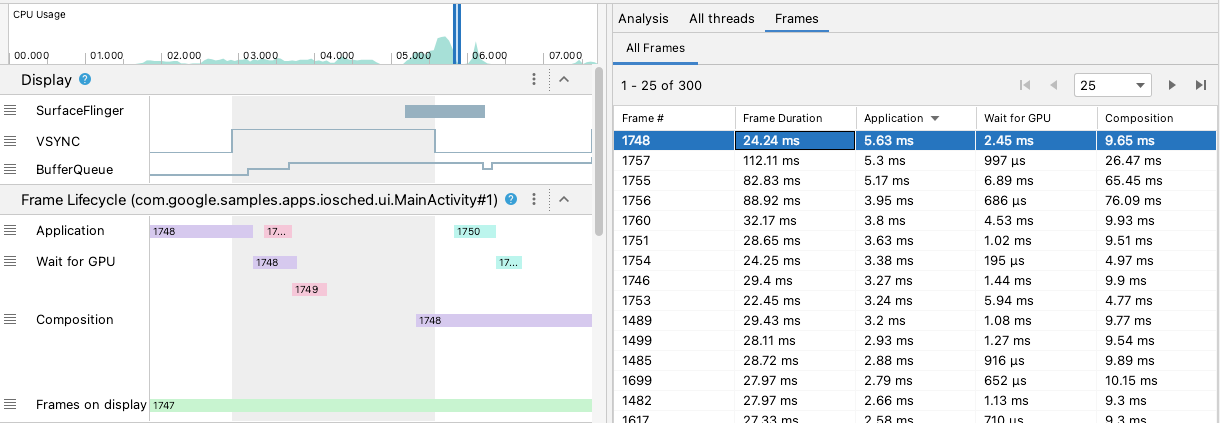
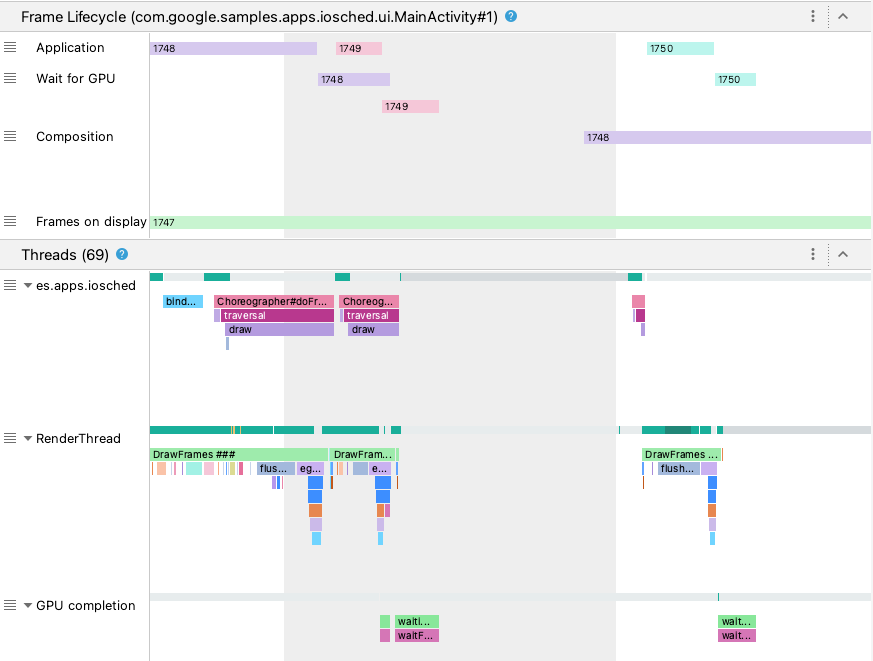
ส่วนวงจรเฟรมประกอบด้วยชื่อเลเยอร์และ 4 แทร็ก โดยแต่ละแทร็กจะแสดงถึงขั้นตอนหนึ่งในไปป์ไลน์การแสดงผลเฟรม องค์ประกอบ Frame
Lifecycle มีดังนี้
- วงจรเฟรม (ชื่อเลเยอร์): ชื่อส่วนมีชื่อเลเยอร์
ในวงเล็บ เลเยอร์คือหน่วยเดียวของการเรียบเรียง
- แอปพลิเคชัน: แทร็กนี้แสดงเวลาตั้งแต่ตอนที่แอปนำบัฟเฟอร์ออกจากคิว
จนถึงตอนที่ใส่บัฟเฟอร์กลับเข้าไปในคิว ซึ่งโดยปกติจะสอดคล้องกับเหตุการณ์การติดตามใน
RenderThread
- รอ GPU: แทร็กนี้แสดงระยะเวลาที่ GPU เป็นเจ้าของบัฟเฟอร์ ซึ่งเป็นระยะเวลานับจากเวลาที่ส่งบัฟเฟอร์ไปยัง GPU จนถึงเวลาที่ GPU ทำงานกับบัฟเฟอร์เสร็จ ไม่ได้หมายความว่า GPU ทำงานเฉพาะในบัฟเฟอร์นี้ในช่วงเวลานี้ หากต้องการดูข้อมูลโดยละเอียดเกี่ยวกับสิ่งที่ GPU ทำ
ในช่วงเวลาหนึ่งๆ คุณอาจต้องใช้
Android GPU Inspector
- การคอมโพสิต: แทร็กนี้แสดงเวลาตั้งแต่ตอนที่ SurfaceFlinger
ล็อกบัฟเฟอร์และส่งบัฟเฟอร์สำหรับการคอมโพสิต ไปจนถึงตอนที่ส่งบัฟเฟอร์
ไปยังจอแสดงผล
- เฟรมที่แสดง: แทร็กนี้แสดงระยะเวลาที่เฟรมอยู่บนหน้าจอ
ส่วนวงจรเฟรมจะแสดงให้เห็นว่าบัฟเฟอร์เฟรมเคลื่อนที่ระหว่าง
ขั้นตอนต่างๆ ของไปป์ไลน์การแสดงผลอย่างไร เฟรมจะมีรหัสสีตามหมายเลขเฟรม
เพื่อให้ติดตามเฟรมที่ต้องการได้ง่ายขึ้น
Android Studio ยังแสดงเฟรมทั้งหมดในการติดตามในรูปแบบตารางในแท็บเฟรมทั้งหมดด้วย
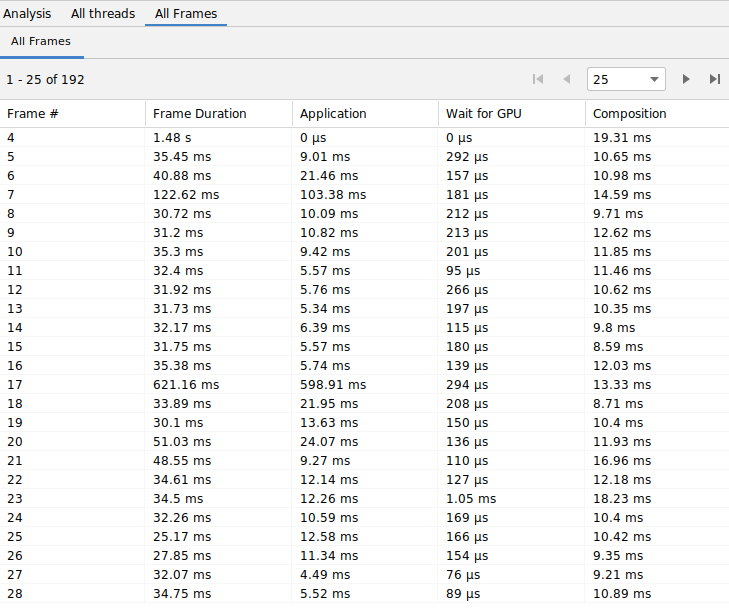
คอลัมน์เฟรม #, แอปพลิเคชัน, รอ GPU และการคอมโพสิตแสดงข้อมูลเดียวกันกับแทร็กในส่วนวงจรของเฟรมตามที่ระบุไว้ข้างต้น คอลัมน์ระยะเวลาของเฟรมแสดงเวลา
ตั้งแต่เริ่มต้นแอปพลิเคชันจนถึงเริ่มต้นเฟรมที่แสดง ซึ่งเป็นระยะเวลาที่ใช้ในการแสดงผลเฟรมตั้งแต่ต้นจนจบ
คุณสามารถจัดเรียงตารางเฟรมตามคอลัมน์ใดก็ได้เพื่อค้นหาเฟรมที่สั้นที่สุดหรือ
ยาวที่สุดได้อย่างรวดเร็ว ตารางยังรองรับตัวควบคุมการแบ่งหน้า ซึ่งช่วยให้คุณไปยังส่วนต่างๆ
ของเฟรมหลายร้อยเฟรมได้
หากต้องการตรวจหาและตรวจสอบอาการกระตุกใน Android 11 ให้ทำตามขั้นตอนต่อไปนี้
จัดเรียงตารางเฟรมทั้งหมดตามคอลัมน์แอปพลิเคชันจากมากไปน้อย
เพื่อให้เฟรมที่ใช้เวลานานที่สุดปรากฏก่อน
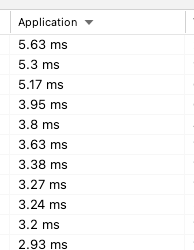
ค้นหาเฟรมที่ทำงานนานที่สุด แล้วเลือกแถวในตาราง ซึ่งจะซูมเข้าที่เฟรมที่เลือกในมุมมองไทม์ไลน์ทางด้านซ้าย
มองหาเธรดที่เกี่ยวข้องในส่วนวงจรของ Frame และเธรด
ตรวจหาความหน่วงใน Android 10 และต่ำกว่า
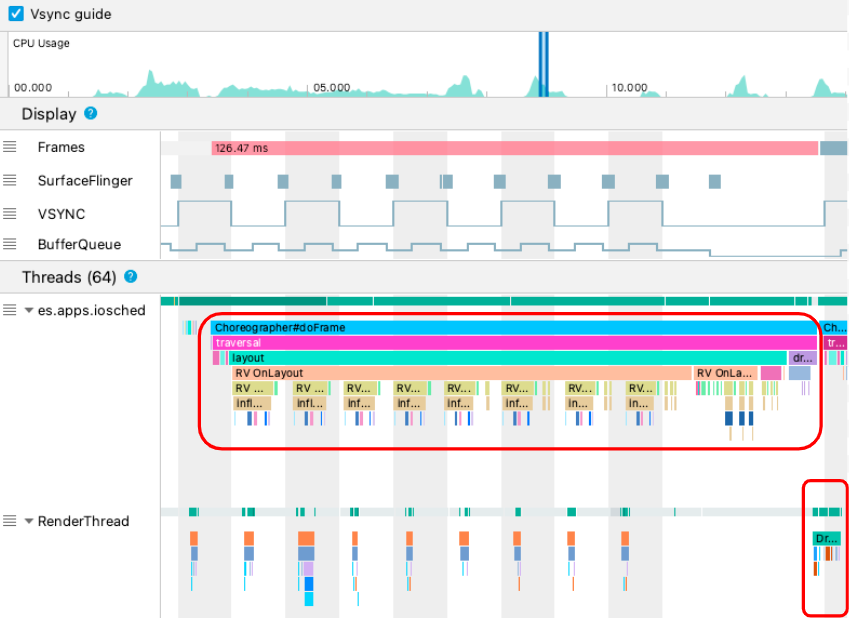
สำหรับอุปกรณ์ที่ใช้ Android 10 (API ระดับ 29) และต่ำกว่า ข้อมูลไปป์ไลน์กราฟิกของระบบปฏิบัติการที่เกี่ยวข้อง
จะแสดงในส่วนเดียวในแทร็กระบบของ CPU Profiler ที่ชื่อว่าจอแสดงผล

- เฟรม: ส่วนนี้แสดงเธรด UI และ
RenderThread
เหตุการณ์การติดตาม
ในแอปของคุณ เหตุการณ์ที่นานกว่า 16 มิลลิวินาทีจะมีสีแดงเพื่อ
ไฮไลต์เฟรมที่อาจกระตุกเนื่องจากเกินกำหนดเวลาในการแสดงผลที่
60 เฟรมต่อวินาที (fps)
- SurfaceFlinger: ส่วนนี้จะแสดงเมื่อ SurfaceFlinger ประมวลผล
บัฟเฟอร์เฟรม SurfaceFlinger เป็นกระบวนการของระบบที่มีหน้าที่
ส่งบัฟเฟอร์ไปยังจอแสดงผล
- VSYNC: ส่วนนี้จะแสดง VSYNC ซึ่งเป็นสัญญาณที่ซิงค์
ไปป์ไลน์การแสดงผล แทร็กจะแสดงสัญญาณ VSYNC-app ซึ่งจะแสดงเมื่อ
แอปของคุณเริ่มทำงานช้าเกินไป โดยปกติแล้ว ปัญหานี้เกิดขึ้นเนื่องจากเทรด UI
ไม่ว่าง ซึ่งจะทำให้เกิดการกะพริบที่มองเห็นได้บนหน้าจอระหว่างภาพเคลื่อนไหว และเพิ่มเวลาในการตอบสนองของอินพุตจนกว่าภาพเคลื่อนไหวหรือการเลื่อนจะเสร็จสมบูรณ์
ซึ่งมีความสำคัญอย่างยิ่งต่อการดูจอแสดงผลที่มีอัตราการรีเฟรชสูง เนื่องจากอาจเกิดขึ้นบ่อยกว่า 60 ครั้งต่อวินาทีหรือในอัตราที่เปลี่ยนแปลงได้
- BufferQueue: ส่วนนี้แสดงจำนวนบัฟเฟอร์เฟรมที่อยู่ในคิวและ
รอให้ SurfaceFlinger ใช้ สำหรับแอปที่ติดตั้งใช้งานในอุปกรณ์ที่ใช้ Android 9 (API ระดับ 28) ขึ้นไป แทร็กนี้จะแสดงจำนวนบัฟเฟอร์ของ Surface ของแอป BufferQueue
(
0
, 1
หรือ 2
) BufferQueue จะช่วยให้คุณเข้าใจสถานะของบัฟเฟอร์รูปภาพขณะที่ย้ายไปมาระหว่างคอมโพเนนต์กราฟิกของ Android เช่น ค่า 2
หมายความว่าขณะนี้แอปใช้การบัฟเฟอร์ 3 เท่า ซึ่งส่งผลให้เกิดความหน่วงของอินพุตเพิ่มเติม
ส่วนการแสดงผลจะให้สัญญาณที่เป็นประโยชน์ในการตรวจหาการกระตุกที่อาจเกิดขึ้น เช่น เมื่อเธรด UI หรือ RenderThread
ใช้เวลานานกว่า 16 มิลลิวินาที หากต้องการตรวจสอบรายละเอียดที่แน่นอนของสาเหตุที่ทำให้เกิดการกระตุก คุณสามารถตรวจสอบส่วนเธรด ซึ่งแสดงเธรดที่เกี่ยวข้องกับการแสดงผล UI
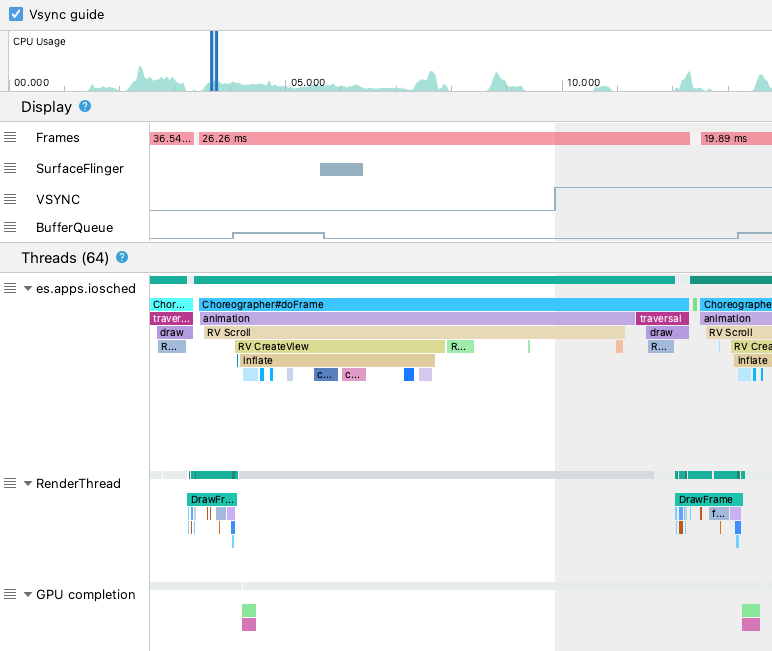
ในรูปภาพด้านบน ส่วนเธรดจะแสดงเธรด UI
(java.com.google.samples.apps.iosched
), RenderThread
และเธรด GPU completion
เธรดเหล่านี้เกี่ยวข้องกับการแสดงผล UI และอาจทำให้เกิด
อาการกระตุก
หากต้องการตรวจหาความกระตุกใน Android 10 หรือต่ำกว่า ให้ทำตามขั้นตอนต่อไปนี้
ดูแทร็กเฟรมในจอแสดงผล เฟรมสีแดงคือเฟรมที่
ควรตรวจสอบ

เมื่อพบเฟรมที่อาจไม่ราบรื่น ให้ซูมเข้าโดยกด W
หรือ
เลื่อนล้อเมาส์ขณะกด Control
(Command ใน macOS) ซูมเข้าไปเรื่อยๆ จนกว่าจะเริ่มเห็น
เหตุการณ์การติดตามในเทรด UI และ RenderThread

ในรูปด้านบน Choreographer#doFrame
จะแสดงเมื่อเธรด UI เรียกใช้
Choreographer
เพื่อประสานงาน
ภาพเคลื่อนไหว เลย์เอาต์ของมุมมอง การวาดรูปภาพ และกระบวนการที่เกี่ยวข้อง DrawFrames
จะแสดงเมื่อ RenderThread
สร้างและส่งคำสั่งวาดจริงไปยัง GPU
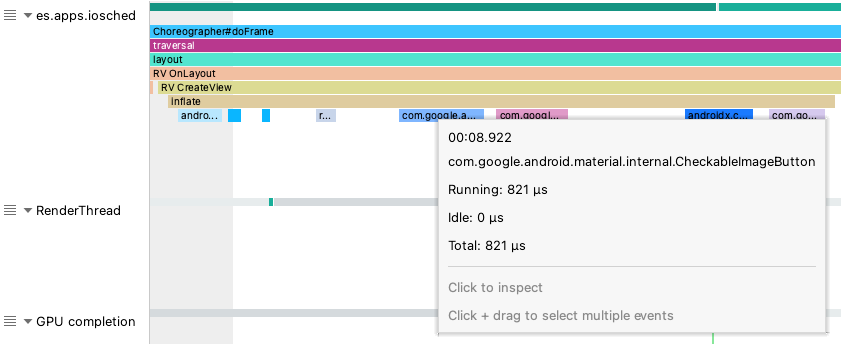
หากเห็นเหตุการณ์การติดตามที่ยาวเป็นพิเศษ คุณสามารถซูมเข้าเพิ่มเติมและดูว่า
อะไรอาจเป็นสาเหตุที่ทำให้การแสดงผลช้า รูปด้านบนแสดง inflate
ในเทรด UI ซึ่งหมายความว่าแอปใช้เวลาในการขยายเลย์เอาต์
เมื่อซูมเข้าไปในinflate
เหตุการณ์ใดเหตุการณ์หนึ่ง คุณจะดูระยะเวลาที่แน่นอนของ
คอมโพเนนต์ UI แต่ละรายการได้ ดังที่แสดงด้านล่าง
ดูข้อมูลเพิ่มเติม
ดูข้อมูลเพิ่มเติมเกี่ยวกับวิธีลดอาการกระตุกได้ที่แหล่งที่มาทั่วไปของอาการกระตุก
ตัวอย่างเนื้อหาและโค้ดในหน้าเว็บนี้ขึ้นอยู่กับใบอนุญาตที่อธิบายไว้ในใบอนุญาตการใช้เนื้อหา Java และ OpenJDK เป็นเครื่องหมายการค้าหรือเครื่องหมายการค้าจดทะเบียนของ Oracle และ/หรือบริษัทในเครือ
อัปเดตล่าสุด 2025-07-27 UTC
[[["เข้าใจง่าย","easyToUnderstand","thumb-up"],["แก้ปัญหาของฉันได้","solvedMyProblem","thumb-up"],["อื่นๆ","otherUp","thumb-up"]],[["ไม่มีข้อมูลที่ฉันต้องการ","missingTheInformationINeed","thumb-down"],["ซับซ้อนเกินไป/มีหลายขั้นตอนมากเกินไป","tooComplicatedTooManySteps","thumb-down"],["ล้าสมัย","outOfDate","thumb-down"],["ปัญหาเกี่ยวกับการแปล","translationIssue","thumb-down"],["ตัวอย่าง/ปัญหาเกี่ยวกับโค้ด","samplesCodeIssue","thumb-down"],["อื่นๆ","otherDown","thumb-down"]],["อัปเดตล่าสุด 2025-07-27 UTC"],[],[],null,["# UI jank detection\n\nAndroid renders UI by generating a frame from your app and displaying it on\nthe screen. If your app suffers from slow UI rendering, then the system is\nforced to skip frames. When this happens, the user perceives a recurring flicker\non their screen, which is referred to as *jank*.\n\nWhen jank occurs, it's usually because of some deceleration or blocking async\ncall on the UI thread (in most apps, it's the main thread). You can use system\ntraces to identify where the problem is.\n\nDetect jank on Android 12 and higher\n------------------------------------\n\nFor devices using Android 12 (API level 31) or higher, a captured trace is shown\nin the **Janky frames** track under the **Display** pane in the CPU Profiler.\n\nTo detect jank,\n\n1. In Android Studio, select **View \\\u003e Tool Windows \\\u003e Profiler** or click **Profile**\n in the toolbar.\n\n If prompted by the **Select Deployment Target** dialog, choose the device to\n which to deploy your app for profiling. If you've connected a device over USB\n but don't see it listed, ensure that you have\n [enabled USB debugging](/studio/debug/dev-options#enable).\n2. Click anywhere in the **CPU** timeline to open the CPU Profiler.\n\n3. Select **System Trace** from the configurations menu in the CPU Profiler and\n click **Record** . After you finish interacting with your app, click **Stop**.\n\n4. You should see the **Janky frames** track under **Display** . By default, the\n Profiler only shows janky frames as candidates for investigation. Within each\n janky frame, the red portion highlights the duration the frame takes past its\n rendering deadline.\n\n5. Once you find a janky frame, click on it; optionally, you can press **M** to\n adjust the zoom to focus on the selected frame. The relevant events are\n highlighted in these threads: the main thread, **RenderThread** and\n **GPU completion** .\n\n6. You can optionally see all frames or a breakdown of the rendering time by\n toggling the checkboxes **All Frames** and **Lifecycle** , respectively.\n\nDetect jank on Android 11\n-------------------------\n\nFor devices using Android 11 (API level 30), a captured trace is shown in the\n**Frame Lifecycle** section in the CPU Profiler.\n\nThe **Frame Lifecycle** section contains the layer name and four tracks. Each\ntrack represents one stage in the frame rendering pipeline. The **Frame\nLifecycle** elements are as follows:\n\n1. **Frame Lifecycle (Layer name)** : The section title contains the layer name in parentheses. A *layer* is a single unit of composition.\n2. **Application** : This track shows the time from when the buffer was dequeued by the app to when it was enqueued back. This usually corresponds to the trace events in `RenderThread`.\n3. **Wait for GPU** : This track shows how long the buffer was owned by the GPU. This is the time from when the buffer is sent to the GPU to when the GPU finishes its work on the buffer. **This does not indicate that the GPU was working only on\n this buffer during this time.** For detailed info on what the GPU works on during a given time, you may want to use [Android GPU Inspector](/agi).\n4. **Composition**: This track shows the time starting from when SurfaceFlinger latches on to the buffer and sends it for composition, to when the buffer is sent to the display.\n5. **Frames on display**: This track shows how long the frame was on the screen.\n\nThe **Frame Lifecycle** section illustrates how a frame buffer moves between\ndifferent stages of the rendering pipeline. The frames are color coded by frame\nnumber so that it's easier to track a particular frame.\n\nAndroid Studio also shows all frames in the trace in a table format in the **All\nFrames** tab.\n\nThe **Frame #** , **Application** , **Wait for GPU** , and\n**Composition** columns represent the same data as the tracks in the **Frame\nLifecycle** section as above. The column **Frame Duration** represents the time\nfrom the start of **Application** to the start of **Frames on Display**. This is\nessentially how long it takes to render a frame end-to-end.\n\nYou can sort the frames table by any column to quickly find the shortest or\nlongest frame. The table also supports pagination controls that help you navigate\nthrough hundreds of frames.\n\nTo detect and investigate jank on Android 11, follow these steps:\n\n1. Sort the **All Frames** table by the **Application** column in descending\n order, so that the frames that take the longest appear first.\n\n2. Find the longest running frames and select the table row. This zooms in on\n the selected frame in the timeline view to the left.\n\n3. Look for relevant threads in the **Frame Lifecycle** and **Threads** sections.\n\nDetect jank on Android 10 and lower\n-----------------------------------\n\nFor devices using Android 10 (API level 29) and lower, relevant OS graphics\npipeline information is displayed in a single section on the CPU Profiler system\ntrace called **Display**.\n\n- **Frames** : This section shows the UI thread and `RenderThread` trace events in your app. Events that are longer than 16ms are colored red to highlight potential janky frames because they exceed the deadline to render at 60 frames per second (fps).\n- **SurfaceFlinger**: This section shows when the SurfaceFlinger processes the frame buffers. SurfaceFlinger is a system process that is responsible for sending buffers to display.\n- **VSYNC**: This section displays the VSYNC, a signal that synchronizes the display pipeline. The track displays the VSYNC-app signal, which shows when your app is starting too late. Typically, this occurs because the UI thread is busy. It causes a visible flicker to appear on your screen during an animation and adds extra input latency until the animation or scroll completes. This is especially important to view for high-refresh-rate displays, as they may occur more frequently than 60 times per second or at a variable rate.\n- **BufferQueue** : This section shows how many frame buffers are queued up and are waiting for SurfaceFlinger to consume. For apps deployed to devices running Android 9 (API level 28) or higher, this track shows the buffer count of the app's surface [BufferQueue](https://source.android.com/devices/graphics#bufferqueue) (`0`, `1`, or `2`). BufferQueue can help you understand the state of image buffers as they move between the Android graphics components. For example, a value of `2` means that the app is currently triple-buffered, which results in extra input latency.\n\nThe **Display** section provides useful signals to detect potential jank---for\nexample, when the UI thread or `RenderThread` takes longer than 16 ms. To investigate\nexact details of what caused the jank, you can probe the **Threads**\nsection, which shows the threads relevant to UI rendering.\n\nIn the figure above, the **Threads** section shows the UI thread\n(`java.com.google.samples.apps.iosched`), `RenderThread`, and the `GPU completion`\nthread. These are the threads relevant to UI rendering and may contribute to\njank.\n\nTo detect jank on Android 10 or lower, follow these steps:\n\n1. Look at the **Frames** track in **Display**. The red frames are candidates\n for investigation.\n\n2. Once you find a potentially janky frame, zoom in by pressing `W` or\n scrolling the mouse wheel while holding \u003ckbd\u003eControl\u003c/kbd\u003e\n (\u003ckbd\u003eCommand\u003c/kbd\u003e on macOS). Continue zooming in until you start to see the\n trace events in the UI thread and `RenderThread`.\n\n In the figure above, `Choreographer#doFrame` shows when the UI thread calls\n [`Choreographer`](/reference/android/view/Choreographer) to coordinate\n animation, view layout, image drawing, and related processes. `DrawFrames`\n shows when `RenderThread` forms and issues actual drawing commands to the GPU.\n3. If you see a particularly long trace event, you can zoom in further and find out\n what may have contributed to the slow rendering. The figure above shows `inflate`\n in the UI thread, which means the app is spending time on inflating the layout.\n When you zoom into one of the `inflate` events, you can find out exactly how long\n each UI component is taking, as shown below.\n\nLearn more\n----------\n\nTo learn more about how to reduce jank, see\n[Common sources of jank](/topic/performance/vitals/render#common-jank)."]]