
Android Studio 3.0 以上版本可對已啟用偵錯功能的 APK 進行剖析及偵錯,無須透過 Android Studio 專案建構 APK。
如要開始對 APK 偵錯,請按照下列步驟操作:
在 Android Studio 歡迎畫面中,按一下「Profile or debug APK」。
如果您已開啟專案,也可以從選單列中依序點選「File」>「Profile or Debug APK」。
在隨即開啟的對話方塊中,選取要匯入 Android Studio 的 APK。
按一下「OK」。
如果沒有看到這個選項,請確認你已啟用「Android APK 支援」外掛程式。
接著,Android Studio 會顯示未封裝的 APK 檔案 (類似圖 1)。這並非完全反編譯的檔案組合,但會為 SMALI 檔案提供較易讀取的 DEX 檔案。
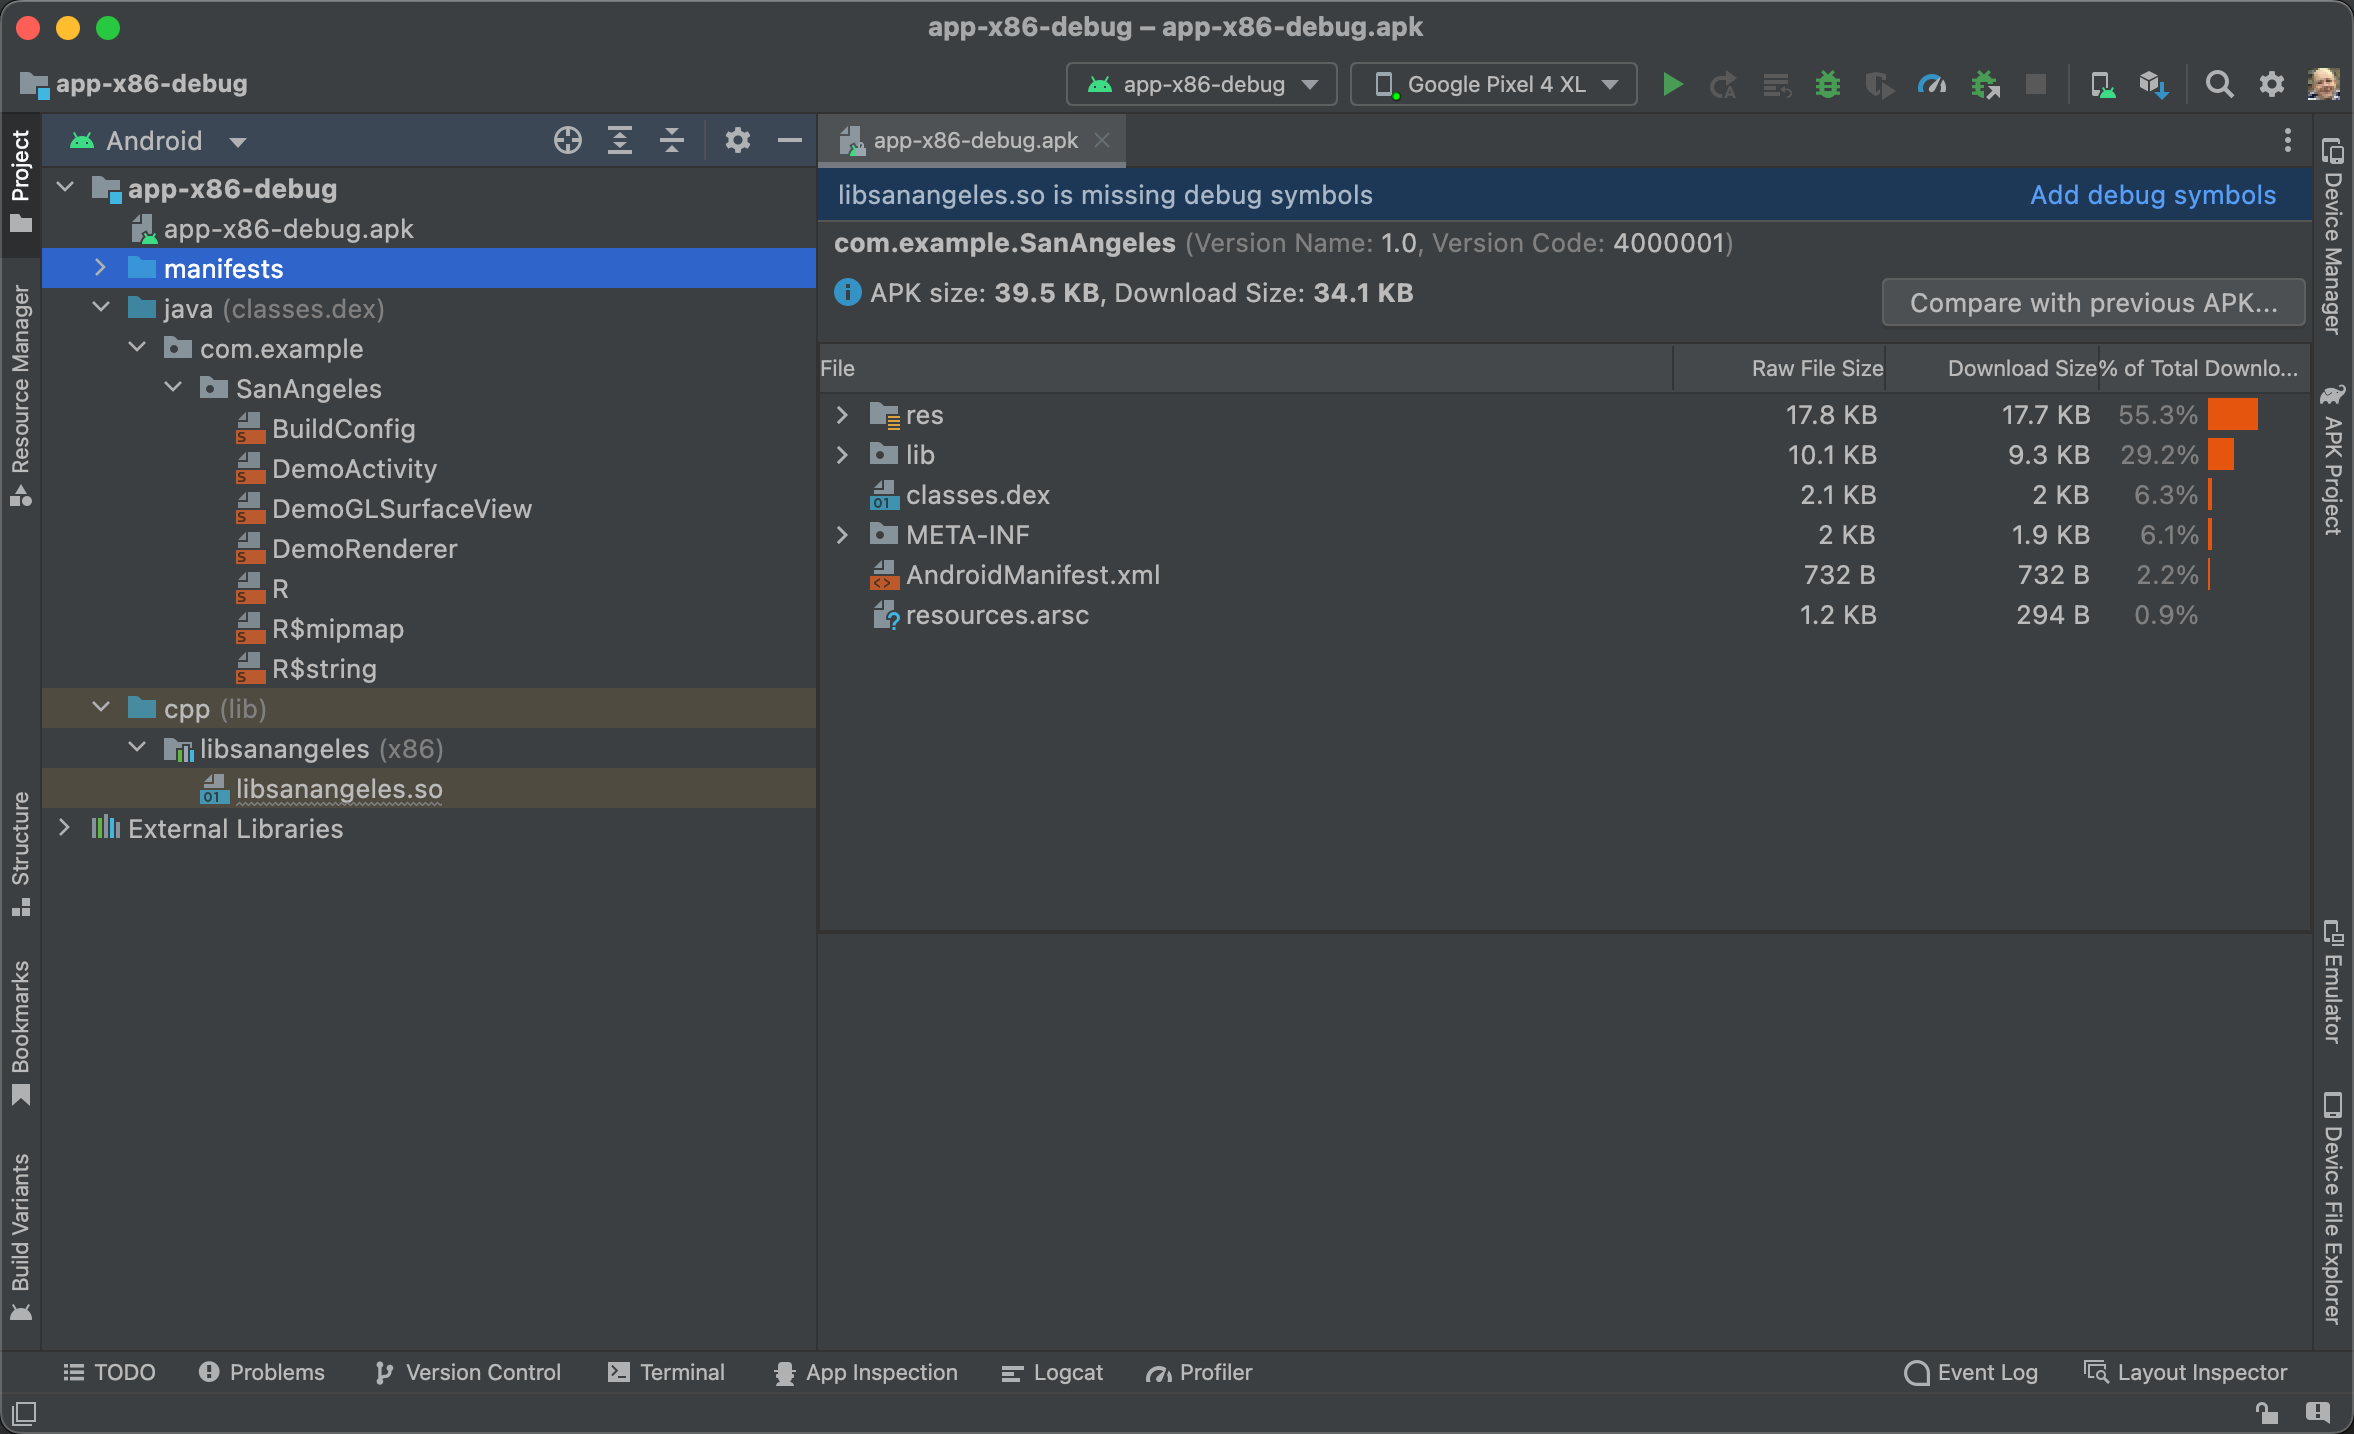
圖 1. 將預先建構的 APK 匯入 Android Studio。
在「Project」窗格的「Android」檢視畫面中,您可以查看 APK 的下列內容:
- APK file:按兩下 APK 即可開啟 APK 分析工具。
- manifests:包含從 APK 擷取的應用程式資訊清單。
- java:含有 Kotlin 或 Java 程式碼,這些是由 Android Studio 從 APK 的 DEX 檔案反組譯為 SMALI 檔案而來。這個目錄中的每個 SMALI 檔案都會對應一個 Kotlin 或 Java 類別。
- cpp:如果應用程式含有原生程式碼,這個目錄會包含 APK 的原生程式庫 (SO 檔案)。
- External Libraries︰含有 Android SDK。
您可以使用 Android 分析器開始測試應用程式效能。
如要對應用程式的 Kotlin 或 Java 程式碼偵錯,您需附加 Kotlin 或 Java 來源,並在 Kotlin 或 Java 來源檔案中加入中斷點。同樣地,如要對原生程式碼偵錯,就必須附加原生偵錯符號。
附加 Kotlin 或 Java 來源
根據預設,Android Studio 會從 APK 擷取 Kotlin 或 Java 程式碼,然後儲存為 SMALI 檔案。如要使用中斷點對 Kotlin 或 Java 程式碼偵錯,您需將 IDE 指向與待偵錯 SMALI 檔案對應的 Kotlin 或 Java 來源檔案。
如要附加 Kotlin 或 Java 來源,請按照下列步驟操作:
- 在「Android」檢視畫面的「Project」窗格中,按兩下 SMALI 檔案。開啟檔案後,編輯器會顯示一個橫幅,要求您選取 Kotlin 或 Java 來源:

- 在編輯器視窗中,按一下橫幅內的「Attach Kotlin/Java Sources...」。
- 前往含有應用程式 Kotlin 或 Java 來源檔案的目錄,然後按一下「Open」。
在「Project」視窗中,Android Studio 會將 SMALI 檔案替換為對應的 Kotlin 或 Java 來源檔案。Android Studio 也會自動加入內部類別。您現在可以加入中斷點,並對應用程式偵錯。
附加原生偵錯符號
如果 APK 內含的原生程式庫 (SO 檔案) 不含偵錯符號,Android Studio 會顯示橫幅 (類似圖 1 所示)。您必須先附加可偵錯的原生程式庫,才能對 APK 的原生程式碼偵錯或使用中斷點。
如要附加可偵錯的原生程式庫,請按照下列步驟操作:
- 如果尚未下載 NDK 和工具,請先完成下載。
在「Android」檢視畫面中,前往「Project」視窗的「cpp」目錄,按兩下不含偵錯符號的原生程式庫檔案。
編輯器會顯示 APK 支援的所有 ABI 表格。
按一下編輯器視窗右上角的「Add」。
找到要附加的可偵錯原生程式庫並前往其所屬目錄,然後按一下「OK」。
如果 APK 和可偵錯的原生程式庫是以其他工作站建構,您也需按照下列步驟指定本機偵錯符號的路徑:
在編輯器視窗的「Path Mappings」區段中,編輯「Local Paths」欄下方的欄位,加入所缺少偵錯符號的本機路徑 (如圖 2 所示)。
在大部分情況下,您只需要提供根資料夾的路徑,Android Studio 就會自動檢查子目錄,對應其他來源。Android Studio 也會將遠端 NDK 的路徑對應至本機 NDK 下載項目。
在編輯器視窗的「Path Mappings」區段中,按一下「Apply Changes」。
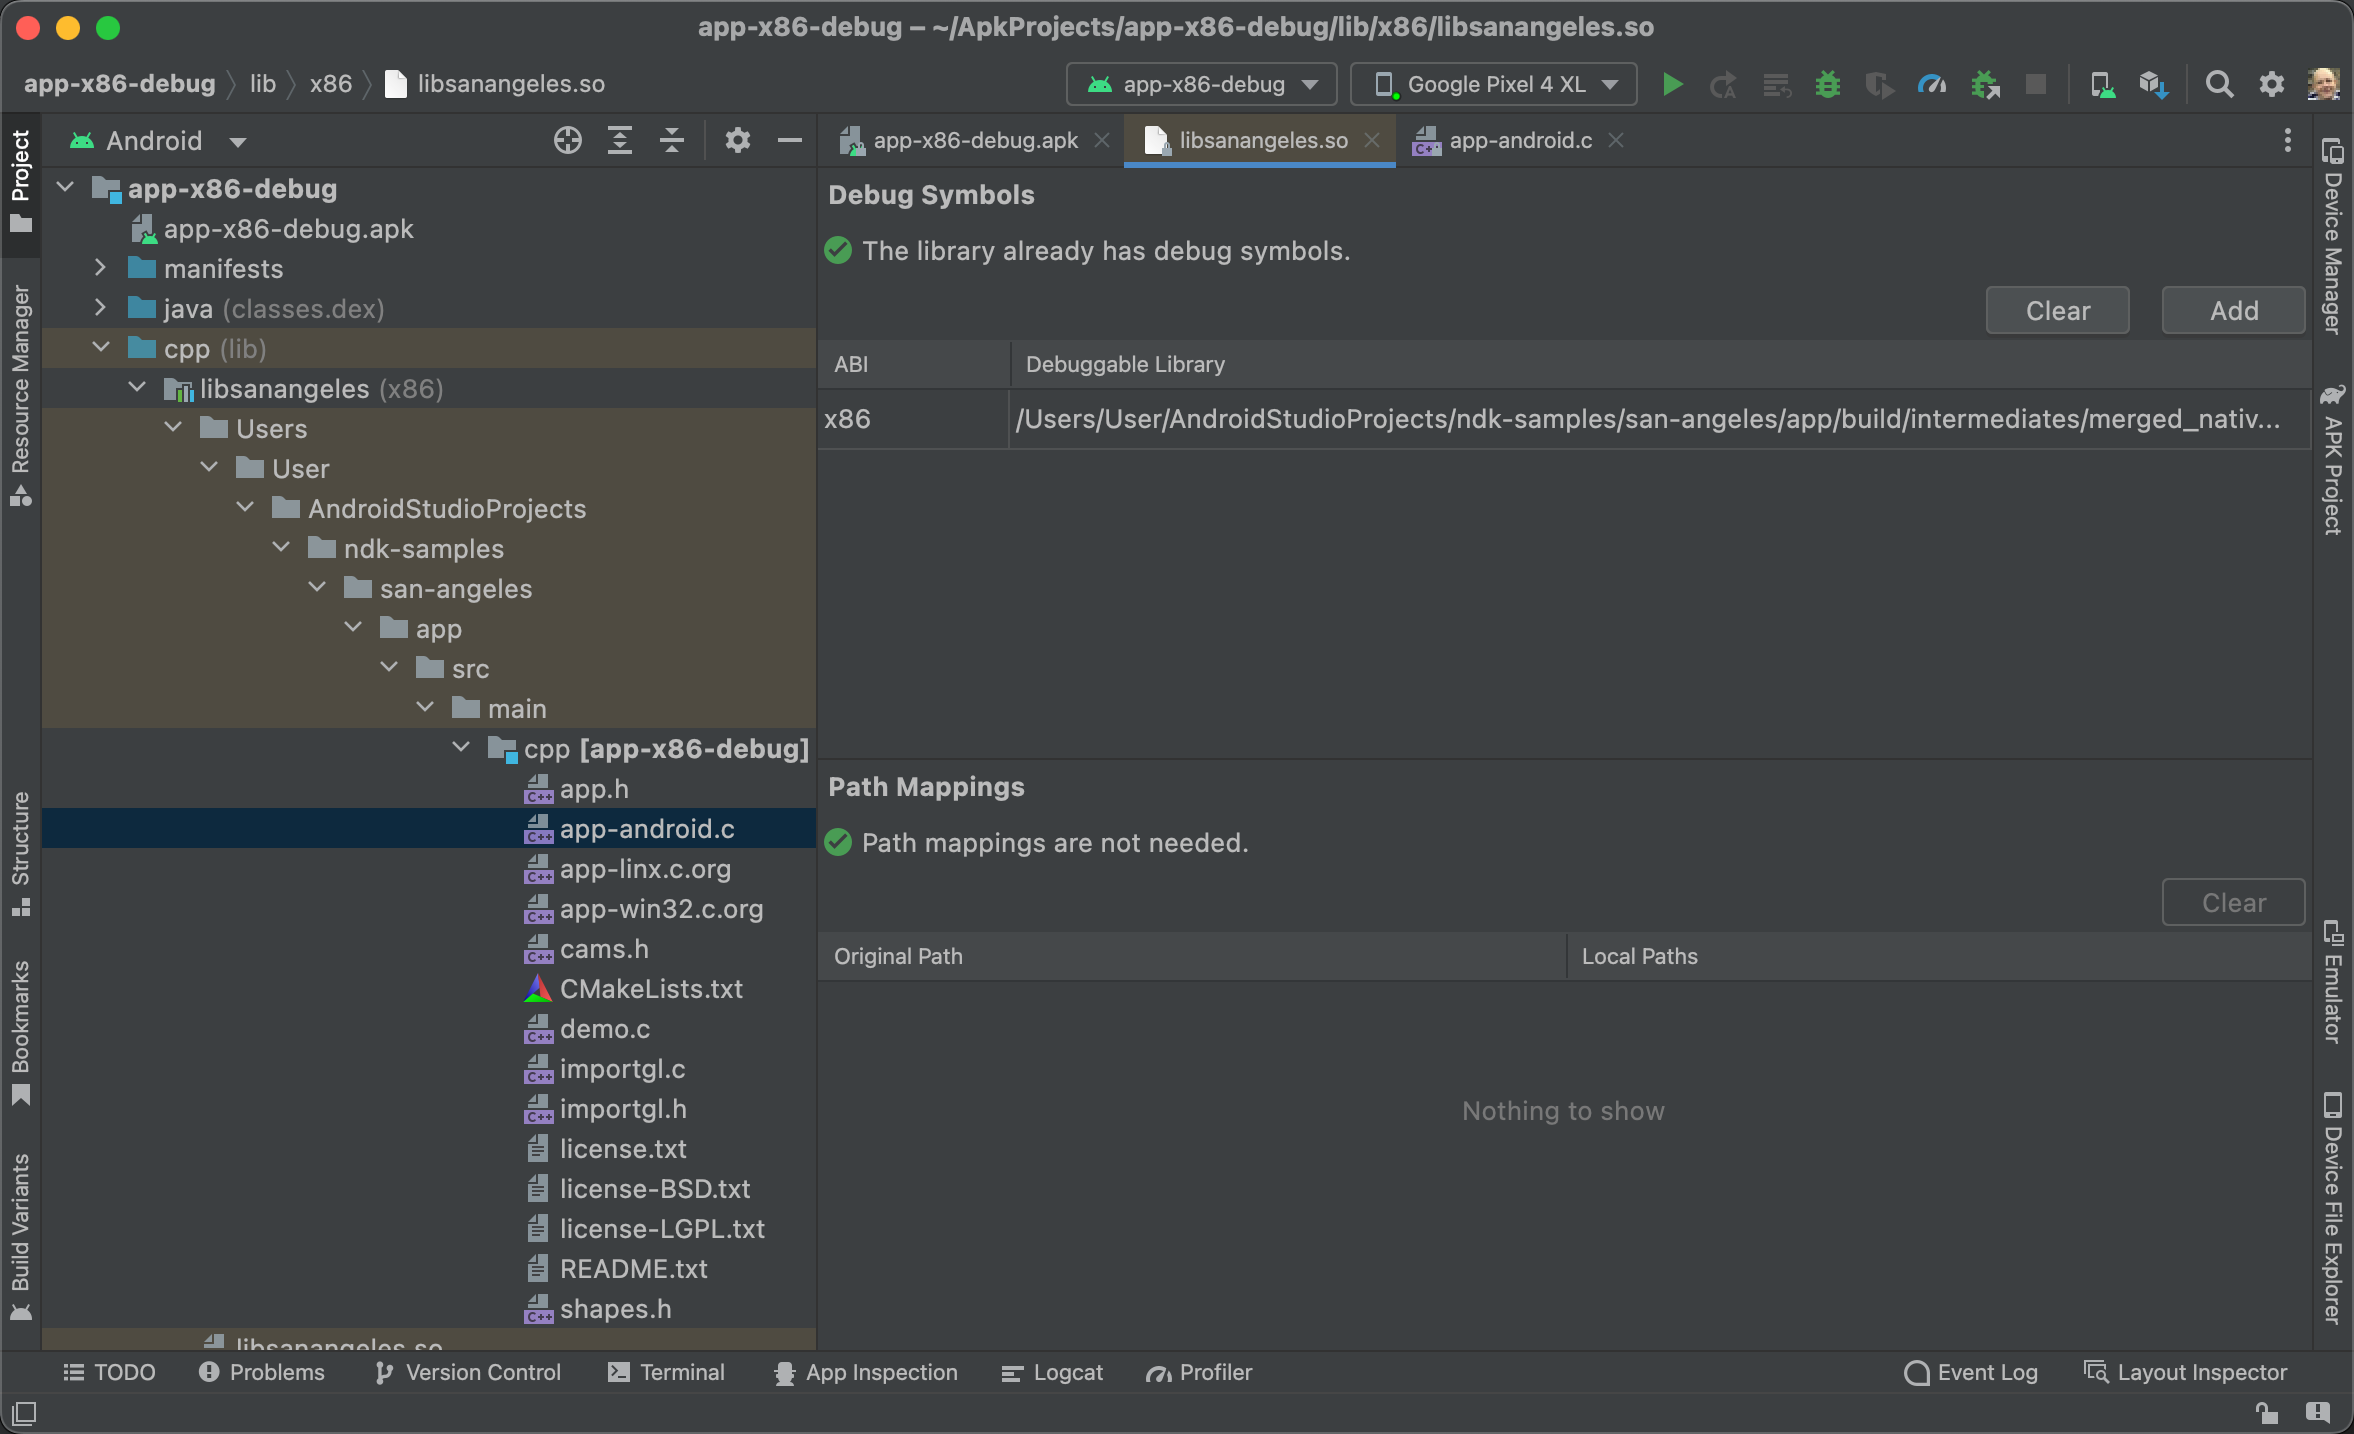
圖 2. 偵錯符號的本機路徑。
「Project」視窗會顯示原生來源檔案。開啟這些原生來源檔案即可加入中斷點,並對應用程式偵錯。如要移除對應關係,請在編輯器視窗的「Path Mappings」區段中,按一下「Clear」。
已知問題:將偵錯符號附加到 APK 時,您必須使用同一個工作站或建構伺服器建構 APK 和可進行偵錯的 SO 檔案。
如果是 Android Studio 3.6 以上版本,當 APK 在 IDE 以外的位置更新時,不需要建立新專案。Android Studio 會偵測 APK 中的變更,並提供重新匯入的選項。

圖 3. 可在已更新的 Android Studio 以外的平台重新匯入 APK。