
如果您現有的應用程式是以 View 為基礎,可能不想一次重寫整個 UI。這個頁面可協助您在現有應用程式中新增 Compose 元件。如要開始在應用程式中使用 Compose,請參閱「為現有應用程式設定 Compose」。
Jetpack Compose 原本就設計成可與 View 互通操作。這項功能意味著您可以將現有的 View 應用程式遷移至 Compose,同時仍然可以建構新功能。如要遷移至 Compose,建議採用逐步遷移,遷移期間,Compose 和 View 在程式碼集中共存,直至應用程式完全遷移至 Compose。
如要將應用程式遷移至 Compose,請按照下列步驟操作:
- 使用 Compose 建構新畫面。
- 建構功能時,識別可重複使用的元素,並開始建立常見 UI 元件的程式庫。
- 在一個畫面一次性取代現有功能。
使用 Compose 建構新畫面
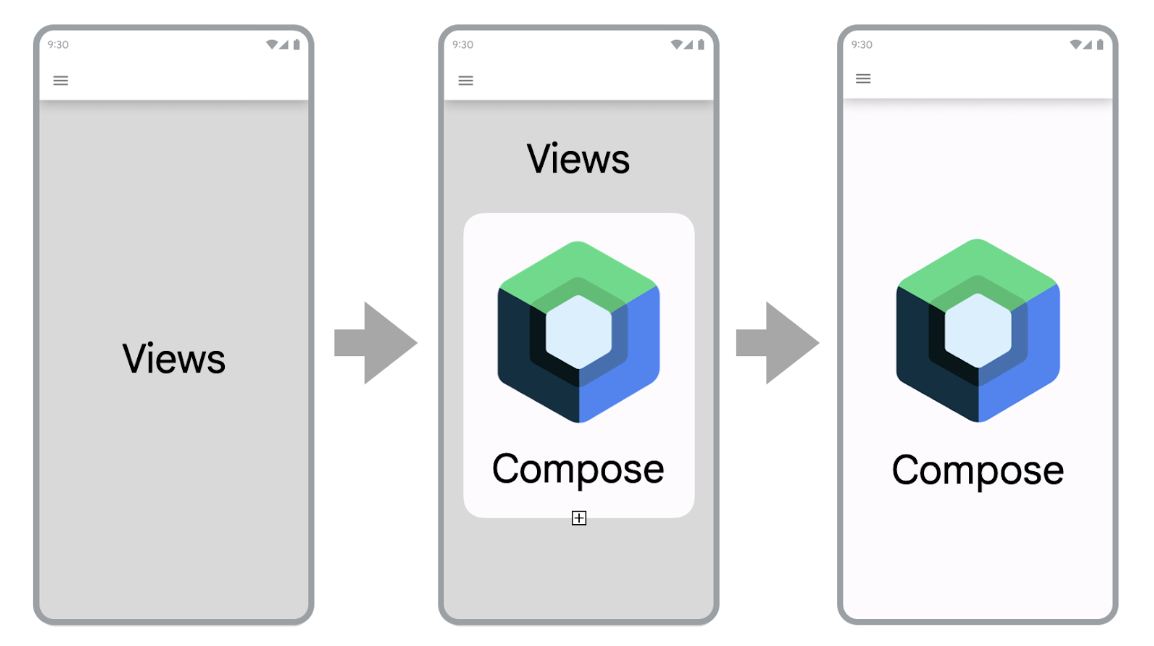
使用 Compose 建構能涵蓋整個畫面的新功能,是提高 Compose 採用率的最佳方法。採用這項策略,您可以新增功能並充分利用 Compose 的優勢,同時仍滿足公司的業務需求。
使用 Compose 在現有應用程式中建構新畫面時,仍會在應用程式的架構限制下運作。如果您使用 Fragment 和 Navigation 元件,則必須建立新的 Fragment,並用 Compose 建構其內容。
如要在 Fragment 中使用 Compose,請在 Fragment 的 onCreateView() 生命週期方法中傳回 ComposeView。ComposeView 的 setContent() 方法可讓您提供可組合函式。
class NewFeatureFragment : Fragment() { override fun onCreateView( inflater: LayoutInflater, container: ViewGroup?, savedInstanceState: Bundle? ): View { return ComposeView(requireContext()).apply { setViewCompositionStrategy(ViewCompositionStrategy.DisposeOnViewTreeLifecycleDestroyed) setContent { NewFeatureScreen() } } } }
詳情請參閱「Fragment 中的 ComposeView」。
在現有畫面上新增功能
如果您新增的功能屬於現有畫面的一部分,也可以在現有以 View 為基礎的畫面中使用 Compose。方法是在檢視區塊階層中新增 ComposeView,就像任何其他 View 一樣。
舉例來說,假設您想要在 LinearLayout 中新增子項檢視畫面。您可以在 XML 中執行此操作,如下所示:
<LinearLayout xmlns:android="http://schemas.android.com/apk/res/android" android:orientation="vertical" android:layout_width="match_parent" android:layout_height="match_parent"> <TextView android:id="@+id/text" android:layout_width="wrap_content" android:layout_height="wrap_content" /> <androidx.compose.ui.platform.ComposeView android:id="@+id/compose_view" android:layout_width="match_parent" android:layout_height="match_parent" /> </LinearLayout>
加載檢視畫面後,稍後可以參照階層中的 ComposeView 並呼叫 setContent()。
如要進一步瞭解 ComposeView,請參閱互通性 API。
建構常見 UI 元件的程式庫
使用 Compose 建構功能時,很快就會發現最終會建構元件的程式庫。建立常見 UI 元件的程式庫,可讓您在應用程式中提供這些元件的單一可靠資料來源,並促進重複使用。建構的功能隨後可能會依賴這個程式庫。如果您要在 Compose 中建構自訂設計系統,這會是很實用的做法。
視乎應用程式的大小,這個程式庫可以是獨立的套件、模組或程式庫模組。如要進一步瞭解如何管理應用程式中的模組,請參閱 Android 應用程式模組化指南。
用 Compose 取代現有功能
除了使用 Compose 建構新功能外,您還需要逐步遷移應用程式中的現有功能,以充分利用 Compose 的優勢。
將應用程式限定為 Compose 後,即可加速開發,還能縮短應用程式的 APK 大小和建構時間。詳情請參閱「比較 Compose 和 View 的效能」。
簡易畫面
將現有功能遷移至 Compose 時,首先查看簡易畫面。簡易畫面可以是歡迎畫面、確認畫面或設定畫面,其中 UI 中顯示的資料相對靜態。
擷取下列 XML 檔案:
<LinearLayout xmlns:android="http://schemas.android.com/apk/res/android" android:orientation="vertical" android:layout_width="match_parent" android:layout_height="match_parent"> <TextView android:id="@+id/title_text" android:layout_width="wrap_content" android:layout_height="wrap_content" android:text="@string/title" android:textAppearance="?attr/textAppearanceHeadline2" /> <TextView android:id="@+id/subtitle_text" android:layout_width="wrap_content" android:layout_height="wrap_content" android:text="@string/subtitle" android:textAppearance="?attr/textAppearanceHeadline6" /> <TextView android:id="@+id/body_text" android:layout_width="wrap_content" android:layout_height="0dp" android:layout_weight="1" android:text="@string/body" android:textAppearance="?attr/textAppearanceBody1" /> <Button android:id="@+id/confirm_button" android:layout_width="match_parent" android:layout_height="wrap_content" android:text="@string/confirm"/> </LinearLayout>
XML 檔案可透過以下幾行程式碼在 Compose 中重新編寫:
@Composable fun SimpleScreen() { Column(Modifier.fillMaxSize()) { Text( text = stringResource(R.string.title), style = MaterialTheme.typography.headlineMedium ) Text( text = stringResource(R.string.subtitle), style = MaterialTheme.typography.headlineSmall ) Text( text = stringResource(R.string.body), style = MaterialTheme.typography.bodyMedium ) Spacer(modifier = Modifier.weight(1f)) Button(onClick = { /* Handle click */ }, Modifier.fillMaxWidth()) { Text(text = stringResource(R.string.confirm)) } } }
View 和 Compose 的混合畫面
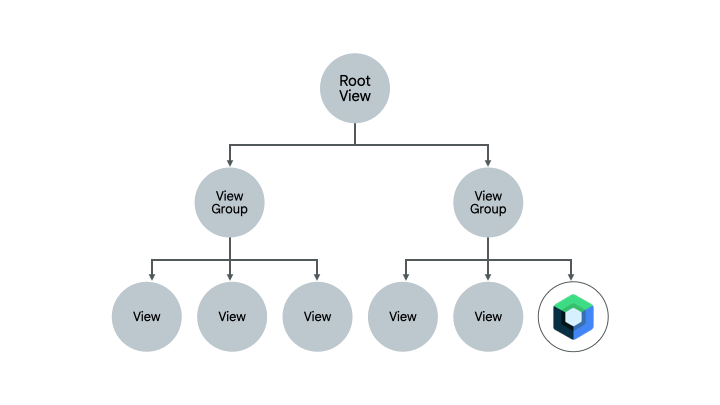
已經包含一些 Compose 程式碼的畫面是完全遷移至 Compose 的另一個好的選擇。視畫面的複雜度而定,您可以將其完全遷移至 Compose,也可以逐個遷移。如果畫面以 UI 階層子樹狀結構中的 Compose 開頭,則可以繼續遷移 UI 元素,直至整個畫面在 Compose 中。此方法又稱為自下而上的做法。
移除 Fragment 和 Navigation 元件
移除所有片段並替換為對應的畫面層級可組合項後,即可移轉至 Navigation Compose。畫面層級可組合項可以包含Compose 和 View 內容的組合,但所有導覽目的地都必須是可組合項,才能啟用 Navigation Compose 遷移作業。在那之前,您應繼續在混合 View 和 Compose 的程式碼集中使用以片段為基礎的 Navigation 元件。詳情請參閱「將 Jetpack Navigation 遷移至 Navigation Compose」。
其他資源
請參閱下列其他資源,以進一步瞭解如何將現有的以 View 為基礎的應用程式遷移至 Compose:
- 程式碼研究室
- 遷移至 Jetpack Compose:在本程式碼研究室中,瞭解如何將部分 Sunflower 應用程式遷移至 Compose。
- 網誌文章
- 將 Sunflower 遷移至 Jetpack Compose:瞭解如何使用本頁所述策略將 Sunflower 遷移至 Compose。
- Jetpack Compose 互通性:在 RecyclerView 中使用 Compose:瞭解如何在
RecyclerView中有效使用 Compose。
後續步驟
現在,您已瞭解遷移現有以 View 為基礎的應用程式所採用的策略,接著探索互通性 API 以瞭解詳情。
為您推薦
- 注意:系統會在 JavaScript 關閉時顯示連結文字
- 在 Views 中使用 Compose
- 捲動
- 將
RecyclerView遷移至 Lazy list