
Mit Verknüpfungen können Sie Nutzern bestimmte Arten von Inhalten präsentieren und ihnen helfen, schnell auf Teile Ihrer App zuzugreifen.
Wie Sie Inhalte mit Verknüpfungen bereitstellen, hängt von Ihrem Anwendungsfall und davon ab, ob der Kontext der Verknüpfung app- oder nutzergesteuert ist. Der Kontext einer statischen Verknüpfung ändert sich nicht, der Kontext einer dynamischen Verknüpfung ändert sich ständig. In beiden Fällen wird der Kontext jedoch von Ihrer App bestimmt. Wenn ein Nutzer auswählt, wie Ihre App Inhalte für ihn bereitstellt, z. B. über eine angepinnte Verknüpfung, wird der Kontext vom Nutzer definiert. In den folgenden Szenarien werden einige Anwendungsfälle für die einzelnen Arten von Verknüpfungen beschrieben:
- Statische Verknüpfungen eignen sich am besten für Apps, die während der gesamten Interaktion eines Nutzers mit der App eine konsistente Struktur für die Verknüpfung von Inhalten verwenden. Da die meisten Launcher nur vier Verknüpfungen gleichzeitig anzeigen, sind statische Verknüpfungen nützlich, um eine Routineaufgabe auf konsistente Weise auszuführen, z. B. wenn der Nutzer seinen Kalender oder seine E‑Mails auf bestimmte Weise aufrufen möchte.
- Dynamische Verknüpfungen werden für kontextbezogene Aktionen in Apps verwendet. Kontextsensitive Verknüpfungen sind auf die Aktionen zugeschnitten, die Nutzer in einer App ausführen. Wenn Sie beispielsweise ein Spiel entwickeln, in dem Nutzer beim Starten des Spiels mit ihrem aktuellen Level beginnen können, müssen Sie die Verknüpfung häufig aktualisieren. Wenn Sie eine dynamische Verknüpfung verwenden, können Sie sie jedes Mal aktualisieren, wenn der Nutzer ein Level abschließt.
- Angepinnte Verknüpfungen werden für bestimmte nutzergesteuerte Aktionen verwendet. Ein Nutzer möchte beispielsweise eine bestimmte Website an den Launcher anpinnen. Das ist von Vorteil, weil der Nutzer so eine benutzerdefinierte Aktion ausführen kann, z. B. in einem Schritt zur Website navigieren, und zwar schneller als mit einer Standardinstanz eines Browsers.
Statische Verknüpfungen erstellen
Statische Verknüpfungen bieten Links zu allgemeinen Aktionen in Ihrer App. Diese Aktionen müssen während des gesamten Lebenszyklus der aktuellen Version Ihrer App konsistent bleiben. Gute Optionen für statische Verknüpfungen sind das Aufrufen gesendeter Nachrichten, das Stellen eines Weckers und das Anzeigen der Trainingsaktivitäten eines Nutzers für den Tag.
So erstellen Sie eine statische Verknüpfung:
- Suchen Sie in der Datei
AndroidManifest.xmlIhrer App nach der Aktivität, deren Intent-Filter auf die Aktionandroid.intent.action.MAINund die Kategorieandroid.intent.category.LAUNCHERfestgelegt sind. Fügen Sie dieser Aktivität ein
<meta-data>-Element hinzu, das auf die Ressourcendatei verweist, in der die App-Verknüpfungen definiert sind:<manifest xmlns:android="http://schemas.android.com/apk/res/android" package="com.example.myapplication"> <application ... > <activity android:name="Main"> <intent-filter> <action android:name="android.intent.action.MAIN" /> <category android:name="android.intent.category.LAUNCHER" /> </intent-filter> <meta-data android:name="android.app.shortcuts" android:resource="@xml/shortcuts" /> </activity> </application> </manifest>Erstellen Sie eine neue Ressourcendatei mit dem Namen
res/xml/shortcuts.xml.Fügen Sie in der neuen Ressourcendatei ein
<shortcuts>-Stammelement hinzu, das eine Liste von<shortcut>-Elementen enthält. Fügen Sie in jedes<shortcut>-Element Informationen zu einer statischen Verknüpfung ein, einschließlich des Symbols, der Beschreibungslabels und der Intents, die in der App gestartet werden:<shortcuts xmlns:android="http://schemas.android.com/apk/res/android"> <shortcut android:shortcutId="compose" android:enabled="true" android:icon="@drawable/compose_icon" android:shortcutShortLabel="@string/compose_shortcut_short_label1" android:shortcutLongLabel="@string/compose_shortcut_long_label1" android:shortcutDisabledMessage="@string/compose_disabled_message1"> <intent android:action="android.intent.action.VIEW" android:targetPackage="com.example.myapplication" android:targetClass="com.example.myapplication.Main" /> <!-- If your shortcut is associated with multiple intents, include them here. The last intent in the list determines what the user sees when they launch this shortcut. --> <categories android:name="android.shortcut.conversation" /> <capability-binding android:key="actions.intent.CREATE_MESSAGE" /> </shortcut> <!-- Specify more shortcuts here. --> </shortcuts>
Attributwerte anpassen
Die folgende Liste enthält Beschreibungen der verschiedenen Attribute in einer statischen Verknüpfung. Geben Sie einen Wert für android:shortcutId und android:shortcutShortLabel an. Alle anderen Werte sind optional.
android:shortcutIdEin Stringliteral, das die Verknüpfung darstellt, wenn ein
ShortcutManager-Objekt Vorgänge darauf ausführt.android:shortcutShortLabelEine prägnante Formulierung, die den Zweck der Verknüpfung beschreibt. Beschränken Sie diese Kurzbeschreibung nach Möglichkeit auf 10 Zeichen.
Weitere Informationen finden Sie unter
setShortLabel().android:shortcutLongLabelEin erweiterter Ausdruck, der den Zweck der Verknüpfung beschreibt. Wenn genügend Platz vorhanden ist, wird dieser Wert anstelle von
android:shortcutShortLabelim Launcher angezeigt. Beschränken Sie diese lange Beschreibung nach Möglichkeit auf 25 Zeichen.Weitere Informationen finden Sie unter
setLongLabel().android:shortcutDisabledMessageDie Nachricht, die in einem unterstützten Launcher angezeigt wird, wenn der Nutzer versucht, eine deaktivierte Verknüpfung zu starten. In der Nachricht muss dem Nutzer erklärt werden, warum die Verknüpfung deaktiviert ist. Der Wert dieses Attributs hat keine Auswirkungen, wenn
android:enabledgleichtrueist.android:enabledGibt an, ob der Nutzer über einen unterstützten Launcher mit der Verknüpfung interagieren kann. Der Standardwert von
android:enabledisttrue. Wenn Sie sie auffalsesetzen, geben Sie eineandroid:shortcutDisabledMessagean, in der Sie erklären, warum Sie die Tastenkombination deaktivieren. Wenn Sie der Meinung sind, dass Sie keine solche Nachricht bereitstellen müssen, entfernen Sie die Verknüpfung vollständig aus der XML-Datei.android:iconDie Bitmap oder das adaptive Symbol, die der Launcher verwendet, wenn er die Verknüpfung dem Nutzer anzeigt. Dieser Wert kann der Pfad zu einem Bild oder zur Ressourcendatei sein, die das Bild enthält. Verwenden Sie nach Möglichkeit adaptive Symbole, um die Leistung und Konsistenz zu verbessern.
Innere Elemente konfigurieren
Die XML-Datei, in der die statischen Verknüpfungen einer App aufgeführt sind, unterstützt die folgenden Elemente innerhalb jedes <shortcut>-Elements. Sie müssen für jede statische Verknüpfung, die Sie definieren, ein intent-Element einfügen.
intentDie Aktion, die das System startet, wenn der Nutzer die Verknüpfung auswählt. Für diese Intention muss ein Wert für das Attribut
android:actionangegeben werden.Sie können mehrere Intents für eine einzelne Verknüpfung angeben. Weitere Informationen finden Sie unter Mehrere Intents und Aktivitäten verwalten, Intent festlegen und in der
TaskStackBuilder-Klassenreferenz.categoriesBietet eine Gruppierung für die Arten von Aktionen, die durch die Verknüpfungen Ihrer App ausgeführt werden, z. B. das Erstellen neuer Chatnachrichten.
Eine Liste der unterstützten Shortcut-Kategorien finden Sie in der
ShortcutInfo-Klassenreferenz.capability-bindingDeklariert die mit der Verknüpfung verknüpfte capability.
Im vorherigen Beispiel ist die Verknüpfung mit einer Funktion verknüpft, die für
CREATE_MESSAGEdeklariert ist. Das ist ein integrierter Intent für App Actions. Mit dieser Capability-Bindung können Nutzer gesprochene Befehle mit Google Assistant verwenden, um einen Shortcut aufzurufen.
Dynamische Verknüpfungen erstellen
Dynamische Verknüpfungen enthalten Links zu bestimmten, kontextbezogenen Aktionen in Ihrer App. Diese Aktionen können sich zwischen den einzelnen Nutzungen Ihrer App und während der Ausführung Ihrer App ändern. Gute Anwendungsfälle für dynamische Verknüpfungen sind das Anrufen einer bestimmten Person, das Navigieren zu einem bestimmten Ort und das Laden eines Spiels vom letzten Speicherpunkt des Nutzers. Sie können auch dynamische Verknüpfungen verwenden, um eine Unterhaltung zu öffnen.
Die Jetpack-Bibliothek ShortcutManagerCompat ist eine Hilfsbibliothek für die ShortcutManager API, mit der Sie dynamische Verknüpfungen in Ihrer App verwalten können. Durch die Verwendung der ShortcutManagerCompat-Bibliothek wird Boilerplate-Code reduziert und dafür gesorgt, dass Ihre Verknüpfungen auf allen Android-Versionen konsistent funktionieren. Diese Bibliothek ist auch erforderlich, um dynamische Verknüpfungen zu senden, damit sie auf Google-Plattformen wie Assistant mit der Google Shortcuts Integration Library angezeigt werden können.
Mit der ShortcutManagerCompat API kann Ihre App die folgenden Vorgänge mit dynamischen Verknüpfungen ausführen:
- Push und Update:Verwenden Sie
pushDynamicShortcut(), um Ihre dynamischen Verknüpfungen zu veröffentlichen und zu aktualisieren. Wenn bereits dynamische oder angepinnte Verknüpfungen mit derselben ID vorhanden sind, werden alle veränderlichen Verknüpfungen aktualisiert. - Entfernen:Entfernen Sie eine Reihe dynamischer Verknüpfungen mit
removeDynamicShortcuts(). Entfernen Sie alle dynamischen Shortcuts mitremoveAllDynamicShortcuts().
Weitere Informationen zum Ausführen von Vorgängen für Verknüpfungen finden Sie unter Verknüpfungen verwalten und in der ShortcutManagerCompat-Referenz.
Hier ist ein Beispiel für das Erstellen einer dynamischen Verknüpfung und das Verknüpfen mit Ihrer App:
val shortcut = ShortcutInfoCompat.Builder(context, "id1")
        .setShortLabel("Website")
        .setLongLabel("Open the website")
        .setIcon(IconCompat.createWithResource(context, R.drawable.icon_website))
        .setIntent(Intent(Intent.ACTION_VIEW,
                Uri.parse("https://www.mysite.example.com/")))
        .build()

ShortcutManagerCompat.pushDynamicShortcut(context, shortcut)
Google Shortcuts Integration Library hinzufügen
Die Google Shortcuts Integration Library ist eine optionale Jetpack-Bibliothek. Damit können Sie dynamische Verknüpfungen bereitstellen, die auf Android-Oberflächen wie dem Launcher und auf Google-Oberflächen angezeigt werden können. Mit dieser Bibliothek können Nutzer Ihre Verknüpfungen finden, um schnell auf bestimmte Inhalte zuzugreifen oder Aktionen in Ihrer App zu wiederholen.
Dynamische Verknüpfungen, die mit dieser Bibliothek übertragen werden, unterliegen nicht den Verknüpfungslimits, die pro Gerät gelten. So kann Ihre App jedes Mal, wenn ein Nutzer eine zugehörige Aktion in Ihrer App ausführt, eine Verknüpfung pushen. Wenn Sie häufig verwendete Verknüpfungen auf diese Weise pushen, kann Google die Nutzungsmuster Ihrer Nutzer nachvollziehen und ihnen kontextbezogene Verknüpfungen vorschlagen.
Assistant kann beispielsweise anhand von Verknüpfungen, die von Ihrer Fitness-Tracking-App gesendet werden, erkennen, dass ein Nutzer normalerweise jeden Morgen läuft, und proaktiv die Verknüpfung „Lauf starten“ vorschlagen, wenn der Nutzer sein Smartphone morgens in die Hand nimmt.
Die Google Shortcuts Integration Library bietet selbst keine adressierbaren Funktionen. Wenn Sie diese Bibliothek Ihrer App hinzufügen, können Google-Plattformen die Verknüpfungen, die Ihre App mit ShortcutManagerCompat bereitstellt, nutzen.
So verwenden Sie diese Bibliothek in Ihrer App:
Aktualisieren Sie die Datei
gradle.properties, um AndroidX-Bibliotheken zu unterstützen:android.useAndroidX=true # Automatically convert third-party libraries to use AndroidX android.enableJetifier=trueFügen Sie in
app/build.gradleAbhängigkeiten für die Google Shortcuts Integration Library undShortcutManagerCompathinzu:dependencies { implementation "androidx.core:core:1.6.0" implementation 'androidx.core:core-google-shortcuts:1.0.0' ... }
Nachdem Sie die Bibliotheksabhängigkeiten Ihrem Android-Projekt hinzugefügt haben, kann Ihre App die Methode pushDynamicShortcut() aus ShortcutManagerCompat verwenden, um dynamische Verknüpfungen zu senden, die auf dem Launcher und auf teilnehmenden Google-Oberflächen angezeigt werden können.
Angepinnte Verknüpfungen erstellen
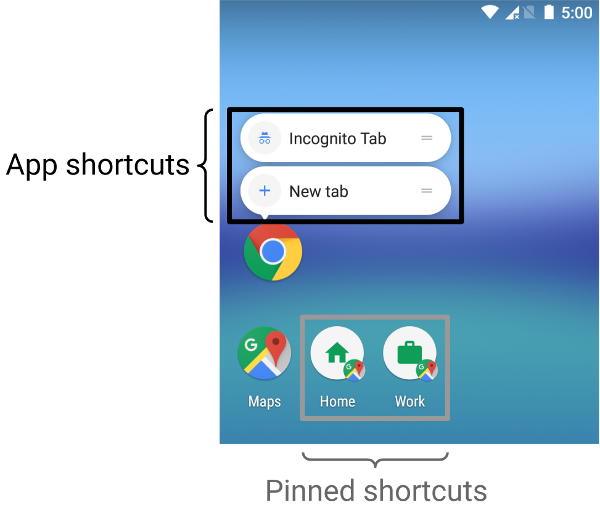
Unter Android 8.0 (API-Level 26) und höher können Sie angepinnte Verknüpfungen erstellen. Im Gegensatz zu statischen und dynamischen Verknüpfungen werden angepinnte Verknüpfungen in unterstützten Launchern als separate Symbole angezeigt. Abbildung 1 zeigt den Unterschied zwischen diesen beiden Arten von Verknüpfungen.
So pinnen Sie mit Ihrer App eine Verknüpfung an einen unterstützten Launcher:
- Prüfen Sie mit
isRequestPinShortcutSupported(), ob der Standardlauncher des Geräts das Anpinnen von Verknüpfungen in der App unterstützt. Sie haben zwei Möglichkeiten, ein
ShortcutInfo-Objekt zu erstellen, je nachdem, ob die Verknüpfung vorhanden ist:- Wenn die Verknüpfung vorhanden ist, erstellen Sie ein
ShortcutInfo-Objekt, das nur die ID der vorhandenen Verknüpfung enthält. Das System findet und pinnt automatisch alle anderen Informationen, die mit der Verknüpfung zusammenhängen. - Wenn Sie eine neue Verknüpfung anpinnen, erstellen Sie ein
ShortcutInfo-Objekt, das eine ID, eine Intention und ein kurzes Label für die neue Verknüpfung enthält.
- Wenn die Verknüpfung vorhanden ist, erstellen Sie ein
Pinnen Sie die Verknüpfung an den Launcher des Geräts, indem Sie
requestPinShortcut()aufrufen. Bei diesem Vorgang können Sie einPendingIntent-Objekt übergeben, das Ihre App nur benachrichtigt, wenn die Verknüpfung erfolgreich angepinnt wurde.Nachdem eine Verknüpfung angepinnt wurde, kann Ihre App ihre Inhalte mit der Methode
updateShortcuts()aktualisieren. Weitere Informationen finden Sie unter Shortcuts aktualisieren.
Das folgende Code-Snippet zeigt, wie ein angepinntes Shortcut erstellt wird.
val shortcutManager = getSystemService<ShortcutManager>()

if (shortcutManager!!.isRequestPinShortcutSupported) {
    // Enable the existing shortcut with the ID "my-shortcut".
    val pinShortcutInfo = ShortcutInfo.Builder(context, "my-shortcut").build()

    // Create the PendingIntent object only if your app needs to be notified
    // that the user let the shortcut be pinned. If the pinning operation fails,
    // your app isn't notified. Assume here that the app implements a method
    // called createShortcutResultIntent() that returns a broadcast intent.
    val pinnedShortcutCallbackIntent = shortcutManager.createShortcutResultIntent(pinShortcutInfo)

    // Configure the intent so that your app's broadcast receiver gets the
    // callback successfully. For details, see PendingIntent.getBroadcast().
    val successCallback = PendingIntent.getBroadcast(context, /* request code */ 0,
            pinnedShortcutCallbackIntent, /* flags */ 0)

    shortcutManager.requestPinShortcut(pinShortcutInfo,
            successCallback.intentSender)
}
Benutzerdefinierte Verknüpfungsaktivität erstellen
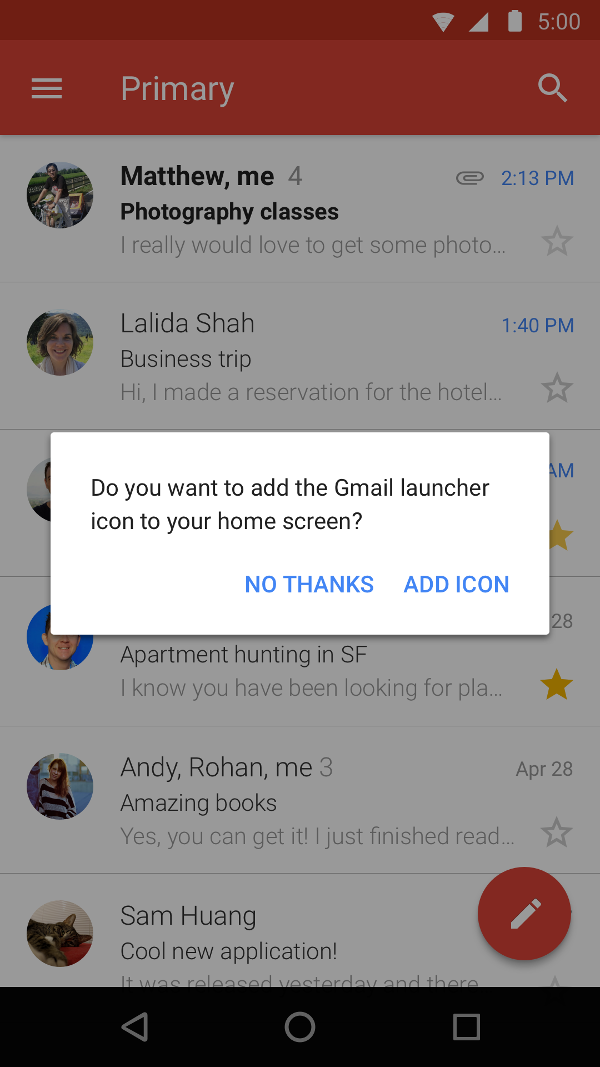
Sie können auch eine spezielle Aktivität erstellen, mit der Nutzer Verknüpfungen erstellen können, die benutzerdefinierte Optionen und eine Bestätigungsschaltfläche enthalten. Abbildung 2 zeigt ein Beispiel für diese Art von Aktivität in der Gmail App.
Fügen Sie in der Manifestdatei Ihrer App ACTION_CREATE_SHORTCUT dem <intent-filter>-Element der Aktivität hinzu. Mit dieser Deklaration wird das folgende Verhalten festgelegt, wenn der Nutzer versucht, eine Verknüpfung zu erstellen:
- Das System startet die spezielle Aktivität Ihrer App.
- Der Nutzer legt Optionen für die Verknüpfung fest.
- Der Nutzer wählt die Bestätigungsschaltfläche aus.
- Ihre App erstellt die Verknüpfung mit der Methode
createShortcutResultIntent(). Diese Methode gibt einIntentzurück, das Ihre App übersetResult()an die zuvor ausgeführte Aktivität weiterleitet. - Ihre App ruft
finish()für die Aktivität auf, die zum Erstellen der benutzerdefinierten Verknüpfung verwendet wurde.
Ebenso kann Ihre App Nutzer nach der Installation oder beim ersten Start der App auffordern, angepinnte Verknüpfungen zum Startbildschirm hinzuzufügen. Diese Methode ist effektiv, da sie Nutzern hilft, eine Verknüpfung im Rahmen ihres normalen Workflows zu erstellen.
Tastenkombinationen testen
Wenn Sie die App-Verknüpfungen testen möchten, installieren Sie die App auf einem Gerät mit einem Launcher, der Verknüpfungen unterstützt. Führen Sie dann folgende Schritte aus:
- Halten Sie das Launcher-Symbol Ihrer App gedrückt, um die Verknüpfungen aufzurufen, die Sie für Ihre App definiert haben.
- Ziehen Sie eine Verknüpfung, um sie an den Launcher des Geräts anzupinnen.