
Thiết bị có thể gập lại giúp mang đến trải nghiệm xem độc đáo. Nhờ chế độ màn hình sau và chế độ màn hình đôi, bạn có thể tạo các tính năng màn hình đặc biệt cho thiết bị có thể gập lại (chẳng hạn như chế độ xem trước ảnh chân dung tự chụp bằng camera sau và các màn hình hiển thị đồng thời nhưng khác nhau trên màn hình trong và ngoài).
Chế độ màn hình sau
Thông thường, khi thiết bị có thể gập lại được mở ra, chỉ có màn hình trong ở trạng thái hoạt động. Chế độ màn hình sau cho phép bạn di chuyển một hoạt động sang màn hình ngoài của thiết bị có thể gập lại. Màn hình này thường hướng ra ngoài (lưng điện thoại hướng vào người dùng) khi thiết bị được mở ra. Màn hình trong sẽ tự động tắt.
Trên ứng dụng mới, bản xem trước của camera sẽ được hiển thị trên màn hình ngoài để người dùng có thể tự chụp ảnh chân dung bằng camera sau. Nhờ đó, hiệu suất chụp ảnh thường tốt hơn nhiều so với camera trước.
Nhằm kích hoạt chế độ màn hình sau, người dùng sẽ trả lời một hộp thoại để cho phép ứng dụng chuyển màn hình, ví dụ:
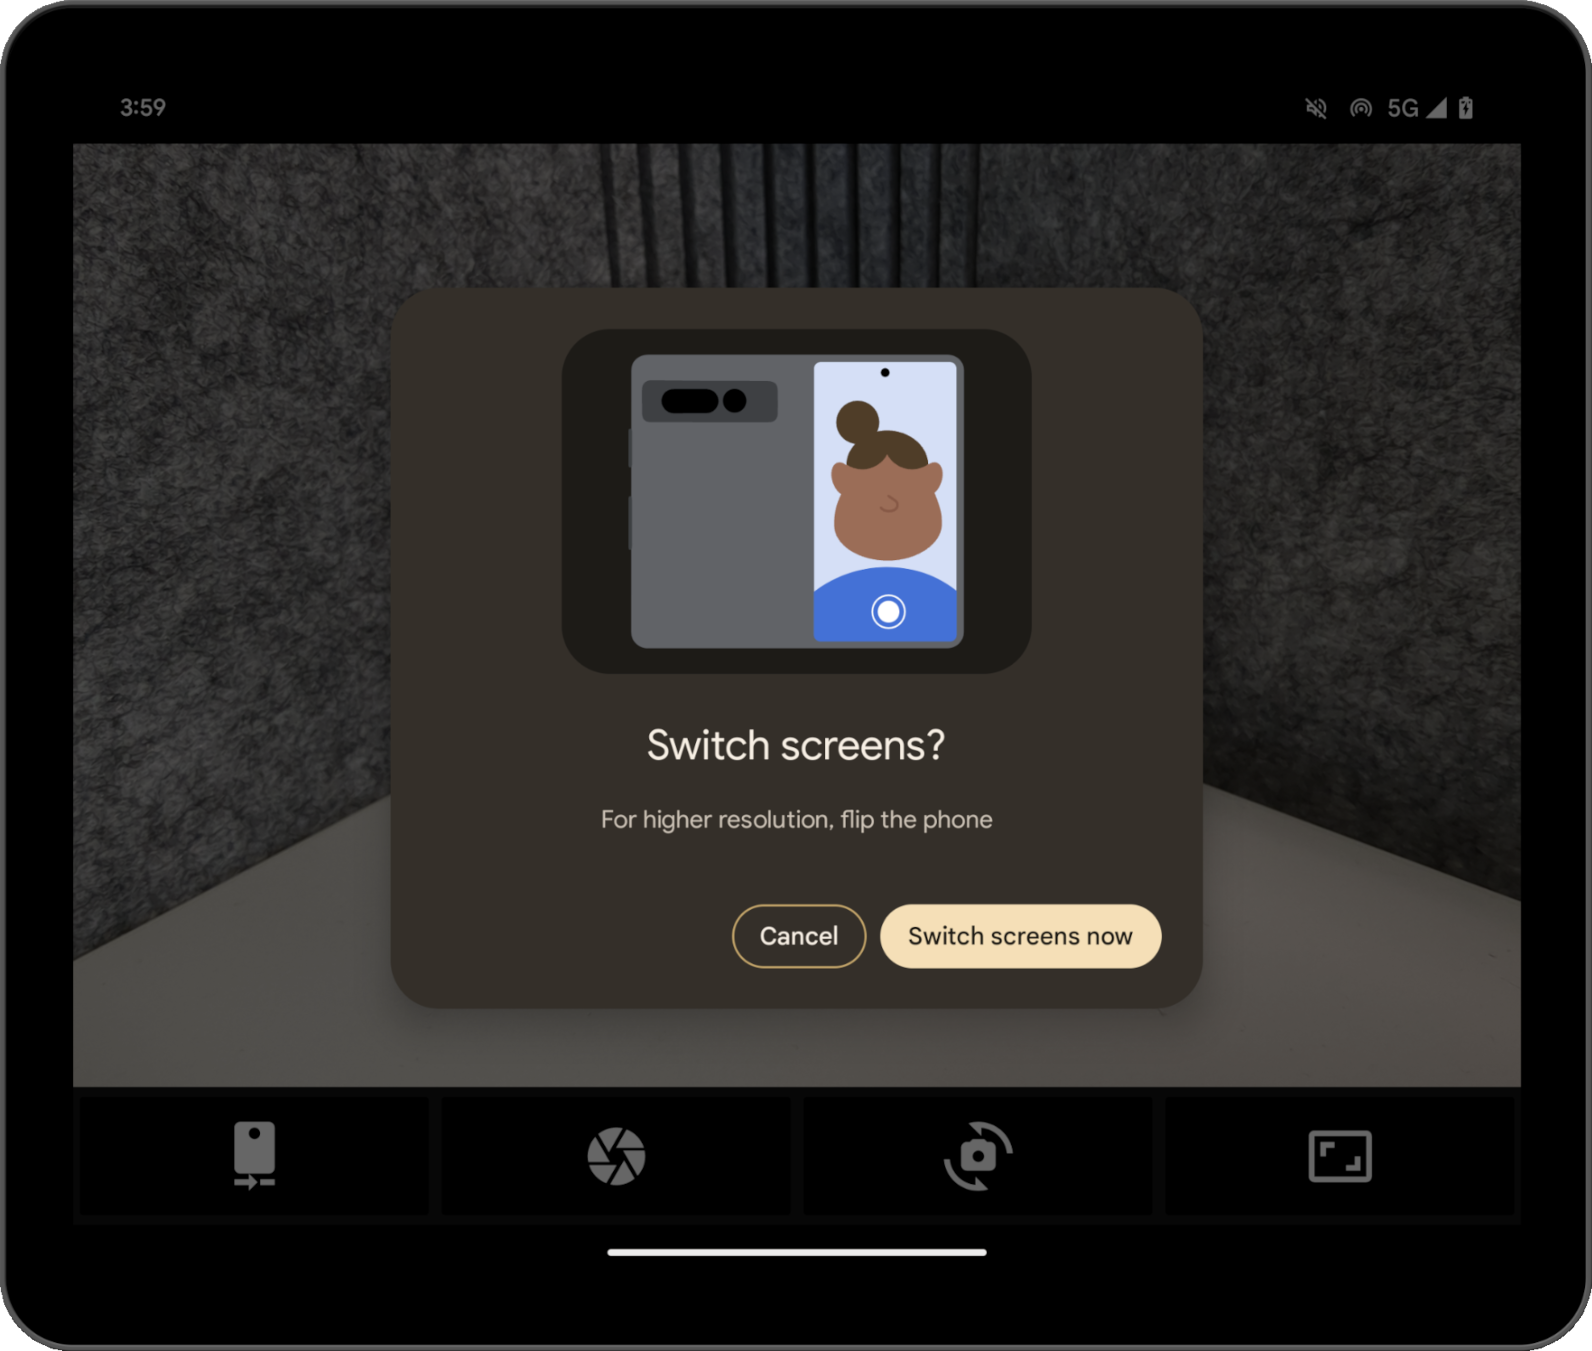
Hệ thống sẽ tạo hộp thoại này nên bạn không cần tự phát triển. Các hộp thoại khác nhau sẽ xuất hiện, tuỳ thuộc vào trạng thái của thiết bị; ví dụ: hệ thống sẽ hướng dẫn người dùng mở thiết bị ra nếu thiết bị đang ở trạng thái gập. Bạn không thể tuỳ chỉnh hộp thoại và hộp thoại này có thể thay đổi tuỳ theo thiết bị của nhiều OEM (Nhà sản xuất thiết bị gốc).
Bạn có thể dùng thử chế độ màn hình sau bằng ứng dụng máy ảnh trên Pixel Fold. Hãy xem một ví dụ về cách triển khai trong lớp học lập trình Tối ưu hoá ứng dụng máy ảnh trên thiết bị có thể gập lại nhờ Jetpack WindowManager.
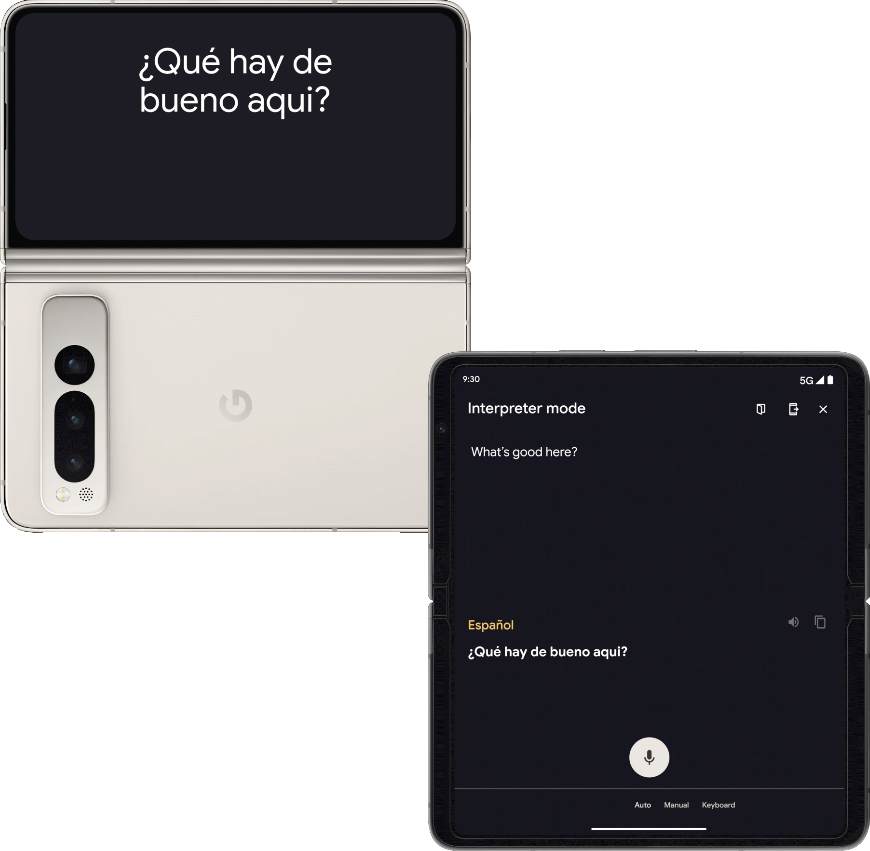
Chế độ màn hình đôi
Chế độ màn hình đôi cho phép bạn hiển thị nội dung cùng lúc trên cả hai màn hình của thiết bị có thể gập lại. Điện thoại Pixel Fold chạy Android 14 (API cấp 34) trở lên có thể dùng chế độ Dual‑screen.
Một ví dụ về trường hợp sử dụng là trình phiên dịch trên Dual Screen.
Bật các chế độ theo cách có lập trình
Bạn có thể truy cập vào chế độ màn hình sau và chế độ Dual Screen thông qua API Jetpack WindowManager, kể từ thư viện phiên bản 1.2.0-beta03.
Thêm phần phụ thuộc WindowManager vào tệp build.gradle của mô-đun ứng dụng:
Groovy
dependencies {
    implementation "androidx.window:window:1.2.0-beta03"
}
Kotlin
dependencies {
    implementation("androidx.window:window:1.2.0-beta03")
}
Điểm truy cập là WindowAreaController, cung cấp thông tin và hành vi liên quan đến việc di chuyển cửa sổ giữa các màn hình hoặc giữa các khu vực hiển thị trên một thiết bị. WindowAreaController cho phép bạn truy vấn danh sách các đối tượng WindowAreaInfo hiện có.
Dùng WindowAreaInfo để truy cập vào WindowAreaSession, giao diện tượng trưng cho một tính năng đang hoạt động trên khu vực cửa sổ. Sử dụng WindowAreaSession để xác định tình trạng sẵn có của một WindowAreaCapability cụ thể.
Mỗi chức năng liên quan đến một WindowAreaCapability.Operation cụ thể.
Trong phiên bản 1.2.0-beta03, Jetpack WindowManager hỗ trợ 2 loại thao tác:
WindowAreaCapability.Operation.OPERATION_PRESENT_ON_AREAdùng để khởi động chế độ dual‑screenWindowAreaCapability.Operation.OPERATION_TRANSFER_ACTIVITY_TO_AREAdùng để khởi động chế độ màn hình sau
Dưới đây là ví dụ về cách khai báo các biến cho chế độ màn hình sau và chế độ màn hình đôi trong hoạt động chính của ứng dụng:
Kotlin
private lateinit var windowAreaController: WindowAreaController
private lateinit var displayExecutor: Executor
private var windowAreaSession: WindowAreaSession? = null
private var windowAreaInfo: WindowAreaInfo? = null
private var capabilityStatus: WindowAreaCapability.Status =
    WindowAreaCapability.Status.WINDOW_AREA_STATUS_UNSUPPORTED

private val dualScreenOperation = WindowAreaCapability.Operation.OPERATION_PRESENT_ON_AREA
private val rearDisplayOperation = WindowAreaCapability.Operation.OPERATION_TRANSFER_ACTIVITY_TO_AREA
Java
private WindowAreaControllerCallbackAdapter windowAreaController = null;
private Executor displayExecutor = null;
private WindowAreaSessionPresenter windowAreaSession = null;
private WindowAreaInfo windowAreaInfo = null;
private WindowAreaCapability.Status capabilityStatus  =
        WindowAreaCapability.Status.WINDOW_AREA_STATUS_UNSUPPORTED;

private WindowAreaCapability.Operation dualScreenOperation =
        WindowAreaCapability.Operation.OPERATION_PRESENT_ON_AREA;
private WindowAreaCapability.Operation rearDisplayOperation =
        WindowAreaCapability.Operation.OPERATION_TRANSFER_ACTIVITY_TO_AREA;
Dưới đây là cách khởi tạo các biến trong phương thức onCreate() của hoạt động:
Kotlin
displayExecutor = ContextCompat.getMainExecutor(this)
windowAreaController = WindowAreaController.getOrCreate()

lifecycleScope.launch(Dispatchers.Main) {
    lifecycle.repeatOnLifecycle(Lifecycle.State.STARTED) {
        windowAreaController.windowAreaInfos
            .map { info -> info.firstOrNull { it.type == WindowAreaInfo.Type.TYPE_REAR_FACING } }
            .onEach { info -> windowAreaInfo = info }
            .map { it?.getCapability(operation)?.status ?: WindowAreaCapability.Status.WINDOW_AREA_STATUS_UNSUPPORTED }
            .distinctUntilChanged()
            .collect {
                capabilityStatus = it
            }
    }
}
Java
displayExecutor = ContextCompat.getMainExecutor(this);
windowAreaController = new WindowAreaControllerCallbackAdapter(WindowAreaController.getOrCreate());
windowAreaController.addWindowAreaInfoListListener(displayExecutor, this);

windowAreaController.addWindowAreaInfoListListener(displayExecutor,
  windowAreaInfos -> {
    for(WindowAreaInfo newInfo : windowAreaInfos){
        if(newInfo.getType().equals(WindowAreaInfo.Type.TYPE_REAR_FACING)){
            windowAreaInfo = newInfo;
            capabilityStatus = newInfo.getCapability(presentOperation).getStatus();
            break;
        }
    }
});
Trước khi bắt đầu một thao tác, hãy kiểm tra xem một chức năng cụ thể có được hỗ trợ không:
Kotlin
when (capabilityStatus) {
    WindowAreaCapability.Status.WINDOW_AREA_STATUS_UNSUPPORTED -> {
      // The selected display mode is not supported on this device.
    }
    WindowAreaCapability.Status.WINDOW_AREA_STATUS_UNAVAILABLE -> {
      // The selected display mode is not available.
    }
    WindowAreaCapability.Status.WINDOW_AREA_STATUS_AVAILABLE -> {
      // The selected display mode is available and can be enabled.
    }
    WindowAreaCapability.Status.WINDOW_AREA_STATUS_ACTIVE -> {
      // The selected display mode is already active.
    }
    else -> {
      // The selected display mode status is unknown.
    }
}
Java
if (capabilityStatus.equals(WindowAreaCapability.Status.WINDOW_AREA_STATUS_UNSUPPORTED)) {
  // The selected display mode is not supported on this device.
}
else if (capabilityStatus.equals(WindowAreaCapability.Status.WINDOW_AREA_STATUS_UNAVAILABLE)) {
  // The selected display mode is not available.
}
else if (capabilityStatus.equals(WindowAreaCapability.Status.WINDOW_AREA_STATUS_AVAILABLE)) {
  // The selected display mode is available and can be enabled.
}
else if (capabilityStatus.equals(WindowAreaCapability.Status.WINDOW_AREA_STATUS_ACTIVE)) {
  // The selected display mode is already active.
}
else {
  // The selected display mode status is unknown.
}
Chế độ Dual Screen
Ví dụ sau đây giúp đóng phiên nếu chức năng này vốn đang hoạt động, hoặc cách gọi hàm presentContentOnWindowArea():
Kotlin
fun toggleDualScreenMode() {
    if (windowAreaSession != null) {
        windowAreaSession?.close()
    }
    else {
        windowAreaInfo?.token?.let { token ->
            windowAreaController.presentContentOnWindowArea(
                token = token,
                activity = this,
                executor = displayExecutor,
                windowAreaPresentationSessionCallback = this
            )
        }
    }
}
Java
private void toggleDualScreenMode() {
    if(windowAreaSession != null) {
        windowAreaSession.close();
    }
    else {
        Binder token = windowAreaInfo.getToken();
        windowAreaController.presentContentOnWindowArea( token, this, displayExecutor, this);
    }
}
Hãy lưu ý việc dùng hoạt động chính của ứng dụng làm đối số WindowAreaPresentationSessionCallback.
API này dùng phương thức tiếp cận của trình nghe: khi đưa ra yêu cầu trình chiếu nội dung lên màn hình khác của một thiết bị có thể gập lại, bạn sẽ bắt đầu một phiên được trả về thông qua phương thức onSessionStarted() của trình nghe. Khi đóng phiên, bạn sẽ nhận được thông báo xác nhận trong phương thức onSessionEnded().
Để tạo trình nghe, hãy triển khai giao diện WindowAreaPresentationSessionCallback:
Kotlin
class MainActivity : AppCompatActivity(), windowAreaPresentationSessionCallback
Java
public class MainActivity extends AppCompatActivity implements WindowAreaPresentationSessionCallback
Trình nghe cần triển khai các phương thức onSessionStarted(), onSessionEnded(), và onContainerVisibilityChanged(). Phương thức gọi lại sẽ thông báo cho bạn về trạng thái phiên và cho phép bạn cập nhật ứng dụng cho phù hợp.
Lệnh gọi lại onSessionStarted() sẽ nhận WindowAreaSessionPresenter làm đối số. Đối số là vùng chứa cho phép bạn truy cập vào một khu vực cửa sổ và trình chiếu nội dung. Hệ thống có thể tự động loại bỏ bản trình bày khi người dùng rời khỏi cửa sổ chính của ứng dụng hoặc có thể đóng bản trình bày bằng cách gọi WindowAreaSessionPresenter#close().
Đối với các lệnh gọi lại khác, để đơn giản, bạn chỉ cần kiểm tra nội dung hàm để xem có lỗi nào không rồi ghi lại trạng thái:
Kotlin
override fun onSessionStarted(session: WindowAreaSessionPresenter) {
    windowAreaSession = session
    val view = TextView(session.context)
    view.text = "Hello world!"
    session.setContentView(view)
}

override fun onSessionEnded(t: Throwable?) {
    if(t != null) {
        Log.e(logTag, "Something was broken: ${t.message}")
    }
}

override fun onContainerVisibilityChanged(isVisible: Boolean) {
    Log.d(logTag, "onContainerVisibilityChanged. isVisible = $isVisible")
}
Java
@Override
public void onSessionStarted(@NonNull WindowAreaSessionPresenter session) {
    windowAreaSession = session;
    TextView view = new TextView(session.getContext());
    view.setText("Hello world, from the other screen!");
    session.setContentView(view);
}

@Override public void onSessionEnded(@Nullable Throwable t) {
    if(t != null) {
        Log.e(logTag, "Something was broken: ${t.message}");
    }
}

@Override public void onContainerVisibilityChanged(boolean isVisible) {
    Log.d(logTag, "onContainerVisibilityChanged. isVisible = " + isVisible);
}
Để duy trì tính nhất quán trong toàn bộ hệ sinh thái, hãy sử dụng biểu tượng chính thức cho Dual Screen để hướng dẫn người dùng cách bật hoặc tắt chế độ Dual Screen.
Để xem ví dụ về cách thức hoạt động, hãy xem DualScreenActivity.kt.
Chế độ màn hình sau
Tương tự như ví dụ về chế độ màn hình đôi, ví dụ sau về hàm toggleRearDisplayMode() sẽ đóng phiên nếu chức năng này đã hoạt động hoặc cách gọi hàm transferActivityToWindowArea():
Kotlin
fun toggleRearDisplayMode() {
    if(capabilityStatus == WindowAreaCapability.Status.WINDOW_AREA_STATUS_ACTIVE) {
        if(windowAreaSession == null) {
            windowAreaSession = windowAreaInfo?.getActiveSession(
                operation
            )
        }
        windowAreaSession?.close()
    } else {
        windowAreaInfo?.token?.let { token ->
            windowAreaController.transferActivityToWindowArea(
                token = token,
                activity = this,
                executor = displayExecutor,
                windowAreaSessionCallback = this
            )
        }
    }
}
Java
void toggleDualScreenMode() {
    if(capabilityStatus == WindowAreaCapability.Status.WINDOW_AREA_STATUS_ACTIVE) {
        if(windowAreaSession == null) {
            windowAreaSession = windowAreaInfo.getActiveSession(
                operation
            )
        }
        windowAreaSession.close()
    }
    else {
        Binder token = windowAreaInfo.getToken();
        windowAreaController.transferActivityToWindowArea(token, this, displayExecutor, this);
    }
}
Trong trường hợp này, hoạt động hiển thị được dùng dưới dạng một WindowAreaSessionCallback, dễ triển khai hơn vì lệnh gọi lại này không nhận một công cụ trình chiếu cho phép hiển thị nội dung trên một khu vực cửa sổ mà lại chuyển toàn bộ hoạt động sang một khu vực khác:
Kotlin
override fun onSessionStarted() {
    Log.d(logTag, "onSessionStarted")
}

override fun onSessionEnded(t: Throwable?) {
    if(t != null) {
        Log.e(logTag, "Something was broken: ${t.message}")
    }
}
Java
@Override public void onSessionStarted(){
    Log.d(logTag, "onSessionStarted");
}

@Override public void onSessionEnded(@Nullable Throwable t) {
    if(t != null) {
        Log.e(logTag, "Something was broken: ${t.message}");
    }
}
Để duy trì tính nhất quán trong toàn bộ hệ sinh thái, hãy sử dụng biểu tượng chính thức của Camera sau để hướng dẫn người dùng cách bật hoặc tắt chế độ màn hình sau.
Tài nguyên khác
- Lớp học lập trình Tối ưu hoá ứng dụng máy ảnh trên thiết bị có thể gập lại nhờ Jetpack WindowManager
- Thông tin tóm tắt về gói
androidx.window.area - Mã mẫu Jetpack WindowManager: