
ווידג'טים של אוספים מתמחים בהצגת הרבה רכיבים מאותו סוג, כמו אוספים של תמונות מאפליקציית גלריה, מאמרים מאפליקציית חדשות או הודעות מאפליקציית תקשורת. בדרך כלל, ווידג'טים של אוספים מתמקדים בשני תרחישי שימוש: עיון באוסף ופתיחת רכיב מהאוסף לתצוגת הפרטים שלו. אפשר לגלול בווידג'טים של קולקציות באופן אנכי.
הווידג'טים האלה משתמשים ב-RemoteViewsService כדי להציג אוספים שמגובים על ידי נתונים מרחוק, למשל מספק תוכן. הווידג'ט מציג את הנתונים באמצעות אחד מסוגי התצוגות הבאים, שנקראים תצוגות אוסף:
ListView- תצוגה שבה הפריטים מוצגים ברשימה שאפשר לגלול בה אנכית.
GridView- תצוגה שבה הפריטים מוצגים ברשת דו-ממדית שאפשר לגלול בה.
StackView- תצוגת כרטיסים מוערמים – בדומה לכרטיסיות טלפון – שבה המשתמש יכול להחליק את הכרטיס הקדמי למעלה או למטה כדי לראות את הכרטיס הקודם או הבא, בהתאמה.
AdapterViewFlipper- אנימציה פשוטה שמבוססת על מתאם
ViewAnimatorשמוצגת בין שתי תצוגות או יותר. בכל פעם מוצג רק ילד אחד.
תצוגות האוספים האלה מציגות אוספים שמגובים בנתונים מרוחקים, ולכן הן משתמשות ב-Adapter כדי לקשר את ממשק המשתמש שלהן לנתונים. Adapter מחבר פריטים בודדים מקבוצת נתונים לאובייקטים בודדים של View.
ומכיוון שתצוגות האוסף האלה מגובות על ידי מתאמים, מסגרת Android צריכה לכלול ארכיטקטורה נוספת כדי לתמוך בשימוש בהן בווידג'טים. בהקשר של ווידג'ט, התג Adapter מוחלף בתג RemoteViewsFactory, שהוא מעטפת דקה סביב הממשק Adapter. כשמבקשים פריט ספציפי באוסף, הפונקציה RemoteViewsFactory יוצרת ומחזירה את הפריט באוסף כאובייקט RemoteViews. כדי לכלול תצוגת אוסף בווידג'ט, צריך להטמיע את RemoteViewsService ואת RemoteViewsFactory.
RemoteViewsService הוא שירות שמאפשר למתאם מרוחק לבקש אובייקטים של RemoteViews. RemoteViewsFactory הוא ממשק למתאם בין תצוגת אוסף – כמו ListView, GridView ו-StackView – לבין הנתונים הבסיסיים של התצוגה הזו. בדוגמה הבאה מוצג קוד boilerplate להטמעה של השירות והממשק האלה, מתוך StackWidgetהדוגמה:
Kotlin
class StackWidgetService : RemoteViewsService() {

    override fun onGetViewFactory(intent: Intent): RemoteViewsFactory {
        return StackRemoteViewsFactory(this.applicationContext, intent)
    }
}

class StackRemoteViewsFactory(
        private val context: Context,
        intent: Intent
) : RemoteViewsService.RemoteViewsFactory {

// See the RemoteViewsFactory API reference for the full list of methods to
// implement.

}
Java
public class StackWidgetService extends RemoteViewsService {
    @Override
    public RemoteViewsFactory onGetViewFactory(Intent intent) {
        return new StackRemoteViewsFactory(this.getApplicationContext(), intent);
    }
}

class StackRemoteViewsFactory implements RemoteViewsService.RemoteViewsFactory {

// See the RemoteViewsFactory API reference for the full list of methods to
// implement.

}
אפליקציה לדוגמה
קטעי הקוד בקטע הזה נלקחו גם הם מStackWidget
הדוגמה:

StackWidget.הדוגמה הזו מורכבת מערימה של עשרה תצוגות שמציגות את הערכים אפס עד תשע. אלו ההתנהגויות העיקריות של הווידג'ט לדוגמה:
המשתמש יכול להעיף את התצוגה העליונה בווידג'ט אנכית כדי להציג את התצוגה הבאה או הקודמת. זו התנהגות מובנית של
StackView.ללא אינטראקציה עם המשתמש, הווידג'ט עובר אוטומטית בין התצוגות שלו ברצף, כמו מצגת. הסיבה לכך היא ההגדרה
android:autoAdvanceViewId="@id/stack_view"בקובץres/xml/stackwidgetinfo.xml. ההגדרה הזו חלה על מזהה התצוגה המפורטת, שבמקרה הזה הוא מזהה התצוגה המפורטת של תצוגת הערימה.אם המשתמש מקיש על התצוגה העליונה, בווידג'ט מוצגת ההודעה
ToastTouched view n (הוקשה על תצוגה n), כאשר n הוא האינדקס (המיקום) של התצוגה שהוקשה עליה. מידע נוסף על הטמעה של התנהגויות זמין בקטע הוספת התנהגות לפריטים ספציפיים.
הטמעה של ווידג'טים באמצעות אוספים
כדי להטמיע ווידג'ט עם אוספים, פועלים לפי ההליך להטמעה של כל ווידג'ט, ואז מבצעים כמה שלבים נוספים:
משנים את המניפסט, מוסיפים תצוגת אוסף לפריסת הווידג'ט ומשנים את מחלקת המשנה AppWidgetProvider.
מניפסט לווידג'טים עם אוספים
בנוסף לדרישות שמפורטות במאמר הצהרה על ווידג'ט במניפסט, צריך לאפשר לווידג'טים עם אוספים להיקשר ל-RemoteViewsService. כדי לעשות את זה, צריך להצהיר על השירות בקובץ המניפסט עם ההרשאה BIND_REMOTEVIEWS.
כך אפליקציות אחרות לא יוכלו לגשת לנתונים של הווידג'ט שלכם באופן חופשי.
לדוגמה, כשיוצרים ווידג'ט שמשתמש ב-RemoteViewsService כדי לאכלס תצוגת אוסף, יכול להיות שרשומה במניפסט תיראה כך:
<service android:name="MyWidgetService"
    android:permission="android.permission.BIND_REMOTEVIEWS" />
בדוגמה הזו, android:name="MyWidgetService" מתייחס למחלקת המשנה שלכם של RemoteViewsService.
פריסה של ווידג'טים עם אוספים
הדרישה העיקרית מקובץ ה-XML של פריסת הווידג'ט היא שהוא יכלול אחת מתצוגות האוסף: ListView, GridView, StackView או AdapterViewFlipper. קובץ widget_layout.xml לדוגמה של StackWidget:
<FrameLayout xmlns:android="http://schemas.android.com/apk/res/android"
    android:layout_width="match_parent"
    android:layout_height="match_parent">
    <StackView
        android:id="@+id/stack_view"
        android:layout_width="match_parent"
        android:layout_height="match_parent"
        android:gravity="center"
        android:loopViews="true" />
    <TextView
        android:id="@+id/empty_view"
        android:layout_width="match_parent"
        android:layout_height="match_parent"
        android:gravity="center"
        android:background="@drawable/widget_item_background"
        android:textColor="#ffffff"
        android:textStyle="bold"
        android:text="@string/empty_view_text"
        android:textSize="20sp" />
</FrameLayout>
חשוב לזכור שתצוגות ריקות צריכות להיות באותה רמה של תצוגת האוסף, שאותה התצוגה הריקה מייצגת.
בנוסף לקובץ הפריסה של הווידג'ט כולו, יוצרים עוד קובץ פריסה שמגדיר את הפריסה של כל פריט באוסף – למשל, פריסה לכל ספר באוסף של ספרים. בדוגמה StackWidget יש רק קובץ פריסת פריטים אחד, widget_item.xml, כי כל הפריטים משתמשים באותה פריסה.
המחלקות AppWidgetProvider לווידג'טים עם אוספים
בדומה לווידג'טים רגילים, רוב הקוד במחלקת המשנה AppWidgetProvider בדרך כלל מופיע ב-onUpdate().
ההבדל העיקרי בהטמעה של onUpdate() כשיוצרים ווידג'ט עם אוספים הוא שצריך להפעיל את setRemoteAdapter(). ההגדרה הזו מציינת לתצוגת האוסף מאיפה לקבל את הנתונים.
לאחר מכן, RemoteViewsService יכול להחזיר את ההטמעה של RemoteViewsFactory, והווידג'ט יכול להציג את הנתונים המתאימים. כשמפעילים את השיטה הזו, מעבירים כוונה שמפנה להטמעה של RemoteViewsService ואת מזהה הווידג'ט שמציין את הווידג'ט לעדכון.
לדוגמה, כך מיושמת הדוגמה StackWidget של שיטת הקריאה החוזרת onUpdate() כדי להגדיר את RemoteViewsService כמתאם המרוחק לאוסף הווידג'טים:
Kotlin
override fun onUpdate(
        context: Context,
        appWidgetManager: AppWidgetManager,
        appWidgetIds: IntArray
) {
    // Update each of the widgets with the remote adapter.
    appWidgetIds.forEach { appWidgetId ->

        // Set up the intent that starts the StackViewService, which
        // provides the views for this collection.
        val intent = Intent(context, StackWidgetService::class.java).apply {
            // Add the widget ID to the intent extras.
            putExtra(AppWidgetManager.EXTRA_APPWIDGET_ID, appWidgetId)
            data = Uri.parse(toUri(Intent.URI_INTENT_SCHEME))
        }
        // Instantiate the RemoteViews object for the widget layout.
        val views = RemoteViews(context.packageName, R.layout.widget_layout).apply {
            // Set up the RemoteViews object to use a RemoteViews adapter.
            // This adapter connects to a RemoteViewsService through the
            // specified intent.
            // This is how you populate the data.
            setRemoteAdapter(R.id.stack_view, intent)

            // The empty view is displayed when the collection has no items.
            // It must be in the same layout used to instantiate the
            // RemoteViews object.
            setEmptyView(R.id.stack_view, R.id.empty_view)
        }

        // Do additional processing specific to this widget.

        appWidgetManager.updateAppWidget(appWidgetId, views)
    }
    super.onUpdate(context, appWidgetManager, appWidgetIds)
}
Java
public void onUpdate(Context context, AppWidgetManager appWidgetManager, int[] appWidgetIds) {
    // Update each of the widgets with the remote adapter.
    for (int i = 0; i < appWidgetIds.length; ++i) {

        // Set up the intent that starts the StackViewService, which
        // provides the views for this collection.
        Intent intent = new Intent(context, StackWidgetService.class);
        // Add the widget ID to the intent extras.
        intent.putExtra(AppWidgetManager.EXTRA_APPWIDGET_ID, appWidgetIds[i]);
        intent.setData(Uri.parse(intent.toUri(Intent.URI_INTENT_SCHEME)));
        // Instantiate the RemoteViews object for the widget layout.
        RemoteViews views = new RemoteViews(context.getPackageName(), R.layout.widget_layout);
        // Set up the RemoteViews object to use a RemoteViews adapter.
        // This adapter connects to a RemoteViewsService through the specified
        // intent.
        // This is how you populate the data.
        views.setRemoteAdapter(R.id.stack_view, intent);

        // The empty view is displayed when the collection has no items.
        // It must be in the same layout used to instantiate the RemoteViews
        // object.
        views.setEmptyView(R.id.stack_view, R.id.empty_view);

        // Do additional processing specific to this widget.

        appWidgetManager.updateAppWidget(appWidgetIds[i], views);
    }
    super.onUpdate(context, appWidgetManager, appWidgetIds);
}
שמירת נתונים
כמו שמתואר בדף הזה, מחלקת המשנה RemoteViewsService מספקת את RemoteViewsFactory שמשמש לאכלוס תצוגת האוסף המרוחק.
צריך לבצע את הפעולות הבאות:
מחלקה משנית
RemoteViewsService. RemoteViewsServiceהוא השירות שדרכו מתאם מרוחק יכול לבקשRemoteViews.במחלקת המשנה
RemoteViewsService, כוללים מחלקה שמטמיעה את הממשקRemoteViewsFactory. RemoteViewsFactoryהוא ממשק למתאם בין תצוגת אוסף מרוחקת – כמוListView,GridView, StackView– לבין הנתונים הבסיסיים של התצוגה הזו. ההטמעה שלכם אחראית ליצירת אובייקטRemoteViewsלכל פריט במערך הנתונים. הממשק הזה הוא מעטפת דקה סביבAdapter.
אי אפשר להסתמך על מופע יחיד של השירות או על נתונים שהוא מכיל כדי לשמור על נתונים. אל תאחסנו נתונים ב-RemoteViewsService אלא אם הם סטטיים. אם רוצים שהנתונים של הווידג'ט יישמרו, הגישה הכי טובה היא להשתמש ב-ContentProvider שהנתונים שלו נשמרים גם אחרי סיום התהליך. לדוגמה, ווידג'ט של חנות מכולת יכול לאחסן את המצב של כל פריט ברשימת הקניות במיקום קבוע, כמו מסד נתונים של SQL.
התוכן העיקרי של ההטמעה של RemoteViewsService הוא RemoteViewsFactory, שמתואר בקטע הבא.
הממשק RemoteViewsFactory
הכיתה המותאמת אישית שמיישמת את הממשק RemoteViewsFactory מספקת לווידג'ט את הנתונים של הפריטים באוסף. כדי לעשות את זה, הוא משלב את קובץ הפריסה של פריט הווידג'ט בפורמט XML עם מקור נתונים. מקור הנתונים יכול להיות כל דבר, ממסד נתונים ועד למערך פשוט. StackWidget
בדוגמה, מקור הנתונים הוא מערך של WidgetItems. הפונקציה RemoteViewsFactory פועלת כמתאם כדי להצמיד את הנתונים לתצוגת האוסף המרוחקת.
שתי השיטות הכי חשובות שצריך להטמיע עבור מחלקת המשנה RemoteViewsFactory הן onCreate() ו-getViewAt().
המערכת קוראת ל-onCreate() כשיוצרים את המפעל בפעם הראשונה.
כאן מגדירים חיבורים או סמנים למקור הנתונים. לדוגמה, בדוגמה StackWidget נעשה שימוש ב-onCreate() כדי לאתחל מערך של אובייקטים מסוג WidgetItem. כשהווידג'ט פעיל, המערכת ניגשת לאובייקטים האלה באמצעות מיקום האינדקס שלהם במערך ומציגה את הטקסט שהם מכילים.
קטע מתוך ההטמעה של StackWidgetהדוגמהRemoteViewsFactory שמציג חלקים מהמתודה onCreate():
Kotlin
private const val REMOTE_VIEW_COUNT: Int = 10

class StackRemoteViewsFactory(
        private val context: Context
) : RemoteViewsService.RemoteViewsFactory {

    private lateinit var widgetItems: List<WidgetItem>

    override fun onCreate() {
        // In onCreate(), set up any connections or cursors to your data
        // source. Heavy lifting, such as downloading or creating content,
        // must be deferred to onDataSetChanged() or getViewAt(). Taking
        // more than 20 seconds on this call results in an ANR.
        widgetItems = List(REMOTE_VIEW_COUNT) { index -> WidgetItem("$index!") }
        ...
    }
    ...
}
Java
class StackRemoteViewsFactory implements RemoteViewsService.RemoteViewsFactory {
    private static final int REMOTE_VIEW_COUNT = 10;
    private List<WidgetItem> widgetItems = new ArrayList<WidgetItem>();

    public void onCreate() {
        // In onCreate(), setup any connections or cursors to your data
        // source. Heavy lifting, such as downloading or creating content,
        // must be deferred to onDataSetChanged() or getViewAt(). Taking
        // more than 20 seconds on this call results in an ANR.
        for (int i = 0; i < REMOTE_VIEW_COUNT; i++) {
            widgetItems.add(new WidgetItem(i + "!"));
        }
        ...
    }
...
השיטה RemoteViewsFactory getViewAt() מחזירה אובייקט RemoteViews שמתאים לנתונים במיקום position שצוין במערך הנתונים. קטע מתוך ההטמעה של RemoteViewsFactory בדוגמה של StackWidget:
Kotlin
override fun getViewAt(position: Int): RemoteViews {
    // Construct a remote views item based on the widget item XML file
    // and set the text based on the position.
    return RemoteViews(context.packageName, R.layout.widget_item).apply {
        setTextViewText(R.id.widget_item, widgetItems[position].text)
    }
}
Java
public RemoteViews getViewAt(int position) {
    // Construct a remote views item based on the widget item XML file
    // and set the text based on the position.
    RemoteViews views = new RemoteViews(context.getPackageName(), R.layout.widget_item);
    views.setTextViewText(R.id.widget_item, widgetItems.get(position).text);
    return views;
}
הוספת התנהגות לפריטים ספציפיים
בקטעים הקודמים מוסבר איך לקשר את הנתונים לאוסף הווידג'טים. אבל מה אם רוצים להוסיף התנהגות דינמית לפריטים בודדים בתצוגת האוסף?
כפי שמתואר במאמר טיפול באירועים באמצעות המחלקה onUpdate(), בדרך כלל משתמשים ב-setOnClickPendingIntent() כדי להגדיר את התנהגות הלחיצה של אובייקט מסוים – למשל, כדי לגרום ללחצן להפעיל Activity. אבל
אסור להשתמש בגישה הזו בתצוגות של ילדים בפריט אוסף בודד.
לדוגמה, אפשר להשתמש ב-setOnClickPendingIntent() כדי להגדיר לחצן גלובלי בווידג'ט של Gmail שמפעיל את האפליקציה, אבל לא בפריטים בודדים ברשימה.
במקום זאת, כדי להוסיף התנהגות קליק לפריטים ספציפיים באוסף, משתמשים ב-setOnClickFillInIntent(). כדי לעשות את זה, צריך להגדיר תבנית של PendingIntent לתצוגת האוסף, ואז להגדיר Fill-in Intent לכל פריט באוסף באמצעות RemoteViewsFactory.
בקטע הזה אנחנו משתמשים בדוגמה StackWidget כדי להסביר איך מוסיפים התנהגות לפריטים בודדים. בדוגמה StackWidget, אם המשתמש מקיש על התצוגה העליונה, בווידג'ט מוצגת ההודעה Toast 'הוקשה תצוגה n', כאשר n הוא האינדקס (המיקום) של התצוגה שהוקשה. כך זה עובד:
ה-
StackWidgetProvider– מחלקה משנית שלAppWidgetProvider– יוצרת כוונה בהמתנה עם פעולה מותאמת אישית בשםTOAST_ACTION.כשמשתמש מקיש על תצוגה, האירוע intent מופעל ומשודר
TOAST_ACTION.השידור הזה נחטף על ידי השיטה
onReceive()של המחלקהStackWidgetProvider, והווידג'ט מציג את ההודעהToastלתצוגה שנלחצה. הנתונים של הפריטים באוסף מסופקים על ידיRemoteViewsFactoryדרךRemoteViewsService.
הגדרת תבנית של כוונת משתמש בהמתנה
ה-StackWidgetProvider (מחלקת משנה של AppWidgetProvider) מגדיר PendingIntent. פריטים בודדים באוסף לא יכולים להגדיר כוונות בהמתנה משלהם. במקום זאת, האוסף כולו מגדיר תבנית של Intent בהמתנה, והפריטים הבודדים מגדירים Intent למילוי כדי ליצור התנהגות ייחודית על בסיס פריט-לפריט.
המחלקות האלה מקבלות גם את השידור שמועבר כשמשתמש נוגע בתצוגה. האירוע הזה מעובד בשיטה onReceive(). אם הפעולה של הכוונה היא TOAST_ACTION, בווידג'ט מוצגת הודעה Toast לגבי התצוגה הנוכחית.
Kotlin
const val TOAST_ACTION = "com.example.android.stackwidget.TOAST_ACTION"
const val EXTRA_ITEM = "com.example.android.stackwidget.EXTRA_ITEM"

class StackWidgetProvider : AppWidgetProvider() {

    ...

    // Called when the BroadcastReceiver receives an Intent broadcast.
    // Checks whether the intent's action is TOAST_ACTION. If it is, the
    // widget displays a Toast message for the current item.
    override fun onReceive(context: Context, intent: Intent) {
        val mgr: AppWidgetManager = AppWidgetManager.getInstance(context)
        if (intent.action == TOAST_ACTION) {
            val appWidgetId: Int = intent.getIntExtra(
                    AppWidgetManager.EXTRA_APPWIDGET_ID,
                    AppWidgetManager.INVALID_APPWIDGET_ID
            )
            // EXTRA_ITEM represents a custom value provided by the Intent
            // passed to the setOnClickFillInIntent() method to indicate the
            // position of the clicked item. See StackRemoteViewsFactory in
            // Set the fill-in Intent for details.
            val viewIndex: Int = intent.getIntExtra(EXTRA_ITEM, 0)
            Toast.makeText(context, "Touched view $viewIndex", Toast.LENGTH_SHORT).show()
        }
        super.onReceive(context, intent)
    }

    override fun onUpdate(
            context: Context,
            appWidgetManager: AppWidgetManager,
            appWidgetIds: IntArray
    ) {
        // Update each of the widgets with the remote adapter.
        appWidgetIds.forEach { appWidgetId ->

            // Sets up the intent that points to the StackViewService that
            // provides the views for this collection.
            val intent = Intent(context, StackWidgetService::class.java).apply {
                putExtra(AppWidgetManager.EXTRA_APPWIDGET_ID, appWidgetId)
                // When intents are compared, the extras are ignored, so embed
                // the extra sinto the data so that the extras are not ignored.
                data = Uri.parse(toUri(Intent.URI_INTENT_SCHEME))
            }
            val rv = RemoteViews(context.packageName, R.layout.widget_layout).apply {
                setRemoteAdapter(R.id.stack_view, intent)

                // The empty view is displayed when the collection has no items.
                // It must be a sibling of the collection view.
                setEmptyView(R.id.stack_view, R.id.empty_view)
            }

            // This section makes it possible for items to have individualized
            // behavior. It does this by setting up a pending intent template.
            // Individuals items of a collection can't set up their own pending
            // intents. Instead, the collection as a whole sets up a pending
            // intent template, and the individual items set a fillInIntent
            // to create unique behavior on an item-by-item basis.
            val toastPendingIntent: PendingIntent = Intent(
                    context,
                    StackWidgetProvider::class.java
            ).run {
                // Set the action for the intent.
                // When the user touches a particular view, it has the effect of
                // broadcasting TOAST_ACTION.
                action = TOAST_ACTION
                putExtra(AppWidgetManager.EXTRA_APPWIDGET_ID, appWidgetId)
                data = Uri.parse(toUri(Intent.URI_INTENT_SCHEME))

                PendingIntent.getBroadcast(context, 0, this, PendingIntent.FLAG_UPDATE_CURRENT)
            }
            rv.setPendingIntentTemplate(R.id.stack_view, toastPendingIntent)

            appWidgetManager.updateAppWidget(appWidgetId, rv)
        }
        super.onUpdate(context, appWidgetManager, appWidgetIds)
    }
}
Java
public class StackWidgetProvider extends AppWidgetProvider {
    public static final String TOAST_ACTION = "com.example.android.stackwidget.TOAST_ACTION";
    public static final String EXTRA_ITEM = "com.example.android.stackwidget.EXTRA_ITEM";

    ...

    // Called when the BroadcastReceiver receives an Intent broadcast.
    // Checks whether the intent's action is TOAST_ACTION. If it is, the
    // widget displays a Toast message for the current item.
    @Override
    public void onReceive(Context context, Intent intent) {
        AppWidgetManager mgr = AppWidgetManager.getInstance(context);
        if (intent.getAction().equals(TOAST_ACTION)) {
            int appWidgetId = intent.getIntExtra(AppWidgetManager.EXTRA_APPWIDGET_ID,
                AppWidgetManager.INVALID_APPWIDGET_ID);
            // EXTRA_ITEM represents a custom value provided by the Intent
            // passed to the setOnClickFillInIntent() method to indicate the
            // position of the clicked item. See StackRemoteViewsFactory in
            // Set the fill-in Intent for details.
            int viewIndex = intent.getIntExtra(EXTRA_ITEM, 0);
            Toast.makeText(context, "Touched view " + viewIndex, Toast.LENGTH_SHORT).show();
        }
        super.onReceive(context, intent);
    }

    @Override
    public void onUpdate(Context context, AppWidgetManager appWidgetManager, int[] appWidgetIds) {
        // Update each of the widgets with the remote adapter.
        for (int i = 0; i < appWidgetIds.length; ++i) {

            // Sets up the intent that points to the StackViewService that
            // provides the views for this collection.
            Intent intent = new Intent(context, StackWidgetService.class);
            intent.putExtra(AppWidgetManager.EXTRA_APPWIDGET_ID, appWidgetIds[i]);
            // When intents are compared, the extras are ignored, so embed
            // the extras into the data so that the extras are not
            // ignored.
            intent.setData(Uri.parse(intent.toUri(Intent.URI_INTENT_SCHEME)));
            RemoteViews rv = new RemoteViews(context.getPackageName(), R.layout.widget_layout);
            rv.setRemoteAdapter(appWidgetIds[i], R.id.stack_view, intent);

            // The empty view is displayed when the collection has no items. It
            // must be a sibling of the collection view.
            rv.setEmptyView(R.id.stack_view, R.id.empty_view);

            // This section makes it possible for items to have individualized
            // behavior. It does this by setting up a pending intent template.
            // Individuals items of a collection can't set up their own pending
            // intents. Instead, the collection as a whole sets up a pending
            // intent template, and the individual items set a fillInIntent
            // to create unique behavior on an item-by-item basis.
            Intent toastIntent = new Intent(context, StackWidgetProvider.class);
            // Set the action for the intent.
            // When the user touches a particular view, it has the effect of
            // broadcasting TOAST_ACTION.
            toastIntent.setAction(StackWidgetProvider.TOAST_ACTION);
            toastIntent.putExtra(AppWidgetManager.EXTRA_APPWIDGET_ID, appWidgetIds[i]);
            intent.setData(Uri.parse(intent.toUri(Intent.URI_INTENT_SCHEME)));
            PendingIntent toastPendingIntent = PendingIntent.getBroadcast(context, 0, toastIntent,
                PendingIntent.FLAG_UPDATE_CURRENT);
            rv.setPendingIntentTemplate(R.id.stack_view, toastPendingIntent);

            appWidgetManager.updateAppWidget(appWidgetIds[i], rv);
        }
        super.onUpdate(context, appWidgetManager, appWidgetIds);
    }
}
הגדרת כוונת המשתמש להשלמת פרטים
ה-RemoteViewsFactory צריך להגדיר כוונת מילוי בכל פריט באוסף. כך אפשר להבחין בין הפעולות השונות שמתבצעות בלחיצה על פריט מסוים. הכוונה להשלמת המידע משולבת עם תבנית PendingIntent כדי לקבוע את הכוונה הסופית שמופעלת כשמקישים על הפריט.
Kotlin
private const val REMOTE_VIEW_COUNT: Int = 10

class StackRemoteViewsFactory(
        private val context: Context,
        intent: Intent
) : RemoteViewsService.RemoteViewsFactory {

    private lateinit var widgetItems: List<WidgetItem>
    private val appWidgetId: Int = intent.getIntExtra(
            AppWidgetManager.EXTRA_APPWIDGET_ID,
            AppWidgetManager.INVALID_APPWIDGET_ID
    )

    override fun onCreate() {
        // In onCreate(), set up any connections or cursors to your data source.
        // Heavy lifting, such as downloading or creating content, must be
        // deferred to onDataSetChanged() or getViewAt(). Taking more than 20
        // seconds on this call results in an ANR.
        widgetItems = List(REMOTE_VIEW_COUNT) { index -> WidgetItem("$index!") }
        ...
    }
    ...

    override fun getViewAt(position: Int): RemoteViews {
        // Construct a remote views item based on the widget item XML file
        // and set the text based on the position.
        return RemoteViews(context.packageName, R.layout.widget_item).apply {
            setTextViewText(R.id.widget_item, widgetItems[position].text)

            // Set a fill-intent to fill in the pending intent template.
            // that is set on the collection view in StackWidgetProvider.
            val fillInIntent = Intent().apply {
                Bundle().also { extras ->
                    extras.putInt(EXTRA_ITEM, position)
                    putExtras(extras)
                }
            }
            // Make it possible to distinguish the individual on-click
            // action of a given item.
            setOnClickFillInIntent(R.id.widget_item, fillInIntent)
            ...
        }
    }
    ...
}
Java
public class StackWidgetService extends RemoteViewsService {
    @Override
    public RemoteViewsFactory onGetViewFactory(Intent intent) {
        return new StackRemoteViewsFactory(this.getApplicationContext(), intent);
    }
}

class StackRemoteViewsFactory implements RemoteViewsService.RemoteViewsFactory {
    private static final int count = 10;
    private List<WidgetItem> widgetItems = new ArrayList<WidgetItem>();
    private Context context;
    private int appWidgetId;

    public StackRemoteViewsFactory(Context context, Intent intent) {
        this.context = context;
        appWidgetId = intent.getIntExtra(AppWidgetManager.EXTRA_APPWIDGET_ID,
                AppWidgetManager.INVALID_APPWIDGET_ID);
    }

    // Initialize the data set.
    public void onCreate() {
        // In onCreate(), set up any connections or cursors to your data
        // source. Heavy lifting, such as downloading or creating
        // content, must be deferred to onDataSetChanged() or
        // getViewAt(). Taking more than 20 seconds on this call results
        // in an ANR.
        for (int i = 0; i < count; i++) {
            widgetItems.add(new WidgetItem(i + "!"));
        }
        ...
    }

    // Given the position (index) of a WidgetItem in the array, use the
    // item's text value in combination with the widget item XML file to
    // construct a RemoteViews object.
    public RemoteViews getViewAt(int position) {
        // Position always ranges from 0 to getCount() - 1.

        // Construct a RemoteViews item based on the widget item XML
        // file and set the text based on the position.
        RemoteViews rv = new RemoteViews(context.getPackageName(), R.layout.widget_item);
        rv.setTextViewText(R.id.widget_item, widgetItems.get(position).text);

        // Set a fill-intent to fill in the pending
        // intent template that is set on the collection view in
        // StackWidgetProvider.
        Bundle extras = new Bundle();
        extras.putInt(StackWidgetProvider.EXTRA_ITEM, position);
        Intent fillInIntent = new Intent();
        fillInIntent.putExtras(extras);
        // Make it possible to distinguish the individual on-click
        // action of a given item.
        rv.setOnClickFillInIntent(R.id.widget_item, fillInIntent);

        // Return the RemoteViews object.
        return rv;
    }
    ...
}
שמירה על עדכניות הנתונים באוסף
איור 2 מציג את תהליך העדכון בווידג'ט שמשתמש באוספים. בדוגמה הזו אפשר לראות איך קוד הווידג'ט מקיים אינטראקציה עם RemoteViewsFactory ואיך אפשר להפעיל עדכונים:
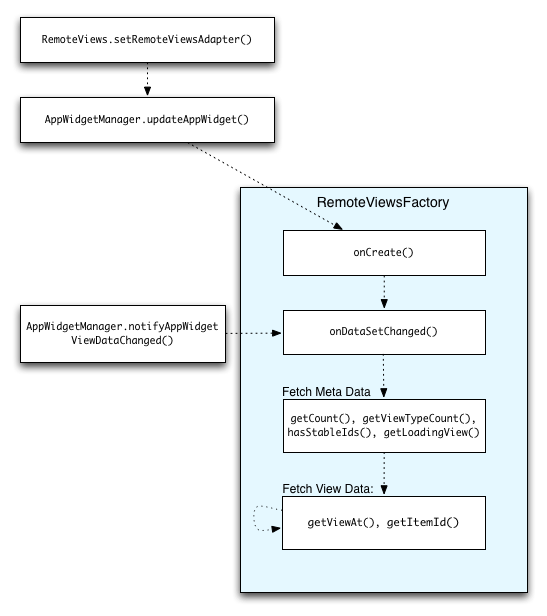
RemoteViewsFactory במהלך עדכונים.ווידג'טים שמשתמשים בקולקציות יכולים לספק למשתמשים תוכן עדכני. לדוגמה, הווידג'ט של Gmail מאפשר למשתמשים לראות תמונת מצב של תיבת הדואר הנכנס שלהם. כדי לאפשר את זה, צריך להפעיל את RemoteViewsFactory ואת תצוגת האוסף כדי לאחזר ולהציג נתונים חדשים.
כדי לעשות את זה, משתמשים בפקודה AppWidgetManager כדי להתקשר אל notifyAppWidgetViewDataChanged(). השיחה הזו גורמת להחזרת קריאה (callback) לשיטה onDataSetChanged() של אובייקט RemoteViewsFactory, שמאפשרת לכם לאחזר נתונים חדשים.
אפשר לבצע פעולות שדורשות הרבה משאבי עיבוד באופן סינכרוני בתוך פונקציית הקריאה החוזרת onDataSetChanged(). מובטח שהשיחה הזו תושלם לפני שאחזור את המטא-נתונים או את נתוני הצפייה מ-RemoteViewsFactory. אפשר גם לבצע פעולות שדורשות הרבה משאבי עיבוד בשיטה getViewAt(). אם הקריאה הזו נמשכת זמן רב, תצוגת הטעינה – שצוינה בשיטה getLoadingView() של האובייקט RemoteViewsFactory – מוצגת במיקום המתאים בתצוגת האוסף עד שהיא חוזרת.
שימוש ב-RemoteCollectionItems כדי להעביר אוסף ישירות
ב-Android 12 (רמת API 31) נוספה השיטה setRemoteAdapter(int viewId,
RemoteViews.RemoteCollectionItems
items), שמאפשרת לאפליקציה להעביר אוסף ישירות כשמאכלסים תצוגת אוסף. אם מגדירים את המתאם באמצעות השיטה הזו, לא צריך להטמיע RemoteViewsFactory ולא צריך לקרוא ל-notifyAppWidgetViewDataChanged().
בנוסף לכך שהגישה הזו מקלה על מילוי המתאם, היא גם מסירה את זמן האחזור של מילוי פריטים חדשים כשהמשתמשים גוללים למטה ברשימה כדי לחשוף פריט חדש. הגישה הזו להגדרת המתאם מומלצת כל עוד קבוצת הפריטים באוסף קטנה יחסית. עם זאת, לדוגמה, הגישה הזו לא מתאימה אם האוסף מכיל מספר רב של Bitmaps שמועברים אל setImageViewBitmap.
אם האוסף לא משתמש במערך קבוע של פריסות – כלומר, אם פריטים מסוימים מופיעים רק לפעמים – צריך להשתמש ב-setViewTypeCount כדי לציין את המספר המקסימלי של פריסות ייחודיות שהאוסף יכול להכיל. כך אפשר להשתמש שוב במתאם בעדכונים של הווידג'ט של האפליקציה.
דוגמה להטמעה של אוספים פשוטים של RemoteViews.
Kotlin
val itemLayouts = listOf(
        R.layout.item_type_1,
        R.layout.item_type_2,
        ...
)

remoteView.setRemoteAdapter(
        R.id.list_view,
        RemoteViews.RemoteCollectionItems.Builder()
            .addItem(/* id= */ ID_1, RemoteViews(context.packageName, R.layout.item_type_1))
            .addItem(/* id= */ ID_2, RemoteViews(context.packageName, R.layout.item_type_2))
            ...
            .setViewTypeCount(itemLayouts.count())
            .build()
)
Java
List<Integer> itemLayouts = Arrays.asList(
    R.layout.item_type_1,
    R.layout.item_type_2,
    ...
);

remoteView.setRemoteAdapter(
    R.id.list_view,
    new RemoteViews.RemoteCollectionItems.Builder()
        .addItem(/* id= */ ID_1, new RemoteViews(context.getPackageName(), R.layout.item_type_1))
        .addItem(/* id= */ ID_2, new RemoteViews(context.getPackageName(), R.layout.item_type_2))
        ...
        .setViewTypeCount(itemLayouts.size())
        .build()
);