
कलेक्शन विजेट, एक ही तरह के कई एलिमेंट दिखाने के लिए बने होते हैं. जैसे, गैलरी ऐप्लिकेशन से ली गई तस्वीरों के कलेक्शन, किसी न्यूज़ ऐप्लिकेशन से लिए गए लेख या किसी कम्यूनिकेशन ऐप्लिकेशन से लिए गए मैसेज. कलेक्शन विजेट आम तौर पर दो इस्तेमाल के मामलों पर फ़ोकस करते हैं: कलेक्शन ब्राउज़ करना और कलेक्शन का कोई एलिमेंट खोलकर उसकी पूरी जानकारी देखना. कलेक्शन विजेट को ऊपर-नीचे स्क्रोल किया जा सकता है.
ये विजेट,
RemoteViewsService का इस्तेमाल करके ऐसे
कलेक्शन दिखाते हैं जो रिमोट डेटा पर आधारित होते हैं. जैसे, कॉन्टेंट
प्रोवाइडर से मिला डेटा. विजेट, डेटा को इनमें से किसी एक व्यू टाइप का इस्तेमाल करके दिखाता है. इन्हें कलेक्शन
व्यू कहा जाता है:
ListView- यह व्यू, आइटम को ऊपर-नीचे स्क्रोल की जा सकने वाली सूची में दिखाता है.
GridView- यह व्यू, आइटम को दो डाइमेंशन वाली स्क्रोल की जा सकने वाली ग्रिड में दिखाता है.
StackView- यह स्टैक किए गए कार्ड का व्यू है. यह एक तरह का रोलोडैक्स है, जिसमें उपयोगकर्ता, पहले या अगले कार्ड को देखने के लिए, सबसे ऊपर वाले कार्ड को ऊपर या नीचे की ओर फ़्लिक कर सकता है.
AdapterViewFlipper- यह
अडैप्टर पर आधारित एक सामान्य
ViewAnimatorहै, जो दो या उससे ज़्यादा व्यू के बीच ऐनिमेशन दिखाता है. इसमें एक बार में सिर्फ़ एक चाइल्ड दिखाया जाता है.
कलेक्शन व्यू, रिमोट डेटा पर आधारित कलेक्शन दिखाते हैं. इसलिए, वे अपने यूज़र इंटरफ़ेस को डेटा से बाइंड करने के लिए, Adapter का इस्तेमाल करते हैं. एक Adapter, डेटा के सेट में मौजूद अलग-अलग आइटम को
अलग-अलग View ऑब्जेक्ट से बाइंड करता है.
ये कलेक्शन व्यू, अडैप्टर पर आधारित होते हैं. इसलिए, Android फ़्रेमवर्क में, विजेट में इनके इस्तेमाल के लिए अतिरिक्त आर्किटेक्चर शामिल होना चाहिए. विजेट के कॉन्टेक्स्ट
में, Adapter की जगह
RemoteViewsFactory का इस्तेमाल किया जाता है,
यह Adapter इंटरफ़ेस के लिए एक पतला रैपर है. कलेक्शन में किसी
खास आइटम के लिए अनुरोध किए जाने पर, RemoteViewsFactory कलेक्शन के लिए आइटम बनाता है और उसे
RemoteViews ऑब्जेक्ट के तौर पर दिखाता है. अपने विजेट में कलेक्शन व्यू शामिल करने के लिए, RemoteViewsService और RemoteViewsFactory लागू करें.
RemoteViewsService एक ऐसी सेवा है जिसकी मदद से, रिमोट अडैप्टर,
RemoteViews ऑब्जेक्ट का अनुरोध कर सकता है. RemoteViewsFactory एक इंटरफ़ेस है. इसका इस्तेमाल, कलेक्शन व्यू—जैसे कि ListView, GridView, और StackView—और उस व्यू के लिए मौजूद डेटा के बीच अडैप्टर के तौर पर किया जाता है. StackWidget
सैंपल से, इस सेवा और
इंटरफ़ेस को लागू करने के लिए, बॉयलरप्लेट कोड का एक उदाहरण यहां दिया गया है:
Kotlin
class StackWidgetService : RemoteViewsService() {

    override fun onGetViewFactory(intent: Intent): RemoteViewsFactory {
        return StackRemoteViewsFactory(this.applicationContext, intent)
    }
}

class StackRemoteViewsFactory(
        private val context: Context,
        intent: Intent
) : RemoteViewsService.RemoteViewsFactory {

// See the RemoteViewsFactory API reference for the full list of methods to
// implement.

}
Java
public class StackWidgetService extends RemoteViewsService {
    @Override
    public RemoteViewsFactory onGetViewFactory(Intent intent) {
        return new StackRemoteViewsFactory(this.getApplicationContext(), intent);
    }
}

class StackRemoteViewsFactory implements RemoteViewsService.RemoteViewsFactory {

// See the RemoteViewsFactory API reference for the full list of methods to
// implement.

}
सैंपल ऐप्लिकेशन
इस सेक्शन में दिए गए कोड के स्निपेट भी StackWidget
सैंपल से लिए गए हैं:
StackWidget.इस सैंपल में, दस व्यू का एक स्टैक शामिल है. इसमें शून्य से नौ तक की वैल्यू दिखती हैं. सैंपल विजेट के ये मुख्य व्यवहार हैं:
उपयोगकर्ता, विजेट में सबसे ऊपर वाले व्यू को ऊपर या नीचे की ओर फ़्लिंग करके, अगला या पिछला व्यू दिखा सकता है. यह
StackViewका एक इन-बिल्ट व्यवहार है.उपयोगकर्ता के किसी भी इंटरैक्शन के बिना, विजेट अपने-आप क्रम से व्यू में आगे बढ़ता है. यह स्लाइड शो की तरह काम करता है. ऐसा
android:autoAdvanceViewId="@id/stack_view"सेटिंग की वजह से होता है जोres/xml/stackwidgetinfo.xmlफ़ाइल में मौजूद है. यह सेटिंग, व्यू आईडी पर लागू होती है. इस मामले में, यह स्टैक व्यू का व्यू आईडी है.अगर उपयोगकर्ता सबसे ऊपर वाले व्यू को टच करता है, तो विजेट,
Toastमैसेज "Touched view n," दिखाता है. यहां n , टच किए गए व्यू का इंडेक्स (जगह) है. व्यवहार लागू करने के तरीके के बारे में ज़्यादा जानने के लिए, अलग-अलग आइटम में व्यवहार जोड़ना सेक्शन देखें.
कलेक्शन वाले विजेट लागू करना
कलेक्शन वाले विजेट को लागू करने के लिए, किसी भी विजेट को लागू करने की
प्रोसेस अपनाएं. इसके बाद, कुछ अतिरिक्त चरण पूरे करें:
मेनिफ़ेस्ट में बदलाव करें, विजेट लेआउट में कलेक्शन व्यू जोड़ें, और अपनी
AppWidgetProvider सबक्लास में बदलाव करें.
कलेक्शन वाले विजेट के लिए मेनिफ़ेस्ट
मेनिफ़ेस्ट में विजेट की जानकारी देना
में बताई गई ज़रूरी शर्तों के अलावा, आपको यह पक्का करना होगा कि कलेक्शन वाले विजेट, आपके RemoteViewsService से बाइंड हो सकें. इसके लिए, अपनी मेनिफ़ेस्ट फ़ाइल में, सेवा की जानकारी दें
BIND_REMOTEVIEWS.
इससे, अन्य ऐप्लिकेशन को आपके विजेट के डेटा को बिना अनुमति के ऐक्सेस करने से रोका जा सकता है.
उदाहरण के लिए, RemoteViewsService का इस्तेमाल करके कलेक्शन व्यू में डेटा भरने वाला विजेट बनाते समय, मेनिफ़ेस्ट एंट्री इस तरह दिख सकती है:
<service android:name="MyWidgetService"
    android:permission="android.permission.BIND_REMOTEVIEWS" />
इस उदाहरण में, android:name="MyWidgetService" आपके सबक्लास को दिखाता है
RemoteViewsService.
कलेक्शन वाले विजेट के लिए लेआउट
आपके विजेट लेआउट की एक्सएमएल फ़ाइल के लिए मुख्य ज़रूरी शर्त यह है कि इसमें कलेक्शन व्यू में से कोई एक शामिल हो: ListView, GridView, StackView या AdapterViewFlipper. widget_layout.xml सैंपल के लिए,
StackWidget
फ़ाइल यहां दी गई है:
<FrameLayout xmlns:android="http://schemas.android.com/apk/res/android"
    android:layout_width="match_parent"
    android:layout_height="match_parent">
    <StackView
        android:id="@+id/stack_view"
        android:layout_width="match_parent"
        android:layout_height="match_parent"
        android:gravity="center"
        android:loopViews="true" />
    <TextView
        android:id="@+id/empty_view"
        android:layout_width="match_parent"
        android:layout_height="match_parent"
        android:gravity="center"
        android:background="@drawable/widget_item_background"
        android:textColor="#ffffff"
        android:textStyle="bold"
        android:text="@string/empty_view_text"
        android:textSize="20sp" />
</FrameLayout>
ध्यान दें कि खाली व्यू, उस कलेक्शन व्यू के साथ-साथ मौजूद होने चाहिए जिसके लिए खाली व्यू, खाली स्थिति दिखाता है.
अपने पूरे विजेट के लिए लेआउट फ़ाइल के अलावा, एक और लेआउट फ़ाइल बनाएं. इसमें कलेक्शन में मौजूद हर आइटम के लिए लेआउट तय किया जाता है. उदाहरण के लिए, किताबों के कलेक्शन में मौजूद हर किताब के लिए एक लेआउट. StackWidget सैंपल में, आइटम के लिए सिर्फ़ एक लेआउट फ़ाइल, widget_item.xml है, क्योंकि सभी आइटम एक ही लेआउट का इस्तेमाल करते हैं.
कलेक्शन वाले विजेट के लिए AppWidgetProvider क्लास
सामान्य विजेट की तरह, आपके
AppWidgetProvider सबक्लास
में ज़्यादातर कोड, आम तौर पर
onUpdate() में होता है.
कलेक्शन वाला विजेट बनाते समय, onUpdate() के लिए आपके लागू करने में मुख्य अंतर यह है कि आपको
setRemoteAdapter() को कॉल करना होगा. इससे कलेक्शन व्यू को पता चलता है कि उसे अपना डेटा कहां से लेना है.
इसके बाद, RemoteViewsService, RemoteViewsFactory के आपके लागू करने की जानकारी दे सकता है. साथ ही, विजेट, सही डेटा दिखा सकता है. इस तरीके को कॉल करते समय, एक इंटेंट पास करें. यह इंटेंट, RemoteViewsService के आपके लागू करने की जानकारी और विजेट आईडी को दिखाता है. विजेट आईडी, अपडेट किए जाने वाले विजेट की जानकारी देता है.
उदाहरण के लिए, StackWidget सैंपल, विजेट कलेक्शन के लिए रिमोट अडैप्टर के तौर पर RemoteViewsService को सेट करने के लिए, onUpdate() कॉलबैक तरीके को इस तरह लागू करता है:
Kotlin
override fun onUpdate(
        context: Context,
        appWidgetManager: AppWidgetManager,
        appWidgetIds: IntArray
) {
    // Update each of the widgets with the remote adapter.
    appWidgetIds.forEach { appWidgetId ->

        // Set up the intent that starts the StackViewService, which
        // provides the views for this collection.
        val intent = Intent(context, StackWidgetService::class.java).apply {
            // Add the widget ID to the intent extras.
            putExtra(AppWidgetManager.EXTRA_APPWIDGET_ID, appWidgetId)
            data = Uri.parse(toUri(Intent.URI_INTENT_SCHEME))
        }
        // Instantiate the RemoteViews object for the widget layout.
        val views = RemoteViews(context.packageName, R.layout.widget_layout).apply {
            // Set up the RemoteViews object to use a RemoteViews adapter.
            // This adapter connects to a RemoteViewsService through the
            // specified intent.
            // This is how you populate the data.
            setRemoteAdapter(R.id.stack_view, intent)

            // The empty view is displayed when the collection has no items.
            // It must be in the same layout used to instantiate the
            // RemoteViews object.
            setEmptyView(R.id.stack_view, R.id.empty_view)
        }

        // Do additional processing specific to this widget.

        appWidgetManager.updateAppWidget(appWidgetId, views)
    }
    super.onUpdate(context, appWidgetManager, appWidgetIds)
}
Java
public void onUpdate(Context context, AppWidgetManager appWidgetManager, int[] appWidgetIds) {
    // Update each of the widgets with the remote adapter.
    for (int i = 0; i < appWidgetIds.length; ++i) {

        // Set up the intent that starts the StackViewService, which
        // provides the views for this collection.
        Intent intent = new Intent(context, StackWidgetService.class);
        // Add the widget ID to the intent extras.
        intent.putExtra(AppWidgetManager.EXTRA_APPWIDGET_ID, appWidgetIds[i]);
        intent.setData(Uri.parse(intent.toUri(Intent.URI_INTENT_SCHEME)));
        // Instantiate the RemoteViews object for the widget layout.
        RemoteViews views = new RemoteViews(context.getPackageName(), R.layout.widget_layout);
        // Set up the RemoteViews object to use a RemoteViews adapter.
        // This adapter connects to a RemoteViewsService through the specified
        // intent.
        // This is how you populate the data.
        views.setRemoteAdapter(R.id.stack_view, intent);

        // The empty view is displayed when the collection has no items.
        // It must be in the same layout used to instantiate the RemoteViews
        // object.
        views.setEmptyView(R.id.stack_view, R.id.empty_view);

        // Do additional processing specific to this widget.

        appWidgetManager.updateAppWidget(appWidgetIds[i], views);
    }
    super.onUpdate(context, appWidgetManager, appWidgetIds);
}
डेटा को सेव करना
इस पेज पर बताए गए तरीके के मुताबिक, RemoteViewsService सबक्लास, RemoteViewsFactory उपलब्ध कराता है. इसका इस्तेमाल, रिमोट कलेक्शन व्यू में डेटा भरने के लिए किया जाता है.
खास तौर पर, ये चरण पूरे करें:
RemoteViewsServiceका सबक्लास बनाएं.RemoteViewsServiceवह सेवा है जिसकी मदद से रिमोट अडैप्टर,RemoteViewsका अनुरोध कर सकता है.RemoteViewsServiceके अपने सबक्लास में, एक ऐसी क्लास शामिल करें जोRemoteViewsFactoryइंटरफ़ेस को लागू करती हो.RemoteViewsFactoryएक इंटरफ़ेस है. इसका इस्तेमाल, रिमोट कलेक्शन व्यू—जैसे किListView,GridView,StackView—और उस व्यू के लिए मौजूद डेटा के बीच अडैप्टर के तौर पर किया जाता है. आपके लागू करने की ज़िम्मेदारी, डेटासेट में मौजूद हर आइटम के लिएRemoteViewsऑब्जेक्ट बनाना है. यह इंटरफ़ेस,Adapterके लिए एक पतला रैपर है.
डेटा को सेव करने के लिए, अपनी सेवा के किसी एक इंस्टेंस या उसमें मौजूद किसी भी डेटा पर भरोसा नहीं किया जा सकता. RemoteViewsService में डेटा तब तक सेव न करें, जब तक वह स्टैटिक न हो. अगर आपको अपने विजेट का डेटा सेव करना है, तो सबसे सही तरीका है कि आप
ContentProvider का इस्तेमाल करें. इसका डेटा
प्रोसेस लाइफ़साइकल के बाद भी सेव रहता है. उदाहरण के लिए, किराने की दुकान का विजेट, किराने की हर लिस्ट के आइटम की स्थिति को किसी ऐसी जगह पर सेव कर सकता है जहां डेटा सेव रहता है. जैसे, SQL डेटाबेस.
RemoteViewsService के लागू करने की मुख्य जानकारी, उसका RemoteViewsFactory है. इसके बारे में अगले सेक्शन में बताया गया है.
RemoteViewsFactory इंटरफ़ेस
RemoteViewsFactory इंटरफ़ेस को लागू करने वाली आपकी कस्टम क्लास, विजेट को उसके कलेक्शन में मौजूद आइटम का डेटा उपलब्ध कराती है. इसके लिए, यह आपके विजेट आइटम के एक्सएमएल लेआउट फ़ाइल को डेटा के सोर्स के साथ जोड़ती है. डेटा का यह सोर्स, डेटाबेस से लेकर सामान्य कलेक्शन तक कुछ भी हो सकता है. StackWidget सैंपल में, डेटा सोर्स, WidgetItems का एक कलेक्शन है. RemoteViewsFactory, डेटा को रिमोट कलेक्शन व्यू से जोड़ने के लिए, अडैप्टर के तौर पर काम करता है.
सबक्लास के लिए, आपको दो सबसे ज़रूरी तरीके लागू करने होंगे:
RemoteViewsFactory
onCreate() और
getViewAt().
सिस्टम, पहली बार आपकी फ़ैक्ट्री बनाते समय onCreate() को कॉल करता है.
यहां, अपने डेटा सोर्स से कोई भी कनेक्शन या कर्सर सेट अप करें. उदाहरण के लिए, StackWidget सैंपल, WidgetItem ऑब्जेक्ट के कलेक्शन को शुरू करने के लिए, onCreate() का इस्तेमाल करता है. जब आपका विजेट चालू होता है, तो सिस्टम, कलेक्शन में उनकी इंडेक्स वाली जगह का इस्तेमाल करके इन ऑब्जेक्ट को ऐक्सेस करता है और उनमें मौजूद टेक्स्ट दिखाता है.
StackWidget सैंपल के RemoteViewsFactory को लागू करने का एक स्निपेट यहां दिया गया है. इसमें onCreate() तरीके के कुछ हिस्से दिखाए गए हैं:
Kotlin
private const val REMOTE_VIEW_COUNT: Int = 10

class StackRemoteViewsFactory(
        private val context: Context
) : RemoteViewsService.RemoteViewsFactory {

    private lateinit var widgetItems: List<WidgetItem>

    override fun onCreate() {
        // In onCreate(), set up any connections or cursors to your data
        // source. Heavy lifting, such as downloading or creating content,
        // must be deferred to onDataSetChanged() or getViewAt(). Taking
        // more than 20 seconds on this call results in an ANR.
        widgetItems = List(REMOTE_VIEW_COUNT) { index -> WidgetItem("$index!") }
        ...
    }
    ...
}
Java
class StackRemoteViewsFactory implements RemoteViewsService.RemoteViewsFactory {
    private static final int REMOTE_VIEW_COUNT = 10;
    private List<WidgetItem> widgetItems = new ArrayList<WidgetItem>();

    public void onCreate() {
        // In onCreate(), setup any connections or cursors to your data
        // source. Heavy lifting, such as downloading or creating content,
        // must be deferred to onDataSetChanged() or getViewAt(). Taking
        // more than 20 seconds on this call results in an ANR.
        for (int i = 0; i < REMOTE_VIEW_COUNT; i++) {
            widgetItems.add(new WidgetItem(i + "!"));
        }
        ...
    }
...
RemoteViewsFactory तरीका getViewAt() डेटासेट में तय की गई position पर मौजूद डेटा के लिए, RemoteViews ऑब्जेक्ट
दिखाता है. StackWidget सैंपल के RemoteViewsFactory को लागू करने का एक स्निपेट यहां दिया गया है:
Kotlin
override fun getViewAt(position: Int): RemoteViews {
    // Construct a remote views item based on the widget item XML file
    // and set the text based on the position.
    return RemoteViews(context.packageName, R.layout.widget_item).apply {
        setTextViewText(R.id.widget_item, widgetItems[position].text)
    }
}
Java
public RemoteViews getViewAt(int position) {
    // Construct a remote views item based on the widget item XML file
    // and set the text based on the position.
    RemoteViews views = new RemoteViews(context.getPackageName(), R.layout.widget_item);
    views.setTextViewText(R.id.widget_item, widgetItems.get(position).text);
    return views;
}
अलग-अलग आइटम में व्यवहार जोड़ना
पिछले सेक्शन में, अपने डेटा को विजेट कलेक्शन से बाइंड करने का तरीका बताया गया है. हालांकि, अगर आपको अपने कलेक्शन व्यू में मौजूद अलग-अलग आइटम में डाइनैमिक व्यवहार जोड़ना है, तो क्या करें?
Handle events with the onUpdate()
class में बताए गए तरीके के मुताबिक, आम तौर पर
setOnClickPendingIntent() का इस्तेमाल करके, किसी ऑब्जेक्ट के क्लिक करने पर होने वाले व्यवहार को सेट किया जाता है. जैसे, किसी बटन को क्लिक करने पर
cause a button to launch an Activity लॉन्च करना. हालांकि, किसी कलेक्शन आइटम में मौजूद चाइल्ड व्यू के लिए, इस तरीके का इस्तेमाल नहीं किया जा सकता.
उदाहरण के लिए, Gmail विजेट में, ग्लोबल बटन सेट अप करने के लिए setOnClickPendingIntent() का इस्तेमाल किया जा सकता है. इससे ऐप्लिकेशन लॉन्च होता है. हालांकि, इसका इस्तेमाल, लिस्ट में मौजूद अलग-अलग आइटम के लिए नहीं किया जा सकता.
इसके बजाय, कलेक्शन में मौजूद अलग-अलग आइटम में क्लिक करने पर होने वाला व्यवहार जोड़ने के लिए, setOnClickFillInIntent() का इस्तेमाल करें. इसके लिए, अपने कलेक्शन व्यू के लिए पेंडिंग इंटेंट टेंप्लेट सेट अप करें. इसके बाद, RemoteViewsFactory के ज़रिए, कलेक्शन में मौजूद हर आइटम पर फ़िल-इन इंटेंट सेट करें.
इस सेक्शन में, StackWidget सैंपल का इस्तेमाल करके, अलग-अलग आइटम में व्यवहार जोड़ने का तरीका बताया गया है. StackWidget सैंपल में, अगर उपयोगकर्ता सबसे ऊपर वाले व्यू को टच करता है,
तो विजेट, "Touched view n" मैसेज दिखाता है. यहां n, टच किए गए व्यू का
इंडेक्स (जगह) है.Toast आइए जानते हैं कि ऐसा कैसे करें:
StackWidgetProvider—एकAppWidgetProviderसबक्लास—कस्टम ऐक्शन के साथ एक पेंडिंग इंटेंट बनाता है. इसेTOAST_ACTIONकहा जाता है.जब उपयोगकर्ता किसी व्यू को टच करता है, तो इंटेंट फ़ायर होता है और यह
TOAST_ACTIONब्रॉडकास्ट करता है.इस ब्रॉडकास्ट को
StackWidgetProviderक्लास केonReceive()तरीके से इंटरसेप्ट किया जाता है. इसके बाद, विजेट, टच किए गए व्यू के लिएToastमैसेज दिखाता है. कलेक्शन आइटम का डेटा,RemoteViewsServiceके ज़रिएRemoteViewsFactoryउपलब्ध कराता है.
पेंडिंग इंटेंट टेंप्लेट सेट अप करना
The StackWidgetProvider (एक
AppWidgetProvider सबक्लास)
एक पेंडिंग इंटेंट सेट अप करता है. कलेक्शन के अलग-अलग आइटम, अपने पेंडिंग इंटेंट सेट अप नहीं कर सकते. इसके बजाय, कलेक्शन एक पेंडिंग इंटेंट टेंप्लेट सेट अप करता है. साथ ही, अलग-अलग आइटम, आइटम के हिसाब से यूनीक व्यवहार बनाने के लिए, फ़िल-इन इंटेंट सेट करते हैं.
इस क्लास को वह ब्रॉडकास्ट भी मिलता है जो उपयोगकर्ता के किसी व्यू को टच करने पर भेजा जाता है. यह इस इवेंट को अपने onReceive() तरीके से प्रोसेस करता है. अगर इंटेंट का ऐक्शन TOAST_ACTION है, तो विजेट, मौजूदा व्यू के लिए Toast मैसेज दिखाता है.
Kotlin
const val TOAST_ACTION = "com.example.android.stackwidget.TOAST_ACTION"
const val EXTRA_ITEM = "com.example.android.stackwidget.EXTRA_ITEM"

class StackWidgetProvider : AppWidgetProvider() {

    ...

    // Called when the BroadcastReceiver receives an Intent broadcast.
    // Checks whether the intent's action is TOAST_ACTION. If it is, the
    // widget displays a Toast message for the current item.
    override fun onReceive(context: Context, intent: Intent) {
        val mgr: AppWidgetManager = AppWidgetManager.getInstance(context)
        if (intent.action == TOAST_ACTION) {
            val appWidgetId: Int = intent.getIntExtra(
                    AppWidgetManager.EXTRA_APPWIDGET_ID,
                    AppWidgetManager.INVALID_APPWIDGET_ID
            )
            // EXTRA_ITEM represents a custom value provided by the Intent
            // passed to the setOnClickFillInIntent() method to indicate the
            // position of the clicked item. See StackRemoteViewsFactory in
            // Set the fill-in Intent for details.
            val viewIndex: Int = intent.getIntExtra(EXTRA_ITEM, 0)
            Toast.makeText(context, "Touched view $viewIndex", Toast.LENGTH_SHORT).show()
        }
        super.onReceive(context, intent)
    }

    override fun onUpdate(
            context: Context,
            appWidgetManager: AppWidgetManager,
            appWidgetIds: IntArray
    ) {
        // Update each of the widgets with the remote adapter.
        appWidgetIds.forEach { appWidgetId ->

            // Sets up the intent that points to the StackViewService that
            // provides the views for this collection.
            val intent = Intent(context, StackWidgetService::class.java).apply {
                putExtra(AppWidgetManager.EXTRA_APPWIDGET_ID, appWidgetId)
                // When intents are compared, the extras are ignored, so embed
                // the extra sinto the data so that the extras are not ignored.
                data = Uri.parse(toUri(Intent.URI_INTENT_SCHEME))
            }
            val rv = RemoteViews(context.packageName, R.layout.widget_layout).apply {
                setRemoteAdapter(R.id.stack_view, intent)

                // The empty view is displayed when the collection has no items.
                // It must be a sibling of the collection view.
                setEmptyView(R.id.stack_view, R.id.empty_view)
            }

            // This section makes it possible for items to have individualized
            // behavior. It does this by setting up a pending intent template.
            // Individuals items of a collection can't set up their own pending
            // intents. Instead, the collection as a whole sets up a pending
            // intent template, and the individual items set a fillInIntent
            // to create unique behavior on an item-by-item basis.
            val toastPendingIntent: PendingIntent = Intent(
                    context,
                    StackWidgetProvider::class.java
            ).run {
                // Set the action for the intent.
                // When the user touches a particular view, it has the effect of
                // broadcasting TOAST_ACTION.
                action = TOAST_ACTION
                putExtra(AppWidgetManager.EXTRA_APPWIDGET_ID, appWidgetId)
                data = Uri.parse(toUri(Intent.URI_INTENT_SCHEME))

                PendingIntent.getBroadcast(context, 0, this, PendingIntent.FLAG_UPDATE_CURRENT)
            }
            rv.setPendingIntentTemplate(R.id.stack_view, toastPendingIntent)

            appWidgetManager.updateAppWidget(appWidgetId, rv)
        }
        super.onUpdate(context, appWidgetManager, appWidgetIds)
    }
}
Java
public class StackWidgetProvider extends AppWidgetProvider {
    public static final String TOAST_ACTION = "com.example.android.stackwidget.TOAST_ACTION";
    public static final String EXTRA_ITEM = "com.example.android.stackwidget.EXTRA_ITEM";

    ...

    // Called when the BroadcastReceiver receives an Intent broadcast.
    // Checks whether the intent's action is TOAST_ACTION. If it is, the
    // widget displays a Toast message for the current item.
    @Override
    public void onReceive(Context context, Intent intent) {
        AppWidgetManager mgr = AppWidgetManager.getInstance(context);
        if (intent.getAction().equals(TOAST_ACTION)) {
            int appWidgetId = intent.getIntExtra(AppWidgetManager.EXTRA_APPWIDGET_ID,
                AppWidgetManager.INVALID_APPWIDGET_ID);
            // EXTRA_ITEM represents a custom value provided by the Intent
            // passed to the setOnClickFillInIntent() method to indicate the
            // position of the clicked item. See StackRemoteViewsFactory in
            // Set the fill-in Intent for details.
            int viewIndex = intent.getIntExtra(EXTRA_ITEM, 0);
            Toast.makeText(context, "Touched view " + viewIndex, Toast.LENGTH_SHORT).show();
        }
        super.onReceive(context, intent);
    }

    @Override
    public void onUpdate(Context context, AppWidgetManager appWidgetManager, int[] appWidgetIds) {
        // Update each of the widgets with the remote adapter.
        for (int i = 0; i < appWidgetIds.length; ++i) {

            // Sets up the intent that points to the StackViewService that
            // provides the views for this collection.
            Intent intent = new Intent(context, StackWidgetService.class);
            intent.putExtra(AppWidgetManager.EXTRA_APPWIDGET_ID, appWidgetIds[i]);
            // When intents are compared, the extras are ignored, so embed
            // the extras into the data so that the extras are not
            // ignored.
            intent.setData(Uri.parse(intent.toUri(Intent.URI_INTENT_SCHEME)));
            RemoteViews rv = new RemoteViews(context.getPackageName(), R.layout.widget_layout);
            rv.setRemoteAdapter(appWidgetIds[i], R.id.stack_view, intent);

            // The empty view is displayed when the collection has no items. It
            // must be a sibling of the collection view.
            rv.setEmptyView(R.id.stack_view, R.id.empty_view);

            // This section makes it possible for items to have individualized
            // behavior. It does this by setting up a pending intent template.
            // Individuals items of a collection can't set up their own pending
            // intents. Instead, the collection as a whole sets up a pending
            // intent template, and the individual items set a fillInIntent
            // to create unique behavior on an item-by-item basis.
            Intent toastIntent = new Intent(context, StackWidgetProvider.class);
            // Set the action for the intent.
            // When the user touches a particular view, it has the effect of
            // broadcasting TOAST_ACTION.
            toastIntent.setAction(StackWidgetProvider.TOAST_ACTION);
            toastIntent.putExtra(AppWidgetManager.EXTRA_APPWIDGET_ID, appWidgetIds[i]);
            intent.setData(Uri.parse(intent.toUri(Intent.URI_INTENT_SCHEME)));
            PendingIntent toastPendingIntent = PendingIntent.getBroadcast(context, 0, toastIntent,
                PendingIntent.FLAG_UPDATE_CURRENT);
            rv.setPendingIntentTemplate(R.id.stack_view, toastPendingIntent);

            appWidgetManager.updateAppWidget(appWidgetIds[i], rv);
        }
        super.onUpdate(context, appWidgetManager, appWidgetIds);
    }
}
फ़िल-इन इंटेंट सेट करना
आपके RemoteViewsFactory को, कलेक्शन में मौजूद हर आइटम पर फ़िल-इन इंटेंट सेट करना होगा. इससे, किसी आइटम के क्लिक करने पर होने वाले अलग-अलग ऐक्शन को अलग-अलग किया जा सकता है. इसके बाद, फ़िल-इन इंटेंट को
PendingIntent टेंप्लेट के साथ मिलाकर, फ़ाइनल इंटेंट तय किया जाता है.
जब आइटम पर टैप किया जाता है, तो यह इंटेंट एक्ज़ीक्यूट होता है.
Kotlin
private const val REMOTE_VIEW_COUNT: Int = 10

class StackRemoteViewsFactory(
        private val context: Context,
        intent: Intent
) : RemoteViewsService.RemoteViewsFactory {

    private lateinit var widgetItems: List<WidgetItem>
    private val appWidgetId: Int = intent.getIntExtra(
            AppWidgetManager.EXTRA_APPWIDGET_ID,
            AppWidgetManager.INVALID_APPWIDGET_ID
    )

    override fun onCreate() {
        // In onCreate(), set up any connections or cursors to your data source.
        // Heavy lifting, such as downloading or creating content, must be
        // deferred to onDataSetChanged() or getViewAt(). Taking more than 20
        // seconds on this call results in an ANR.
        widgetItems = List(REMOTE_VIEW_COUNT) { index -> WidgetItem("$index!") }
        ...
    }
    ...

    override fun getViewAt(position: Int): RemoteViews {
        // Construct a remote views item based on the widget item XML file
        // and set the text based on the position.
        return RemoteViews(context.packageName, R.layout.widget_item).apply {
            setTextViewText(R.id.widget_item, widgetItems[position].text)

            // Set a fill-intent to fill in the pending intent template.
            // that is set on the collection view in StackWidgetProvider.
            val fillInIntent = Intent().apply {
                Bundle().also { extras ->
                    extras.putInt(EXTRA_ITEM, position)
                    putExtras(extras)
                }
            }
            // Make it possible to distinguish the individual on-click
            // action of a given item.
            setOnClickFillInIntent(R.id.widget_item, fillInIntent)
            ...
        }
    }
    ...
}
Java
public class StackWidgetService extends RemoteViewsService {
    @Override
    public RemoteViewsFactory onGetViewFactory(Intent intent) {
        return new StackRemoteViewsFactory(this.getApplicationContext(), intent);
    }
}

class StackRemoteViewsFactory implements RemoteViewsService.RemoteViewsFactory {
    private static final int count = 10;
    private List<WidgetItem> widgetItems = new ArrayList<WidgetItem>();
    private Context context;
    private int appWidgetId;

    public StackRemoteViewsFactory(Context context, Intent intent) {
        this.context = context;
        appWidgetId = intent.getIntExtra(AppWidgetManager.EXTRA_APPWIDGET_ID,
                AppWidgetManager.INVALID_APPWIDGET_ID);
    }

    // Initialize the data set.
    public void onCreate() {
        // In onCreate(), set up any connections or cursors to your data
        // source. Heavy lifting, such as downloading or creating
        // content, must be deferred to onDataSetChanged() or
        // getViewAt(). Taking more than 20 seconds on this call results
        // in an ANR.
        for (int i = 0; i < count; i++) {
            widgetItems.add(new WidgetItem(i + "!"));
        }
        ...
    }

    // Given the position (index) of a WidgetItem in the array, use the
    // item's text value in combination with the widget item XML file to
    // construct a RemoteViews object.
    public RemoteViews getViewAt(int position) {
        // Position always ranges from 0 to getCount() - 1.

        // Construct a RemoteViews item based on the widget item XML
        // file and set the text based on the position.
        RemoteViews rv = new RemoteViews(context.getPackageName(), R.layout.widget_item);
        rv.setTextViewText(R.id.widget_item, widgetItems.get(position).text);

        // Set a fill-intent to fill in the pending
        // intent template that is set on the collection view in
        // StackWidgetProvider.
        Bundle extras = new Bundle();
        extras.putInt(StackWidgetProvider.EXTRA_ITEM, position);
        Intent fillInIntent = new Intent();
        fillInIntent.putExtras(extras);
        // Make it possible to distinguish the individual on-click
        // action of a given item.
        rv.setOnClickFillInIntent(R.id.widget_item, fillInIntent);

        // Return the RemoteViews object.
        return rv;
    }
    ...
}
कलेक्शन के डेटा को अप-टू-डेट रखना
दूसरी इमेज में, कलेक्शन का इस्तेमाल करने वाले विजेट में अपडेट का फ़्लो दिखाया गया है. इसमें दिखाया गया है कि विजेट का कोड, RemoteViewsFactory के साथ कैसे इंटरैक्ट करता है. साथ ही, अपडेट को ट्रिगर करने का तरीका भी बताया गया है:
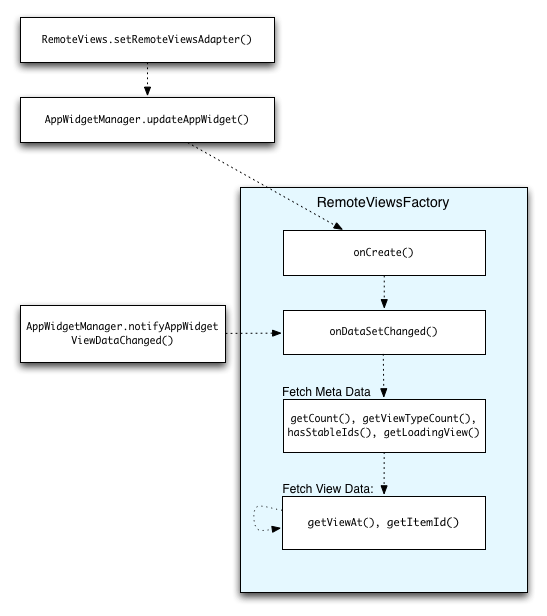
RemoteViewsFactory के साथ इंटरैक्शन.कलेक्शन का इस्तेमाल करने वाले विजेट, उपयोगकर्ताओं को अप-टू-डेट कॉन्टेंट उपलब्ध करा सकते हैं. उदाहरण के लिए, Gmail विजेट, उपयोगकर्ताओं को उनके इनबॉक्स की झलक दिखाता है. ऐसा करने के लिए, RemoteViewsFactory और कलेक्शन व्यू को ट्रिगर करें, ताकि वे नया डेटा फ़ेच और दिखा सकें.
इसके लिए,
AppWidgetManager का इस्तेमाल करके,
notifyAppWidgetViewDataChanged() को कॉल करें. इस कॉल से, आपके RemoteViewsFactory ऑब्जेक्ट के
onDataSetChanged()
तरीके को कॉलबैक मिलता है. इससे, नया डेटा फ़ेच किया जा सकता है.
onDataSetChanged() कॉलबैक में, प्रोसेस करने में ज़्यादा समय लगने वाली कार्रवाइयां सिंक्रोनस तरीके से की जा सकती हैं. इस बात की गारंटी है कि RemoteViewsFactory से मेटाडेटा या व्यू डेटा फ़ेच करने से पहले, यह कॉल पूरी हो जाती है. getViewAt() तरीके में भी, प्रोसेस करने में ज़्यादा समय लगने वाली कार्रवाइयां की जा सकती हैं. अगर इस कॉल में ज़्यादा समय लगता है, तो कलेक्शन व्यू की संबंधित जगह पर, लोड हो रहा व्यू दिखता है. यह व्यू,
RemoteViewsFactory ऑब्जेक्ट के
getLoadingView()
तरीके से तय किया जाता है. यह व्यू तब तक दिखता है, जब तक यह कॉल पूरी नहीं हो जाती.
कलेक्शन को सीधे तौर पर पास करने के लिए, RemoteCollectionItems का इस्तेमाल करना
Android 12 (एपीआई लेवल 31) में, setRemoteAdapter(int viewId,
RemoteViews.RemoteCollectionItems
items)
तरीका जोड़ा गया है. इसकी मदद से, आपका ऐप्लिकेशन, कलेक्शन व्यू में डेटा भरते समय, कलेक्शन को सीधे तौर पर पास कर सकता है. अगर आपने इस तरीके का इस्तेमाल करके अपना अडैप्टर सेट किया है, तो आपको RemoteViewsFactory को लागू करने की ज़रूरत नहीं है. साथ ही, आपको notifyAppWidgetViewDataChanged() को कॉल करने की भी ज़रूरत नहीं है.
इससे, अडैप्टर में डेटा भरना आसान हो जाता है. इसके अलावा, जब उपयोगकर्ता, नया आइटम दिखाने के लिए सूची में नीचे की ओर स्क्रोल करते हैं, तो नए आइटम में डेटा भरने में लगने वाला समय भी कम हो जाता है. अडैप्टर को सेट करने का यह तरीका तब बेहतर होता है, जब कलेक्शन आइटम का सेट अपेक्षाकृत छोटा हो. हालांकि, उदाहरण के लिए, अगर आपके कलेक्शन में कई Bitmaps हैं और उन्हें setImageViewBitmap में पास किया जा रहा है, तो यह तरीका अच्छी तरह काम नहीं करता.
अगर कलेक्शन में लेआउट का एक जैसा सेट इस्तेमाल नहीं किया जाता है. इसका मतलब है कि अगर कुछ आइटम सिर्फ़ कभी-कभी मौजूद होते हैं, तो setViewTypeCount का इस्तेमाल करके, उन यूनीक लेआउट की ज़्यादा से ज़्यादा संख्या तय करें जो कलेक्शन में शामिल हो सकते हैं. इससे, आपके ऐप्लिकेशन विजेट के अपडेट के दौरान, अडैप्टर को फिर से इस्तेमाल किया जा सकता है.
RemoteViews के आसान कलेक्शन को लागू करने का एक उदाहरण यहां दिया गया है.
Kotlin
val itemLayouts = listOf(
        R.layout.item_type_1,
        R.layout.item_type_2,
        ...
)

remoteView.setRemoteAdapter(
        R.id.list_view,
        RemoteViews.RemoteCollectionItems.Builder()
            .addItem(/* id= */ ID_1, RemoteViews(context.packageName, R.layout.item_type_1))
            .addItem(/* id= */ ID_2, RemoteViews(context.packageName, R.layout.item_type_2))
            ...
            .setViewTypeCount(itemLayouts.count())
            .build()
)
Java
List<Integer> itemLayouts = Arrays.asList(
    R.layout.item_type_1,
    R.layout.item_type_2,
    ...
);

remoteView.setRemoteAdapter(
    R.id.list_view,
    new RemoteViews.RemoteCollectionItems.Builder()
        .addItem(/* id= */ ID_1, new RemoteViews(context.getPackageName(), R.layout.item_type_1))
        .addItem(/* id= */ ID_2, new RemoteViews(context.getPackageName(), R.layout.item_type_2))
        ...
        .setViewTypeCount(itemLayouts.size())
        .build()
);