Zadbaj o dobrą organizację dzięki kolekcji
Zapisuj i kategoryzuj treści zgodnie ze swoimi preferencjami.
Komponent Nawigacja umożliwia dodawanie zarówno właściwości, jak i animacji widoku do
. Aby utworzyć własne animacje, zapoznaj się z
Zasoby animacji.
Na początek nawigacja zawiera też kilka domyślnych animacji. Aby dodać
animacje do akcji, wykonaj te czynności:
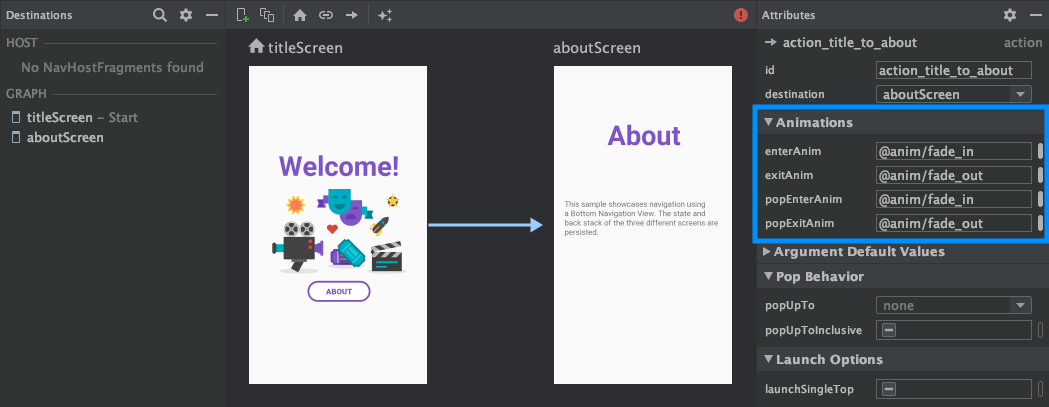
W edytorze nawigacji kliknij działanie, w przypadku którego powinna pojawić się animacja.
wystąpienia.
W sekcji Animacje w panelu Atrybuty kliknij menu.
strzałkę obok animacji, którą chcesz dodać. Możesz wybrać jedną z tych opcji:
następujące typy:
Podawanie miejsca docelowego
Opuszczanie miejsca docelowego
Wprowadzanie miejsca docelowego przez
pop action, działanie
który podczas nawigacji powoduje wyodrębnianie dodatkowych miejsc docelowych poza stos tylny.
Opuszczanie miejsca docelowego przez kliknięcie wyskakującego okienka
Wybierz animację z wyświetlonej listy animacji projektu.
.
Rysunek 1. Sekcja Animacje komponentu
Atrybuty.
Po dodaniu animacji kliknij kartę Tekst, aby przełączyć się na tryb XML.
widok. Kod XML animacji pojawi się w odpowiednim
<action> element. W tym przykładzie specifyAmountFragment jest
źródłowe miejsce docelowe dla działania confirmationAction:
Dodaj wspólne przejścia elementów między miejscami docelowymi
Jeśli widok jest udostępniany między 2 miejscami docelowymi, możesz użyć
przejścia ze współużytkowanego elementu, by określić, jak ma się wyświetlać widok, gdy
nawigowanie z jednego miejsca docelowego do drugiego. Przejścia elementów wspólnych
stanowią część ram przejścia.
Elementy udostępnione są dostarczane automatycznie, a nie przez
plik XML nawigacji. Miejsca docelowe aktywności i fragmentów mają podklasę
z Navigator.Extras
z dodatkowymi opcjami nawigacji, w tym z udostępnionymi
. Możesz przekazać te Extras podczas połączenia
navigate()
Udostępniony element przechodzi do miejsca docelowego fragmentu
FragmentNavigator.Extras
pozwala mapować udostępnione elementy z jednego miejsca docelowego na drugie
według nazwy przejścia, podobnie jak w przypadku użycia
FragmentTransaction.addSharedElement()
Następnie możesz przekazać dodatki do navigate() w sposób pokazany poniżej
przykład:
Kotlin
valextras=FragmentNavigatorExtras(view1to"hero_image")view.findNavController().navigate(R.id.confirmationAction,null,// Bundle of argsnull,// NavOptionsextras)
Java
FragmentNavigator.Extrasextras=newFragmentNavigator.Extras.Builder().addSharedElement(view1,"hero_image").build();Navigation.findNavController(view).navigate(R.id.details,null,// Bundle of argsnull,// NavOptionsextras);
Udostępniony element przechodzi do miejsca docelowego aktywności
// Rename the Pair class from the Android framework to avoid a name clashimportandroid.util.PairasUtilPair...valoptions=ActivityOptionsCompat.makeSceneTransitionAnimation(activity,UtilPair.create(view1,"hero_image"))valextras=ActivityNavigatorExtras(options)view.findNavController().navigate(R.id.details,null,// Bundle of argsnull,// NavOptionsextras)
Java
ActivityOptionsoptions=ActivityOptions.makeSceneTransitionAnimation(this,Pair.create(view1,"hero_image"));ActivityNavigatorExtrasextras=newActivityNavigatorExtras.Builder().setActivityOptions(options).build();Navigation.findNavController(view).navigate(R.id.details,null,// Bundle of argsnull,// NavOptionsextras);
Zastosuj animacje pop do przejść aktywności
Gdy przechodzisz do lub z elementu Activity, animacje wyostrzenia nie są stosowane
automatycznie. Zamiast tego musisz wywołać
ActivityNavigator.applyPopAnimationsToPendingTransition()
z docelowego miejsca docelowego Activity, gdzie ma nastąpić animacja:
Treść strony i umieszczone na niej fragmenty kodu podlegają licencjom opisanym w Licencji na treści. Java i OpenJDK są znakami towarowymi lub zastrzeżonymi znakami towarowymi należącymi do firmy Oracle lub jej podmiotów stowarzyszonych.
Ostatnia aktualizacja: 2025-07-27 UTC.
[[["Łatwo zrozumieć","easyToUnderstand","thumb-up"],["Rozwiązało to mój problem","solvedMyProblem","thumb-up"],["Inne","otherUp","thumb-up"]],[["Brak potrzebnych mi informacji","missingTheInformationINeed","thumb-down"],["Zbyt skomplikowane / zbyt wiele czynności do wykonania","tooComplicatedTooManySteps","thumb-down"],["Nieaktualne treści","outOfDate","thumb-down"],["Problem z tłumaczeniem","translationIssue","thumb-down"],["Problem z przykładami/kodem","samplesCodeIssue","thumb-down"],["Inne","otherDown","thumb-down"]],["Ostatnia aktualizacja: 2025-07-27 UTC."],[],[],null,["# Animate transitions between destinations\n\nThe Navigation component lets you add both property and view animations to\nactions. To create your own animations, check out\n[Animation resources](/guide/topics/resources/animation-resource).\n\nNavigation also includes several default animations to get you started. To add\nanimations to an action, do the following:\n\n1. In the Navigation editor, click on the action where the animation should occur.\n2. In the **Animations** section of the **Attributes** panel, click the dropdown arrow next to the animation you'd like to add. You can choose between the following types:\n - Entering a destination\n - Exiting a destination\n - Entering a destination via a [*pop action*](/guide/navigation/navigation-navigate#pop), an action that pops additional destinations off of the back stack when navigating.\n - Exiting a destination via a pop action\n3. Choose an animation from the list of project animations that appears.\n\n**Figure 1.** The **Animations** section of the **Attributes** panel.\n\nOnce you've added animations, click the **Text** tab to toggle to the XML text\nview. The XML for the animations now appears in the corresponding\n`\u003caction\u003e` element. In the following example, `specifyAmountFragment` is the\nsource destination for the `confirmationAction` action: \n\n```xml\n\u003cfragment\n android:id=\"@+id/specifyAmountFragment\"\n android:name=\"com.example.buybuddy.buybuddy.SpecifyAmountFragment\"\n android:label=\"fragment_specify_amount\"\n tools:layout=\"@layout/fragment_specify_amount\"\u003e\n \u003caction\n android:id=\"@+id/confirmationAction\"\n app:destination=\"@id/confirmationFragment\"\n app:enterAnim=\"@anim/slide_in_right\"\n app:exitAnim=\"@anim/slide_out_left\"\n app:popEnterAnim=\"@anim/slide_in_left\"\n app:popExitAnim=\"@anim/slide_out_right\" /\u003e\n\u003c/fragment\u003e\n```\n\nAdd shared element transitions between destinations\n---------------------------------------------------\n\nWhen a view is shared between two destinations, you can use a\n*shared element transition* to define how the view transitions when\nnavigating from one destination to the other. Shared element transitions\nare part of the Transition Framework.\n| **Note:** When using shared elements transitions, you should **not** use the Animation Framework (`enterAnim`, `exitAnim`, and so on from the previous section). Instead, you should be using only the Transition Framework for setting your enter and exit transitions.\n\nShared elements are supplied programmatically rather than through your\nnavigation XML file. Activity and fragment destinations each have a subclass\nof the [`Navigator.Extras`](/reference/androidx/navigation/Navigator.Extras)\ninterface that accepts additional options for navigation, including shared\nelements. You can pass these `Extras` when calling\n[`navigate()`](/reference/androidx/navigation/NavController#navigate(int,%20android.os.Bundle,%20androidx.navigation.NavOptions,%20androidx.navigation.Navigator.Extras)).\n| **Note:** Be sure to familiarize yourself with shared element transitions before continuing. For fragment shared element transitions, see [Navigate between fragments using animations](/training/basics/fragments/animate). For activity shared element transitions, see [Start an activity using an animation](/training/transitions/start-activity#start-with-element).\n\n### Shared element transitions to a fragment destination\n\nThe [`FragmentNavigator.Extras`](/reference/androidx/navigation/fragment/FragmentNavigator.Extras)\nclass allows you to map shared elements from one destination to the next\nby their transition name, similar to using\n[`FragmentTransaction.addSharedElement()`](/reference/androidx/fragment/app/FragmentTransaction#addSharedElement(android.view.View,%20java.lang.String)).\nYou can then pass the extras to `navigate()`, as shown in the following\nexample: \n\n### Kotlin\n\n```kotlin\nval extras = FragmentNavigatorExtras(view1 to \"hero_image\")\n\nview.findNavController().navigate(\n R.id.confirmationAction,\n null, // Bundle of args\n null, // NavOptions\n extras)\n```\n\n### Java\n\n```java\nFragmentNavigator.Extras extras = new FragmentNavigator.Extras.Builder()\n .addSharedElement(view1, \"hero_image\")\n .build();\n\nNavigation.findNavController(view).navigate(\n R.id.details,\n null, // Bundle of args\n null, // NavOptions\n extras);\n```\n\n### Shared element transitions to an activity destination\n\nActivities rely on [ActivityOptionsCompat](https://developer.android.com/reference/androidx/core/app/ActivityOptionsCompat) to control Shared Element Transitions as detailed in the [Start an activity with a shared element](https://developer.android.com/training/transitions/start-activity#start-transition) documentation and as shown in the example below: \n\n### Kotlin\n\n```kotlin\n// Rename the Pair class from the Android framework to avoid a name clash\nimport android.util.Pair as UtilPair\n...\nval options = ActivityOptionsCompat.makeSceneTransitionAnimation(activity,\n UtilPair.create(view1, \"hero_image\"))\nval extras = ActivityNavigatorExtras(options)\nview.findNavController().navigate(\n R.id.details,\n null, // Bundle of args\n null, // NavOptions\n extras)\n```\n\n### Java\n\n```java\nActivityOptions options = ActivityOptions.makeSceneTransitionAnimation(this,\n Pair.create(view1, \"hero_image\"));\n\nActivityNavigatorExtras extras = new ActivityNavigatorExtras.Builder()\n .setActivityOptions(options)\n .build();\n\n\nNavigation.findNavController(view).navigate(\n R.id.details,\n null, // Bundle of args\n null, // NavOptions\n extras);\n```\n\nApply pop animations to activity transitions\n--------------------------------------------\n\nWhen you navigate to or from an `Activity`, pop animations are not applied\nautomatically. Instead, you must call\n[`ActivityNavigator.applyPopAnimationsToPendingTransition()`](/reference/androidx/navigation/ActivityNavigator#applyPopAnimationsToPendingTransition(android.app.Activity))\nfrom the target `Activity` destination where the animation should occur: \n\n### Kotlin\n\n```kotlin\noverride fun finish() {\n super.finish()\n ActivityNavigator.applyPopAnimationsToPendingTransition(this)\n}\n```\n\n### Java\n\n```java\n@Override\npublic void finish() {\n super.finish();\n ActivityNavigator.applyPopAnimationsToPendingTransition(this);\n}\n```"]]