संग्रह की मदद से व्यवस्थित रहें
अपनी प्राथमिकताओं के आधार पर, कॉन्टेंट को सेव करें और कैटगरी में बांटें.
Compose को आज़माएं
Android के लिए, Jetpack Compose को यूज़र इंटरफ़ेस (यूआई) टूलकिट के तौर पर इस्तेमाल करने का सुझाव दिया जाता है. Compose में WindowInsets का इस्तेमाल करने का तरीका जानें.
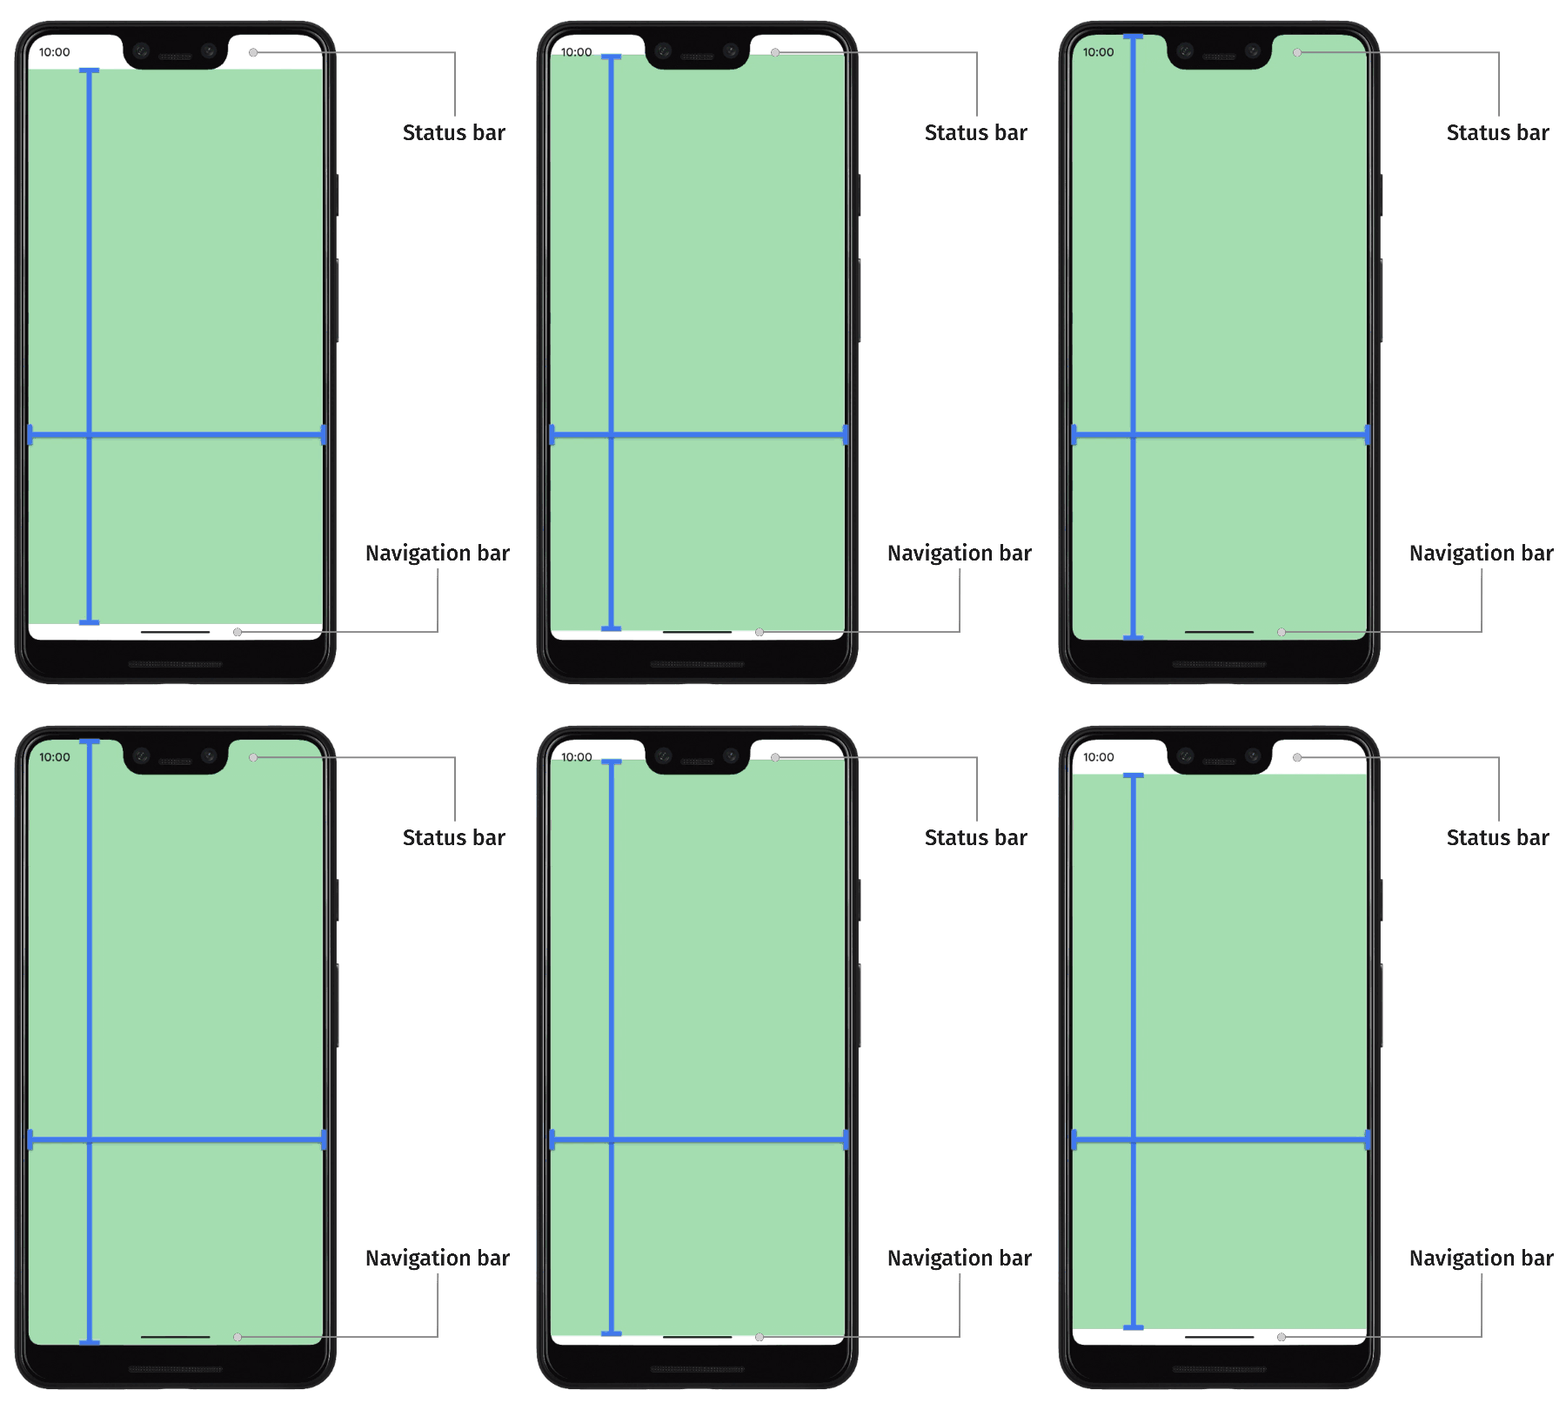
पहली इमेज. स्टेटस बार और नेविगेशन बार को मिलाकर, सिस्टम बार कहा जाता है.
सभी ऐप्लिकेशन को इस तरह से लेआउट करें कि आपका कॉन्टेंट, स्क्रीन के सबसे ऊपर वाले किनारे से लेकर सबसे नीचे वाले किनारे तक फैला हो. Android 15 (एपीआई लेवल 35) से, यह डिफ़ॉल्ट व्यवहार है. इसका मतलब है कि आपके ऐप्लिकेशन के सबसे ऊपर और सबसे नीचे वाले हिस्से, स्टेटस बार और नेविगेशन बार के पीछे लेआउट किए गए हैं. स्टेटस बार और नेविगेशन बार को एक साथ सिस्टम बार कहा जाता है. सिस्टम बार ऐसे एरिया होते हैं जो आम तौर पर सूचनाएं दिखाने, डिवाइस की स्थिति के बारे में बताने, और डिवाइस को नेविगेट करने के लिए इस्तेमाल किए जाते हैं.
आपके ऐप्लिकेशन और सिस्टम यूज़र इंटरफ़ेस (यूआई) के बीच ओवरलैप होने वाली जगहें, विंडो इंसर्ट का एक उदाहरण हैं. ये आपकी स्क्रीन के उन हिस्सों को दिखाती हैं जहां आपका ऐप्लिकेशन, सिस्टम यूज़र इंटरफ़ेस (यूआई) के साथ इंटरसेक्ट कर सकता है. यूज़र इंटरफ़ेस (यूआई) के इन हिस्सों के साथ इंटरसेक्ट करने का मतलब है कि कॉन्टेंट के ऊपर डिसप्ले करना. हालांकि, इससे आपके ऐप्लिकेशन को सिस्टम के जेस्चर के बारे में भी पता चल सकता है.
विंडो इंसर्ट के ये टाइप उपलब्ध हैं.
डिफ़ॉल्ट रूप से, ऐप्लिकेशन की विंडो को पूरी स्क्रीन पर फैलाने के लिए ऑप्ट-इन करें. इससे ऐप्लिकेशन का कॉन्टेंट, सिस्टम बार के पीछे एक किनारे से दूसरे किनारे तक दिखेगा. सिस्टम बार के पीछे ज़रूरी कॉन्टेंट और टच टारगेट न दिखें, इसके लिए ऑफ़सेट का इस्तेमाल करें.
फ़िल्में या इमेज जैसा कॉन्टेंट दिखाने वाले ऐप्लिकेशन, ज़्यादा बेहतर अनुभव देने के लिए कुछ समय के लिए सिस्टम बार छिपा सकते हैं.
सिस्टम बार में बदलाव करने से पहले, उपयोगकर्ताओं की ज़रूरतों और उम्मीदों के बारे में सोच लें. ऐसा इसलिए, क्योंकि सिस्टम बार से उपयोगकर्ताओं को डिवाइस को नेविगेट करने और उसकी स्थिति देखने का स्टैंडर्ड तरीका मिलता है.
डिसप्ले कटआउट, कुछ डिवाइसों पर डिसप्ले का वह हिस्सा होता है जो डिसप्ले की सतह में फैला होता है. इससे डिवाइस के सामने वाले हिस्से पर सेंसर लगाने के लिए जगह मिलती है. ऐप्लिकेशन, डिस्प्ले कटआउट की सुविधा के साथ काम कर सकते हैं. इसके लिए, उन्हें कटआउट की जगह के बारे में क्वेरी करनी होगी, ताकि कोई भी ज़रूरी कॉन्टेंट, कटआउट वाली जगह पर न दिखे.
कीबोर्ड ट्रांज़िशन एक सामान्य उदाहरण है, जहां विंडो इंसर्ट को डाइनैमिक तरीके से अपडेट किया जाता है. ऐप्लिकेशन, कीबोर्ड की मौजूदा स्थिति का पता लगा सकते हैं. साथ ही, प्रोग्राम के हिसाब से स्थितियों को टॉगल कर सकते हैं. इसके अलावा, विंडो इंसर्ट के लिए ऐनिमेशन का इस्तेमाल कर सकते हैं. साथ ही, कीबोर्ड ट्रांज़िशन के दौरान ऐप्लिकेशन के कॉन्टेंट को आसानी से ऐनिमेट कर सकते हैं.
इस पेज पर मौजूद कॉन्टेंट और कोड सैंपल कॉन्टेंट के लाइसेंस में बताए गए लाइसेंस के हिसाब से हैं. Java और OpenJDK, Oracle और/या इससे जुड़ी हुई कंपनियों के ट्रेडमार्क या रजिस्टर किए हुए ट्रेडमार्क हैं.
आखिरी बार 2025-08-27 (UTC) को अपडेट किया गया.
[[["समझने में आसान है","easyToUnderstand","thumb-up"],["मेरी समस्या हल हो गई","solvedMyProblem","thumb-up"],["अन्य","otherUp","thumb-up"]],[["वह जानकारी मौजूद नहीं है जो मुझे चाहिए","missingTheInformationINeed","thumb-down"],["बहुत मुश्किल है / बहुत सारे चरण हैं","tooComplicatedTooManySteps","thumb-down"],["पुराना","outOfDate","thumb-down"],["अनुवाद से जुड़ी समस्या","translationIssue","thumb-down"],["सैंपल / कोड से जुड़ी समस्या","samplesCodeIssue","thumb-down"],["अन्य","otherDown","thumb-down"]],["आखिरी बार 2025-08-27 (UTC) को अपडेट किया गया."],[],[],null,["Try the Compose way \nJetpack Compose is the recommended UI toolkit for Android. Learn how to work with WindowInsets in Compose. \n[WindowInsets in Compose →](/develop/ui/compose/system/insets) \n\n\u003cbr /\u003e\n\n**Figure 1.** The status bar and navigation bar, collectively called the *system bars*.\n\nLayout all apps so that your content stretches from the top edge to the bottom\nedge of the screen. This is the default behavior beginning in Android 15\n(API level 35). This means that the top and bottom areas of your app are laid\nout behind the status bar and the navigation bar. Together, the status bar and\nthe navigation bar are called the *system bars*. The system bars are areas that\nare generally dedicated to the display of notifications, communication of device\nstatus, and device navigation.\n\nThe overlaps between your app and the areas where the system UI is displayed is\none example of *window insets*, which represent the parts of your screen where\nyour app can intersect with the system UI. Intersecting with these parts of the\nUI can mean displaying above the content, but it can also inform your app about\nsystem gestures.\n\nThe following types of window insets are available.\n\n- By default, opt-in to expand your app window to extend across the entire\n screen and draw app content [edge-to-edge](/training/gestures/edge-to-edge)\n behind the system bars. Use offsets to avoid displaying important content\n and touch targets behind system bars.\n\n- Apps that display content such as movies or images can temporarily [hide the\n system bars](/training/system-ui/immersive) for a more immersive experience.\n Carefully consider your users' needs and expectations before modifying the\n system bars, since they give users a standard way of navigating a device and\n viewing its status.\n\n- A *display cutout* is an area on some devices that extends into the display\n surface to provide space for sensors on the front of the device. Apps can\n support [display cutouts](/guide/topics/display-cutout) by querying their\n positions so that no important content overlaps the cutout area.\n\n- A keyboard transition is a common example where window insets are\n dynamically updated. Apps can observe the current keyboard state,\n programmatically toggle the states, support animations for window insets,\n and make app content animate seamlessly between keyboard transitions."]]