اشکال را تعریف کنید
با مجموعهها، منظم بمانید
ذخیره و طبقهبندی محتوا براساس اولویتهای شما.
توانایی تعریف اشکال برای ترسیم در زمینه نمای OpenGL ES اولین گام در ایجاد گرافیک های سطح بالا برای برنامه شما است. طراحی با OpenGL ES بدون دانستن چند چیز اساسی در مورد اینکه چگونه OpenGL ES از شما انتظار دارد که اشیاء گرافیکی را تعریف کنید، می تواند کمی مشکل باشد.
این درس سیستم مختصات OpenGL ES را نسبت به صفحه دستگاه اندروید، اصول اولیه تعریف شکل، شکل چهره و همچنین تعریف مثلث و مربع را توضیح می دهد.
مثلث را تعریف کنید
OpenGL ES به شما امکان می دهد اشیاء ترسیم شده را با استفاده از مختصات در فضای سه بعدی تعریف کنید. بنابراین، قبل از ترسیم مثلث، باید مختصات آن را مشخص کنید. در OpenGL، روش معمولی برای انجام این کار، تعریف یک آرایه راس از اعداد ممیز شناور برای مختصات است. برای حداکثر کارایی، این مختصات را در یک ByteBuffer
مینویسید، که برای پردازش به خط لوله گرافیکی OpenGL ES ارسال میشود.
کاتلین
// number of coordinates per vertex in this array
const val COORDS_PER_VERTEX = 3
var triangleCoords = floatArrayOf( // in counterclockwise order:
0.0f, 0.622008459f, 0.0f, // top
-0.5f, -0.311004243f, 0.0f, // bottom left
0.5f, -0.311004243f, 0.0f // bottom right
)
class Triangle {
// Set color with red, green, blue and alpha (opacity) values
val color = floatArrayOf(0.63671875f, 0.76953125f, 0.22265625f, 1.0f)
private var vertexBuffer: FloatBuffer =
// (number of coordinate values * 4 bytes per float)
ByteBuffer.allocateDirect(triangleCoords.size * 4).run {
// use the device hardware's native byte order
order(ByteOrder.nativeOrder())
// create a floating point buffer from the ByteBuffer
asFloatBuffer().apply {
// add the coordinates to the FloatBuffer
put(triangleCoords)
// set the buffer to read the first coordinate
position(0)
}
}
}
جاوا
public class Triangle {
private FloatBuffer vertexBuffer;
// number of coordinates per vertex in this array
static final int COORDS_PER_VERTEX = 3;
static float triangleCoords[] = { // in counterclockwise order:
0.0f, 0.622008459f, 0.0f, // top
-0.5f, -0.311004243f, 0.0f, // bottom left
0.5f, -0.311004243f, 0.0f // bottom right
};
// Set color with red, green, blue and alpha (opacity) values
float color[] = { 0.63671875f, 0.76953125f, 0.22265625f, 1.0f };
public Triangle() {
// initialize vertex byte buffer for shape coordinates
ByteBuffer bb = ByteBuffer.allocateDirect(
// (number of coordinate values * 4 bytes per float)
triangleCoords.length * 4);
// use the device hardware's native byte order
bb.order(ByteOrder.nativeOrder());
// create a floating point buffer from the ByteBuffer
vertexBuffer = bb.asFloatBuffer();
// add the coordinates to the FloatBuffer
vertexBuffer.put(triangleCoords);
// set the buffer to read the first coordinate
vertexBuffer.position(0);
}
}
به طور پیشفرض، OpenGL ES یک سیستم مختصات را در نظر میگیرد که در آن [0,0,0] (X,Y,Z) مرکز قاب GLSurfaceView
را مشخص میکند، [1,1,0] گوشه سمت راست بالای قاب و [- 1،-1،0] گوشه سمت چپ پایین کادر است. برای تصویری از این سیستم مختصات، راهنمای توسعه دهنده OpenGL ES را ببینید.
توجه داشته باشید که مختصات این شکل به صورت خلاف جهت عقربه های ساعت تعریف شده است. ترتیب ترسیم مهم است زیرا مشخص میکند که کدام سمت وجه جلویی شکل است که معمولاً میخواهید آن را بکشید و چهره پشتی که میتوانید با استفاده از ویژگی OpenGL ES Cull face ترسیم نکنید. برای اطلاعات بیشتر در مورد چهره ها و حذف، به راهنمای توسعه دهنده OpenGL ES مراجعه کنید.
مربع را تعریف کنید
تعریف مثلث در OpenGL بسیار آسان است، اما اگر بخواهید کمی پیچیده تر به دست آورید، چه؟ بگو مربع؟ راه های مختلفی برای انجام این کار وجود دارد، اما یک مسیر معمولی برای ترسیم چنین شکلی در OpenGL ES استفاده از دو مثلث است که با هم کشیده شده اند:

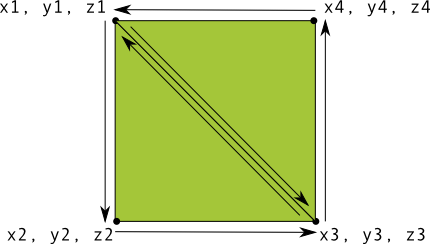
شکل 1. رسم مربع با استفاده از دو مثلث.
مجدداً، باید رئوس را در جهت خلاف جهت عقربههای ساعت برای هر دو مثلثی که این شکل را نشان میدهند تعریف کنید و مقادیر را در یک ByteBuffer
قرار دهید. به منظور اجتناب از تعریف دو مختصات مشترک توسط هر مثلث، از یک لیست ترسیمی استفاده کنید تا به خط لوله گرافیکی OpenGL ES بگویید چگونه این رئوس را ترسیم کند. در اینجا کد این شکل آمده است:
کاتلین
// number of coordinates per vertex in this array
const val COORDS_PER_VERTEX = 3
var squareCoords = floatArrayOf(
-0.5f, 0.5f, 0.0f, // top left
-0.5f, -0.5f, 0.0f, // bottom left
0.5f, -0.5f, 0.0f, // bottom right
0.5f, 0.5f, 0.0f // top right
)
class Square2 {
private val drawOrder = shortArrayOf(0, 1, 2, 0, 2, 3) // order to draw vertices
// initialize vertex byte buffer for shape coordinates
private val vertexBuffer: FloatBuffer =
// (# of coordinate values * 4 bytes per float)
ByteBuffer.allocateDirect(squareCoords.size * 4).run {
order(ByteOrder.nativeOrder())
asFloatBuffer().apply {
put(squareCoords)
position(0)
}
}
// initialize byte buffer for the draw list
private val drawListBuffer: ShortBuffer =
// (# of coordinate values * 2 bytes per short)
ByteBuffer.allocateDirect(drawOrder.size * 2).run {
order(ByteOrder.nativeOrder())
asShortBuffer().apply {
put(drawOrder)
position(0)
}
}
}
جاوا
public class Square {
private FloatBuffer vertexBuffer;
private ShortBuffer drawListBuffer;
// number of coordinates per vertex in this array
static final int COORDS_PER_VERTEX = 3;
static float squareCoords[] = {
-0.5f, 0.5f, 0.0f, // top left
-0.5f, -0.5f, 0.0f, // bottom left
0.5f, -0.5f, 0.0f, // bottom right
0.5f, 0.5f, 0.0f }; // top right
private short drawOrder[] = { 0, 1, 2, 0, 2, 3 }; // order to draw vertices
public Square() {
// initialize vertex byte buffer for shape coordinates
ByteBuffer bb = ByteBuffer.allocateDirect(
// (# of coordinate values * 4 bytes per float)
squareCoords.length * 4);
bb.order(ByteOrder.nativeOrder());
vertexBuffer = bb.asFloatBuffer();
vertexBuffer.put(squareCoords);
vertexBuffer.position(0);
// initialize byte buffer for the draw list
ByteBuffer dlb = ByteBuffer.allocateDirect(
// (# of coordinate values * 2 bytes per short)
drawOrder.length * 2);
dlb.order(ByteOrder.nativeOrder());
drawListBuffer = dlb.asShortBuffer();
drawListBuffer.put(drawOrder);
drawListBuffer.position(0);
}
}
این مثال به شما نگاهی به آنچه که برای ایجاد اشکال پیچیده تر با OpenGL نیاز است، می دهد. به طور کلی، شما از مجموعه های مثلث برای ترسیم اشیا استفاده می کنید. در درس بعدی یاد می گیرید که چگونه این اشکال را روی صفحه بکشید.
محتوا و نمونه کدها در این صفحه مشمول پروانههای توصیفشده در پروانه محتوا هستند. جاوا و OpenJDK علامتهای تجاری یا علامتهای تجاری ثبتشده Oracle و/یا وابستههای آن هستند.
تاریخ آخرین بهروزرسانی 2025-07-29 بهوقت ساعت هماهنگ جهانی.
[[["درک آسان","easyToUnderstand","thumb-up"],["مشکلم را برطرف کرد","solvedMyProblem","thumb-up"],["غیره","otherUp","thumb-up"]],[["اطلاعاتی که نیاز دارم وجود ندارد","missingTheInformationINeed","thumb-down"],["بیشازحد پیچیده/ مراحل بسیار زیاد","tooComplicatedTooManySteps","thumb-down"],["قدیمی","outOfDate","thumb-down"],["مشکل ترجمه","translationIssue","thumb-down"],["مشکل کد / نمونهها","samplesCodeIssue","thumb-down"],["غیره","otherDown","thumb-down"]],["تاریخ آخرین بهروزرسانی 2025-07-29 بهوقت ساعت هماهنگ جهانی."],[],[],null,["# Define shapes\n\nBeing able to define shapes to be drawn in the context of an OpenGL ES view is the first step in\ncreating high-end graphics for your app. Drawing with OpenGL ES can be a little tricky without\nknowing a few basic things about how OpenGL ES expects you to define graphic objects.\n\nThis lesson explains the OpenGL ES coordinate system relative to an Android device screen, the\nbasics of defining a shape, shape faces, as well as defining a triangle and a square.\n\nDefine a triangle\n-----------------\n\nOpenGL ES allows you to define drawn objects using coordinates in three-dimensional space. So,\nbefore you can draw a triangle, you must define its coordinates. In OpenGL, the typical way to do\nthis is to define a vertex array of floating point numbers for the coordinates. For maximum\nefficiency, you write these coordinates into a [ByteBuffer](/reference/java/nio/ByteBuffer), that is passed into the\nOpenGL ES graphics pipeline for processing. \n\n### Kotlin\n\n```kotlin\n// number of coordinates per vertex in this array\nconst val COORDS_PER_VERTEX = 3\nvar triangleCoords = floatArrayOf( // in counterclockwise order:\n 0.0f, 0.622008459f, 0.0f, // top\n -0.5f, -0.311004243f, 0.0f, // bottom left\n 0.5f, -0.311004243f, 0.0f // bottom right\n)\n\nclass Triangle {\n\n // Set color with red, green, blue and alpha (opacity) values\n val color = floatArrayOf(0.63671875f, 0.76953125f, 0.22265625f, 1.0f)\n\n private var vertexBuffer: FloatBuffer =\n // (number of coordinate values * 4 bytes per float)\n ByteBuffer.allocateDirect(triangleCoords.size * 4).run {\n // use the device hardware's native byte order\n order(ByteOrder.nativeOrder())\n\n // create a floating point buffer from the ByteBuffer\n asFloatBuffer().apply {\n // add the coordinates to the FloatBuffer\n put(triangleCoords)\n // set the buffer to read the first coordinate\n position(0)\n }\n }\n}\n```\n\n### Java\n\n```java\npublic class Triangle {\n\n private FloatBuffer vertexBuffer;\n\n // number of coordinates per vertex in this array\n static final int COORDS_PER_VERTEX = 3;\n static float triangleCoords[] = { // in counterclockwise order:\n 0.0f, 0.622008459f, 0.0f, // top\n -0.5f, -0.311004243f, 0.0f, // bottom left\n 0.5f, -0.311004243f, 0.0f // bottom right\n };\n\n // Set color with red, green, blue and alpha (opacity) values\n float color[] = { 0.63671875f, 0.76953125f, 0.22265625f, 1.0f };\n\n public Triangle() {\n // initialize vertex byte buffer for shape coordinates\n ByteBuffer bb = ByteBuffer.allocateDirect(\n // (number of coordinate values * 4 bytes per float)\n triangleCoords.length * 4);\n // use the device hardware's native byte order\n bb.order(ByteOrder.nativeOrder());\n\n // create a floating point buffer from the ByteBuffer\n vertexBuffer = bb.asFloatBuffer();\n // add the coordinates to the FloatBuffer\n vertexBuffer.put(triangleCoords);\n // set the buffer to read the first coordinate\n vertexBuffer.position(0);\n }\n}\n```\n\nBy default, OpenGL ES assumes a coordinate system where \\[0,0,0\\] (X,Y,Z) specifies the center of\nthe [GLSurfaceView](/reference/android/opengl/GLSurfaceView) frame,\n\\[1,1,0\\] is the top right corner of the frame and\n\\[-1,-1,0\\] is bottom left corner of the frame. For an illustration of this coordinate system, see the\n[OpenGL ES developer\nguide](/develop/ui/views/graphics/opengl/about-opengl#coordinate-mapping).\n\nNote that the coordinates of this shape are defined in a counterclockwise order. The drawing\norder is important because it defines which side is the front face of the shape, which you typically\nwant to have drawn, and the back face, which you can choose to not draw using the OpenGL ES cull\nface feature. For more information about faces and culling, see the\n[OpenGL ES](/develop/ui/views/graphics/opengl/about-opengl#faces-winding) developer guide.\n\nDefine a square\n---------------\n\nDefining triangles is pretty easy in OpenGL, but what if you want to get a just a little more\ncomplex? Say, a square? There are a number of ways to do this, but a typical path to drawing such a\nshape in OpenGL ES is to use two triangles drawn together:\n\n\n**Figure 1.** Drawing a square using two triangles.\n\nAgain, you should define the vertices in a counterclockwise order for both triangles that\nrepresent this shape, and put the values in a [ByteBuffer](/reference/java/nio/ByteBuffer). In order to avoid\ndefining the two coordinates shared by each triangle twice, use a drawing list to tell the\nOpenGL ES graphics pipeline how to draw these vertices. Here's the code for this shape: \n\n### Kotlin\n\n```kotlin\n// number of coordinates per vertex in this array\nconst val COORDS_PER_VERTEX = 3\nvar squareCoords = floatArrayOf(\n -0.5f, 0.5f, 0.0f, // top left\n -0.5f, -0.5f, 0.0f, // bottom left\n 0.5f, -0.5f, 0.0f, // bottom right\n 0.5f, 0.5f, 0.0f // top right\n)\n\nclass Square2 {\n\n private val drawOrder = shortArrayOf(0, 1, 2, 0, 2, 3) // order to draw vertices\n\n // initialize vertex byte buffer for shape coordinates\n private val vertexBuffer: FloatBuffer =\n // (# of coordinate values * 4 bytes per float)\n ByteBuffer.allocateDirect(squareCoords.size * 4).run {\n order(ByteOrder.nativeOrder())\n asFloatBuffer().apply {\n put(squareCoords)\n position(0)\n }\n }\n\n // initialize byte buffer for the draw list\n private val drawListBuffer: ShortBuffer =\n // (# of coordinate values * 2 bytes per short)\n ByteBuffer.allocateDirect(drawOrder.size * 2).run {\n order(ByteOrder.nativeOrder())\n asShortBuffer().apply {\n put(drawOrder)\n position(0)\n }\n }\n}\n```\n\n### Java\n\n```java\npublic class Square {\n\n private FloatBuffer vertexBuffer;\n private ShortBuffer drawListBuffer;\n\n // number of coordinates per vertex in this array\n static final int COORDS_PER_VERTEX = 3;\n static float squareCoords[] = {\n -0.5f, 0.5f, 0.0f, // top left\n -0.5f, -0.5f, 0.0f, // bottom left\n 0.5f, -0.5f, 0.0f, // bottom right\n 0.5f, 0.5f, 0.0f }; // top right\n\n private short drawOrder[] = { 0, 1, 2, 0, 2, 3 }; // order to draw vertices\n\n public Square() {\n // initialize vertex byte buffer for shape coordinates\n ByteBuffer bb = ByteBuffer.allocateDirect(\n // (# of coordinate values * 4 bytes per float)\n squareCoords.length * 4);\n bb.order(ByteOrder.nativeOrder());\n vertexBuffer = bb.asFloatBuffer();\n vertexBuffer.put(squareCoords);\n vertexBuffer.position(0);\n\n // initialize byte buffer for the draw list\n ByteBuffer dlb = ByteBuffer.allocateDirect(\n // (# of coordinate values * 2 bytes per short)\n drawOrder.length * 2);\n dlb.order(ByteOrder.nativeOrder());\n drawListBuffer = dlb.asShortBuffer();\n drawListBuffer.put(drawOrder);\n drawListBuffer.position(0);\n }\n}\n```\n\nThis example gives you a peek at what it takes to create more complex shapes with OpenGL. In\ngeneral, you use collections of triangles to draw objects. In the next lesson, you learn how to draw\nthese shapes on screen."]]