Ensuite, suivez le guide Créer un widget simple pour créer et définir les informations sur le widget de l'application dans le fichier @xml/my_app_widget_info.
La seule différence pour Glance est qu'il n'y a pas de fichier XML initialLayout, mais vous devez en définir un. Vous pouvez utiliser la mise en page de chargement prédéfinie fournie dans la bibliothèque:
Créez une classe qui étend GlanceAppWidget et remplace la méthode provideGlance. Cette méthode vous permet de charger les données nécessaires à l'affichage de votre widget:
classMyAppWidget:GlanceAppWidget(){overridesuspendfunprovideGlance(context:Context,id:GlanceId){// In this method, load data needed to render the AppWidget.// Use `withContext` to switch to another thread for long running// operations.provideContent{// create your AppWidget hereText("Hello World")}}}
Créez une instance dans le glanceAppWidget de votre GlanceAppWidgetReceiver:
classMyAppWidgetReceiver:GlanceAppWidgetReceiver(){// Let MyAppWidgetReceiver know which GlanceAppWidget to useoverridevalglanceAppWidget:GlanceAppWidget=MyAppWidget()}
Vous avez maintenant configuré un AppWidget à l'aide de Glance.
Créer une UI
L'extrait de code suivant montre comment créer l'UI:
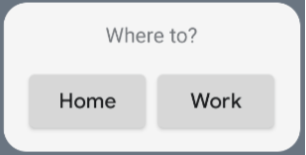
/* Import Glance Composables In the event there is a name clash with the Compose classes of the same name, you may rename the imports per https://kotlinlang.org/docs/packages.html#imports using the `as` keyword.import androidx.glance.Buttonimport androidx.glance.layout.Columnimport androidx.glance.layout.Rowimport androidx.glance.text.Text*/classMyAppWidget:GlanceAppWidget(){overridesuspendfunprovideGlance(context:Context,id:GlanceId){// Load data needed to render the AppWidget.// Use `withContext` to switch to another thread for long running// operations.provideContent{// create your AppWidget hereMyContent()}}@ComposableprivatefunMyContent(){Column(modifier=GlanceModifier.fillMaxSize(),verticalAlignment=Alignment.Top,horizontalAlignment=Alignment.CenterHorizontally){Text(text="Where to?",modifier=GlanceModifier.padding(12.dp))Row(horizontalAlignment=Alignment.CenterHorizontally){Button(text="Home",onClick=actionStartActivity<MyActivity>())Button(text="Work",onClick=actionStartActivity<MyActivity>())}}}}
L'exemple de code précédent effectue les opérations suivantes:
Au niveau supérieur Column, les éléments sont placés verticalement les uns après les autres.
Le Column étend sa taille pour correspondre à l'espace disponible (via GlanceModifier) et aligne son contenu en haut (verticalAlignment) et le centre horizontalement (horizontalAlignment).
Le contenu de Column est défini à l'aide du lambda. L'ordre est important.
Le premier élément de Column est un composant Text avec une marge de 12.dp.
Le deuxième élément est un Row, dans lequel les éléments sont placés horizontalement les uns à la suite des autres, avec deux Buttons centrés horizontalement (horizontalAlignment). L'affichage final dépend de l'espace disponible.
Voici un exemple de ce à quoi cela peut ressembler:
Figure 1. Exemple d'UI.
Vous pouvez modifier les valeurs d'alignement ou appliquer différentes valeurs de modificateur (telles que la marge intérieure) pour modifier l'emplacement et la taille des composants. Consultez la documentation de référence pour obtenir la liste complète des composants, des paramètres et des modificateurs disponibles pour chaque classe.
Le contenu et les exemples de code de cette page sont soumis aux licences décrites dans la Licence de contenu. Java et OpenJDK sont des marques ou des marques déposées d'Oracle et/ou de ses sociétés affiliées.
Dernière mise à jour le 2025/08/28 (UTC).
[[["Facile à comprendre","easyToUnderstand","thumb-up"],["J'ai pu résoudre mon problème","solvedMyProblem","thumb-up"],["Autre","otherUp","thumb-up"]],[["Il n'y a pas l'information dont j'ai besoin","missingTheInformationINeed","thumb-down"],["Trop compliqué/Trop d'étapes","tooComplicatedTooManySteps","thumb-down"],["Obsolète","outOfDate","thumb-down"],["Problème de traduction","translationIssue","thumb-down"],["Mauvais exemple/Erreur de code","samplesCodeIssue","thumb-down"],["Autre","otherDown","thumb-down"]],["Dernière mise à jour le 2025/08/28 (UTC)."],[],[],null,["The following sections describe how to create a simple app widget with Glance.\n| **Key Point:** Glance provides a modern approach to build app widgets using Compose, but is restricted by the limitations of `AppWidgets` and `RemoteViews`. Therefore, Glance uses different *composables* from the Jetpack Compose UI.\n\nDeclare the `AppWidget` in the Manifest\n\nAfter completing the [setup steps](/develop/ui/compose/glance/setup), declare the [`AppWidget`](/guide/topics/appwidgets) and its\nmetadata in your app.\n\n1. Extend the `AppWidget` receiver from `GlanceAppWidgetReceiver`:\n\n\n ```kotlin\n class MyAppWidgetReceiver : GlanceAppWidgetReceiver() {\n override val glanceAppWidget: GlanceAppWidget = TODO(\"Create GlanceAppWidget\")\n }https://github.com/android/snippets/blob/7a0ebbee11495f628cf9d574f6b6069c2867232a/compose/snippets/src/main/java/com/example/compose/snippets/glance/GlanceSnippets.kt#L100-L102\n ```\n\n \u003cbr /\u003e\n\n2. Register the provider of the app widget in your `AndroidManifest.xml` file\n and the associated metadata file:\n\n \u003creceiver android:name=\".glance.MyReceiver\"\n android:exported=\"true\"\u003e\n \u003cintent-filter\u003e\n \u003caction android:name=\"android.appwidget.action.APPWIDGET_UPDATE\" /\u003e\n \u003c/intent-filter\u003e\n \u003cmeta-data\n android:name=\"android.appwidget.provider\"\n android:resource=\"@xml/my_app_widget_info\" /\u003e\n \u003c/receiver\u003e \n https://github.com/android/snippets/blob/7a0ebbee11495f628cf9d574f6b6069c2867232a/compose/snippets/src/main/AndroidManifest.xml#L61-L69\n\nAdd the `AppWidgetProviderInfo` metadata\n\nNext, follow the [Create a simple widget](/guide/topics/appwidgets#MetaData) guide to create and define the app\nwidget info in the `@xml/my_app_widget_info` file.\n\nThe only difference for Glance is that there is no `initialLayout` XML, but\nyou must define one. You can use the predefined loading layout provided in\nthe library: \n\n \u003cappwidget-provider xmlns:android=\"http://schemas.android.com/apk/res/android\"\n android:initialLayout=\"@layout/glance_default_loading_layout\"\u003e\n \u003c/appwidget-provider\u003e \n https://github.com/android/snippets/blob/7a0ebbee11495f628cf9d574f6b6069c2867232a/compose/snippets/src/main/res/xml/my_app_widget_info.xml#L18-L20\n\nDefine `GlanceAppWidget`\n\n1. Create a new class that extends from [`GlanceAppWidget`](/reference/kotlin/androidx/glance/appwidget/GlanceAppWidget) and overrides the\n `provideGlance` method. This is the method where you can load data that is\n needed to render your widget:\n\n | **Note:** `provideGlance` runs on the main thread. To perform any long running operations in `provideGlance`, switch to another thread using `withContext`. See [Use coroutines for main-safety](/kotlin/coroutines/coroutines-adv#main-safety) for more details on how to run outside of the main thread.\n\n\n ```kotlin\n class MyAppWidget : GlanceAppWidget() {\n\n override suspend fun provideGlance(context: Context, id: GlanceId) {\n\n // In this method, load data needed to render the AppWidget.\n // Use `withContext` to switch to another thread for long running\n // operations.\n\n provideContent {\n // create your AppWidget here\n Text(\"Hello World\")\n }\n }\n }https://github.com/android/snippets/blob/7a0ebbee11495f628cf9d574f6b6069c2867232a/compose/snippets/src/main/java/com/example/compose/snippets/glance/GlanceSnippets.kt#L116-L129\n ```\n\n \u003cbr /\u003e\n\n2. Instantiate it in the `glanceAppWidget` on your `GlanceAppWidgetReceiver`:\n\n\n ```kotlin\n class MyAppWidgetReceiver : GlanceAppWidgetReceiver() {\n\n // Let MyAppWidgetReceiver know which GlanceAppWidget to use\n override val glanceAppWidget: GlanceAppWidget = MyAppWidget()\n }https://github.com/android/snippets/blob/7a0ebbee11495f628cf9d574f6b6069c2867232a/compose/snippets/src/main/java/com/example/compose/snippets/glance/GlanceSnippets.kt#L108-L112\n ```\n\n \u003cbr /\u003e\n\nYou've now configured an `AppWidget` using Glance.\n\nCreate UI\n\nThe following snippet demonstrates how to create the UI:\n\n\n```kotlin\n/* Import Glance Composables\n In the event there is a name clash with the Compose classes of the same name,\n you may rename the imports per https://kotlinlang.org/docs/packages.html#imports\n using the `as` keyword.\n\nimport androidx.glance.Button\nimport androidx.glance.layout.Column\nimport androidx.glance.layout.Row\nimport androidx.glance.text.Text\n*/\nclass MyAppWidget : GlanceAppWidget() {\n\n override suspend fun provideGlance(context: Context, id: GlanceId) {\n // Load data needed to render the AppWidget.\n // Use `withContext` to switch to another thread for long running\n // operations.\n\n provideContent {\n // create your AppWidget here\n MyContent()\n }\n }\n\n @Composable\n private fun MyContent() {\n Column(\n modifier = GlanceModifier.fillMaxSize(),\n verticalAlignment = Alignment.Top,\n horizontalAlignment = Alignment.CenterHorizontally\n ) {\n Text(text = \"Where to?\", modifier = GlanceModifier.padding(12.dp))\n Row(horizontalAlignment = Alignment.CenterHorizontally) {\n Button(\n text = \"Home\",\n onClick = actionStartActivity\u003cMyActivity\u003e()\n )\n Button(\n text = \"Work\",\n onClick = actionStartActivity\u003cMyActivity\u003e()\n )\n }\n }\n }\n}https://github.com/android/snippets/blob/7a0ebbee11495f628cf9d574f6b6069c2867232a/compose/snippets/src/main/java/com/example/compose/snippets/glance/GlanceSnippets.kt#L135-L178\n```\n\n\u003cbr /\u003e\n\nThe preceding code sample does the following:\n\n- In the top level [`Column`](/reference/kotlin/androidx/glance/layout/package-summary#column), items are placed vertically one after each other.\n- The `Column` expands its size to match the available space (via the [`GlanceModifier`](/reference/kotlin/androidx/glance/GlanceModifier)) and aligns its content to the top (`verticalAlignment`) and centers it horizontally (`horizontalAlignment`).\n- The `Column`'s content is defined using the lambda. The order matters.\n - The first item in the `Column` is a `Text` component with `12.dp` of padding.\n - The second item is a [`Row`](/reference/kotlin/androidx/glance/layout/package-summary#row), where items are placed horizontally one after each other, with two [`Buttons`](/reference/kotlin/androidx/glance/package-summary#button) centered horizontally (`horizontalAlignment`). The final display depends on the available space. The following image is an example of what it may look like:\n\n**Figure 1.** An example UI.\n\nYou can change the alignment values or apply different modifier values (such as\npadding) to change the placement and size of the components. See the [reference\ndocumentation](/reference/kotlin/androidx/glance/package-summary) for a full list of components, parameters, and available\nmodifiers for each class."]]