
การแจ้งเตือนจะให้ข้อมูลสั้นๆ ที่ทันท่วงทีเกี่ยวกับเหตุการณ์ในแอปขณะที่ไม่ได้ใช้งาน เอกสารนี้แสดงวิธีสร้างการแจ้งเตือนด้วยฟีเจอร์ต่างๆ ดูข้อมูลเบื้องต้นเกี่ยวกับลักษณะที่การแจ้งเตือนปรากฏใน Android ได้ที่ภาพรวมของการแจ้งเตือน ดูโค้ดตัวอย่างที่ใช้การแจ้งเตือนได้ในตัวอย่าง SociaLite ใน GitHub
โค้ดในหน้านี้ใช้ API NotificationCompat จากไลบรารี AndroidX
โดย API เหล่านี้ช่วยให้คุณเพิ่มฟีเจอร์ที่มีเฉพาะใน Android เวอร์ชันใหม่กว่า
ขณะที่ยังคงความเข้ากันได้กับ Android 9 (API ระดับ 28)
อย่างไรก็ตาม ฟีเจอร์บางอย่าง เช่น การดำเนินการตอบกลับในบรรทัด จะไม่มีผลใน
เวอร์ชันก่อนๆ
สร้างการแจ้งเตือนพื้นฐาน
การแจ้งเตือนในรูปแบบพื้นฐานและกะทัดรัดที่สุด หรือที่เรียกว่ารูปแบบยุบจะแสดงไอคอน ชื่อ และเนื้อหาข้อความจำนวนเล็กน้อย ส่วนนี้แสดงวิธีสร้างการแจ้งเตือนที่ผู้ใช้แตะเพื่อเปิดกิจกรรมในแอปได้
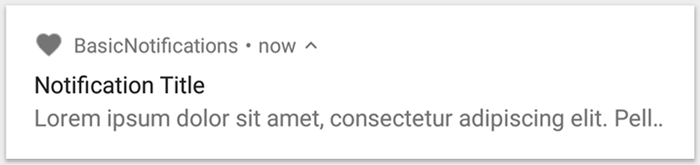
รูปที่ 1 การแจ้งเตือนที่มีไอคอน ชื่อ และข้อความ
ดูรายละเอียดเพิ่มเติมเกี่ยวกับส่วนต่างๆ ของการแจ้งเตือนได้ที่โครงสร้างของการแจ้งเตือน
ประกาศสิทธิ์รันไทม์
Android 13 (ระดับ API 33) ขึ้นไปรองรับสิทธิ์รันไทม์สำหรับการโพสต์การแจ้งเตือนที่ไม่ได้รับการยกเว้น (รวมถึงบริการที่ทำงานอยู่เบื้องหน้า (FGS)) จากแอป
สิทธิ์ที่คุณต้องประกาศในไฟล์ Manifest ของแอปจะปรากฏในข้อมูลโค้ดต่อไปนี้
<manifest ...>
    <uses-permission android:name="android.permission.POST_NOTIFICATIONS"/>
    <application ...>
        ...
    </application>
</manifest>
ดูรายละเอียดเพิ่มเติมเกี่ยวกับสิทธิ์รันไทม์ได้ที่สิทธิ์รันไทม์ของการแจ้งเตือน
ตั้งค่าเนื้อหาการแจ้งเตือน
หากต้องการเริ่มต้นใช้งาน ให้ตั้งค่าเนื้อหาและช่องทางการแจ้งเตือนโดยใช้ออบเจ็กต์
NotificationCompat.Builder ตัวอย่างต่อไปนี้แสดงวิธี
สร้างการแจ้งเตือนที่มีข้อมูลต่อไปนี้
ไอคอนขนาดเล็กที่ตั้งค่าโดย
setSmallIcon()นี่เป็นเนื้อหาที่ผู้ใช้มองเห็นได้เพียงเนื้อหาเดียวที่จำเป็นชื่อที่ตั้งค่าโดย
setContentTitle()ข้อความเนื้อหาที่ตั้งค่าโดย
setContentText()ลำดับความสำคัญของการแจ้งเตือนที่ตั้งค่าโดย
setPriority()ลำดับความสำคัญ จะเป็นตัวกำหนดระดับการรบกวนของการแจ้งเตือนใน Android 7.1 และเวอร์ชันก่อนหน้า สำหรับ Android 8.0 ขึ้นไป ให้ตั้งค่าความสำคัญของช่องทางตามที่แสดงในส่วนถัดไปแทน
val textTitle = "Title" val textContent = "Content" val builder = NotificationCompat.Builder(context, CHANNEL_ID) .setSmallIcon(R.drawable.ic_logo) .setContentTitle(textTitle) .setContentText(textContent) .setPriority(NotificationCompat.PRIORITY_DEFAULT)
เครื่องมือสร้าง NotificationCompat.Builder กำหนดให้คุณระบุรหัสช่องทาง
การดำเนินการนี้จำเป็นต่อความเข้ากันได้กับ Android 8.0 (API ระดับ 26) ขึ้นไป แต่เวอร์ชันก่อนหน้าจะละเว้น
โดยค่าเริ่มต้น จะมีการตัดเนื้อหาข้อความของการแจ้งเตือนให้อยู่ภายใน 1 บรรทัด คุณแสดงข้อมูลเพิ่มเติมได้โดยสร้างการแจ้งเตือนที่ขยายได้
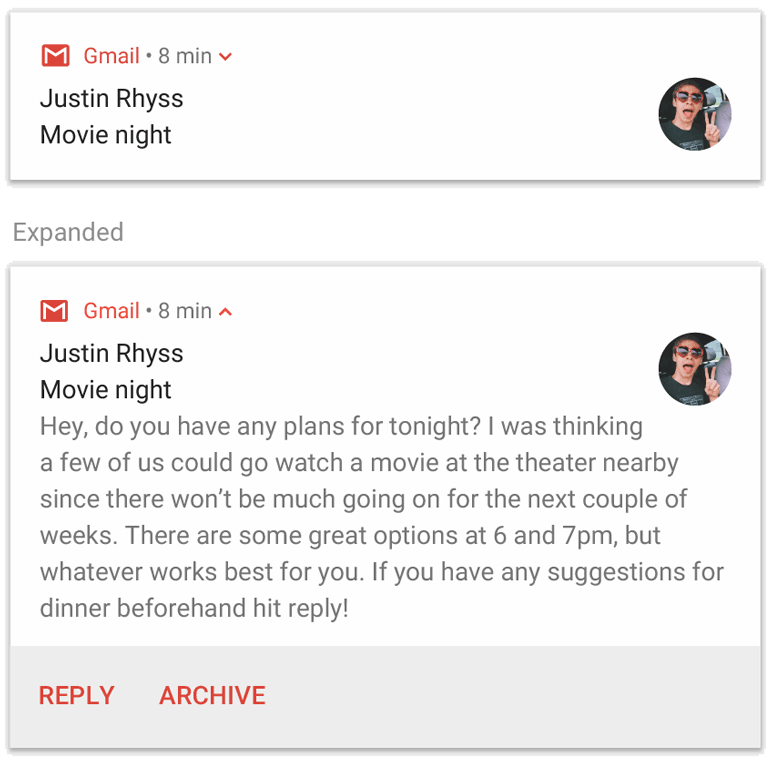
รูปที่ 2 การแจ้งเตือนที่ขยายได้ในรูปแบบที่ยุบและขยาย
หากต้องการให้การแจ้งเตือนยาวกว่านี้ คุณอาจเปิดใช้การแจ้งเตือนที่ขยายได้โดยเพิ่มเทมเพลตรูปแบบด้วย setStyle() ตัวอย่างเช่น
โค้ดต่อไปนี้จะสร้างพื้นที่ข้อความที่ใหญ่ขึ้น
val builder = NotificationCompat.Builder(context, CHANNEL_ID) .setSmallIcon(R.drawable.ic_logo) .setContentTitle("My notification") .setContentText("Much longer text that cannot fit one line...") .setStyle(NotificationCompat.BigTextStyle() .bigText("Much longer text that cannot fit one line...")) .setPriority(NotificationCompat.PRIORITY_DEFAULT)
ดูข้อมูลเพิ่มเติมเกี่ยวกับรูปแบบการแจ้งเตือนขนาดใหญ่อื่นๆ รวมถึงวิธีเพิ่มรูปภาพและตัวควบคุมการเล่นสื่อได้ที่ สร้างการแจ้งเตือนที่ขยายได้
สร้างช่องทางและตั้งค่าความสำคัญ
ก่อนที่จะแสดงการแจ้งเตือนใน Android 8.0 ขึ้นไป ให้ลงทะเบียนช่องทางการแจ้งเตือนของแอปกับระบบโดยส่งอินสแตนซ์ของ NotificationChannel ไปยัง createNotificationChannel() โค้ดต่อไปนี้ถูกบล็อกโดยเงื่อนไขในเวอร์ชัน SDK_INT
fun createNotificationChannel(context: Context) { // Create the NotificationChannel, but only on API 26+ because // the NotificationChannel class is not in the Support Library. if (Build.VERSION.SDK_INT >= Build.VERSION_CODES.O) { val name = context.getString(R.string.channel_name) val descriptionText = context.getString(R.string.channel_description) val importance = NotificationManager.IMPORTANCE_DEFAULT val channel = NotificationChannel(CHANNEL_ID, name, importance).apply { description = descriptionText } // Register the channel with the system. val notificationManager: NotificationManager = context.getSystemService(NotificationManager::class.java) as NotificationManager notificationManager.createNotificationChannel(channel) } }
เนื่องจากคุณต้องสร้างช่องทางการแจ้งเตือนก่อนโพสต์การแจ้งเตือนใน Android 8.0 ขึ้นไป ให้เรียกใช้โค้ดนี้ทันทีที่แอปเริ่มทำงาน คุณเรียกใช้ฟังก์ชันนี้ซ้ำๆ ได้อย่างปลอดภัย เนื่องจากระบบจะไม่ดำเนินการใดๆ หากมีการสร้างช่องทางการแจ้งเตือนที่มีอยู่แล้ว
เครื่องมือสร้าง NotificationChannel ต้องมี importance โดยใช้ค่าคงที่ค่าใดค่าหนึ่งจากคลาส NotificationManager พารามิเตอร์นี้จะกำหนดวิธีกระตุ้นให้ผู้ใช้สนใจการแจ้งเตือนที่อยู่ในช่องทางนี้ กำหนดลำดับความสำคัญด้วย setPriority() เพื่อรองรับ Android 7.1 และเวอร์ชันก่อนหน้า ดังที่แสดง
ในตัวอย่างก่อนหน้า
แม้ว่าคุณจะต้องตั้งค่าความสำคัญหรือลำดับความสำคัญของการแจ้งเตือนตามที่แสดงในตัวอย่างต่อไปนี้ แต่ระบบก็ไม่รับประกันลักษณะการทำงานของการแจ้งเตือนที่คุณได้รับ ในบางกรณี ระบบอาจเปลี่ยนระดับความสำคัญตามปัจจัยอื่นๆ และผู้ใช้สามารถกำหนดระดับความสำคัญของช่องทางหนึ่งๆ ใหม่ได้เสมอ
ดูข้อมูลเพิ่มเติมเกี่ยวกับความหมายของระดับต่างๆ ได้ที่หัวข้อระดับความสำคัญของการแจ้งเตือน
ตั้งค่าการดำเนินการเมื่อแตะของการแจ้งเตือน
การแจ้งเตือนทุกรายการต้องตอบสนองต่อการแตะ โดยปกติแล้วจะเป็นการเปิดกิจกรรมในแอปที่สอดคล้องกับการแจ้งเตือน โดยระบุ Intent ของเนื้อหาที่กำหนดด้วยออบเจ็กต์ PendingIntent
แล้วส่งไปยัง
setContentIntent()
ข้อมูลโค้ดต่อไปนี้แสดงวิธีสร้าง Intent พื้นฐานเพื่อเปิดกิจกรรมเมื่อผู้ใช้แตะการแจ้งเตือน
// Create an explicit intent for an Activity in your app. val intent = Intent(context, AlertDetails::class.java).apply { flags = Intent.FLAG_ACTIVITY_NEW_TASK or Intent.FLAG_ACTIVITY_CLEAR_TASK } val pendingIntent: PendingIntent = PendingIntent.getActivity(context, 0, intent, PendingIntent.FLAG_IMMUTABLE) val builder = NotificationCompat.Builder(context, CHANNEL_ID) .setSmallIcon(R.drawable.ic_logo) .setContentTitle("My notification") .setContentText("Hello World!") .setPriority(NotificationCompat.PRIORITY_DEFAULT) // Set the intent that fires when the user taps the notification. .setContentIntent(pendingIntent) .setAutoCancel(true)
โค้ดนี้เรียกใช้ setAutoCancel() ซึ่งจะนำ
การแจ้งเตือนออกโดยอัตโนมัติเมื่อผู้ใช้แตะการแจ้งเตือน
Intent Flag ในตัวอย่างก่อนหน้าจะรักษาประสบการณ์การไปยังส่วนต่างๆ ที่ผู้ใช้คาดหวังหลังจากที่ผู้ใช้เปิดแอปโดยใช้การแจ้งเตือน คุณอาจต้องใช้ฟีเจอร์นี้ ทั้งนี้ขึ้นอยู่กับประเภทกิจกรรมที่คุณกำลังจะเริ่ม ซึ่งอาจเป็นกิจกรรมใดกิจกรรมหนึ่งต่อไปนี้
กิจกรรมที่มีไว้สำหรับการตอบกลับการแจ้งเตือนเท่านั้น ไม่มีเหตุผลที่ผู้ใช้จะไปยังกิจกรรมนี้ในระหว่างการใช้งานแอปตามปกติ ดังนั้นกิจกรรมจึงเริ่มงานใหม่แทนที่จะเพิ่มลงในงานและ Back Stack ที่มีอยู่ของแอป นี่คือประเภทของ Intent ที่สร้างขึ้นในตัวอย่างก่อนหน้า
กิจกรรมที่มีอยู่ในโฟลว์แอปปกติของแอป ในกรณีนี้ การเริ่มกิจกรรมจะสร้าง Back Stack เพื่อให้เป็นไปตามความคาดหวังของผู้ใช้สำหรับปุ่มย้อนกลับและปุ่มขึ้น
แสดงการแจ้งเตือน
หากต้องการให้การแจ้งเตือนปรากฏขึ้น ให้เรียกใช้ NotificationManagerCompat.notify() โดยส่งรหัสที่ไม่ซ้ำกันสำหรับการแจ้งเตือนและผลลัพธ์ของ NotificationCompat.Builder.build() ซึ่ง
แสดงในตัวอย่างต่อไปนี้
with(NotificationManagerCompat.from(context)) { if (ActivityCompat.checkSelfPermission( context, Manifest.permission.POST_NOTIFICATIONS ) != PackageManager.PERMISSION_GRANTED ) { // TODO: Consider calling ActivityCompat#requestPermissions here // to request the missing permissions, and then overriding // public fun onRequestPermissionsResult(requestCode: Int, permissions: Array<out String>, // grantResults: IntArray) // to handle the case where the user grants the permission. See the documentation // for ActivityCompat#requestPermissions for more details. return@with } // notificationId is a unique int for each notification that you must define. notify(notificationId, builder.build())
บันทึกรหัสการแจ้งเตือนที่คุณส่งไปยัง NotificationManagerCompat.notify()
เนื่องจากคุณจะต้องใช้รหัสนี้เมื่อต้องการอัปเดตหรือ
นำการแจ้งเตือนออก
นอกจากนี้ หากต้องการทดสอบการแจ้งเตือนพื้นฐานในอุปกรณ์ที่ใช้ Android 13 ขึ้นไป ให้เปิดการแจ้งเตือนด้วยตนเองหรือสร้างกล่องโต้ตอบเพื่อขอการแจ้งเตือน
เพิ่มปุ่มดำเนินการ
การแจ้งเตือนจะมีปุ่มดำเนินการได้สูงสุด 3 ปุ่มที่ช่วยให้ผู้ใช้ตอบสนองต่อการแจ้งเตือนได้อย่างรวดเร็ว เช่น เลื่อนการช่วยเตือนหรือตอบกลับข้อความ แต่ปุ่มดำเนินการเหล่านี้ต้องไม่ซ้ำกับการดำเนินการที่เกิดขึ้นเมื่อผู้ใช้แตะการแจ้งเตือน
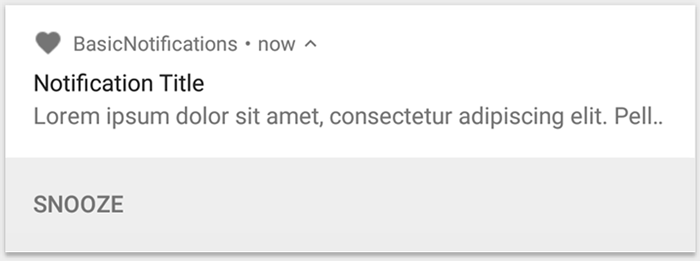
รูปที่ 3 การแจ้งเตือนที่มีปุ่มดำเนินการ 1 ปุ่ม
หากต้องการเพิ่มปุ่มดำเนินการ ให้ส่ง PendingIntent ไปยังเมธอด addAction()
ซึ่งคล้ายกับการตั้งค่าการแตะเริ่มต้นของการแจ้งเตือน ยกเว้นว่าคุณจะทำสิ่งอื่นๆ ได้แทนการเปิดกิจกรรม เช่น เริ่ม BroadcastReceiver ที่ทำงานในเบื้องหลังเพื่อไม่ให้การดำเนินการขัดจังหวะแอปที่เปิดอยู่แล้ว
ตัวอย่างเช่น โค้ดต่อไปนี้แสดงวิธีส่งการบรอดแคสต์ข้อความไปยังเครื่องรับที่เฉพาะเจาะจง
val ACTION_SNOOZE = "snooze" val snoozeIntent = Intent(context, MyBroadcastReceiver::class.java).apply { action = ACTION_SNOOZE putExtra(EXTRA_NOTIFICATION_ID, 0) } val snoozePendingIntent: PendingIntent = PendingIntent.getBroadcast(context, 0, snoozeIntent, PendingIntent.FLAG_IMMUTABLE) val builder = NotificationCompat.Builder(context, CHANNEL_ID) .setSmallIcon(R.drawable.ic_logo) .setContentTitle("My notification") .setContentText("Hello World!") .setPriority(NotificationCompat.PRIORITY_DEFAULT) .setContentIntent(pendingIntent) .addAction(R.drawable.snooze, context.getString(R.string.snooze), snoozePendingIntent)
ดูข้อมูลเพิ่มเติมเกี่ยวกับการสร้าง BroadcastReceiver เพื่อเรียกใช้การทำงานเบื้องหลังได้ที่ภาพรวมของการบรอดแคสต์ข้อความ
หากคุณต้องการสร้างการแจ้งเตือนที่มีปุ่มควบคุมการเล่นสื่อ เช่น หยุดชั่วคราวและข้ามแทร็ก โปรดดูวิธีสร้างการแจ้งเตือนที่มีตัวควบคุมสื่อ
เพิ่มการดำเนินการตอบกลับโดยตรง
การดำเนินการตอบกลับโดยตรงซึ่งเปิดตัวใน Android 7.0 (API ระดับ 24) ช่วยให้ผู้ใช้ป้อนข้อความลงในการแจ้งเตือนได้โดยตรง จากนั้นระบบจะส่งข้อความไปยังแอปของคุณโดยไม่ต้องเปิดกิจกรรม เช่น คุณสามารถใช้การดำเนินการตอบกลับโดยตรง เพื่อให้ผู้ใช้ตอบกลับข้อความหรืออัปเดตรายการงานได้จากภายในการแจ้งเตือน

รูปที่ 4 การแตะปุ่ม "ตอบกลับ" จะเปิดช่องป้อนข้อความ
การดำเนินการตอบกลับโดยตรงจะปรากฏเป็นปุ่มเพิ่มเติมในการแจ้งเตือนที่เปิดช่องป้อนข้อความ เมื่อผู้ใช้พิมพ์เสร็จแล้ว ระบบจะแนบข้อความตอบกลับไปยัง Intent ที่คุณระบุสําหรับการดำเนินการในการแจ้งเตือน และส่ง Intent ไปยังแอปของคุณ
เพิ่มปุ่มตอบกลับ
หากต้องการสร้างการดำเนินการในการแจ้งเตือนที่รองรับการตอบกลับโดยตรง ให้ทำตามขั้นตอนต่อไปนี้
สร้างอินสแตนซ์ของ RemoteInput.Builder ที่คุณเพิ่มลงในการดำเนินการในการแจ้งเตือนได้ เครื่องมือสร้างของคลาสนี้ยอมรับสตริงที่ระบบใช้เป็นคีย์สำหรับอินพุตข้อความ ต่อมาแอปของคุณใช้คีย์นั้นเพื่อดึงข้อความของอินพุต
// Key for the string that's delivered in the action's intent. val replyLabel: String = context.resources.getString(R.string.reply_label) val remoteInput: RemoteInput = RemoteInput.Builder(KEY_TEXT_REPLY).run { setLabel(replyLabel) build() }
สร้าง PendingIntent สำหรับการดำเนินการตอบกลับ
// Build a PendingIntent for the reply action to trigger. val replyPendingIntent: PendingIntent = PendingIntent.getBroadcast(context, conversationId, getMessageReplyIntent(conversationId), PendingIntent.FLAG_MUTABLE)
แนบออบเจ็กต์ RemoteInput ไปกับการดำเนินการโดยใช้
addRemoteInput()
// Create the reply action and add the remote input. val action: NotificationCompat.Action = NotificationCompat.Action.Builder(R.drawable.reply, context.getString(R.string.reply_label), replyPendingIntent) .addRemoteInput(remoteInput) .build()
ใช้การดำเนินการกับการแจ้งเตือนและเผยแพร่การแจ้งเตือน
// Build the notification and add the action.
val newMessageNotification = NotificationCompat.Builder(context, CHANNEL_ID)
    .setSmallIcon(R.drawable.ic_message)
    .setContentTitle(context.getString(R.string.title))
    .setContentText(context.getString(R.string.content))
    .addAction(action)
    .build()

// Issue the notification.
NotificationManagerCompat.from(context).notify(notificationId, newMessageNotification)
ระบบจะแจ้งให้ผู้ใช้ป้อนคำตอบเมื่อทริกเกอร์การดำเนินการในการแจ้งเตือน ดังที่แสดงในรูปที่ 4
ดึงข้อมูลจากผู้ใช้จากคำตอบ
หากต้องการรับข้อมูลจากผู้ใช้ที่ป้อนจาก UI การตอบกลับของการแจ้งเตือน ให้เรียกใช้ RemoteInput.getResultsFromIntent() โดยส่ง Intent ที่ได้รับจาก BroadcastReceiver ของคุณ
private fun getMessageText(intent: Intent): CharSequence? { return RemoteInput.getResultsFromIntent(intent)?.getCharSequence(KEY_TEXT_REPLY) }
หลังจากประมวลผลข้อความแล้ว ให้อัปเดตการแจ้งเตือนโดยเรียกใช้
NotificationManagerCompat.notify() ด้วยรหัสและแท็กเดียวกัน หากมี การดำเนินการนี้จำเป็นต่อการซ่อน UI การตอบกลับโดยตรงและเป็นการยืนยันกับผู้ใช้ว่าเราได้รับการตอบกลับและประมวลผลอย่างถูกต้องแล้ว
// Build a new notification, which informs the user that the system // handled their interaction with the previous notification. val repliedNotification = NotificationCompat.Builder(context, CHANNEL_ID) .setSmallIcon(R.drawable.message) .setContentText(context.getString(R.string.replied)) .build() // Issue the new notification. NotificationManagerCompat.from(context).notify(notificationId, repliedNotification)
ดึงข้อมูลอื่นๆ
การจัดการข้อมูลประเภทอื่นๆ จะทำงานคล้ายกันกับ RemoteInput ตัวอย่างต่อไปนี้ใช้รูปภาพเป็นอินพุต
val replyLabel: String = context.resources.getString(R.string.reply_label) val remoteInput: RemoteInput = RemoteInput.Builder(KEY_REPLY).run { setLabel(replyLabel) // Allow for image data types in the input. // This method can be used again to allow for other data types. setAllowDataType("image/*", true) build() }
เรียกใช้ RemoteInput#getDataResultsFromIntent และดึงข้อมูลที่เกี่ยวข้อง
class ReplyReceiver : BroadcastReceiver() { override fun onReceive(context: Context, intent: Intent) { val dataResults = RemoteInput.getDataResultsFromIntent(intent, KEY_REPLY) val imageUri: Uri? = dataResults?.get("image/*") as? Uri if (imageUri != null) { // Extract the image context.contentResolver.openInputStream(imageUri)?.use { inputStream -> val bitmap = BitmapFactory.decodeStream(inputStream) // Display the image // ... } } } companion object { const val KEY_REPLY = "key_reply" const val KEY_TEXT_REPLY = "key_text_reply" } }
เมื่อทำงานกับการแจ้งเตือนใหม่นี้ ให้ใช้บริบทที่ส่งไปยังเมธอด onReceive() ของผู้รับ
ต่อท้ายการตอบกลับที่ด้านล่างของการแจ้งเตือนโดยเรียกใช้
setRemoteInputHistory() แต่หากคุณกำลังสร้างแอปรับส่งข้อความ ให้สร้างการแจ้งเตือนสไตล์การรับส่งข้อความและต่อท้ายข้อความใหม่ในการสนทนา
ดูคำแนะนำเพิ่มเติมสำหรับการแจ้งเตือนจากแอปรับส่งข้อความได้ที่ส่วนเกี่ยวกับแนวทางปฏิบัติแนะนำสำหรับแอปรับส่งข้อความ
แสดงข้อความด่วน
แอปอาจต้องแสดงข้อความเร่งด่วนที่คำนึงถึงเวลา เช่น สายโทรศัพท์เรียกเข้าหรือเสียงปลุก ในสถานการณ์เช่นนี้ คุณสามารถเชื่อมโยง Intent แบบเต็มหน้าจอกับการแจ้งเตือนได้
เมื่อมีการเรียกใช้การแจ้งเตือน ผู้ใช้จะเห็นรูปแบบใดรูปแบบหนึ่งต่อไปนี้ขึ้นอยู่กับสถานะการล็อกของอุปกรณ์
- หากอุปกรณ์ของผู้ใช้ล็อกอยู่ กิจกรรมแบบเต็มหน้าจอจะปรากฏขึ้นและครอบคลุมหน้าจอล็อก
- หากอุปกรณ์ของผู้ใช้ปลดล็อกอยู่ การแจ้งเตือนจะปรากฏในรูปแบบที่ขยาย ซึ่งมีตัวเลือกในการจัดการหรือปิดการแจ้งเตือน
ข้อมูลโค้ดต่อไปนี้แสดงวิธีเชื่อมโยงการแจ้งเตือนกับ Intent แบบเต็มหน้าจอ
val fullScreenIntent = Intent(context, ImportantActivity::class.java) val fullScreenPendingIntent = PendingIntent.getActivity(context, 0, fullScreenIntent, PendingIntent.FLAG_IMMUTABLE) val builder = NotificationCompat.Builder(context, CHANNEL_ID) .setSmallIcon(R.drawable.ic_logo) .setContentTitle("My notification") .setContentText("Hello World!") .setPriority(NotificationCompat.PRIORITY_DEFAULT) .setFullScreenIntent(fullScreenPendingIntent, true)
ตั้งค่าระดับการมองเห็นของหน้าจอล็อก
หากต้องการควบคุมระดับรายละเอียดที่มองเห็นได้ในการแจ้งเตือนจากหน้าจอล็อก ให้เรียกใช้ setVisibility() และระบุค่าใดค่าหนึ่งต่อไปนี้
VISIBILITY_PUBLIC: เนื้อหาทั้งหมดของการแจ้งเตือนจะแสดงในหน้าจอล็อกVISIBILITY_SECRET: ไม่มีการแจ้งเตือนแสดงในหน้าจอล็อกVISIBILITY_PRIVATE: เฉพาะข้อมูลพื้นฐาน เช่น ไอคอนของการแจ้งเตือนและชื่อเนื้อหา จะแสดงในหน้าจอล็อก เนื้อหาทั้งหมดของการแจ้งเตือนไม่แสดง
เมื่อตั้งค่าเป็น VISIBILITY_PRIVATE คุณยังระบุเนื้อหาการแจ้งเตือนเวอร์ชันอื่นที่ซ่อนรายละเอียดบางอย่างได้ด้วย เช่น แอป SMS
อาจแสดงการแจ้งเตือนที่ระบุว่า "คุณมีข้อความใหม่ 3 ข้อความ" แต่ซ่อนเนื้อหาและผู้ส่งข้อความ หากต้องการส่งการแจ้งเตือนทางเลือกนี้ ให้สร้างการแจ้งเตือนทางเลือกด้วย NotificationCompat.Builder ตามปกติก่อน จากนั้นแนบการแจ้งเตือนทางเลือกไปกับการแจ้งเตือนปกติด้วย setPublicVersion()
โปรดทราบว่าผู้ใช้มีสิทธิ์ควบคุมสูงสุดเสมอว่าจะให้การแจ้งเตือนแสดงในหน้าจอล็อกหรือไม่ และสามารถควบคุมการแจ้งเตือนตามช่องทางการแจ้งเตือนของแอปได้
อัปเดตการแจ้งเตือน
หากต้องการอัปเดตการแจ้งเตือนหลังจากเผยแพร่การแจ้งเตือนไปแล้ว ให้เรียกใช้ NotificationManagerCompat.notify() อีกครั้งโดยส่งรหัสเดียวกันกับที่คุณใช้ก่อนหน้านี้ หากคุณปิดการแจ้งเตือนก่อนหน้านี้ ระบบจะสร้างการแจ้งเตือนใหม่แทน
คุณสามารถเลือกเรียกใช้ setOnlyAlertOnce() เพื่อให้การแจ้งเตือน
ขัดจังหวะผู้ใช้ด้วยเสียง การสั่น หรือสัญญาณภาพเฉพาะครั้งแรกที่การแจ้งเตือนปรากฏขึ้น และไม่ใช่สำหรับการอัปเดตในภายหลัง
นำการแจ้งเตือนออก
การแจ้งเตือนจะยังคงปรากฏให้เห็นจนกว่าจะเกิดเหตุการณ์ใดเหตุการณ์หนึ่งต่อไปนี้
- ผู้ใช้ปิดการแจ้งเตือน
- ผู้ใช้แตะการแจ้งเตือน หากคุณเรียกใช้
setAutoCancel()เมื่อสร้างการแจ้งเตือน - คุณเรียกใช้
cancel()สำหรับรหัสการแจ้งเตือนที่เฉพาะเจาะจง วิธีนี้จะ ลบการแจ้งเตือนที่กำลังดำเนินการด้วย - คุณเรียกใช้
cancelAll()ซึ่งจะนำการแจ้งเตือนทั้งหมดที่คุณเผยแพร่ก่อนหน้านี้ออก - ระยะเวลาที่ระบุจะผ่านไป หากคุณตั้งค่าการหมดเวลาเมื่อสร้างการแจ้งเตือนโดยใช้
setTimeoutAfter()หากจำเป็น คุณสามารถยกเลิก การแจ้งเตือนได้ก่อนที่ระยะหมดเวลาที่ระบุจะผ่านไป
แนวทางปฏิบัติแนะนำสำหรับแอปรับส่งข้อความ
โปรดพิจารณาแนวทางปฏิบัติแนะนำที่ระบุไว้ที่นี่เมื่อสร้างการแจ้งเตือนสำหรับแอปรับส่งข้อความและแชท
ใช้ MessagingStyle
ตั้งแต่ Android 7.0 (ระดับ API 24) เป็นต้นไป Android จะมีเทมเพลตรูปแบบการแจ้งเตือนสำหรับเนื้อหาการรับส่งข้อความโดยเฉพาะ การใช้คลาส
NotificationCompat.MessagingStyle คุณจะเปลี่ยนป้ายกำกับหลายรายการที่แสดงในการแจ้งเตือนได้ ซึ่งรวมถึงชื่อการสนทนา
ข้อความเพิ่มเติม และมุมมองเนื้อหาสำหรับการแจ้งเตือน
ข้อมูลโค้ดต่อไปนี้แสดงวิธีปรับแต่งรูปแบบการแจ้งเตือนโดยใช้คลาส MessagingStyle
val message1 = NotificationCompat.MessagingStyle.Message( messages[0].text, messages[0].time, messages[0].sender ) val message2 = NotificationCompat.MessagingStyle.Message( messages[1].text, messages[1].time, messages[1].sender ) notification = NotificationCompat.Builder(context, CHANNEL_ID) .setSmallIcon(R.drawable.ic_logo) .setStyle( NotificationCompat.MessagingStyle(Person.Builder().setName("Me").build()) .addMessage(message1) .addMessage(message2) ) .build()
ตั้งแต่ Android 9.0 (API ระดับ 28) เป็นต้นไป คุณจะต้องใช้คลาส
Person เพื่อให้การแสดงผลการแจ้งเตือน
และอวาตาร์เป็นไปอย่างเหมาะสม
เมื่อใช้ NotificationCompat.MessagingStyle ให้ทำดังนี้
- เรียกใช้
MessagingStyle.setConversationTitle()เพื่อตั้งชื่อแชทกลุ่มที่มีผู้เข้าร่วมมากกว่า 2 คน ชื่อการสนทนาที่ดีอาจเป็นชื่อของแชทเป็นกลุ่ม หรือหากไม่มีชื่อ ก็อาจเป็นรายชื่อผู้เข้าร่วมในการสนทนา หากไม่มีข้อมูลนี้ ระบบอาจเข้าใจผิดว่าข้อความดังกล่าวเป็นการสนทนาแบบตัวต่อตัวกับผู้ส่งข้อความล่าสุดในการสนทนา - ใช้เมธอด
MessagingStyle.setData()เพื่อรวมข้อความสื่อ เช่น รูปภาพ โดยรองรับประเภท MIME ของรูปแบบ image/*
ใช้การตอบกลับโดยตรง
การตอบกลับโดยตรงช่วยให้ผู้ใช้ตอบกลับข้อความในบรรทัดได้
- หลังจากที่ผู้ใช้ตอบกลับด้วยการดำเนินการตอบกลับในบรรทัด ให้ใช้
MessagingStyle.addMessage()เพื่ออัปเดตการแจ้งเตือนMessagingStyleและอย่าเพิกถอนหรือยกเลิกการแจ้งเตือน การไม่ยกเลิก การแจ้งเตือนจะช่วยให้ผู้ใช้ส่งการตอบกลับหลายรายการจากการแจ้งเตือนได้ - หากต้องการทำให้การดำเนินการตอบกลับในบรรทัดเข้ากันได้กับ Wear OS ให้เรียกใช้
Action.WearableExtender.setHintDisplayInlineAction(true) - ใช้เมธอด
addHistoricMessage()เพื่อระบุบริบทในการสนทนาตอบกลับโดยตรงด้วยการเพิ่มข้อความเก่าลงในการแจ้งเตือน
เปิดใช้ฟีเจอร์ช่วยตอบ
- หากต้องการเปิดใช้ฟีเจอร์ช่วยตอบ ให้เรียกใช้
setAllowGeneratedResponses(true)ใน การดำเนินการตอบกลับ ซึ่งจะทำให้ผู้ใช้เห็นคำตอบของฟีเจอร์ช่วยตอบเมื่อมีการบริดจ์การแจ้งเตือนกับอุปกรณ์ Wear OS การตอบกลับด้วยสมาร์ทรีพลายสร้างขึ้นจากโมเดลแมชชีนเลิร์นนิงบนนาฬิกาเท่านั้นโดยใช้บริบทที่ได้รับจากการแจ้งเตือนNotificationCompat.MessagingStyleและไม่มีการอัปโหลดข้อมูลไปยังอินเทอร์เน็ตเพื่อสร้างการตอบกลับ
เพิ่มข้อมูลเมตาของการแจ้งเตือน
- กำหนดข้อมูลเมตาของการแจ้งเตือนเพื่อบอกวิธีจัดการการแจ้งเตือนของแอปเมื่ออุปกรณ์อยู่ในโหมดอย่ารบกวนให้ระบบทราบ เช่น
ใช้เมธอด
addPerson()หรือsetCategory(Notification.CATEGORY_MESSAGE)เพื่อลบล้างโหมดห้ามรบกวน