
Most download traffic consists of images. As a result, the smaller you can make your downloadable images, the better a network experience your app can provide for users. This page provides guidance on making image files smaller and more network-friendly.
About image formats
Android apps typically use images that are in one or more of the following file formats: AVIF, PNG, JPG, and WebP. For each of these formats, there are steps you can take to reduce image sizes.
AVIF
Android 12 (API level 31) and higher support images that use the AV1 Image File Format (AVIF). AVIF is a container format for images and sequences of images encoded using AV1. AVIF takes advantage of the intra-frame encoded content from video compression. This dramatically improves image quality for the same file size when compared to older image formats, such as JPEG. For an in-depth look at the advantages of this format, see Jake Archibald's blog post.
PNG
A key to making your PNG files smaller is reducing the number of unique colors used in each row of pixels that comprises the image. By using fewer colors, you improve the compression potential at all of the other stages of the pipeline.
Reducing the number of unique colors makes a significant difference because PNG compression effectiveness is partly a function of the degree to which horizontally adjacent pixel colors vary. Thus, reducing the number of unique colors in each row of your PNG images can help in reducing their file sizes.
When deciding whether to pursue this strategy, you should keep in mind that reducing the number of unique colors effectively amounts to applying a lossy encoding stage to the image. However, an encoding tool may not be a good judge of how bad a seemingly small error looks to the human eye. Therefore, you should perform this work manually in order to help ensure the right balance between efficient compression and acceptable image quality.
There are two particularly useful approaches you can take: striving for indexed formats, and applying vector quantization.
Strive for indexed formats
Any attempt at color reduction should start with trying to optimize your colors so that you can use the INDEXED format when exporting the image as a PNG. The INDEXED color mode works by choosing the best 256 colors to use, and replacing all pixel values with indices into that color palette. The result is a reduction from 16 million (potential) colors to only 256 colors: from 3 (without transparency) or 4 (with transparency) bytes per pixel to 1 byte per pixel. This change is a significant first-step file size reduction.
Figure 1 shows shows an image and its indexed variant.

Figure 1. An image before and after conversion to the INDEXED format.
Figure 2 shows the color palette for the image in Figure 1:
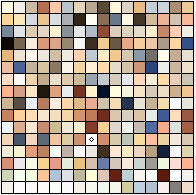
Figure 2. The color palette for the image in Figure 1.
Representing your image as a paletted image goes a long way toward significantly improving the file size, so it's worth investigating if the majority of your images can be converted.
Of course, not every image can be accurately represented with only 256 colors. Some images, for example, might need 257, 310, 512, or 912 colors to look correct. In such cases, vector quantization can also be helpful.
Vector quantization
The process of creating an indexed image may be better described as vector quantization (VQ). VQ serves as a rounding process for multidimensional numbers. In this process, all the colors in your image get grouped based upon their similarity. For a given group, all colors in that group are replaced by a single center point value, which minimizes error for colors in that cell (or "site" if you're using the Voronoi terminology). In Figure 3, the green dots represent input colors, and the red dots are the center points that replace the input colors. Each cell is bounded by blue lines.
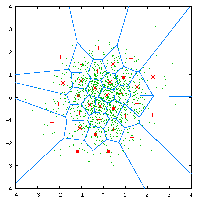
Figure 3. Applying vector quantization to the colors in an image.
The result of applying VQ to an image reduces the number of unique colors, replacing each group of colors with a single color that's "pretty close" in visual quality.
This technique also allows you to define the maximum number of unique colors in your image. For example, Figure 4 shows the a parrot head in 16.7 million colors (24 bits per pixel, or bpp) alongside a version that only allows only 16 (3 bpp) unique colors to be used.
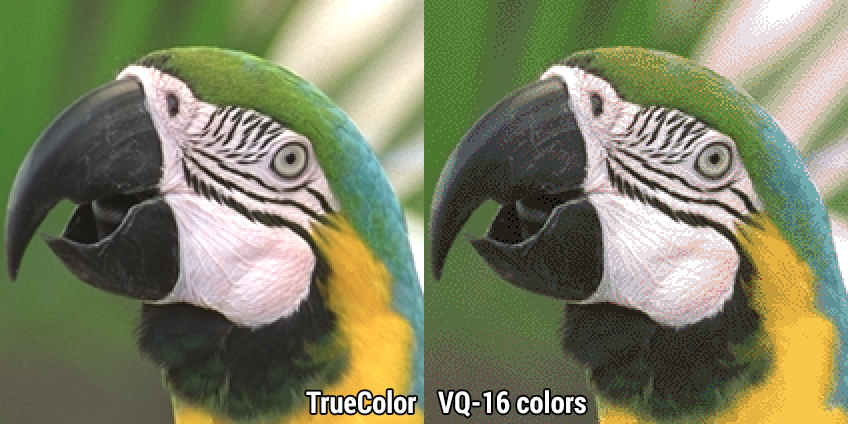
Figure 4. Image before and after application of vector quantification.
Immediately, you can see that there's a loss of quality; most of the gradient colors have been replaced, imparting a banding effect to the image. This image needs more than 16 unique colors.
Setting up a VQ step in your pipeline can help you get a better sense of the true number of unique colors that your image uses, and can help you reduce them significantly. There are a number of readily available tools that you can use to help you implement this technique.
JPG
If you are using JPG images, there are several small changes you can make that potentially provide significant file-size savings. These include:
- Producing a smaller file size through different encoding methods (without impacting quality).
- Adjusting quality slightly in order to yield better compression.
Pursuing these strategies can often net you file-size reductions of up to 25%.
When choosing tools, remember that photo exporting tools can insert unnecessary metadata, such as GPS information, into your images. At a minimum, try to leverage existing tools to help strip out this information from your files.
WebP
WebP is a newer image format supported from Android 4.2.1 (API level 17). This format provides superior lossless and lossy compression for images on the web. Using WebP, developers can create smaller, richer images. WebP lossless image files are, on average, 26% smaller than PNGs. These image files also support transparency (also known as alpha channel) at a cost of just 22% more bytes.
WebP lossy images are 25-34% smaller than comparable JPG images at equivalent SSIM quality indices. For cases when lossy RGB compression is acceptable, lossy WebP also supports transparency, typically producing file sizes 3 times smaller than PNG.
For more information about WebP, visit the WebP site.
You can convert existing BMP, JPG, PNG or static GIF images to WebP format using Android Studio. For more information, see Create WebP images Using Android Studio.
Selecting a format
Different image formats are suitable for different types of images. JPG and PNG have very different compression processes, and they produce quite different results.
The decision between PNG and JPG often comes down to the complexity of the image itself. Figure 5 shows two images that come out quite differently depending on which compression scheme the developer applies. The image on the left has many small details, and thus compresses more efficiently with JPG. The image on the right, with runs of the same color, compresses more efficiently with PNG.

Figure 5. Suitable cases for JPG vs. PNG
WebP as a format can support both lossy and lossless modes, making it an ideal replacement for both PNG and JPG. The only thing to keep in mind is that it only has native support on devices running Android 4.2.1 (API level 17) and higher. Fortunately, the large majority of devices satisfy that requirement.
Figure 6 provides a simple visualization to help you decide which compression scheme to use.
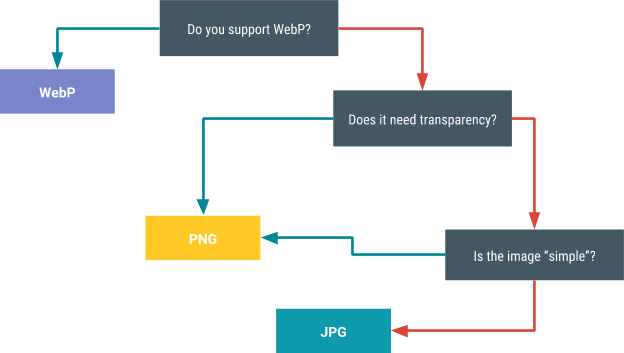
Figure 6. Deciding on a compression scheme
Determine optimal quality values
There are several techniques you can use to achieve the right balance between compression and image quality. One technique uses scalar values and therefore only works for JPG and WebP. The other technique takes advantage of the Butteraugli library, and is usable for all image formats.
Scalar values (JPG and WebP only)
The power of JPG and WebP comes from the fact that you can use a scalar value to balance quality against file size. The trick is finding out what the correct quality value is for your image. Too low a quality level produces a small file at the cost of image quality. Too high a quality level increases file size without providing a noticeable benefit to the user.
The most straightforward solution is to pick some non-maximum value, and use that value. However, be aware that the quality value affects every image differently. While a quality of 75%, for example, may look fine on most images, there may be some cases do not fare as well. You should make sure to test your chosen maximum value against a representative sample of images. Also, make sure to perform all of your tests against the original images, and not on compressed versions.
For large media applications that upload and re-send millions of JPGs a day, hand-tuning for each asset is impractical. You might address this challenge by specifying several different quality levels, according to image category. For example, you might set 35% as the quality setting for thumbnails, since a smaller image hides more compression artifacts.
Butteraugli
The Butteraugli project is a library to test an image's Psychovisual Error Threshold: the point at which a viewer starts to notice image degradation. In other words, this project attempts to quantify how distorted your compressed image is.
Butteraugli allows you to define a goal for visual quality, and then run PNG, JPG, WebP lossy, and WebP lossless compressions. You can then choose the image that is the best balance of file size and Butteraugli level. Figure 7 shows an example of how Butteraugli was used to find the minimal JPG quality level before the visual distortion was high enough for a user could perceive a problem; the result is a roughly 65% reduction in file size.
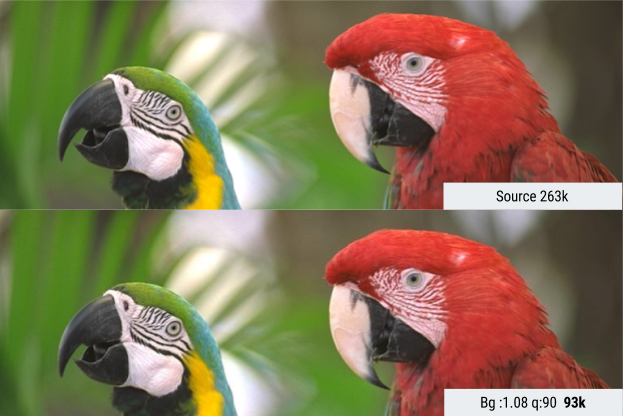
Figure 7. An image before and after application of Butteraugli technology.
Butteraugli allows you to proceed based on either output or input. That is, you can look for the lowest quality setting before a user perceives noticeable distortion in the resulting image, or you can iteratively set image-distortion levels to learn their associated quality levels.
Serving sizes
It is tempting to keep only a single resolution of an image on a server. When a device accesses the image, the server serves it at that one resolution and leaves downscaling to the device.
This solution is convenient for the developer, but potentially painful for the user, because the solution forces the user to download much more data than they need. You should instead store multiple sizes of images, and serve the size that is most appropriate for a particular use case. For example, for a thumbnail, serving an actual thumbnail image instead of serving and downscaling a full-size version consumes much less network bandwidth
This approach is good for download speed, and is less costly for users who may be using limited or metered data plans. Proceeding like this also results in the image's taking less space on the device and in main memory. In the case of large images, such as 4K ones, this approach also saves the device from having to resize images before loading them.
Implementing this approach requires that you have a backend image service to provide images at various resolutions with proper caching. There are existing services that can provide help with this task. For example, App Engine comes with image resizing functionality already installed.