
Android Studio enthält eine grafische Benutzeroberfläche, mit der Sie einen Navigationsgraphen erstellen und bearbeiten können. Im Grunde ist das ein Editor für die zugrunde liegende XML-Ressourcendatei.
Übersicht
Nachdem Sie Ihrer App ein XML-Diagramm hinzugefügt haben, wird es in Android Studio im Navigationseditor geöffnet. Im Navigationseditor können Sie Navigationsdiagramme visuell bearbeiten oder die zugrunde liegende XML-Datei direkt bearbeiten.
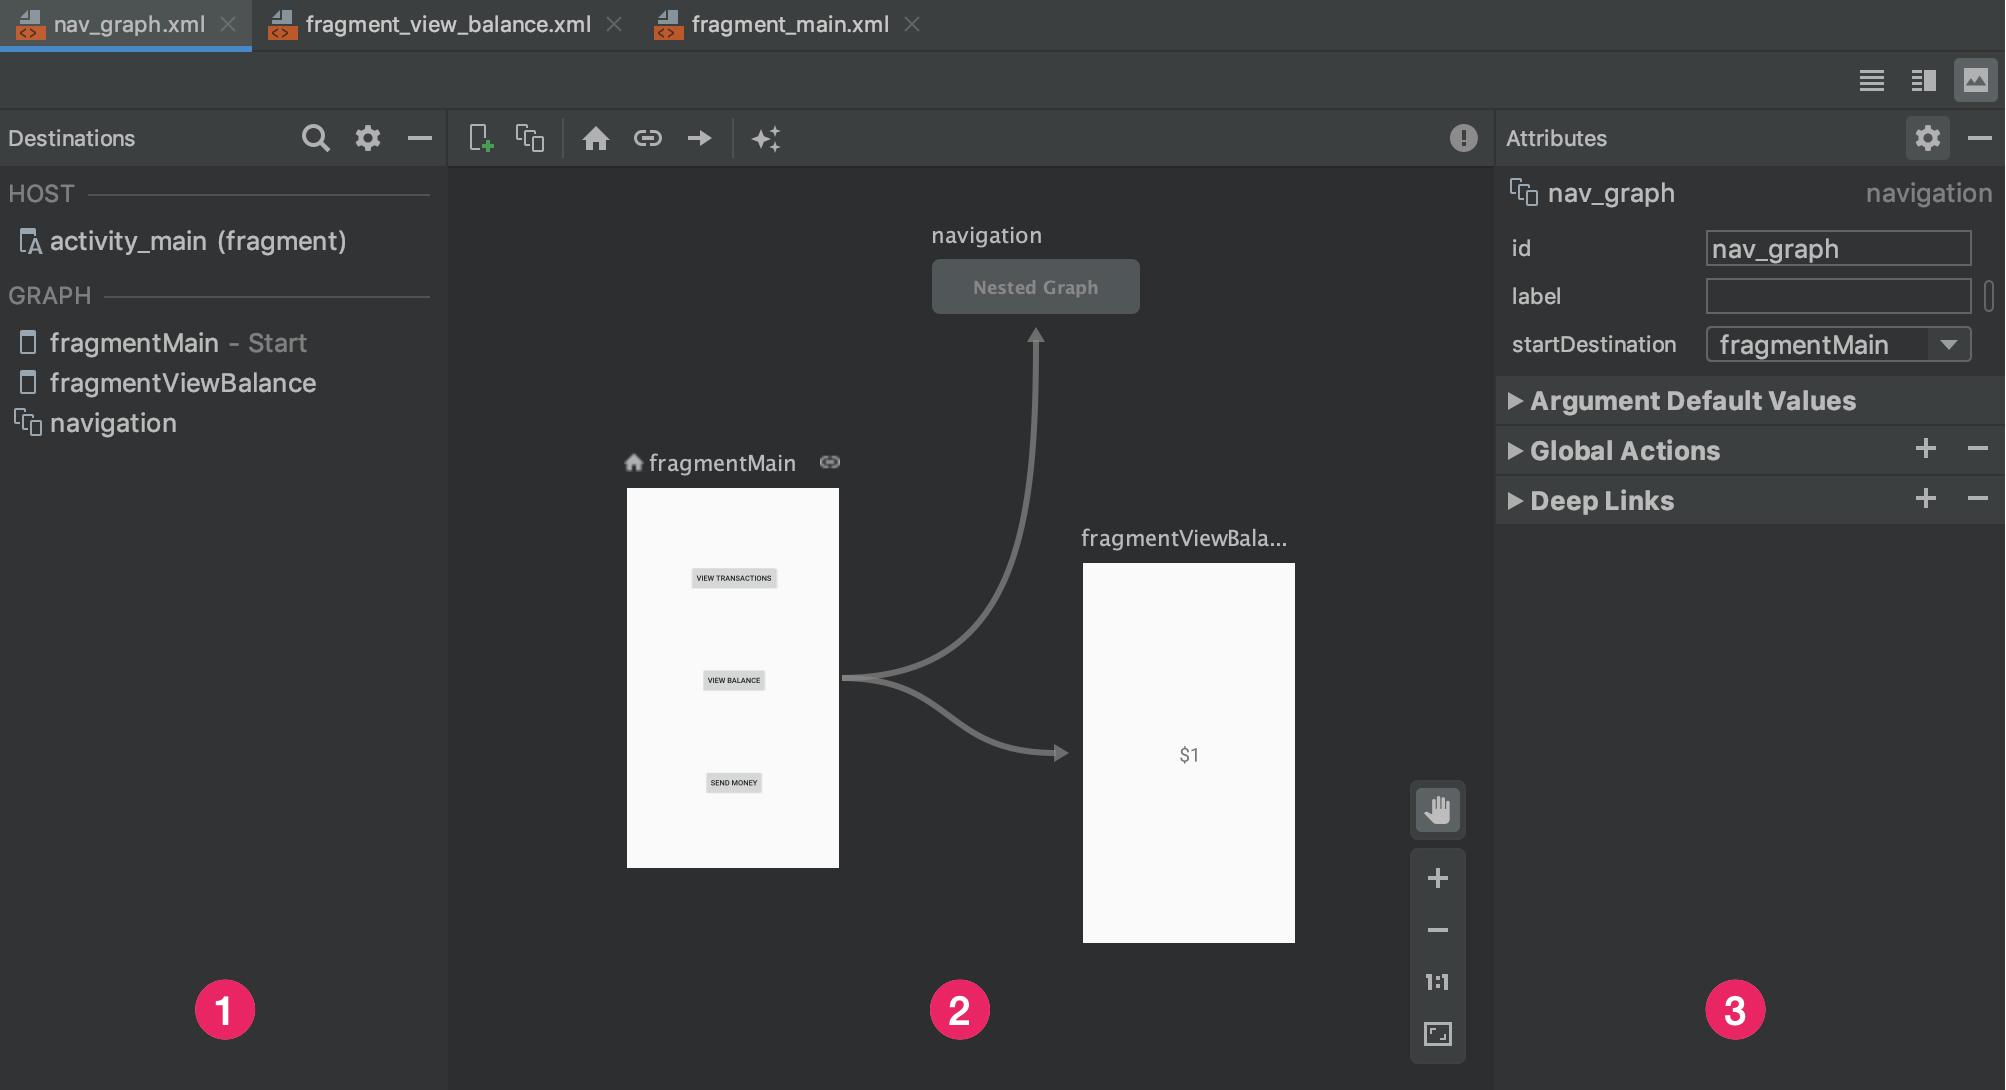
- Bereich „Ziele“: Hier werden der Navigationshost und alle Ziele im Graph Editor aufgeführt.
- Graph Editor (Grafikeditor): Enthält eine visuelle Darstellung Ihres Navigationsdiagramms. Sie können zwischen der Design-Ansicht und der zugrunde liegenden XML-Darstellung in der Text-Ansicht wechseln.
- Attribute: Hier werden Attribute für das ausgewählte Element im Navigationsdiagramm angezeigt.
Klicken Sie auf den Tab Text, um das entsprechende XML zu sehen, das in etwa so aussehen sollte:
<?xml version="1.0" encoding="utf-8"?>
<navigation xmlns:android="http://schemas.android.com/apk/res/android"
            xmlns:app="http://schemas.android.com/apk/res-auto"
            android:id="@+id/nav_graph">

</navigation>
Das Element <navigation> ist das Stammelement eines Navigationsdiagramms. Wenn Sie Ihrem Diagramm Ziele und Verbindungsaktionen hinzufügen, werden die entsprechenden <destination>- und <action>-Elemente hier als untergeordnete Elemente angezeigt. Wenn Sie [geschachtelte Diagramme][2] haben, werden sie als untergeordnete <navigation>-Elemente angezeigt.
Ziele hinzufügen
Sie können ein Ziel aus einem vorhandenen Fragment oder einer vorhandenen Aktivität erstellen. Sie können auch den Navigationseditor verwenden, um ein neues Ziel oder einen Platzhalter zu erstellen, der später durch ein Fragment oder eine Aktivität ersetzt wird.
In diesem Beispiel wird gezeigt, wie Sie ein neues Ziel erstellen. So fügen Sie mit dem Navigationseditor ein neues Ziel hinzu:
- Klicken Sie im Navigationseditor auf das Symbol Neues Ziel
 und dann auf Neues Ziel erstellen.
 - Erstellen Sie im angezeigten Dialogfeld New Android Component (Neue Android-Komponente) Ihr Fragment. Weitere Informationen zu Fragmenten finden Sie in der [Übersicht über Fragmente][3].
Zurück im Navigationseditor sehen Sie, dass Android Studio dieses Ziel dem Diagramm hinzugefügt hat.
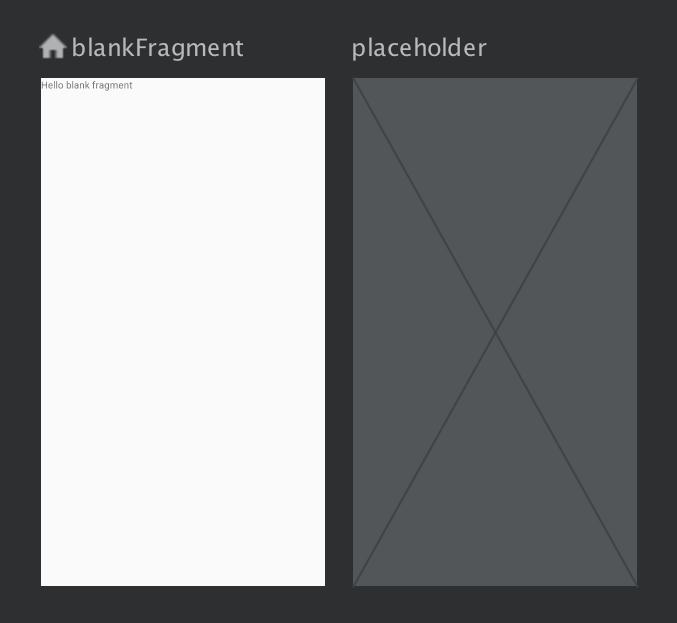
Abbildung 2 zeigt ein Beispiel für ein Ziel und ein [Platzhalterziel][4].
Weitere Möglichkeiten zum Hinzufügen von Zielen zum Navigationsdiagramm finden Sie unter [Zusätzliche Ziele][5].
Ziel aus einem vorhandenen Fragment oder einer vorhandenen Aktivität erstellen
Wenn Sie im Navigationseditor einen vorhandenen Zieltyp hinzufügen möchten, klicken Sie auf Neues Ziel ![]() .
.
Klicken Sie dann im Drop-down-Menü auf das entsprechende Ziel. Sie können sich jetzt eine Vorschau des Ziels in der Design-Ansicht ansehen. Der entsprechende XML-Code wird in der Text-Ansicht des Navigationsdiagramms angezeigt.
Neues Fragmentziel erstellen
So fügen Sie mit dem Navigationseditor einen neuen Zieltyp hinzu:
Klicken Sie im Navigationseditor auf das Symbol Neues Ziel
.Klicken Sie dann auf Neues Ziel erstellen.
Erstellen Sie im angezeigten Dialogfeld New Android Component (Neue Android-Komponente) das Fragment.
Zurück im Navigationseditor sehen Sie, dass Android Studio dieses Ziel dem Diagramm hinzugefügt hat.
Abbildung 3 zeigt ein Beispiel für ein Ziel und ein [Platzhalterziel][2].
Aufbau eines Ziels
Klicken Sie auf ein Ziel, um es auszuwählen, und notieren Sie sich die folgenden Attribute im Bereich Attribute:
- Das Feld Typ gibt an, ob das Ziel als Fragment, Aktivität oder andere benutzerdefinierte Klasse in Ihrem Quellcode implementiert ist.
- Das Feld Label enthält den für Nutzer lesbaren Namen des Ziels. Das kann in der Benutzeroberfläche angezeigt werden, z. B. wenn Sie [
NavGraph][10] über [setupWithNavController()][11] mit einemToolbarverbinden. Verwenden Sie daher Ressourcenstrings für diesen Wert. - Das Feld ID enthält die Ziel-ID, mit der im Code auf das Ziel verwiesen wird.
- Im Drop-down-Menü Klasse wird der Name der Klasse angezeigt, die dem Ziel zugeordnet ist. Klicken Sie auf dieses Drop-down-Menü, um die zugehörige Klasse in einen anderen Zieltyp zu ändern.
Klicken Sie auf den Tab Text, um die XML-Ansicht Ihres Navigationsdiagramms aufzurufen. Die XML-Datei enthält dieselben Attribute id, name, label und layout für das Ziel wie im folgenden Snippet:
<?xml version="1.0" encoding="utf-8"?>
<navigation xmlns:app="http://schemas.android.com/apk/res-auto"
    xmlns:tools="http://schemas.android.com/tools"
    xmlns:android="http://schemas.android.com/apk/res/android"
    app:startDestination="@id/blankFragment">
    <fragment
        android:id="@+id/blankFragment"
        android:name="com.example.cashdog.cashdog.BlankFragment"
        android:label="@string/label_blank"
        tools:layout="@layout/fragment_blank" />
</navigation>
NavHostFragment
Sie können auch den [Layout-Editor][1] verwenden, um einer Aktivität ein NavHostFragment hinzuzufügen. Gehen Sie dazu so vor:
- Doppelklicken Sie in der Liste der Projektdateien auf die XML-Datei des Layouts Ihrer Aktivität, um sie im Layout-Editor zu öffnen.
- Wählen Sie im Bereich Palette die Kategorie Container aus. Alternativ können Sie nach „NavHostFragment“ suchen.
- Ziehen Sie die
NavHostFragment-Ansicht auf Ihre Aktivität. - Wählen Sie im angezeigten Dialogfeld Navigationsdiagramme das entsprechende Navigationsdiagramm aus, das mit diesem
NavHostFragmentverknüpft werden soll, und klicken Sie dann auf OK.
Ziele verbinden
Eine Aktion ist eine logische Verbindung zwischen Zielen. Aktionen werden im Navigationsdiagramm als Pfeile dargestellt. Aktionen verbinden in der Regel ein Ziel mit einem anderen. Sie können aber auch [globale Aktionen][6] erstellen, mit denen Sie von überall in Ihrer App zu einem bestimmten Ziel gelangen.
Mit Aktionen stellen Sie die verschiedenen Pfade dar, die Nutzer in Ihrer App durchlaufen können. Beachten Sie, dass Sie zum tatsächlichen Navigieren zu Zielen weiterhin den Code für die Navigation schreiben müssen.
So verbinden Sie zwei Ziele mit dem Navigationseditor:
Bewegen Sie auf dem Tab Design den Mauszeiger auf die rechte Seite des Ziels, von dem aus Nutzer navigieren sollen. Wie in Abbildung 4 dargestellt, wird rechts neben dem Ziel ein Kreis angezeigt.
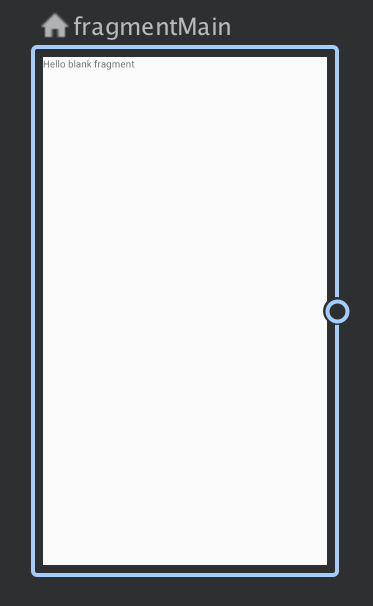
Abbildung 4. Ein Ziel mit einer Aktionsverbindung circle Ziehen Sie den Cursor auf das Ziel, zu dem Nutzer navigieren sollen, und lassen Sie die Maustaste los. Die resultierende Linie zwischen den beiden Zielen stellt eine Aktion dar, wie in Abbildung 5 dargestellt.
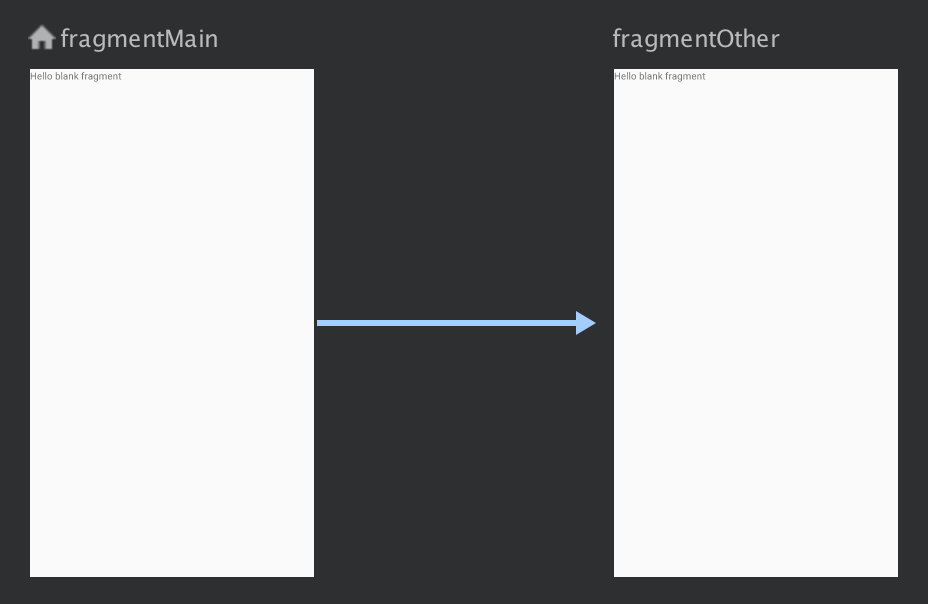
Abbildung 5. Ziele mit einer Aktion verknüpfen Klicken Sie auf den Pfeil, um die Aktion zu markieren. Die folgenden Attribute werden im Bereich Attribute angezeigt:
- Das Feld Type (Typ) enthält „Action“ (Aktion).
- Das Feld ID enthält die ID für die Aktion.
- Das Feld Ziel enthält die ID für das Zielfragment oder die Zielaktivität.
Klicken Sie auf den Tab Text, um zur XML-Ansicht zu wechseln. Dem Quellziel wird jetzt ein Aktionselement hinzugefügt. Die Aktion hat eine ID und ein Attribut „destination“, das die ID des nächsten Ziels enthält, wie im folgenden Beispiel gezeigt:
<?xml version="1.0" encoding="utf-8"?>
<navigation xmlns:app="http://schemas.android.com/apk/res-auto"
   xmlns:tools="http://schemas.android.com/tools"
   xmlns:android="http://schemas.android.com/apk/res/android"
   app:startDestination="@id/blankFragment">
   <fragment
       android:id="@+id/blankFragment"
       android:name="com.example.cashdog.cashdog.BlankFragment"
       android:label="@string/label_blank"
       tools:layout="@layout/fragment_blank" >
       <action
           android:id="@+id/action_blankFragment_to_blankFragment2"
           app:destination="@id/blankFragment2" />
   </fragment>
   <fragment
       android:id="@+id/blankFragment2"
       android:name="com.example.cashdog.cashdog.BlankFragment2"
       android:label="@string/label_blank_2"
       tools:layout="@layout/fragment_blank_fragment2" />
</navigation>
In Ihrem Navigationsdiagramm werden Aktionen durch <action>-Elemente dargestellt. Eine Aktion enthält mindestens eine eigene ID und die ID des Ziels, zu dem ein Nutzer weitergeleitet werden soll.
Platzhalterziele
Sie können Platzhalter verwenden, um nicht implementierte Ziele darzustellen. Ein Platzhalter dient als visuelle Darstellung eines Ziels. Im Navigationseditor können Sie Platzhalter wie jedes andere Ziel verwenden.
[1]: /studio/write/layout-editor [2]: /guide/navigation/navigation-nested-graphs [3]: /guide/components/fragments [4]: /guide/navigation/navigation-create-destinations#placeholders [5]: /guide/navigation/navigation-create-destinations [6]: /guide/navigation/navigation-global-action [10]: /reference/androidx/navigation/NavGraph [11]: /reference/androidx/navigation/ui/NavigationUI#setupWithNavController(androidx.appcompat.widget.Toolbar,%20androidx.navigation.NavController)