
Intent là một đối tượng nhắn tin mà bạn có thể dùng để yêu cầu một thao tác từ một thành phần ứng dụng khác.
Mặc dù ý định hỗ trợ giao tiếp giữa các thành phần theo nhiều cách, nhưng có 3 trường hợp sử dụng cơ bản:
- Bắt đầu một hoạt động
Activityđại diện cho một màn hình duy nhất trong ứng dụng. Bạn có thể bắt đầu một thực thể mới củaActivitybằng cách truyền mộtIntentđếnstartActivity().Intentmô tả hoạt động cần bắt đầu và mang theo mọi dữ liệu cần thiết.Nếu bạn muốn nhận kết quả từ hoạt động khi hoạt động đó kết thúc, hãy gọi
startActivityForResult(). Hoạt động của bạn sẽ nhận được kết quả dưới dạng một đối tượngIntentriêng biệt trong lệnh gọi lạionActivityResult()của hoạt động. Để biết thêm thông tin, hãy xem hướng dẫn về Hoạt động. - Bắt đầu một dịch vụ
Servicelà một thành phần thực hiện các thao tác ở chế độ nền mà không có giao diện người dùng. Với Android 5.0 (cấp độ API 21) trở lên, bạn có thể bắt đầu một dịch vụ bằngJobScheduler. Để biết thêm thông tin vềJobScheduler, hãy xemAPI-reference documentationcủa tính năng này.Đối với các phiên bản trước Android 5.0 (cấp độ API 21), bạn có thể bắt đầu một dịch vụ bằng cách sử dụng các phương thức của lớp
Service. Bạn có thể bắt đầu một dịch vụ để thực hiện thao tác một lần (chẳng hạn như tải tệp xuống) bằng cách truyền mộtIntentđếnstartService().Intentmô tả dịch vụ cần bắt đầu và mang theo mọi dữ liệu cần thiết.Nếu dịch vụ được thiết kế bằng giao diện máy khách-máy chủ, bạn có thể liên kết với dịch vụ từ một thành phần khác bằng cách truyền
IntentđếnbindService(). Để biết thêm thông tin, hãy xem hướng dẫn về Dịch vụ. - Phát sóng
Thông báo truyền tin là thông báo mà mọi ứng dụng đều có thể nhận được. Hệ thống phân phối nhiều thông báo (broadcast) cho các sự kiện hệ thống, chẳng hạn như khi hệ thống khởi động hoặc thiết bị bắt đầu sạc. Bạn có thể truyền một thông báo truyền tin đến các ứng dụng khác bằng cách truyền một
IntentđếnsendBroadcast()hoặcsendOrderedBroadcast().
Phần còn lại của trang này giải thích cách hoạt động của ý định và cách sử dụng ý định. Để biết thông tin liên quan, hãy xem bài viết Tương tác với các ứng dụng khác và Chia sẻ nội dung.
Các loại ý định
Có hai loại ý định:
- Ý định tường minh chỉ định thành phần nào của ứng dụng nào sẽ đáp ứng ý định, bằng cách chỉ định một
ComponentNameđầy đủ. Thông thường, bạn sẽ dùng một ý định tường minh để bắt đầu một thành phần trong ứng dụng của riêng mình, vì bạn biết tên lớp của hoạt động hoặc dịch vụ mà bạn muốn bắt đầu. Ví dụ: bạn có thể bắt đầu một hoạt động mới trong ứng dụng để phản hồi một thao tác của người dùng hoặc bắt đầu một dịch vụ để tải tệp xuống ở chế độ nền. - Ý định ngầm ẩn không đặt tên cho một thành phần cụ thể mà khai báo một thao tác chung cần thực hiện, cho phép một thành phần từ ứng dụng khác xử lý ý định đó. Ví dụ: nếu muốn cho người dùng thấy một vị trí trên bản đồ, bạn có thể dùng một ý định ngầm ẩn để yêu cầu một ứng dụng có khả năng khác cho thấy một vị trí cụ thể trên bản đồ.
Hình 1 cho thấy cách sử dụng ý định khi bắt đầu một hoạt động. Khi đối tượng Intent đặt tên rõ ràng cho một thành phần hoạt động cụ thể, hệ thống sẽ bắt đầu ngay thành phần đó.
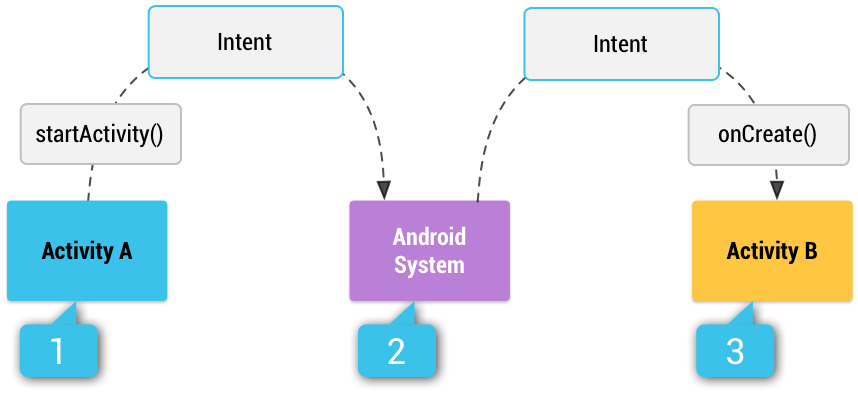
Hình 1. Cách một ý định ngầm ẩn được truyền qua hệ thống để bắt đầu một hoạt động khác: [1] Hoạt động A tạo một Intent có nội dung mô tả hành động và truyền nội dung đó đến startActivity(). [2] Hệ thống Android tìm kiếm tất cả các ứng dụng để tìm một bộ lọc ý định phù hợp với ý định. Khi tìm thấy một kết quả trùng khớp [3], hệ thống sẽ bắt đầu hoạt động trùng khớp (Activity B) bằng cách gọi phương thức onCreate() và truyền cho phương thức này Intent.
Khi bạn dùng một ý định ngầm ẩn, hệ thống Android sẽ tìm thấy thành phần thích hợp để khởi động bằng cách so sánh nội dung của ý định với bộ lọc ý định được khai báo trong tệp kê khai của các ứng dụng khác trên thiết bị. Nếu ý định khớp với một bộ lọc ý định, thì hệ thống sẽ khởi động thành phần đó và gửi đối tượng Intent đến thành phần đó. Nếu có nhiều bộ lọc ý định tương thích, hệ thống sẽ hiển thị một hộp thoại để người dùng có thể chọn ứng dụng sẽ dùng.
Bộ lọc ý định là một biểu thức trong tệp kê khai của ứng dụng, chỉ định loại ý định mà thành phần muốn nhận. Ví dụ: bằng cách khai báo một bộ lọc ý định cho một hoạt động, bạn có thể cho phép các ứng dụng khác trực tiếp bắt đầu hoạt động của bạn bằng một loại ý định nhất định. Tương tự, nếu bạn không khai báo bất kỳ bộ lọc ý định nào cho một hoạt động, thì hoạt động đó chỉ có thể bắt đầu bằng một ý định tường minh.
Thận trọng: Để đảm bảo an toàn cho ứng dụng, hãy luôn sử dụng một ý định rõ ràng khi bắt đầu một Service và không khai báo bộ lọc ý định cho các dịch vụ của bạn. Việc sử dụng một ý định ngầm ẩn để bắt đầu một dịch vụ sẽ gây ra mối nguy hiểm về bảo mật vì bạn không thể chắc chắn dịch vụ nào sẽ phản hồi ý định và người dùng không thể biết dịch vụ nào sẽ bắt đầu. Kể từ Android 5.0 (cấp độ API 21), hệ thống sẽ gửi một ngoại lệ nếu bạn gọi bindService() bằng một ý định ngầm ẩn.
Xây dựng ý định
Đối tượng Intent mang thông tin mà hệ thống Android dùng để xác định thành phần cần khởi động (chẳng hạn như tên thành phần chính xác hoặc danh mục thành phần sẽ nhận ý định), cùng với thông tin mà thành phần nhận dùng để thực hiện đúng hành động (chẳng hạn như hành động cần thực hiện và dữ liệu cần xử lý).
Intent chứa những thông tin chính sau đây:
- Tên thành phần
- Tên của thành phần cần khởi động.
Đây là thông tin không bắt buộc, nhưng là thông tin quan trọng giúp ý định trở nên rõ ràng, tức là ý định chỉ được gửi đến thành phần ứng dụng do tên thành phần xác định. Nếu không có tên thành phần, ý định sẽ là ngầm ẩn và hệ thống sẽ quyết định thành phần nào sẽ nhận ý định dựa trên thông tin ý định khác (chẳng hạn như thao tác, dữ liệu và danh mục – được mô tả bên dưới). Nếu cần khởi động một thành phần cụ thể trong ứng dụng, bạn nên chỉ định tên thành phần.
Lưu ý: Khi bắt đầu một
Service, hãy luôn chỉ định tên thành phần. Nếu không, bạn không thể chắc chắn dịch vụ nào sẽ phản hồi ý định và người dùng không thể biết dịch vụ nào sẽ bắt đầu.Trường này của
Intentlà một đối tượngComponentNamemà bạn có thể chỉ định bằng cách sử dụng tên lớp đủ điều kiện của thành phần đích, bao gồm cả tên gói của ứng dụng, chẳng hạn nhưcom.example.ExampleActivity. Bạn có thể đặt tên thành phần bằngsetComponent(),setClass(),setClassName()hoặc bằng hàm khởi tạoIntent. - Hành động
- Một chuỗi chỉ định thao tác chung cần thực hiện (chẳng hạn như xem hoặc chọn).
Trong trường hợp có ý định truyền tin, đây là hành động đã diễn ra và đang được báo cáo. Hành động này phần lớn quyết định cách cấu trúc phần còn lại của ý định, đặc biệt là thông tin có trong dữ liệu và các phần bổ sung.
Bạn có thể chỉ định các thao tác của riêng mình để sử dụng theo ý định trong ứng dụng (hoặc để các ứng dụng khác sử dụng nhằm gọi các thành phần trong ứng dụng của bạn), nhưng bạn thường chỉ định các hằng số thao tác do lớp
Intenthoặc các lớp khung khác xác định. Sau đây là một số thao tác thường gặp để bắt đầu một hoạt động:ACTION_VIEW- Sử dụng thao tác này trong một ý định có
startActivity()khi bạn có một số thông tin mà một hoạt động có thể cho người dùng thấy, chẳng hạn như ảnh để xem trong ứng dụng thư viện ảnh hoặc địa chỉ để xem trong ứng dụng bản đồ. ACTION_SEND- Còn được gọi là ý định chia sẻ, bạn nên sử dụng ý định này với
startActivity()khi có một số dữ liệu mà người dùng có thể chia sẻ thông qua một ứng dụng khác, chẳng hạn như ứng dụng email hoặc ứng dụng chia sẻ trên mạng xã hội.
Hãy xem tài liệu tham khảo về lớp
Intentđể biết thêm các hằng số xác định các thao tác chung. Các thao tác khác được xác định ở nơi khác trong khung Android, chẳng hạn như trongSettingscho các thao tác mở những màn hình cụ thể trong ứng dụng Cài đặt của hệ thống.Bạn có thể chỉ định thao tác cho một ý định bằng
setAction()hoặc bằng một hàm khởi tạoIntent.Nếu bạn xác định các thao tác của riêng mình, hãy nhớ thêm tên gói ứng dụng làm tiền tố, như trong ví dụ sau:
Kotlin
const val ACTION_TIMETRAVEL = "com.example.action.TIMETRAVEL"
Java
static final String ACTION_TIMETRAVEL = "com.example.action.TIMETRAVEL";
- Dữ liệu
- URI (đối tượng
Uri) tham chiếu đến dữ liệu sẽ được xử lý và/hoặc loại MIME của dữ liệu đó. Loại dữ liệu được cung cấp thường do hành động của ý định quyết định. Ví dụ: nếu hành động làACTION_EDIT, thì dữ liệu phải chứa URI của tài liệu cần chỉnh sửa.Khi tạo một ý định, bạn thường phải chỉ định loại dữ liệu (Loại MIME) ngoài URI của dữ liệu đó. Ví dụ: một hoạt động có thể hiển thị hình ảnh có thể sẽ không phát được tệp âm thanh, mặc dù định dạng URI có thể tương tự nhau. Việc chỉ định loại MIME của dữ liệu sẽ giúp hệ thống Android tìm thấy thành phần phù hợp nhất để nhận ý định của bạn. Tuy nhiên, đôi khi, bạn có thể suy luận loại MIME từ URI, đặc biệt là khi dữ liệu là một URI
content:. URIcontent:cho biết dữ liệu nằm trên thiết bị và doContentProviderkiểm soát, nhờ đó hệ thống có thể thấy loại MIME của dữ liệu.Để chỉ đặt URI dữ liệu, hãy gọi
setData(). Để chỉ đặt loại MIME, hãy gọisetType(). Nếu cần, bạn có thể đặt cả hai một cách rõ ràng bằngsetDataAndType().Thận trọng: Nếu bạn muốn đặt cả URI và loại MIME, đừng gọi
setData()vàsetType()vì mỗi phương thức sẽ vô hiệu hoá giá trị của phương thức kia. Luôn sử dụngsetDataAndType()để đặt cả URI và loại MIME. - Danh mục
- Một chuỗi chứa thông tin bổ sung về loại thành phần sẽ xử lý ý định. Bạn có thể đặt bất kỳ số lượng nội dung mô tả danh mục nào trong một ý định, nhưng hầu hết các ý định không yêu cầu danh mục.
Dưới đây là một số danh mục phổ biến:
CATEGORY_BROWSABLE- Hoạt động đích cho phép trình duyệt web khởi động để hiển thị dữ liệu mà một đường liên kết tham chiếu, chẳng hạn như hình ảnh hoặc thư điện tử.
CATEGORY_LAUNCHER- Hoạt động này là hoạt động ban đầu của một tác vụ và được liệt kê trong trình chạy ứng dụng của hệ thống.
Hãy xem nội dung mô tả lớp
Intentđể nắm được danh sách đầy đủ các danh mục.Bạn có thể chỉ định một danh mục bằng
addCategory().
Các thuộc tính được liệt kê ở trên (tên thành phần, thao tác, dữ liệu và danh mục) thể hiện các đặc điểm xác định của một ý định. Bằng cách đọc các thuộc tính này, hệ thống Android có thể xác định thành phần ứng dụng mà hệ thống nên khởi động. Tuy nhiên, ý định có thể mang theo thông tin bổ sung không ảnh hưởng đến cách ý định được phân giải thành một thành phần ứng dụng. Ý định cũng có thể cung cấp những thông tin sau:
- Thông tin khác
- Cặp khoá-giá trị mang thêm thông tin cần thiết để hoàn thành hành động được yêu cầu.
Tương tự như một số thao tác sử dụng các loại URI dữ liệu cụ thể, một số thao tác cũng sử dụng các phần bổ sung cụ thể.
Bạn có thể thêm dữ liệu bổ sung bằng nhiều phương thức
putExtra(), mỗi phương thức chấp nhận 2 tham số: tên khoá và giá trị. Bạn cũng có thể tạo một đối tượngBundlevới tất cả dữ liệu bổ sung, sau đó chènBundlevàoIntentbằngputExtras().Ví dụ: khi tạo một ý định gửi email bằng
ACTION_SEND, bạn có thể chỉ định người nhận to bằng khoáEXTRA_EMAILvà chỉ định tiêu đề subject bằng khoáEXTRA_SUBJECT.Lớp
Intentchỉ định nhiều hằng sốEXTRA_*cho các loại dữ liệu được chuẩn hoá. Nếu cần khai báo các khoá bổ sung của riêng mình (cho những ý định mà ứng dụng của bạn nhận được), hãy nhớ thêm tên gói của ứng dụng làm tiền tố, như trong ví dụ sau:Kotlin
const val EXTRA_GIGAWATTS = "com.example.EXTRA_GIGAWATTS"
Java
static final String EXTRA_GIGAWATTS = "com.example.EXTRA_GIGAWATTS";
Thận trọng: Không sử dụng dữ liệu
ParcelablehoặcSerializablekhi gửi một ý định mà bạn muốn một ứng dụng khác nhận được. Nếu một ứng dụng cố gắng truy cập vào dữ liệu trong một đối tượngBundlenhưng không có quyền truy cập vào lớp được phân tích cú pháp hoặc được chuyển đổi tuần tự, thì hệ thống sẽ tạo ra mộtRuntimeException. - Cờ
- Cờ được xác định trong lớp
Intentcó chức năng như siêu dữ liệu cho ý định. Các cờ có thể hướng dẫn hệ thống Android cách khởi chạy một hoạt động (ví dụ: hoạt động đó thuộc về tác vụ nào) và cách xử lý hoạt động đó sau khi khởi chạy (ví dụ: hoạt động đó có thuộc danh sách các hoạt động gần đây hay không).Để biết thêm thông tin, hãy xem phương thức
setFlags().
Ví dụ về ý định tường minh
Ý định tường minh là ý định mà bạn dùng để khởi chạy một thành phần ứng dụng cụ thể, chẳng hạn như một hoạt động hoặc dịch vụ cụ thể trong ứng dụng của bạn. Để tạo một ý định tường minh, hãy xác định tên thành phần cho đối tượng Intent – tất cả các thuộc tính ý định khác đều không bắt buộc.
Ví dụ: nếu đã tạo một dịch vụ trong ứng dụng của mình, có tên là DownloadService, được thiết kế để tải một tệp xuống từ web, bạn có thể bắt đầu dịch vụ đó bằng mã sau:
Kotlin
// Executed in an Activity, so 'this' is theContext// The fileUrl is a string URL, such as "http://www.example.com/image.png" val downloadIntent = Intent(this, DownloadService::class.java).apply { data =Uri.parse(fileUrl) } startService(downloadIntent)
Java
// Executed in an Activity, so 'this' is theContext// The fileUrl is a string URL, such as "http://www.example.com/image.png" Intent downloadIntent = new Intent(this, DownloadService.class); downloadIntent.setData(Uri.parse(fileUrl)); startService(downloadIntent);
Hàm khởi tạo Intent(Context, Class) cung cấp cho ứng dụng Context và thành phần một đối tượng Class. Do đó, ý định này sẽ bắt đầu một cách rõ ràng lớp DownloadService trong ứng dụng.
Để biết thêm thông tin về cách tạo và khởi động một dịch vụ, hãy xem hướng dẫn về Dịch vụ.
Ví dụ về ý định ngầm ẩn
Ý định ngầm ẩn chỉ định một thao tác có thể gọi bất kỳ ứng dụng nào trên thiết bị có khả năng thực hiện thao tác đó. Việc sử dụng một ý định ngầm ẩn là hữu ích khi ứng dụng của bạn không thể thực hiện hành động, nhưng các ứng dụng khác có thể thực hiện và bạn muốn người dùng chọn ứng dụng để sử dụng.
Ví dụ: nếu bạn có nội dung mà bạn muốn người dùng chia sẻ với người khác, hãy tạo một ý định bằng thao tác ACTION_SEND và thêm các phần bổ sung chỉ định nội dung cần chia sẻ. Khi bạn gọi startActivity() bằng ý định đó, người dùng có thể chọn một ứng dụng để chia sẻ nội dung.
Kotlin
// Create the text message with a string.
val sendIntent = Intent().apply {
    action = Intent.ACTION_SEND
    putExtra(Intent.EXTRA_TEXT, textMessage)
    type = "text/plain"
}

// Try to invoke the intent.
try {
    startActivity(sendIntent)
} catch (e: ActivityNotFoundException) {
    // Define what your app should do if no activity can handle the intent.
}
Java
// Create the text message with a string.
Intent sendIntent = new Intent();
sendIntent.setAction(Intent.ACTION_SEND);
sendIntent.putExtra(Intent.EXTRA_TEXT, textMessage);
sendIntent.setType("text/plain");

// Try to invoke the intent.
try {
    startActivity(sendIntent);
} catch (ActivityNotFoundException e) {
    // Define what your app should do if no activity can handle the intent.
}
Khi startActivity() được gọi, hệ thống sẽ kiểm tra tất cả các ứng dụng đã cài đặt để xác định ứng dụng nào có thể xử lý loại ý định này (một ý định có thao tác ACTION_SEND và mang dữ liệu "text/plain"). Nếu chỉ có một ứng dụng có thể xử lý yêu cầu này, thì ứng dụng đó sẽ mở ngay lập tức và được cấp ý định. Nếu không có ứng dụng nào khác xử lý được, ứng dụng của bạn có thể nắm bắt ActivityNotFoundException xảy ra. Nếu nhiều hoạt động chấp nhận ý định này, hệ thống sẽ hiển thị một hộp thoại như hộp thoại trong Hình 2 để người dùng có thể chọn ứng dụng sẽ sử dụng.
Hướng dẫn về cách chuyển người dùng đến một ứng dụng khác cũng cung cấp thêm thông tin về việc chạy các ứng dụng khác.
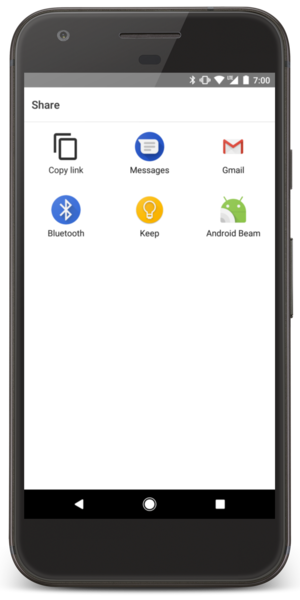
Hình 2. Hộp thoại trình chọn.
Buộc trình chọn ứng dụng
Khi có nhiều ứng dụng phản hồi ý định ngầm ẩn của bạn, người dùng có thể chọn ứng dụng sẽ dùng và đặt ứng dụng đó làm lựa chọn mặc định cho hành động. Khả năng chọn một ứng dụng mặc định sẽ hữu ích khi thực hiện một thao tác mà mỗi lần người dùng có khả năng sẽ muốn sử dụng cùng một ứng dụng, chẳng hạn như khi mở trang web (người dùng thường chỉ ưu tiên một trình duyệt web).
Tuy nhiên, nếu nhiều ứng dụng có thể phản hồi ý định và người dùng có thể muốn sử dụng một ứng dụng khác mỗi lần, thì bạn nên hiện rõ hộp thoại trình chọn. Hộp thoại trình chọn yêu cầu người dùng chọn ứng dụng sẽ sử dụng cho thao tác (người dùng không thể chọn ứng dụng mặc định cho thao tác đó). Ví dụ: khi ứng dụng của bạn thực hiện thao tác "chia sẻ" bằng thao tác ACTION_SEND, người dùng có thể muốn chia sẻ bằng một ứng dụng khác tuỳ thuộc vào tình huống hiện tại của họ, vì vậy, bạn phải luôn sử dụng hộp thoại bộ chọn, như minh hoạ trong Hình 2.
Để hiển thị trình chọn, hãy tạo Intent bằng createChooser() và truyền ý định đó vào startActivity(), như trong ví dụ sau.
Ví dụ này hiển thị một hộp thoại chứa danh sách các ứng dụng phản hồi ý định được chuyển vào phương thức createChooser() và dùng văn bản đã cung cấp làm tiêu đề hộp thoại.
Kotlin
val sendIntent = Intent(Intent.ACTION_SEND)
...

// Always use string resources for UI text.
// This says something like "Share this photo with"
val title: String = resources.getString(R.string.chooser_title)
// Create intent to show the chooser dialog
val chooser: Intent = Intent.createChooser(sendIntent, title)

// Verify the original intent will resolve to at least one activity
if (sendIntent.resolveActivity(packageManager) != null) {
    startActivity(chooser)
}
Java
Intent sendIntent = new Intent(Intent.ACTION_SEND);
...

// Always use string resources for UI text.
// This says something like "Share this photo with"
String title = getResources().getString(R.string.chooser_title);
// Create intent to show the chooser dialog
Intent chooser = Intent.createChooser(sendIntent, title);

// Verify the original intent will resolve to at least one activity
if (sendIntent.resolveActivity(getPackageManager()) != null) {
    startActivity(chooser);
}
Phát hiện các lượt khởi chạy ý định không an toàn
Ứng dụng của bạn có thể khởi chạy các ý định để di chuyển giữa các thành phần bên trong ứng dụng hoặc để thực hiện một hành động thay cho một ứng dụng khác. Để cải thiện tính bảo mật của nền tảng, Android 12 (cấp độ API 31) trở lên cung cấp một tính năng gỡ lỗi cảnh báo bạn nếu ứng dụng của bạn khởi chạy một ý định theo cách không an toàn. Ví dụ: ứng dụng của bạn có thể thực hiện một hoạt động khởi chạy không an toàn của một ý định lồng nhau, đây là một ý định được truyền dưới dạng một thành phần bổ sung trong một ý định khác.
Nếu ứng dụng của bạn thực hiện cả hai hành động sau đây, thì hệ thống sẽ phát hiện một lượt khởi chạy ý định không an toàn và một lỗi vi phạm StrictMode sẽ xảy ra:
- Ứng dụng của bạn sẽ tách các ý định lồng nhau khỏi các thành phần đi kèm của ý định đã phân phối.
- Ứng dụng của bạn sẽ bắt đầu ngay một thành phần ứng dụng bằng cách dùng ý định lồng nhau đó, chẳng hạn như chuyển ý định đến
startActivity(),startService()hoặcbindService().
Để biết thêm thông tin về cách xác định trường hợp này và thực hiện các thay đổi đối với ứng dụng của bạn, hãy đọc bài đăng trên blog về Ý định lồng nhau trên Android trên Medium.
Kiểm tra xem có ý định nào không an toàn được khởi chạy không
Để kiểm tra xem có hoạt động khởi chạy ý định không an toàn trong ứng dụng của bạn hay không, hãy gọi detectUnsafeIntentLaunch() khi bạn định cấu hình VmPolicy, như minh hoạ trong đoạn mã sau. Nếu ứng dụng của bạn phát hiện thấy lỗi vi phạm StrictMode, bạn nên dừng thực thi ứng dụng để bảo vệ thông tin có khả năng nhạy cảm.
Kotlin
fun onCreate() {
    StrictMode.setVmPolicy(VmPolicy.Builder()
        // Other StrictMode checks that you've previously added.
        // ...
        .detectUnsafeIntentLaunch()
        .penaltyLog()
        // Consider also adding penaltyDeath()
        .build())
}
Java
protected void onCreate() {
    StrictMode.setVmPolicy(new VmPolicy.Builder()
        // Other StrictMode checks that you've previously added.
        // ...
        .detectUnsafeIntentLaunch()
        .penaltyLog()
        // Consider also adding penaltyDeath()
        .build());
}
Sử dụng ý định một cách có trách nhiệm hơn
Để giảm thiểu khả năng khởi chạy ý định không an toàn và vi phạm StrictMode, hãy làm theo các phương pháp hay nhất sau.
Chỉ sao chép những phần bổ sung thiết yếu trong các ý định, đồng thời thực hiện mọi quy trình dọn dẹp và xác thực cần thiết. Ứng dụng của bạn có thể sao chép các thành phần bổ sung từ một ý định sang một ý định khác dùng để chạy một thành phần mới. Điều này xảy ra khi ứng dụng của bạn gọi putExtras(Intent) hoặc putExtras(Bundle).
Nếu ứng dụng của bạn thực hiện một trong các thao tác này, hãy chỉ sao chép những dữ liệu bổ sung mà thành phần nhận mong đợi. Nếu ý định khác (nhận bản sao) khởi chạy một thành phần không được xuất, hãy điều chỉnh và xác thực các phần bổ sung trước khi sao chép chúng vào ý định khởi chạy thành phần.
Không xuất các thành phần của ứng dụng một cách không cần thiết. Ví dụ: nếu bạn dự định chạy một thành phần ứng dụng bằng cách sử dụng một ý định lồng nhau nội bộ, hãy đặt thuộc tính android:exported của thành phần đó thành false.
Sử dụng PendingIntent thay vì ý định lồng nhau. Nhờ đó, khi một ứng dụng khác giải mã PendingIntent của Intent chứa ứng dụng đó, ứng dụng khác có thể chạy PendingIntent bằng danh tính của ứng dụng của bạn. Cấu hình này cho phép ứng dụng khác chạy an toàn mọi thành phần, kể cả thành phần không được xuất, trong ứng dụng của bạn.
Sơ đồ trong hình 2 cho thấy cách hệ thống chuyển quyền kiểm soát từ ứng dụng (máy khách) của bạn sang một ứng dụng (dịch vụ) khác, rồi quay lại ứng dụng của bạn:
- Ứng dụng của bạn tạo một ý định gọi một hoạt động trong một ứng dụng khác. Trong ý định đó, bạn thêm một đối tượng
PendingIntentlàm thành phần bổ sung. Ý định đang chờ xử lý này sẽ gọi một thành phần trong ứng dụng của bạn; thành phần này không được xuất. - Khi nhận được ý định của ứng dụng, ứng dụng kia sẽ trích xuất đối tượng
PendingIntentlồng nhau. - Ứng dụng khác gọi phương thức
send()trên đối tượngPendingIntent. - Sau khi chuyển quyền kiểm soát trở lại ứng dụng của bạn, hệ thống sẽ gọi ý định đang chờ xử lý bằng ngữ cảnh của ứng dụng.

Hình 2. Sơ đồ về hoạt động giao tiếp giữa các ứng dụng khi dùng một ý định đang chờ xử lý lồng nhau.
Nhận ý định ngầm ẩn
Để quảng cáo những ý định ngầm mà ứng dụng của bạn có thể nhận được, hãy khai báo một hoặc nhiều bộ lọc ý định cho từng thành phần ứng dụng bằng phần tử <intent-filter> trong tệp kê khai.
Mỗi bộ lọc ý định chỉ định loại ý định mà bộ lọc đó chấp nhận dựa trên thao tác, dữ liệu và danh mục của ý định. Hệ thống chỉ gửi một ý định ngầm ẩn đến thành phần ứng dụng của bạn nếu ý định đó có thể truyền qua một trong các bộ lọc ý định của bạn.
Lưu ý: Ý định tường minh luôn được gửi đến mục tiêu của nó, bất kể thành phần đó khai báo bộ lọc ý định nào.
Một thành phần ứng dụng phải khai báo các bộ lọc riêng biệt cho từng công việc riêng biệt mà thành phần đó có thể thực hiện. Ví dụ: một hoạt động trong ứng dụng thư viện ảnh có thể có 2 bộ lọc: một bộ lọc để xem ảnh và một bộ lọc khác để chỉnh sửa ảnh. Khi hoạt động bắt đầu, hoạt động này sẽ kiểm tra Intent và quyết định cách hoạt động dựa trên thông tin trong Intent (chẳng hạn như có hiện các chế độ kiểm soát của trình chỉnh sửa hay không).
Mỗi bộ lọc ý định được xác định bằng một phần tử <intent-filter> trong tệp kê khai của ứng dụng, được lồng trong thành phần ứng dụng tương ứng (chẳng hạn như phần tử <activity>).
Trong mỗi thành phần ứng dụng có chứa một phần tử <intent-filter>, hãy đặt một giá trị rõ ràng cho android:exported.
Thuộc tính này cho biết liệu các ứng dụng khác có thể truy cập vào thành phần ứng dụng hay không. Trong một số trường hợp, chẳng hạn như các hoạt động có bộ lọc ý định bao gồm danh mục LAUNCHER, bạn nên đặt thuộc tính này thành true. Nếu không, bạn nên đặt thuộc tính này thành false.
Cảnh báo: Nếu một hoạt động, dịch vụ hoặc broadcast receiver trong ứng dụng của bạn sử dụng bộ lọc ý định và không đặt giá trị cho android:exported một cách rõ ràng, thì ứng dụng của bạn sẽ không thể cài đặt trên thiết bị chạy Android 12 trở lên.
Trong <intent-filter>, bạn có thể chỉ định loại ý định cần chấp nhận bằng cách sử dụng một hoặc nhiều trong số 3 phần tử này:
<action>- Khai báo thao tác theo ý định được chấp nhận trong thuộc tính
name. Giá trị phải là giá trị chuỗi theo nghĩa đen của một thao tác, chứ không phải hằng số lớp. <data>- Khai báo loại dữ liệu được chấp nhận, bằng cách sử dụng một hoặc nhiều thuộc tính chỉ định nhiều khía cạnh của URI dữ liệu (
scheme,host,port,path) và loại MIME. <category>- Khai báo danh mục ý định được chấp nhận trong thuộc tính
name. Giá trị phải là giá trị chuỗi theo nghĩa đen của một thao tác, chứ không phải hằng số lớp.Lưu ý: Để nhận ý định ngầm ẩn, bạn phải thêm danh mục
CATEGORY_DEFAULTvào bộ lọc ý định. Các phương thứcstartActivity()vàstartActivityForResult()xử lý mọi ý định như thể chúng đã khai báo danh mụcCATEGORY_DEFAULT. Nếu bạn không khai báo danh mục này trong bộ lọc ý định, thì sẽ không có ý định ngầm ẩn nào được phân giải cho hoạt động của bạn.
Ví dụ: đây là một khai báo hoạt động có bộ lọc ý định để nhận ý định ACTION_SEND khi loại dữ liệu là văn bản:
<activity android:name="ShareActivity" android:exported="false">
    <intent-filter>
        <action android:name="android.intent.action.SEND"/>
        <category android:name="android.intent.category.DEFAULT"/>
        <data android:mimeType="text/plain"/>
    </intent-filter>
</activity>
Bạn có thể tạo một bộ lọc bao gồm nhiều phiên bản của <action>, <data> hoặc <category>.
Nếu có, bạn cần chắc chắn rằng thành phần có thể xử lý mọi tổ hợp của các phần tử bộ lọc đó.
Khi muốn xử lý nhiều loại ý định, nhưng chỉ trong các tổ hợp cụ thể của loại hành động, dữ liệu và danh mục, thì bạn cần tạo nhiều bộ lọc ý định.
Một ý định ngầm ẩn được kiểm thử dựa trên một bộ lọc bằng cách so sánh ý định với từng phần tử trong số 3 phần tử. Để được gửi đến thành phần, ý định phải vượt qua cả 3 bài kiểm thử. Nếu không khớp được dù chỉ một trong số các thành phần đó, hệ thống Android sẽ không gửi ý định đến thành phần. Tuy nhiên, vì một thành phần có thể có nhiều bộ lọc ý định, nên một ý định không truyền qua một trong các bộ lọc của thành phần có thể truyền qua một bộ lọc khác. Bạn có thể xem thêm thông tin về cách hệ thống phân giải ý định trong phần bên dưới về Phân giải ý định.
Thận trọng: Việc sử dụng bộ lọc ý định không phải là cách an toàn để ngăn các ứng dụng khác khởi động thành phần của bạn. Mặc dù bộ lọc ý định hạn chế một thành phần chỉ phản hồi một số loại ý định ngầm ẩn nhất định, nhưng một ứng dụng khác có thể khởi động thành phần ứng dụng của bạn bằng cách sử dụng một ý định tường minh nếu nhà phát triển xác định tên thành phần của bạn.
Nếu bạn muốn chỉ ứng dụng của riêng bạn mới có thể khởi động một trong các thành phần của bạn, thì đừng khai báo bộ lọc ý định trong tệp kê khai. Thay vào đó, hãy đặt thuộc tính exported thành "false" cho thành phần đó.
Tương tự, để tránh vô tình chạy Service của một ứng dụng khác, hãy luôn sử dụng một ý định tường minh để bắt đầu dịch vụ của riêng bạn.
Lưu ý:
Đối với tất cả các hoạt động, bạn phải khai báo bộ lọc ý định trong tệp kê khai.
Tuy nhiên, bạn có thể đăng ký bộ lọc cho broadcast receiver một cách linh động bằng cách gọi registerReceiver(). Sau đó, bạn có thể huỷ đăng ký receiver bằng unregisterReceiver(). Thao tác này cho phép ứng dụng của bạn chỉ lắng nghe các thông báo truyền tin cụ thể trong một khoảng thời gian nhất định khi ứng dụng đang chạy.
Bộ lọc mẫu
Để minh hoạ một số hành vi của bộ lọc ý định, sau đây là một ví dụ trong tệp kê khai của một ứng dụng chia sẻ trên mạng xã hội:
<activity android:name="MainActivity" android:exported="true">
    <!-- This activity is the main entry, should appear in app launcher -->
    <intent-filter>
        <action android:name="android.intent.action.MAIN" />
        <category android:name="android.intent.category.LAUNCHER" />
    </intent-filter>
</activity>

<activity android:name="ShareActivity" android:exported="false">
    <!-- This activity handles "SEND" actions with text data -->
    <intent-filter>
        <action android:name="android.intent.action.SEND"/>
        <category android:name="android.intent.category.DEFAULT"/>
        <data android:mimeType="text/plain"/>
    </intent-filter>
    <!-- This activity also handles "SEND" and "SEND_MULTIPLE" with media data -->
    <intent-filter>
        <action android:name="android.intent.action.SEND"/>
        <action android:name="android.intent.action.SEND_MULTIPLE"/>
        <category android:name="android.intent.category.DEFAULT"/>
        <data android:mimeType="application/vnd.google.panorama360+jpg"/>
        <data android:mimeType="image/*"/>
        <data android:mimeType="video/*"/>
    </intent-filter>
</activity>
Hoạt động đầu tiên, MainActivity, là điểm truy cập chính của ứng dụng – hoạt động mở ra khi người dùng khởi chạy ứng dụng lần đầu bằng biểu tượng trình chạy:
- Thao tác
ACTION_MAINcho biết đây là điểm truy cập chính và không mong đợi bất kỳ dữ liệu ý định nào. - Danh mục
CATEGORY_LAUNCHERcho biết biểu tượng của hoạt động này sẽ được đặt trong trình chạy ứng dụng của hệ thống. Nếu phần tử<activity>không chỉ định biểu tượng bằngicon, thì hệ thống sẽ sử dụng biểu tượng trong phần tử<application>.
Bạn phải ghép hai thành phần này với nhau để hoạt động xuất hiện trong trình chạy ứng dụng.
Hoạt động thứ hai, ShareActivity, nhằm mục đích hỗ trợ việc chia sẻ nội dung văn bản và nội dung nghe nhìn. Mặc dù người dùng có thể truy cập vào hoạt động này bằng cách chuyển đến hoạt động đó từ MainActivity, nhưng họ cũng có thể truy cập trực tiếp vào ShareActivity từ một ứng dụng khác phát hành một ý định ngầm trùng khớp với một trong hai bộ lọc ý định.
Lưu ý: Loại MIME, application/vnd.google.panorama360+jpg, là một kiểu dữ liệu đặc biệt chỉ định ảnh toàn cảnh mà bạn có thể xử lý bằng API ảnh toàn cảnh của Google.
Khớp ý định với bộ lọc ý định của các ứng dụng khác
Nếu một ứng dụng khác nhắm đến Android 13 (API cấp 33) trở lên, thì ứng dụng đó chỉ có thể xử lý ý định của ứng dụng nếu ý định của bạn khớp với các thao tác và danh mục của một phần tử <intent-filter> trong ứng dụng khác đó. Nếu hệ thống không tìm thấy kết quả khớp, hệ thống sẽ gửi một ActivityNotFoundException.
Ứng dụng gửi phải xử lý trường hợp ngoại lệ này.
Tương tự, nếu bạn cập nhật ứng dụng để nhắm đến Android 13 trở lên, thì tất cả ý định bắt nguồn từ các ứng dụng bên ngoài sẽ chỉ được chuyển đến một thành phần đã xuất của ứng dụng nếu ý định đó khớp với các thao tác và danh mục của một phần tử <intent-filter> mà ứng dụng của bạn khai báo. Hành vi này xảy ra bất kể phiên bản SDK mục tiêu của ứng dụng gửi.
Trong các trường hợp sau, tính năng so khớp ý định sẽ không được thực thi:
- Ý định được gửi đến các thành phần không khai báo bất kỳ bộ lọc ý định nào.
- Ý định bắt nguồn từ trong cùng một ứng dụng.
- Ý định bắt nguồn từ hệ thống; tức là ý định được gửi từ "UID hệ thống" (uid=1000). Các ứng dụng hệ thống bao gồm
system_servervà các ứng dụng đặtandroid:sharedUserIdthànhandroid.uid.system. - Ý định bắt nguồn từ gốc.
Tìm hiểu thêm về tính năng so khớp ý định.
Sử dụng ý định đang chờ xử lý
Đối tượng PendingIntent là một trình bao bọc xung quanh đối tượng Intent. Mục đích chính của PendingIntent là cấp quyền cho một ứng dụng bên ngoài sử dụng Intent có trong đó như thể ứng dụng này được thực thi từ quy trình riêng của ứng dụng.
Sau đây là các trường hợp sử dụng chính cho một ý định đang chờ xử lý:
- Khai báo một ý định sẽ được thực thi khi người dùng thực hiện một thao tác với Thông báo của bạn (
NotificationManagercủa hệ thống Android sẽ thực thiIntent). - Khai báo một ý định sẽ được thực thi khi người dùng thực hiện một hành động với Tiện ích ứng dụng (ứng dụng Màn hình chính sẽ thực thi
Intent). - Khai báo một ý định sẽ được thực thi vào một thời điểm cụ thể trong tương lai (
AlarmManagercủa hệ thống Android sẽ thực thiIntent).
Tương tự như mỗi đối tượng Intent được thiết kế để do một loại thành phần ứng dụng cụ thể xử lý (có thể là Activity, Service hoặc BroadcastReceiver), PendingIntent cũng phải được tạo ra với cùng một mục đích. Khi sử dụng một ý định đang chờ xử lý, ứng dụng của bạn sẽ không thực thi ý định bằng một lệnh gọi như startActivity(). Thay vào đó, bạn phải khai báo loại thành phần dự kiến khi tạo PendingIntent bằng cách gọi phương thức tạo tương ứng:
PendingIntent.getActivity()choIntentbắt đầuActivity.PendingIntent.getService()choIntentbắt đầuService.PendingIntent.getBroadcast()choIntentbắt đầuBroadcastReceiver.
Trừ phi ứng dụng của bạn đang nhận các ý định đang chờ xử lý từ các ứng dụng khác, nếu không thì các phương thức nêu trên để tạo PendingIntent có lẽ là các phương thức PendingIntent duy nhất mà bạn cần.
Mỗi phương thức lấy Context hiện tại của ứng dụng, Intent mà bạn muốn bao bọc và một hoặc nhiều cờ chỉ định cách sử dụng ý định (chẳng hạn như liệu ý định có thể được sử dụng nhiều lần hay không).
Để biết thêm thông tin về cách sử dụng ý định đang chờ xử lý, hãy xem tài liệu cho từng trường hợp sử dụng tương ứng, chẳng hạn như trong hướng dẫn về API Thông báo và Tiện ích ứng dụng.
Chỉ định khả năng thay đổi
Nếu ứng dụng của bạn nhắm đến Android 12 trở lên, bạn phải chỉ định khả năng thay đổi của từng đối tượng PendingIntent mà ứng dụng của bạn tạo. Để khai báo rằng một đối tượng PendingIntent nhất định có thể thay đổi hoặc không thể thay đổi, hãy dùng cờ PendingIntent.FLAG_MUTABLE hoặc PendingIntent.FLAG_IMMUTABLE, tương ứng.
Nếu ứng dụng của bạn cố gắng tạo một đối tượng PendingIntent mà không đặt cờ khả năng biến đổi, hệ thống sẽ gửi một IllegalArgumentException và thông báo sau đây sẽ xuất hiện trong Logcat:
PACKAGE_NAME: Targeting S+ (version 31 and above) requires that one of \
FLAG_IMMUTABLE or FLAG_MUTABLE be specified when creating a PendingIntent.

Strongly consider using FLAG_IMMUTABLE, only use FLAG_MUTABLE if \
some functionality depends on the PendingIntent being mutable, e.g. if \
it needs to be used with inline replies or bubbles.
Tạo ý định đang chờ xử lý không thể thay đổi bất cứ khi nào có thể
Trong hầu hết trường hợp, ứng dụng của bạn nên tạo các đối tượng PendingIntent bất biến, như minh hoạ trong đoạn mã sau. Nếu đối tượng PendingIntent là bất biến, thì các ứng dụng khác không thể sửa đổi ý định để điều chỉnh kết quả của việc gọi ý định.
Kotlin
val pendingIntent = PendingIntent.getActivity(applicationContext,
        REQUEST_CODE, intent,
        /* flags */ PendingIntent.FLAG_IMMUTABLE)
Java
PendingIntent pendingIntent = PendingIntent.getActivity(getApplicationContext(),
        REQUEST_CODE, intent,
        /* flags */ PendingIntent.FLAG_IMMUTABLE);
Tuy nhiên, một số trường hợp sử dụng yêu cầu các đối tượng PendingIntent có thể thay đổi:
- Hỗ trợ thao tác trả lời trực tiếp trong thông báo. Tính năng trả lời trực tiếp yêu cầu thay đổi dữ liệu đoạn trích trong đối tượng PendingIntent được liên kết với câu trả lời. Thông thường, bạn yêu cầu thay đổi này bằng cách truyền
FILL_IN_CLIP_DATAlàm cờ cho phương thứcfillIn(). - Liên kết thông báo với khung Android Auto bằng cách sử dụng các thực thể
CarAppExtender. - Đặt các cuộc trò chuyện vào bong bóng bằng cách sử dụng các thực thể của
PendingIntent. Đối tượngPendingIntentcó thể thay đổi cho phép hệ thống áp dụng các cờ chính xác, chẳng hạn nhưFLAG_ACTIVITY_MULTIPLE_TASKvàFLAG_ACTIVITY_NEW_DOCUMENT. - Yêu cầu thông tin vị trí của thiết bị bằng cách gọi
requestLocationUpdates()hoặc các API tương tự. Đối tượngPendingIntentcó thể thay đổi cho phép hệ thống thêm các phần bổ sung của ý định đại diện cho các sự kiện trong vòng đời của vị trí. Những sự kiện này bao gồm thay đổi về vị trí và việc nhà cung cấp bắt đầu cung cấp dịch vụ. - Lên lịch báo thức bằng
AlarmManager. Đối tượngPendingIntentcó thể thay đổi cho phép hệ thống thêm phần bổ sung ý địnhEXTRA_ALARM_COUNT. Dữ liệu bổ sung này biểu thị số lần chuông báo lặp lại đã được kích hoạt. Bằng cách chứa thêm dữ liệu này, ý định có thể thông báo chính xác cho một ứng dụng về việc chuông báo lặp lại có được kích hoạt nhiều lần hay không, chẳng hạn như khi thiết bị ở chế độ ngủ.
Nếu ứng dụng của bạn tạo một đối tượng PendingIntent có thể thay đổi, bạn nên sử dụng một ý định tường minh và điền vào ComponentName. Bằng cách đó, bất cứ khi nào một ứng dụng khác gọi PendingIntent và chuyển quyền kiểm soát trở lại ứng dụng của bạn, thì thành phần tương tự trong ứng dụng của bạn sẽ luôn khởi động.
Sử dụng ý định tường minh trong ý định đang chờ xử lý
Để xác định rõ hơn cách các ứng dụng khác có thể sử dụng ý định đang chờ xử lý của ứng dụng, hãy luôn bao bọc ý định đang chờ xử lý bằng một ý định tường minh. Để giúp bạn tuân thủ phương pháp hay nhất này, hãy làm như sau:
- Kiểm tra để đảm bảo rằng các trường hành động, gói và thành phần của ý định cơ sở đã được thiết lập.
-
Sử dụng
FLAG_IMMUTABLE, được thêm vào Android 6.0 (cấp độ API 23), để tạo ý định đang chờ xử lý. Cờ này ngăn các ứng dụng nhận đượcPendingIntentđiền dữ liệu vào các thuộc tính chưa có dữ liệu. NếuminSdkVersioncủa ứng dụng là22trở xuống, bạn có thể cung cấp đồng thời tính an toàn và khả năng tương thích bằng cách sử dụng mã sau:if (Build.VERSION.SDK_INT >= 23) { // Create a PendingIntent using FLAG_IMMUTABLE. } else { // Existing code that creates a PendingIntent. }
Giải quyết ý định
Khi hệ thống nhận được một ý định ngầm ẩn để bắt đầu một hoạt động, hệ thống sẽ tìm kiếm hoạt động phù hợp nhất cho ý định đó bằng cách so sánh ý định đó với các bộ lọc ý định dựa trên 3 khía cạnh:
- Quay!
- Dữ liệu (cả URI và loại dữ liệu).
- Danh mục.
Các phần sau đây mô tả cách các ý định được so khớp với các thành phần thích hợp theo khai báo bộ lọc ý định trong tệp kê khai của ứng dụng.
Kiểm thử hành động
Để chỉ định các thao tác được chấp nhận, bộ lọc ý định có thể khai báo không hoặc nhiều phần tử <action>, như minh hoạ trong ví dụ sau:
<intent-filter>
    <action android:name="android.intent.action.EDIT" />
    <action android:name="android.intent.action.VIEW" />
    ...
</intent-filter>
Để vượt qua bộ lọc này, thao tác được chỉ định trong Intent phải khớp với một trong các thao tác được liệt kê trong bộ lọc.
Nếu bộ lọc không liệt kê bất kỳ thao tác nào, thì không có ý định nào khớp, vì vậy tất cả các ý định đều không vượt qua được kiểm thử. Tuy nhiên, nếu Intent không chỉ định một thao tác, thì thao tác đó sẽ vượt qua quy trình kiểm thử miễn là bộ lọc chứa ít nhất một thao tác.
Bài kiểm tra theo danh mục
Để chỉ định các danh mục ý định được chấp nhận, bộ lọc ý định có thể khai báo không hoặc nhiều phần tử <category>, như minh hoạ trong ví dụ sau:
<intent-filter>
    <category android:name="android.intent.category.DEFAULT" />
    <category android:name="android.intent.category.BROWSABLE" />
    ...
</intent-filter>
Để một ý định vượt qua bài kiểm thử danh mục, mọi danh mục trong Intent phải khớp với một danh mục trong bộ lọc. Không cần thiết phải đảo ngược – bộ lọc ý định có thể khai báo nhiều danh mục hơn so với các danh mục được chỉ định trong Intent và Intent vẫn được truyền. Do đó, ý định không có danh mục luôn vượt qua bài kiểm tra này, bất kể danh mục nào được khai báo trong bộ lọc.
Lưu ý:
Android tự động áp dụng danh mục CATEGORY_DEFAULT cho tất cả các ý định ngầm ẩn được truyền đến startActivity() và startActivityForResult().
Nếu muốn hoạt động của bạn nhận được ý định ngầm ẩn, thì hoạt động đó phải có một danh mục cho "android.intent.category.DEFAULT" trong bộ lọc ý định, như minh hoạ trong ví dụ <intent-filter> trước đó.
Kiểm thử dữ liệu
Để chỉ định dữ liệu ý định được chấp nhận, bộ lọc ý định có thể khai báo từ 0 phần tử <data> trở lên, như trong ví dụ sau:
<intent-filter>
    <data android:mimeType="video/mpeg" android:scheme="http" ... />
    <data android:mimeType="audio/mpeg" android:scheme="http" ... />
    ...
</intent-filter>
Mỗi phần tử <data> có thể chỉ định một cấu trúc URI và một loại dữ liệu (loại phương tiện MIME).
Mỗi phần của URI là một thuộc tính riêng biệt: scheme, host, port và path:
<scheme>://<host>:<port>/<path>
Ví dụ sau đây cho thấy các giá trị có thể có cho những thuộc tính này:
content://com.example.project:200/folder/subfolder/etc
Trong URI này, tên giao thức là content, máy chủ là com.example.project, cổng là 200 và đường dẫn là folder/subfolder/etc.
Mỗi thuộc tính này là không bắt buộc trong phần tử <data>, nhưng có các mối quan hệ phụ thuộc tuyến tính:
- Nếu bạn không chỉ định một giao thức, thì máy chủ sẽ bị bỏ qua.
- Nếu bạn không chỉ định máy chủ lưu trữ, cổng sẽ bị bỏ qua.
- Nếu bạn không chỉ định cả giao thức và máy chủ lưu trữ, thì đường dẫn sẽ bị bỏ qua.
Khi URI trong một ý định được so sánh với một quy cách URI trong bộ lọc, thì URI đó chỉ được so sánh với các phần của URI có trong bộ lọc. Ví dụ:
- Nếu một bộ lọc chỉ định một lược đồ, thì tất cả URI có lược đồ đó sẽ khớp với bộ lọc.
- Nếu một bộ lọc chỉ định một lược đồ và một cơ quan nhưng không có đường dẫn, thì tất cả URI có cùng lược đồ và cơ quan sẽ vượt qua bộ lọc, bất kể đường dẫn của chúng.
- Nếu một bộ lọc chỉ định một lược đồ, một cơ quan và một đường dẫn, thì chỉ những URI có cùng lược đồ, cơ quan và đường dẫn mới vượt qua bộ lọc.
Lưu ý: Quy cách đường dẫn có thể chứa ký tự đại diện dấu hoa thị (*) để chỉ yêu cầu khớp một phần tên đường dẫn.
Thử nghiệm dữ liệu so sánh cả URI và loại MIME trong ý định với URI và loại MIME được chỉ định trong bộ lọc. Các quy tắc này bao gồm:
- Một ý định không chứa URI cũng không chứa loại MIME sẽ chỉ vượt qua kiểm thử nếu bộ lọc không chỉ định bất kỳ URI hoặc loại MIME nào.
- Một ý định chứa URI nhưng không có Loại MIME (không rõ ràng cũng không suy luận được từ URI) chỉ vượt qua kiểm thử nếu URI của ý định đó khớp với định dạng URI của bộ lọc và bộ lọc cũng không chỉ định Loại MIME.
- Một ý định chứa Loại MIME nhưng không chứa URI chỉ vượt qua kiểm thử nếu bộ lọc liệt kê cùng một Loại MIME và không chỉ định định dạng URI.
- Một ý định chứa cả URI và loại MIME (rõ ràng hoặc có thể suy luận từ URI) chỉ vượt qua phần loại MIME của kiểm thử nếu loại đó khớp với một loại được liệt kê trong bộ lọc. Thành phần này sẽ vượt qua phần URI của kiểm thử nếu URI của thành phần đó khớp với một URI trong bộ lọc hoặc nếu thành phần đó có URI
content:hoặcfile:và bộ lọc không chỉ định URI. Nói cách khác, một thành phần được giả định là hỗ trợ dữ liệucontent:vàfile:nếu bộ lọc của thành phần đó chỉ liệt kê một loại MIME.
Lưu ý: Nếu một ý định chỉ định URI hoặc loại MIME, thì kiểm thử dữ liệu sẽ thất bại nếu không có phần tử <data> nào trong <intent-filter>.
Quy tắc cuối cùng này, quy tắc (d), phản ánh kỳ vọng rằng các thành phần có thể lấy dữ liệu địa phương từ một tệp hoặc nhà cung cấp nội dung.
Do đó, các bộ lọc của họ chỉ có thể liệt kê một loại dữ liệu và không cần phải đặt tên rõ ràng cho các giao thức content: và file:.
Ví dụ sau đây cho thấy một trường hợp điển hình trong đó phần tử <data> cho Android biết rằng thành phần này có thể lấy dữ liệu hình ảnh từ một trình cung cấp nội dung và hiển thị dữ liệu đó:
<intent-filter>
    <data android:mimeType="image/*" />
    ...
</intent-filter>
Bộ lọc chỉ định một kiểu dữ liệu nhưng không chỉ định URI có lẽ là phổ biến nhất vì hầu hết dữ liệu có sẵn đều được nhà cung cấp nội dung phân phối.
Một cấu hình phổ biến khác là bộ lọc có giao thức và loại dữ liệu. Ví dụ: một phần tử <data> như sau cho Android biết rằng thành phần này có thể truy xuất dữ liệu video từ mạng để thực hiện hành động:
<intent-filter>
    <data android:scheme="http" android:mimeType="video/*" />
    ...
</intent-filter>
So khớp ý định
Ý định được so khớp với bộ lọc ý định không chỉ để khám phá thành phần mục tiêu cần kích hoạt mà còn để khám phá thông tin về tập hợp các thành phần trên thiết bị. Ví dụ: Ứng dụng Home điền sẵn trình chạy ứng dụng bằng cách tìm tất cả các hoạt động có bộ lọc ý định chỉ định hành động ACTION_MAIN và danh mục CATEGORY_LAUNCHER.
Quá trình so khớp chỉ thành công nếu các thao tác và danh mục trong Ý định khớp với bộ lọc, như mô tả trong tài liệu về lớp IntentFilter.
Ứng dụng của bạn có thể sử dụng tính năng so khớp ý định theo cách tương tự như ứng dụng Home.
PackageManager có một tập hợp các phương thức query...() trả về tất cả các thành phần có thể chấp nhận một ý định cụ thể và một chuỗi phương thức resolve...() tương tự để xác định thành phần tốt nhất nhằm phản hồi một ý định. Ví dụ: queryIntentActivities() trả về danh sách tất cả các hoạt động có thể thực hiện ý định được truyền dưới dạng đối số và queryIntentServices() trả về danh sách tương tự gồm các dịch vụ.
Không có phương thức nào kích hoạt các thành phần; chúng chỉ liệt kê những thành phần có thể phản hồi. Có một phương thức tương tự là queryBroadcastReceivers() cho broadcast receiver.