


हर टेक्स्ट फ़ील्ड में, किसी खास तरह का टेक्स्ट इनपुट करने की ज़रूरत होती है. जैसे, ईमेल पता, फ़ोन नंबर या सामान्य टेक्स्ट. आपको अपने ऐप्लिकेशन में मौजूद हर टेक्स्ट फ़ील्ड के लिए, इनपुट का टाइप तय करना होगा. इससे सिस्टम, सॉफ़्ट इनपुट का सही तरीका दिखाएगा. जैसे, स्क्रीन पर दिखने वाला कीबोर्ड.
इनपुट के तरीके के साथ उपलब्ध बटन के टाइप के अलावा, कुछ व्यवहार तय किए जा सकते हैं. जैसे, इनपुट का तरीका स्पेलिंग के सुझाव देता है या नहीं, नए वाक्यों का पहला अक्षर कैपिटल करता है या नहीं, और कैरिज रिटर्न बटन की जगह हो गया या अगला जैसे ऐक्शन बटन दिखाता है या नहीं. इस पेज पर, इन विशेषताओं को तय करने का तरीका बताया गया है.
कीबोर्ड का टाइप तय करना
android:inputType
एट्रिब्यूट को
<EditText>एलिमेंट में जोड़कर, अपने टेक्स्ट फ़ील्ड के लिए हमेशा इनपुट का तरीका तय करें.
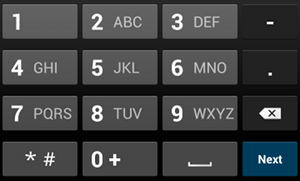
phone इनपुट टाइप.उदाहरण के लिए, अगर आपको फ़ोन नंबर डालने के लिए इनपुट का तरीका चाहिए, तो "phone" वैल्यू का इस्तेमाल करें:
<EditText
    android:id="@+id/phone"
    android:layout_width="fill_parent"
    android:layout_height="wrap_content"
    android:hint="@string/phone_hint"
    android:inputType="phone" />
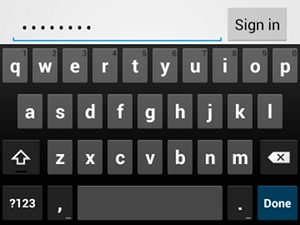
textPassword इनपुट टाइप.अगर टेक्स्ट फ़ील्ड, पासवर्ड के लिए है, तो "textPassword" वैल्यू का इस्तेमाल करें. इससे टेक्स्ट फ़ील्ड में, उपयोगकर्ता का इनपुट छिपा रहेगा:
<EditText
    android:id="@+id/password"
    android:hint="@string/password_hint"
    android:inputType="textPassword"
    ... />
android:inputType एट्रिब्यूट के साथ कई वैल्यू इस्तेमाल की जा सकती हैं. इनकी जानकारी दस्तावेज़ में दी गई है. इनपुट के तरीके की बनावट और अन्य व्यवहार तय करने के लिए, कुछ वैल्यू को एक साथ इस्तेमाल किया जा सकता है.
स्पेलिंग के सुझाव और अन्य व्यवहार चालू करना
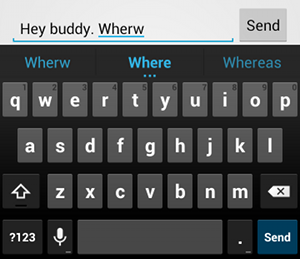
textAutoCorrect जोड़ने से, गलत स्पेलिंग को अपने-आप ठीक करने की सुविधा मिलती है.android:inputType एट्रिब्यूट की मदद से, इनपुट के तरीके के लिए अलग-अलग व्यवहार तय किए जा सकते हैं. सबसे अहम बात यह है कि अगर आपका टेक्स्ट फ़ील्ड, सामान्य टेक्स्ट इनपुट के लिए है—जैसे, टेक्स्ट मैसेज के लिए—तो "textAutoCorrect" वैल्यू का इस्तेमाल करके, स्पेलिंग को अपने-आप ठीक करने की सुविधा चालू करें.
android:inputType एट्रिब्यूट की मदद से, अलग-अलग व्यवहार और इनपुट के तरीके के स्टाइल को एक साथ इस्तेमाल किया जा सकता है. उदाहरण के लिए, यहां एक ऐसा टेक्स्ट फ़ील्ड बनाने का तरीका बताया गया है जो वाक्य के पहले शब्द को कैपिटल करता है और गलत स्पेलिंग को अपने-आप ठीक भी करता है:
<EditText
    android:id="@+id/message"
    android:layout_width="wrap_content"
    android:layout_height="wrap_content"
    android:inputType=
        "textCapSentences|textAutoCorrect"
    ... />
इनपुट के तरीके की कार्रवाई तय करना
सॉफ़्ट इनपुट के ज़्यादातर तरीकों में, नीचे के कोने में उपयोगकर्ता के लिए एक ऐक्शन बटन होता है. यह बटन, मौजूदा टेक्स्ट फ़ील्ड के हिसाब से होता है. डिफ़ॉल्ट रूप से, सिस्टम इस बटन का इस्तेमाल अगला या हो गया कार्रवाई के लिए करता है. हालांकि, अगर आपका टेक्स्ट फ़ील्ड, एक से ज़्यादा लाइनों वाले टेक्स्ट के लिए है—जैसे, android:inputType="textMultiLine"—तो ऐक्शन बटन, कैरिज रिटर्न होता है. हालांकि, अन्य कार्रवाइयां तय की जा सकती हैं. जैसे, भेजें या आगे बढ़ें. ये कार्रवाइयां, आपके टेक्स्ट फ़ील्ड के लिए ज़्यादा सही हो सकती हैं.
कीबोर्ड के ऐक्शन बटन को तय करने के लिए,
android:imeOptions
एट्रिब्यूट का इस्तेमाल करें. इसके साथ, "actionSend" या "actionSearch" जैसी ऐक्शन वैल्यू का इस्तेमाल करें. उदाहरण के लिए:

android:imeOptions="actionSend" तय करते हैं.<EditText android:id="@+id/search" android:layout_width="fill_parent" android:layout_height="wrap_content" android:hint="@string/search_hint" android:inputType="text" android:imeOptions="actionSend" />
इसके बाद, EditText एलिमेंट के लिए TextView.OnEditorActionListener तय करके, ऐक्शन बटन पर होने वाले क्लिक को सुना जा सकता है. अपने लिसनर में, EditorInfo क्लास में तय किए गए सही IME ऐक्शन आईडी का जवाब दें. जैसे, IME_ACTION_SEND. यहां इसका एक उदाहरण दिया गया है:
Kotlin
findViewById<EditText>(R.id.search).setOnEditorActionListener { v, actionId, event ->
    return@setOnEditorActionListener when (actionId) {
        EditorInfo.IME_ACTION_SEND -> {
            sendMessage()
            true
        }
        else -> false
    }
}
Java
EditText editText = (EditText) findViewById(R.id.search);
editText.setOnEditorActionListener(new OnEditorActionListener() {
    @Override
    public boolean onEditorAction(TextView v, int actionId, KeyEvent event) {
        boolean handled = false;
        if (actionId == EditorInfo.IME_ACTION_SEND) {
            sendMessage();
            handled = true;
        }
        return handled;
    }
});
अपने-आप पूरे होने वाले सुझाव देना
अगर आपको उपयोगकर्ताओं को टाइप करते समय सुझाव देने हैं, तो EditText की सबक्लास AutoCompleteTextView का इस्तेमाल किया जा सकता है.
अपने-आप पूरे होने की सुविधा लागू करने के लिए, आपको एक Adapter तय करना होगा. यह अडैप्टर, टेक्स्ट के सुझाव देता है. डेटा के सोर्स के आधार पर, कई अडैप्टर उपलब्ध हैं. जैसे, डेटाबेस या कलेक्शन से डेटा पाने के लिए अलग-अलग अडैप्टर.
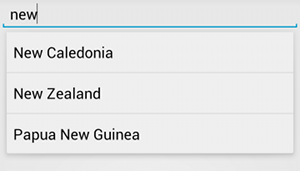
AutoCompleteTextView का उदाहरण.यहां ArrayAdapter का इस्तेमाल करके, कलेक्शन से सुझाव देने वाले AutoCompleteTextView को सेट अप करने का तरीका बताया गया है:
- अपने लेआउट में
AutoCompleteTextViewजोड़ें. यहां सिर्फ़ टेक्स्ट फ़ील्ड वाला लेआउट दिया गया है:<?xml version="1.0" encoding="utf-8"?> <AutoCompleteTextView xmlns:android="http://schemas.android.com/apk/res/android" android:id="@+id/autocomplete_country" android:layout_width="fill_parent" android:layout_height="wrap_content" />
- वह कलेक्शन तय करें जिसमें टेक्स्ट के सभी सुझाव शामिल हों. उदाहरण के लिए, यहां
देशों के नामों का कलेक्शन दिया गया है:
<?xml version="1.0" encoding="utf-8"?>
<resources>
    <string-array name="countries_array">
        <item>Afghanistan</item>
        <item>Albania</item>
        <item>Algeria</item>
        <item>American Samoa</item>
        <item>Andorra</item>
        <item>Angola</item>
        <item>Anguilla</item>
        <item>Antarctica</item>
        ...
    </string-array>
</resources>
- अपने
ActivityयाFragmentमें, सुझाव देने वाले अडैप्टर को तय करने के लिए, यह कोड इस्तेमाल करें:Kotlin
// Get a reference to the AutoCompleteTextView in the layout.
val textView = findViewById(R.id.autocomplete_country) as AutoCompleteTextView
// Get the string array.
val countries: Array<out String> = resources.getStringArray(R.array.countries_array)
// Create the adapter and set it to the AutoCompleteTextView.
ArrayAdapter<String>(this, android.R.layout.simple_list_item_1, countries).also { adapter ->
    textView.setAdapter(adapter)
}
Java
// Get a reference to the AutoCompleteTextView in the layout.
AutoCompleteTextView textView = (AutoCompleteTextView) findViewById(R.id.autocomplete_country);
// Get the string array.
String[] countries = getResources().getStringArray(R.array.countries_array);
// Create the adapter and set it to the AutoCompleteTextView.
ArrayAdapter<String> adapter =
        new ArrayAdapter<String>(this, android.R.layout.simple_list_item_1, countries);
textView.setAdapter(adapter);
ऊपर दिए गए उदाहरण में,
countries_arrayस्ट्रिंग कलेक्शन में मौजूद हर आइटम कोsimple_list_item_1लेआउट में मौजूदTextViewसे बाइंड करने के लिए, एक नयाArrayAdapterशुरू किया गया है. यह Android का दिया गया एक लेआउट है. यह सूची में टेक्स्ट के लिए स्टैंडर्ड बनावट उपलब्ध कराता है. -
setAdapter()को कॉल करके, अडैप्टर कोAutoCompleteTextViewअसाइन करें.