
การสามารถกำหนดรูปร่างที่จะวาดในบริบทของมุมมอง OpenGL ES เป็นขั้นตอนแรก การสร้างกราฟิกระดับไฮเอนด์สำหรับแอปของคุณ การวาดด้วย OpenGL ES อาจยุ่งยากเล็กน้อยโดยไม่มี การที่คุณรู้ข้อมูลเบื้องต้นเกี่ยวกับวิธีที่ OpenGL ES คาดหวังว่าคุณจะกำหนดวัตถุกราฟิก
บทเรียนนี้อธิบายถึงระบบพิกัด OpenGL ES ที่เกี่ยวข้องกับหน้าจออุปกรณ์ Android พื้นฐานในการกำหนดรูปร่าง กำหนดรูปร่างหน้าตา รวมถึงการกำหนดรูปสามเหลี่ยมและสี่เหลี่ยมจัตุรัส
หาความหมายสามเหลี่ยม
OpenGL ES ให้คุณกำหนดวัตถุที่วาดโดยใช้พิกัดในพื้นที่ทรง 3 มิติ ดังนั้น
ก่อนที่จะวาดรูปสามเหลี่ยมได้ คุณต้องกำหนดพิกัดของรูปสามเหลี่ยมดังกล่าวด้วย ใน OpenGL วิธีทดสอบโดยทั่วไป
สิ่งนี้ใช้กำหนดอาร์เรย์เวอร์เท็กซ์ของจำนวนจุดลอยตัวสำหรับพิกัด สำหรับค่าสูงสุด
ให้เขียนพิกัดเหล่านี้ลงใน ByteBuffer ซึ่งส่งผ่านค่า
ไปป์ไลน์กราฟิก OpenGL ES สำหรับการประมวลผล
Kotlin
// number of coordinates per vertex in this array
const val COORDS_PER_VERTEX = 3
var triangleCoords = floatArrayOf(     // in counterclockwise order:
        0.0f, 0.622008459f, 0.0f,      // top
        -0.5f, -0.311004243f, 0.0f,    // bottom left
        0.5f, -0.311004243f, 0.0f      // bottom right
)

class Triangle {

    // Set color with red, green, blue and alpha (opacity) values
    val color = floatArrayOf(0.63671875f, 0.76953125f, 0.22265625f, 1.0f)

    private var vertexBuffer: FloatBuffer =
            // (number of coordinate values * 4 bytes per float)
            ByteBuffer.allocateDirect(triangleCoords.size * 4).run {
                // use the device hardware's native byte order
                order(ByteOrder.nativeOrder())

                // create a floating point buffer from the ByteBuffer
                asFloatBuffer().apply {
                    // add the coordinates to the FloatBuffer
                    put(triangleCoords)
                    // set the buffer to read the first coordinate
                    position(0)
                }
            }
}
Java
public class Triangle {

    private FloatBuffer vertexBuffer;

    // number of coordinates per vertex in this array
    static final int COORDS_PER_VERTEX = 3;
    static float triangleCoords[] = {   // in counterclockwise order:
             0.0f,  0.622008459f, 0.0f, // top
            -0.5f, -0.311004243f, 0.0f, // bottom left
             0.5f, -0.311004243f, 0.0f  // bottom right
    };

    // Set color with red, green, blue and alpha (opacity) values
    float color[] = { 0.63671875f, 0.76953125f, 0.22265625f, 1.0f };

    public Triangle() {
        // initialize vertex byte buffer for shape coordinates
        ByteBuffer bb = ByteBuffer.allocateDirect(
                // (number of coordinate values * 4 bytes per float)
                triangleCoords.length * 4);
        // use the device hardware's native byte order
        bb.order(ByteOrder.nativeOrder());

        // create a floating point buffer from the ByteBuffer
        vertexBuffer = bb.asFloatBuffer();
        // add the coordinates to the FloatBuffer
        vertexBuffer.put(triangleCoords);
        // set the buffer to read the first coordinate
        vertexBuffer.position(0);
    }
}
โดยค่าเริ่มต้น OpenGL ES จะถือว่าระบบพิกัดที่ [0,0,0] (X,Y,Z) ระบุจุดศูนย์กลางของ
เฟรม GLSurfaceView
[1,1,0] คือมุมขวาบนของเฟรม และ
[-1,-1,0] คือมุมซ้ายล่างของเฟรม สำหรับภาพประกอบของระบบพิกัดนี้ โปรดดู
นักพัฒนาแอป OpenGL ES
โปรดทราบว่าพิกัดของรูปร่างนี้จะกำหนดตามลำดับทวนเข็มนาฬิกา ภาพวาด ลำดับนั้นสำคัญ เนื่องจากจะกำหนดว่าด้านใดเป็นด้านหน้าของรูปร่าง ซึ่งคุณมัก ต้องการให้วาดและหน้าด้านหลัง ซึ่งคุณสามารถเลือกที่จะไม่วาดโดยใช้คำสั่ง OpenGL ES ของใบหน้า ดูข้อมูลเพิ่มเติมเกี่ยวกับใบหน้าและการเลือกได้ที่ คู่มือนักพัฒนาซอฟต์แวร์ OpenGL ES
นิยามกำลังสอง
ใน OpenGL การกำหนดรูปสามเหลี่ยมนั้นค่อนข้างง่ายมาก แต่ถ้าอยากได้เพิ่มอีกเล็กน้อย ที่ซับซ้อนหรือไม่ สมมติว่าเป็นรูปสี่เหลี่ยม คุณสามารถทำได้หลายวิธี แต่เส้นทางโดยทั่วไปในการวาดภาพ รูปร่างใน OpenGL ES คือใช้สามเหลี่ยม 2 รูปวาดด้วยกัน ดังนี้
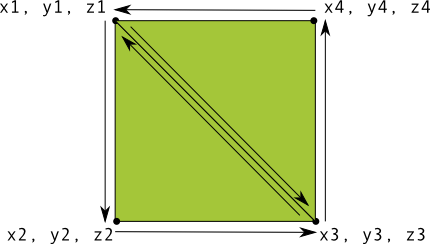
รูปที่ 1 วาดสี่เหลี่ยมจัตุรัสโดยใช้สามเหลี่ยม 2 รูป
คุณควรกำหนดจุดยอดมุมในลำดับทวนเข็มนาฬิกาสำหรับสามเหลี่ยมทั้งสองที่
แทนรูปร่างนี้ และใส่ค่าในรูปแบบ ByteBuffer เพื่อหลีกเลี่ยง
กำหนดพิกัด 2 พิกัดที่แต่ละสามเหลี่ยมใช้ร่วมกัน 2 ครั้ง ให้ใช้รายการวาดเพื่อบอก
วิธีวาดจุดยอดเหล่านี้ของกราฟิกไปป์ไลน์ของ OpenGL ES นี่คือโค้ดสำหรับรูปร่างนี้
Kotlin
// number of coordinates per vertex in this array
const val COORDS_PER_VERTEX = 3
var squareCoords = floatArrayOf(
        -0.5f,  0.5f, 0.0f,      // top left
        -0.5f, -0.5f, 0.0f,      // bottom left
         0.5f, -0.5f, 0.0f,      // bottom right
         0.5f,  0.5f, 0.0f       // top right
)

class Square2 {

    private val drawOrder = shortArrayOf(0, 1, 2, 0, 2, 3) // order to draw vertices

    // initialize vertex byte buffer for shape coordinates
    private val vertexBuffer: FloatBuffer =
            // (# of coordinate values * 4 bytes per float)
            ByteBuffer.allocateDirect(squareCoords.size * 4).run {
                order(ByteOrder.nativeOrder())
                asFloatBuffer().apply {
                    put(squareCoords)
                    position(0)
                }
            }

    // initialize byte buffer for the draw list
    private val drawListBuffer: ShortBuffer =
            // (# of coordinate values * 2 bytes per short)
            ByteBuffer.allocateDirect(drawOrder.size * 2).run {
                order(ByteOrder.nativeOrder())
                asShortBuffer().apply {
                    put(drawOrder)
                    position(0)
                }
            }
}
Java
public class Square {

    private FloatBuffer vertexBuffer;
    private ShortBuffer drawListBuffer;

    // number of coordinates per vertex in this array
    static final int COORDS_PER_VERTEX = 3;
    static float squareCoords[] = {
            -0.5f,  0.5f, 0.0f,   // top left
            -0.5f, -0.5f, 0.0f,   // bottom left
             0.5f, -0.5f, 0.0f,   // bottom right
             0.5f,  0.5f, 0.0f }; // top right

    private short drawOrder[] = { 0, 1, 2, 0, 2, 3 }; // order to draw vertices

    public Square() {
        // initialize vertex byte buffer for shape coordinates
        ByteBuffer bb = ByteBuffer.allocateDirect(
        // (# of coordinate values * 4 bytes per float)
                squareCoords.length * 4);
        bb.order(ByteOrder.nativeOrder());
        vertexBuffer = bb.asFloatBuffer();
        vertexBuffer.put(squareCoords);
        vertexBuffer.position(0);

        // initialize byte buffer for the draw list
        ByteBuffer dlb = ByteBuffer.allocateDirect(
        // (# of coordinate values * 2 bytes per short)
                drawOrder.length * 2);
        dlb.order(ByteOrder.nativeOrder());
        drawListBuffer = dlb.asShortBuffer();
        drawListBuffer.put(drawOrder);
        drawListBuffer.position(0);
    }
}
ตัวอย่างนี้ช่วยให้คุณเห็นถึงสิ่งที่ต้องใช้ในการสร้างรูปร่างที่ซับซ้อนมากขึ้นด้วย OpenGL ใน โดยใช้คอลเล็กชันสามเหลี่ยมเพื่อวาดวัตถุ ในบทเรียนถัดไป คุณจะได้เรียนรู้วิธีวาด รูปทรงเหล่านี้บนหน้าจอ