नीचे दिए गए सेक्शन में, Glance की मदद से ऐप्लिकेशन का आसान विजेट बनाने का तरीका बताया गया है.
मेनिफ़ेस्ट में AppWidget की जानकारी देना
सेटअप करने के चरणों को पूरा करने के बाद, अपने ऐप्लिकेशन में AppWidget और उसके मेटाडेटा का एलान करें.
AppWidgetरिसीवर कोGlanceAppWidgetReceiverसे बढ़ाकर:class MyAppWidgetReceiver : GlanceAppWidgetReceiver() { override val glanceAppWidget: GlanceAppWidget = TODO("Create GlanceAppWidget") }
अपनी
AndroidManifest.xmlफ़ाइल और उससे जुड़ी मेटाडेटा फ़ाइल में, ऐप्लिकेशन विजेट की सेवा देने वाली कंपनी को रजिस्टर करें:<receiver android:name=".glance.MyReceiver" android:exported="true"> <intent-filter> <action android:name="android.appwidget.action.APPWIDGET_UPDATE" /> </intent-filter> <meta-data android:name="android.appwidget.provider" android:resource="@xml/my_app_widget_info" /> </receiver>
AppWidgetProviderInfo मेटाडेटा जोड़ना
इसके बाद, @xml/my_app_widget_info फ़ाइल में ऐप्लिकेशन विजेट की जानकारी बनाने और उसे तय करने के लिए, एक आसान विजेट बनाएं गाइड का पालन करें.
नज़र में सिर्फ़ एक फ़र्क़ है. इसमें initialLayout एक्सएमएल नहीं होता, लेकिन आपको एक एक्सएमएल तय करना होगा. लाइब्रेरी में दिए गए, पहले से तय किए गए लोडिंग लेआउट का इस्तेमाल किया जा सकता है:
<appwidget-provider xmlns:android="http://schemas.android.com/apk/res/android"
android:initialLayout="@layout/glance_default_loading_layout">
</appwidget-provider>
GlanceAppWidget के बारे में बताएं
एक नई क्लास बनाएं, जो
GlanceAppWidgetसे शुरू होती है औरprovideGlanceतरीके को बदल देती है. इस तरीके से, विजेट को रेंडर करने के लिए ज़रूरी डेटा लोड किया जा सकता है:class MyAppWidget : GlanceAppWidget() { override suspend fun provideGlance(context: Context, id: GlanceId) { // In this method, load data needed to render the AppWidget. // Use `withContext` to switch to another thread for long running // operations. provideContent { // create your AppWidget here Text("Hello World") } } }
अपने
GlanceAppWidgetReceiverपरglanceAppWidgetमें इसे इंस्टैंशिएट करें:class MyAppWidgetReceiver : GlanceAppWidgetReceiver() { // Let MyAppWidgetReceiver know which GlanceAppWidget to use override val glanceAppWidget: GlanceAppWidget = MyAppWidget() }
अब आपने Glance का इस्तेमाल करके, AppWidget को कॉन्फ़िगर कर लिया है.
यूज़र इंटरफ़ेस (यूआई) बनाना
नीचे दिए गए स्निपेट में, यूज़र इंटरफ़ेस (यूआई) बनाने का तरीका बताया गया है:
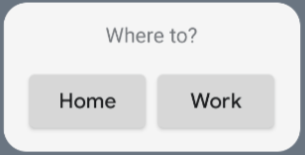
/* Import Glance Composables In the event there is a name clash with the Compose classes of the same name, you may rename the imports per https://kotlinlang.org/docs/packages.html#imports using the `as` keyword. import androidx.glance.Button import androidx.glance.layout.Column import androidx.glance.layout.Row import androidx.glance.text.Text */ class MyAppWidget : GlanceAppWidget() { override suspend fun provideGlance(context: Context, id: GlanceId) { // Load data needed to render the AppWidget. // Use `withContext` to switch to another thread for long running // operations. provideContent { // create your AppWidget here MyContent() } } @Composable private fun MyContent() { Column( modifier = GlanceModifier.fillMaxSize(), verticalAlignment = Alignment.Top, horizontalAlignment = Alignment.CenterHorizontally ) { Text(text = "Where to?", modifier = GlanceModifier.padding(12.dp)) Row(horizontalAlignment = Alignment.CenterHorizontally) { Button( text = "Home", onClick = actionStartActivity<MyActivity>() ) Button( text = "Work", onClick = actionStartActivity<MyActivity>() ) } } } }
ऊपर दिया गया कोड सैंपल ये काम करता है:
- टॉप लेवल
Columnमें, आइटम एक के बाद एक वर्टिकल क्रम में रखे जाते हैं. Column, उपलब्ध जगह के हिसाब से अपना साइज़ बढ़ाता है (GlanceModifierके ज़रिए). साथ ही, अपने कॉन्टेंट को सबसे ऊपर अलाइन करता है (verticalAlignment) और उसे हॉरिज़ॉन्टल तौर पर बीच में रखता है (horizontalAlignment).Columnके कॉन्टेंट को लेम्ब्डा का इस्तेमाल करके तय किया जाता है. क्रम मायने रखता है.Columnमें पहला आइटम,Textकॉम्पोनेंट है, जिसमें12.dpपैडिंग है.- दूसरा आइटम
Rowहै. इसमें आइटम एक के बाद एक हॉरिज़ॉन्टल तरीके से रखे जाते हैं. साथ ही, दोButtonsको हॉरिज़ॉन्टल तरीके से बीच में रखा जाता है (horizontalAlignment). आखिर में, आइटम का डिसप्ले उपलब्ध जगह के हिसाब से होता है. इस इमेज में बताया गया है कि यह कैसा दिख सकता है:

कॉम्पोनेंट की जगह और साइज़ बदलने के लिए, अलाइनमेंट वैल्यू बदली जा सकती हैं या अलग-अलग मॉडिफ़ायर वैल्यू (जैसे, पैडिंग) लागू की जा सकती हैं. हर क्लास के लिए कॉम्पोनेंट, पैरामीटर, और उपलब्ध मॉडिफ़ायर की पूरी सूची देखने के लिए, रेफ़रंस दस्तावेज़ देखें.
