
다음 섹션에서는 Glance를 사용하여 기본 앱 위젯을 만드는 방법을 설명합니다.
매니페스트에서 AppWidget 선언
설정 단계를 완료한 후 앱에서 AppWidget 및 해당
메타데이터를 선언합니다.
GlanceAppWidgetReceiver에서AppWidget리시버를 확장합니다.class MyAppWidgetReceiver : GlanceAppWidgetReceiver() { override val glanceAppWidget: GlanceAppWidget = TODO("Create GlanceAppWidget") }
AndroidManifest.xml파일과 연결된 메타데이터 파일에서 앱 위젯의 제공업체를 등록합니다.<receiver android:name=".glance.MyReceiver" android:exported="true"> <intent-filter> <action android:name="android.appwidget.action.APPWIDGET_UPDATE" /> </intent-filter> <meta-data android:name="android.appwidget.provider" android:resource="@xml/my_app_widget_info" /> </receiver>
AppWidgetProviderInfo 메타데이터 추가
다음으로 위젯 만들기 가이드에 따라 앱
위젯 정보를 @xml/my_app_widget_info 파일에서 만들고 정의합니다.
Glance의 유일한 차이점은 initialLayout XML이 없지만 하나를 정의해야 한다는 것입니다. 라이브러리에 제공된 미리 정의된 로드 레이아웃을 사용할 수 있습니다.
<appwidget-provider xmlns:android="http://schemas.android.com/apk/res/android"
android:initialLayout="@layout/glance_default_loading_layout">
</appwidget-provider>
AppWidgetProviderInfo XML 선언
AppWidgetProviderInfo 객체는 위젯의 필수 속성을 정의합니다. <appwidget-provider> 요소 내의 XML 메타데이터 리소스 파일
(res/xml/my_app_widget_info.xml)에서 AppWidgetProviderInfo를 정의합니다.
<appwidget-provider xmlns:android="http://schemas.android.com/apk/res/android"
    android:minWidth="40dp"
    android:minHeight="40dp"
    android:targetCellWidth="1"
    android:targetCellHeight="1"
    android:maxResizeWidth="250dp"
    android:maxResizeHeight="120dp"
    android:updatePeriodMillis="86400000"
    android:description="@string/example_appwidget_description"
    android:previewLayout="@layout/example_appwidget_preview"
    android:initialLayout="@layout/glance_default_loading_layout"
    android:configure="com.example.android.ExampleAppWidgetConfigurationActivity"
    android:resizeMode="horizontal|vertical"
    android:widgetCategory="home_screen"
    android:widgetFeatures="reconfigurable|configuration_optional">
</appwidget-provider>
위젯 크기 조정 속성
기본 홈 화면은 높이와 너비가 정의된 셀의 그리드를 기반으로 창에 위젯을 배치합니다. 대부분의 홈 화면에서는 위젯이 그리드 셀의 정수 배수인 크기(예: 가로로 2개의 셀, 세로로 3개의 셀)만 사용할 수 있습니다.
위젯 크기 조정 속성을 사용하면 위젯의 기본 크기를 지정하고 위젯 크기의 하한 및 상한을 제공할 수 있습니다. 이 컨텍스트에서 위젯의 기본 크기는 위젯이 홈 화면에 처음 추가될 때 위젯이 사용하는 크기입니다.
다음 표에서는 위젯 크기 조정과 관련된 <appwidget-provider> 속성을 설명합니다.
| 속성 및 설명 | |
|---|---|
targetCellWidth 및
targetCellHeight (Android 12),
minWidth 및 minHeight |
targetCellWidth 및
targetCellHeight를 지원하지 않는 경우 앱이
minWidth 및 minHeight를 사용하도록 두 속성 집합(targetCellWidth 및
targetCellHeight, minWidth 및
minHeight)을 모두 지정하는 것이 좋습니다. 지원되는 경우
targetCellWidth 및 targetCellHeight 속성이
minWidth 및 minHeight
속성보다 우선합니다.
|
minResizeWidth 및
minResizeHeight |
위젯의 절대 최소 크기를 지정합니다. 이러한 값은 위젯을 읽을 수 없거나 사용할 수 없는 크기를 지정합니다. 이러한
속성을 사용하면 사용자가 위젯의 크기를 기본 위젯 크기보다 작게
조정할 수 있습니다. minResizeWidth 속성은
무시됩니다. minWidth보다 크거나 가로
크기 조정이 사용 설정되지 않은 경우
를 참고하세요resizeMode. 마찬가지로
minResizeHeight 속성은
minHeight보다 크거나 세로 크기 조정이 사용 설정되지 않은 경우 무시됩니다. |
maxResizeWidth 및
maxResizeHeight |
위젯의 권장 최대 크기를 지정합니다. 값이 그리드 셀 크기의 배수가 아니면 가장 가까운 셀 크기로 반올림됩니다. maxResizeWidth 속성은
minWidth보다 작거나 가로 크기 조정이 사용 설정되지 않은 경우 무시됩니다. resizeMode를 참고하세요. 마찬가지로,
maxResizeHeight 속성은 minHeight보다 작거나 세로 크기 조정이 사용 설정되지 않은 경우 무시됩니다.
Android 12에서 도입되었습니다. |
resizeMode |
위젯의 크기를 조정할 수 있는 규칙을 지정합니다. 이 속성을 사용하여 홈 화면 위젯의 크기를 가로, 세로
또는 두 축 모두에서 조정할 수 있습니다. 사용자는 위젯을 길게 터치하여 크기 조정 핸들을 표시한 다음 가로 또는 세로 핸들을 드래그하여 레이아웃 그리드에서 위젯의 크기를 변경합니다. `resizeMode` 속성의 값에는
horizontal, vertical, none이 포함됩니다. 위젯을 가로 및 세로로 크기 조정이 가능하도록 선언하려면 horizontal|vertical을 사용하세요. |
예
이전 표의 속성이 위젯 크기 조정에 미치는 영향을 설명하기 위해 다음 사양을 가정해 보겠습니다.
- 그리드 셀의 너비는 30dp, 높이는 50dp입니다.
- 다음 속성 사양이 제공됩니다.
<appwidget-provider xmlns:android="http://schemas.android.com/apk/res/android"
    android:minWidth="80dp"
    android:minHeight="80dp"
    android:targetCellWidth="2"
    android:targetCellHeight="2"
    android:minResizeWidth="40dp"
    android:minResizeHeight="40dp"
    android:maxResizeWidth="120dp"
    android:maxResizeHeight="120dp"
    android:resizeMode="horizontal|vertical" />
Android 12부터:
targetCellWidth 및 targetCellHeight 속성을 위젯의 기본 크기로 사용합니다.
위젯의 크기는 기본적으로 2x2입니다. 위젯의 크기를 2x1로 줄이거나 4x3으로 늘릴 수 있습니다.
Android 11 이하:
minWidth 및 minHeight 속성을 사용하여 위젯의 기본 크기를 계산합니다.
기본 너비 = Math.ceil(80 / 30) = 3
기본 높이 = Math.ceil(80 / 50) = 2
위젯의 크기는 기본적으로 3x2입니다. 위젯의 크기를 2x1로 줄이거나 전체 화면으로 늘릴 수 있습니다.
추가 위젯 속성
다음 표에서는 위젯 크기 조정 이외의 속성과 관련된 <appwidget-provider> 속성을 설명합니다.
| 속성 및 설명 | |
|---|---|
updatePeriodMillis |
콜백 메서드를 호출하여 위젯 프레임워크가
GlanceAppWidgetReceiver에서 업데이트를 요청하는 빈도를 정의합니다.onUpdate() 배터리를 절약하려면 업데이트 빈도를 최대한 낮추는 것이 좋습니다(시간당 한 번 이하).
자세한 내용은 Glance 상태 관리의 위젯 업데이트 시점 섹션을 참고하세요. |
initialLayout |
Glance UI 컴포지션이 렌더링되기 전에 위젯의 로드 레이아웃을 정의하는 레이아웃 리소스를 가리킵니다. 라이브러리에 제공된 미리 정의된 로드 레이아웃을 사용할 수 있습니다. @layout/glance_default_loading_layout. |
configure |
사용자가 위젯을 추가할 때 실행되는 구성 활동을 정의합니다. 이 페이지의 위젯 구성 활동 구현 섹션을 참고하세요. |
description |
위젯에 표시할 위젯 선택 도구 설명을 지정합니다. Android 12에서 도입되었습니다. |
previewLayout (Android 12)
및 previewImage (Android 11 이하) |
|
autoAdvanceViewId |
위젯의 호스트에서 자동으로 진행되는 위젯 하위 뷰의 뷰 ID를 지정합니다. |
widgetCategory |
위젯을 홈 화면
(home_screen), 잠금 화면 (keyguard) 또는 둘 다에 표시할 수 있는지 선언합니다. Android 5.0 이상에서는 home_screen만 유효합니다. |
widgetFeatures |
위젯에서 지원하는 기능을 선언합니다. 예를 들어 위젯의 구성이 선택사항인 경우 configuration_optional과 reconfigurable을 모두 지정합니다. |
GlanceAppWidget 정의
GlanceAppWidget에서 확장되고provideGlance메서드를 재정의하는 새 클래스를 만듭니다. 이 메서드는 위젯을 렌더링하는 데 필요한 데이터를 로드할 수 있는 메서드입니다.class MyAppWidget : GlanceAppWidget() { override suspend fun provideGlance(context: Context, id: GlanceId) { // In this method, load data needed to render the AppWidget. // Use `withContext` to switch to another thread for long running // operations. provideContent { // create your AppWidget here Text("Hello World") } } }
GlanceAppWidgetReceiver의glanceAppWidget에서 인스턴스화합니다.class MyAppWidgetReceiver : GlanceAppWidgetReceiver() { // Let MyAppWidgetReceiver know which GlanceAppWidget to use override val glanceAppWidget: GlanceAppWidget = MyAppWidget() }
이제 Glance를 사용하여 AppWidget을 구성했습니다.
GlanceAppWidgetReceiver 클래스를 사용하여 위젯 브로드캐스트 처리
GlanceAppWidgetReceiver는 기본 AppWidgetProvider를 확장하여 위젯 브로드캐스트와 플랫폼 상태
업데이트를 조정합니다. 위젯이 업데이트, 삭제, 사용 설정 또는 사용 중지될 때 플랫폼 이벤트를 수신하여 Compose 수명 주기 요청으로 변환합니다.
매니페스트에서 위젯 선언
AndroidManifest.xml 파일에서 GlanceAppWidgetReceiver 클래스 서브클래스를 브로드캐스트 리시버로 선언합니다.
<receiver android:name="ExampleAppWidgetReceiver"
          android:exported="false">
    <intent-filter>
        <action android:name="android.appwidget.action.APPWIDGET_UPDATE" />
    </intent-filter>
    <meta-data android:name="android.appwidget.provider"
               android:resource="@xml/my_app_widget_info" />
</receiver>
<receiver> 요소에는 리시버 클래스를 지정하는
android:name 속성이 필요합니다. 리시버는 ACTION_APPWIDGET_UPDATE
브로드캐스트 작업을 <intent-filter> 내에서 수락해야 합니다.
<meta-data> 요소는 이름을
android.appwidget.provider로 식별해야 하며 android:resource 속성은
AppWidgetProviderInfo XML 메타데이터 리소스 (@xml/my_app_widget_info)를 가리켜야 합니다.
GlanceAppWidgetReceiver 클래스 구현
Glance에서는 AppWidgetProvider를 직접 확장하는 대신 GlanceAppWidgetReceiver 를 확장합니다. 리시버를 GlanceAppWidget 인스턴스에 연결하여 구현합니다. GlanceAppWidgetReceiver에서 사용할 수 있는 기본 콜백은 다음과 같이 작동합니다.
onUpdate(): 컴포지션 업데이트를 실행하기 위해 Glance에서 자동으로 재정의됩니다. `onUpdate`를 수동으로 재정의하는 경우 Glance가 컴포지션 스레드를 성공적으로 실행하도록 호출해야 합니다super.onUpdate.onAppWidgetOptionsChanged(): 위젯이 처음 배치되거나 크기가 조정될 때 호출됩니다. Glance는 백그라운드에서 옵션 번들 항목을 읽으므로 레이아웃이 런타임 크기에 따라 원활하게 조정됩니다.onDeleted(Context, IntArray): 사용자가 특정 위젯 인스턴스를 삭제할 때마다 호출됩니다.onEnabled(Context): 위젯의 첫 번째 인스턴스가 성공적으로 생성될 때 트리거됩니다. 전역 마이그레이션을 실행하는 데 적합합니다.onDisabled(Context): 제공업체의 마지막 활성 인스턴스가 삭제될 때 호출됩니다.onReceive(Context, Intent): 특정 콜백 메서드 전에 모든 플랫폼 브로드캐스트를 가로챕니다. 작성하는 모든 맞춤 리시버 로직 이super.onReceive(context, intent)을 호출해야 하며 Glance가 작업을 비동기적으로 자동 라우팅하므로goAsync을 직접 호출해서는 안 됩니다.
위젯 브로드캐스트 인텐트 수신
백그라운드에서 GlanceAppWidgetReceiver는 다음과 같은 기본 플랫폼 위젯 브로드캐스트 인텐트를 필터링하고 처리합니다.
ACTION_APPWIDGET_UPDATEACTION_APPWIDGET_DELETEDACTION_APPWIDGET_ENABLEDACTION_APPWIDGET_DISABLEDACTION_APPWIDGET_OPTIONS_CHANGED
UI 만들기
다음 스니펫은 UI를 만드는 방법을 보여줍니다.
/* Import Glance Composables In the event there is a name clash with the Compose classes of the same name, you may rename the imports per https://kotlinlang.org/docs/packages.html#imports using the `as` keyword. import androidx.glance.Button import androidx.glance.layout.Column import androidx.glance.layout.Row import androidx.glance.text.Text */ class MyAppWidget : GlanceAppWidget() { override suspend fun provideGlance(context: Context, id: GlanceId) { // Load data needed to render the AppWidget. // Use `withContext` to switch to another thread for long running // operations. provideContent { // create your AppWidget here MyContent() } } @Composable private fun MyContent() { Column( modifier = GlanceModifier.fillMaxSize(), verticalAlignment = Alignment.Top, horizontalAlignment = Alignment.CenterHorizontally ) { Text(text = "Where to?", modifier = GlanceModifier.padding(12.dp)) Row(horizontalAlignment = Alignment.CenterHorizontally) { Button( text = "Home", onClick = actionStartActivity<MyActivity>() ) Button( text = "Work", onClick = actionStartActivity<MyActivity>() ) } } } }
이전 코드 샘플은 다음 작업을 실행합니다.
- 최상위
Column에서 항목은 세로로 하나씩 배치됩니다. Column은 사용 가능한 공간에 맞게 크기를 확장하고(GlanceModifier를 통해) 콘텐츠를 상단에 정렬하고( (verticalAlignment)) 가로로 가운데에 배치합니다(horizontalAlignment).Column의 콘텐츠는 람다를 사용하여 정의됩니다. 순서가 중요합니다.
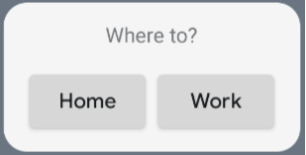
정렬 값을 변경하거나 다양한 수정자 값 (예: 패딩)을 적용하여 구성요소의 배치와 크기를 변경할 수 있습니다. 각 클래스의 구성요소, 매개변수, 사용 가능한 수정자의 전체 목록은 참조 문서를 참고하세요.
둥근 모서리 구현
Android 12에서는 시스템 매개변수를 도입하여 앱 위젯의 모서리 반경을 동적으로 맞춤설정합니다.
system_app_widget_background_radius: 위젯 배경 컨테이너의 모서리 반경을 지정합니다 (28dp보다 클 수 없음).- 내부 반경: 콘텐츠 클리핑을 방지하려면 시스템 배경 윤곽선을 기반으로 내부 콘텐츠의 비례 반경을 계산합니다.
systemRadiusValue - widgetPadding
Glance에서는 GlanceModifier.cornerRadius(android.R.dimen.system_app_widget_background_radius)를 사용하여 컴포지션에서 모서리 반경 크기 조정 속성을 동적으로 적용할 수 있습니다.
Android 11 (API 수준 30) 이하를 실행하는 기기에서 이전 버전과의 호환성을 위해 맞춤 속성 및 맞춤 테마 리소스 대체 항목을 구현합니다.
/values/attrs.xml<resources> <attr name="backgroundRadius" format="dimension" /> </resources>/values/styles.xml<resources> <style name="MyWidgetTheme"> <item name="backgroundRadius">@dimen/my_background_radius_dimen</item> </style> </resources>/values-31/styles.xml<resources> <style name="MyWidgetTheme" parent="@android:style/Theme.DeviceDefault.DayNight"> <item name="backgroundRadius">@android:dimen/system_app_widget_background_radius</item> </style> </resources>/drawable/my_widget_background.xml<shape xmlns:android="http://schemas.android.com/apk/res/android" android:shape="rectangle"> <corners android:radius="?attr/backgroundRadius" /> </shape>