
Dagger 기본사항 페이지에서는 Dagger가 앱에서 종속 항목 삽입을 자동화하도록 지원하는 방법을 설명했습니다. Dagger를 사용하면 지루하고 오류가 발생하기 쉬운 상용구 코드를 작성할 필요가 없습니다.
권장사항 요약
- 가능하면 언제든지
@Inject와 함께 생성자 삽입을 사용하여 Dagger 그래프에 유형을 추가합니다. 가능하지 않을 때는 다음과 같이 합니다.@Binds를 사용하여 인터페이스에 어떤 구현이 있어야 하는지 Dagger에 알립니다.@Provides를 사용하여 프로젝트가 소유하지 않은 클래스를 제공하는 방법을 Dagger에 알립니다.
- 구성요소에서 모듈을 한 번만 선언해야 합니다.
- 주석이 사용되는 전체 기간에 따라 범위 주석의 이름을 지정합니다. 예를 들어
@ApplicationScope,@LoggedUserScope,@ActivityScope이 있습니다.
종속 항목 추가
프로젝트에서 Dagger를 사용하려면 build.gradle 파일의 애플리케이션에 다음 종속 항목을 추가합니다. 최신 버전의 Dagger는 이 GitHub 프로젝트에서 찾을 수 있습니다.
Kotlin
plugins {
  id 'kotlin-kapt'
}

dependencies {
    implementation 'com.google.dagger:dagger:2.x'
    kapt 'com.google.dagger:dagger-compiler:2.x'
}
Java
dependencies {
    implementation 'com.google.dagger:dagger:2.x'
    annotationProcessor 'com.google.dagger:dagger-compiler:2.x'
}
Android의 Dagger
그림 1의 종속 항목 그래프를 통해 Android 앱 예를 살펴보겠습니다.
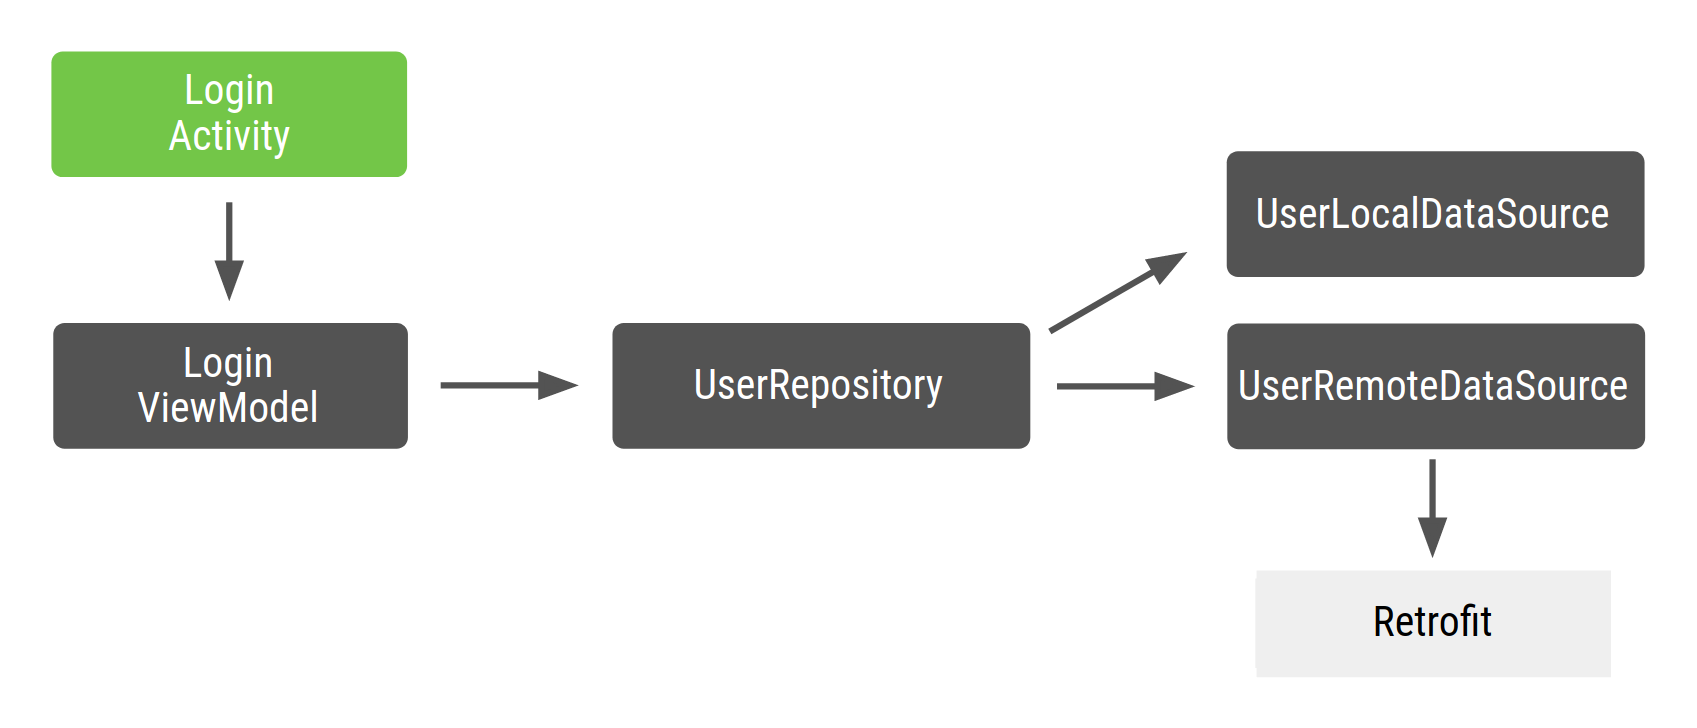
그림 1. 예시 코드의 종속 항목 그래프
Android에서 개발자는 앱이 실행되는 동안 그래프 인스턴스가 메모리에 있기를 원하기 때문에 일반적으로 애플리케이션 클래스에 있는 Dagger 그래프를 만듭니다. 이렇게 하면 그래프는 앱 수명 주기에 연결됩니다. 경우에 따라 애플리케이션 컨텍스트를 그래프에서 사용하려고 할 수도 있습니다. 이를 위해서는 그래프가 Application 클래스 내에 있어야 합니다. 이 접근법의 한 가지 이점은 다른 Android 프레임워크 클래스에서도 그래프를 사용할 수 있다는 것입니다.
또한 테스트에서 맞춤 Application 클래스를 사용할 수 있도록 하여 테스트를 단순화합니다.
그래프를 생성하는 인터페이스는 @Component로 주석이 지정되므로 ApplicationComponent 또는 ApplicationGraph로 호출할 수 있습니다. 일반적으로 다음 코드 스니펫에서와 같이 맞춤 Application 클래스에 그 구성요소의 인스턴스를 유지하고 애플리케이션 그래프가 필요할 때마다 인스턴스를 호출합니다.
Kotlin
// Definition of the Application graph
@Component
interface ApplicationComponent { ... }

// appComponent lives in the Application class to share its lifecycle
class MyApplication: Application() {
    // Reference to the application graph that is used across the whole app
    val appComponent = DaggerApplicationComponent.create()
}
자바
// Definition of the Application graph
@Component
public interface ApplicationComponent {
}

// appComponent lives in the Application class to share its lifecycle
public class MyApplication extends Application {

    // Reference to the application graph that is used across the whole app
    ApplicationComponent appComponent = DaggerApplicationComponent.create();
}
활동 및 프래그먼트와 같은 특정 Android 프레임워크 클래스는 시스템에 의해 인스턴스화되기 때문에 Dagger가 이 클래스를 자동으로 생성할 수 없습니다. 특히 활동의 경우 모든 초기화 코드가 onCreate() 메서드로 이동해야 합니다.
즉, 이전 예에서와 같이 클래스 생성자(생성자 삽입)에서 @Inject 주석을 사용할 수 없습니다. 대신 필드 삽입을 사용해야 합니다.
onCreate() 메서드에서 활동에 필요한 종속 항목을 생성하는 대신 Dagger가 자동으로 종속 항목을 채우도록 합니다. 필드 삽입에서는 대신 Dagger 그래프에서 가져오려고 하는 필드에 @Inject 주석을 적용합니다.
Kotlin
class LoginActivity: Activity() {
    // You want Dagger to provide an instance of LoginViewModel from the graph
    @Inject lateinit var loginViewModel: LoginViewModel
}
자바
public class LoginActivity extends Activity {

    // You want Dagger to provide an instance of LoginViewModel from the graph
    @Inject
    LoginViewModel loginViewModel;
}
단순하게 설명하면 LoginViewModel은 Android 아키텍처 구성요소 ViewModel이 아니며, ViewModel 역할을 하는 일반 클래스일 뿐입니다.
이러한 클래스를 삽입하는 방법에 관한 자세한 내용은 dev-dagger 분기에서 공식 Android Blueprints Dagger 구현의 코드를 확인하세요.
Dagger와 관련한 고려사항 중 하나는 삽입된 필드가 비공개로 유지될 수 없다는 것입니다. 앞의 코드에서와 같이 삽입된 필드는 최소한 package-private 공개 상태를 유지해야 합니다.
활동 삽입
Dagger는 LoginActivity가 필요한 ViewModel을 제공하기 위해 그래프에 액세스해야 한다는 것을 알아야 합니다. Dagger 기본사항 페이지에서는 @Component 인터페이스를 사용하여 그래프에서 가져오려는 항목의 반환 유형으로 함수를 노출함으로써 그래프에서 객체를 가져왔습니다. 이 경우 종속 항목을 삽입해야 하는 객체(여기서는 LoginActivity)에 관해 Dagger에 알려야 합니다. 이를 위해 삽입을 요청하는 객체를 매개변수로 사용하는 함수를 노출합니다.
Kotlin
@Component
interface ApplicationComponent {
    // This tells Dagger that LoginActivity requests injection so the graph needs to
    // satisfy all the dependencies of the fields that LoginActivity is requesting.
    fun inject(activity: LoginActivity)
}
자바
@Component
public interface ApplicationComponent {
    // This tells Dagger that LoginActivity requests injection so the graph needs to
    // satisfy all the dependencies of the fields that LoginActivity is injecting.
    void inject(LoginActivity loginActivity);
}
이 함수는 LoginActivity가 그래프에 액세스하기를 원하며 삽입을 요청한다고 Dagger에 알립니다. Dagger는 LoginActivity에 필요한 모든 종속 항목(자체 종속 항목이 있는 LoginViewModel)을 충족해야 합니다.
삽입을 요청하는 클래스가 여러 개 있다면 구성요소의 모든 클래스를 정확한 유형으로 명시적으로 선언해야 합니다. 예를 들어 삽입을 요청하는 LoginActivity 및 RegistrationActivity가 있다면 두 경우를 모두 포괄하는 일반 메서드 하나를 호출하는 대신 두 개의 inject() 메서드를 호출합니다. 일반 inject() 메서드는 제공해야 할 항목을 Dagger에 알리지 않습니다. 인터페이스의 함수는 임의의 이름을 가질 수 있지만 매개변수로 삽입할 객체를 수신할 때 inject()로 호출하는 것은 Dagger의 규칙입니다.
활동에서 객체를 삽입하려면 Application 클래스에 정의된 appComponent를 사용하고 inject() 메서드를 호출하여 삽입을 요청하는 활동의 인스턴스를 전달합니다.
활동을 사용할 때 프래그먼트 복원 관련 문제를 방지하기 위해 super.onCreate()를 호출하기 전에 활동의 onCreate() 메서드에서 Dagger를 삽입합니다. super.onCreate()의 복원 단계 중에 활동은 활동 결합에 액세스하려고 할 수 있는 프래그먼트를 연결합니다.
프래그먼트를 사용할 때 프래그먼트의 onAttach() 메서드에서 Dagger를 삽입합니다. 이 경우 super.onAttach()를 호출하기 전이나 후에 삽입할 수 있습니다.
Kotlin
class LoginActivity: Activity() {
    // You want Dagger to provide an instance of LoginViewModel from the graph
    @Inject lateinit var loginViewModel: LoginViewModel

    override fun onCreate(savedInstanceState: Bundle?) {
        // Make Dagger instantiate @Inject fields in LoginActivity
        (applicationContext as MyApplication).appComponent.inject(this)
        // Now loginViewModel is available

        super.onCreate(savedInstanceState)
    }
}

// @Inject tells Dagger how to create instances of LoginViewModel
class LoginViewModel @Inject constructor(
    private val userRepository: UserRepository
) { ... }
자바
public class LoginActivity extends Activity {

    // You want Dagger to provide an instance of LoginViewModel from the graph
    @Inject
    LoginViewModel loginViewModel;

    @Override
    protected void onCreate(Bundle savedInstanceState) {
        // Make Dagger instantiate @Inject fields in LoginActivity
        ((MyApplication) getApplicationContext()).appComponent.inject(this);
        // Now loginViewModel is available

        super.onCreate(savedInstanceState);
    }
}

public class LoginViewModel {

    private final UserRepository userRepository;

    // @Inject tells Dagger how to create instances of LoginViewModel
    @Inject
    public LoginViewModel(UserRepository userRepository) {
        this.userRepository = userRepository;
    }
}
다음 코드에서는 그래프를 빌드하기 위해 나머지 종속 항목을 제공하는 방법을 Dagger에 알려 보겠습니다.
Kotlin
class UserRepository @Inject constructor(
    private val localDataSource: UserLocalDataSource,
    private val remoteDataSource: UserRemoteDataSource
) { ... }

class UserLocalDataSource @Inject constructor() { ... }
class UserRemoteDataSource @Inject constructor(
    private val loginService: LoginRetrofitService
) { ... }
Java
public class UserRepository {

    private final UserLocalDataSource userLocalDataSource;
    private final UserRemoteDataSource userRemoteDataSource;

    @Inject
    public UserRepository(UserLocalDataSource userLocalDataSource, UserRemoteDataSource userRemoteDataSource) {
        this.userLocalDataSource = userLocalDataSource;
        this.userRemoteDataSource = userRemoteDataSource;
    }
}

public class UserLocalDataSource {

    @Inject
    public UserLocalDataSource() {}
}

public class UserRemoteDataSource {

    private final LoginRetrofitService loginRetrofitService;

    @Inject
    public UserRemoteDataSource(LoginRetrofitService loginRetrofitService) {
        this.loginRetrofitService = loginRetrofitService;
    }
}
Dagger 모듈
이 예에서는 Retrofit 네트워킹 라이브러리를 사용합니다.
UserRemoteDataSource에는 LoginRetrofitService 종속 항목이 있습니다. 그러나 LoginRetrofitService의 인스턴스를 생성하는 방법은 지금까지 해왔던 것과는 다릅니다. 그것은 클래스 인스턴스화가 아니며, Retrofit.Builder()를 호출하고 다양한 매개변수를 전달하여 로그인 서비스를 구성한 결과입니다.
@Inject 주석 외에도 클래스의 인스턴스를 제공하는 방법(Dagger 모듈 내부의 정보)을 Dagger에 알리는 또 다른 방법이 있습니다. Dagger 모듈은 @Module로 주석이 지정된 클래스입니다. 여기에서 @Provides 주석을 사용하여 종속 항목을 정의할 수 있습니다.
Kotlin
// @Module informs Dagger that this class is a Dagger Module
@Module
class NetworkModule {

    // @Provides tell Dagger how to create instances of the type that this function
    // returns (i.e. LoginRetrofitService).
    // Function parameters are the dependencies of this type.
    @Provides
    fun provideLoginRetrofitService(): LoginRetrofitService {
        // Whenever Dagger needs to provide an instance of type LoginRetrofitService,
        // this code (the one inside the @Provides method) is run.
        return Retrofit.Builder()
                .baseUrl("https://example.com")
                .build()
                .create(LoginService::class.java)
    }
}
자바
// @Module informs Dagger that this class is a Dagger Module
@Module
public class NetworkModule {

    // @Provides tell Dagger how to create instances of the type that this function
    // returns (i.e. LoginRetrofitService).
    // Function parameters are the dependencies of this type.
    @Provides
    public LoginRetrofitService provideLoginRetrofitService() {
        // Whenever Dagger needs to provide an instance of type LoginRetrofitService,
        // this code (the one inside the @Provides method) is run.
        return new Retrofit.Builder()
                .baseUrl("https://example.com")
                .build()
                .create(LoginService.class);
    }
}
모듈은 객체를 제공하는 방식에 관한 정보를 의미론적으로 캡슐화하는 방법입니다. 보시다시피 네트워킹 관련 객체를 제공하는 로직을 그룹화하기 위해 NetworkModule 클래스를 호출했습니다. 애플리케이션이 확장되면 여기서 OkHttpClient를 제공하는 방법이나 Gson 또는 Moshi를 구성하는 방법을 추가할 수도 있습니다.
@Provides 메서드의 종속 항목은 이 메서드의 매개변수입니다. 이전 메서드의 경우 메서드에 매개변수가 없으므로 LoginRetrofitService에 종속 항목이 제공되지 않을 수 있습니다. OkHttpClient를 매개변수로 선언했다면 Dagger는 LoginRetrofitService의 종속 항목을 충족하기 위해 그래프로부터 OkHttpClient 인스턴스를 제공해야 합니다. 예를 들면 다음과 같습니다.
Kotlin
@Module
class NetworkModule {
    // Hypothetical dependency on LoginRetrofitService
    @Provides
    fun provideLoginRetrofitService(
        okHttpClient: OkHttpClient
    ): LoginRetrofitService { ... }
}
자바
@Module
public class NetworkModule {

    @Provides
    public LoginRetrofitService provideLoginRetrofitService(OkHttpClient okHttpClient) {
        ...
    }
}
Dagger 그래프가 이 모듈에 관해 알 수 있도록 하려면 다음과 같이 @Component 인터페이스에 모듈을 추가해야 합니다.
Kotlin
// The "modules" attribute in the @Component annotation tells Dagger what Modules
// to include when building the graph
@Component(modules = [NetworkModule::class])
interface ApplicationComponent {
    ...
}
자바
// The "modules" attribute in the @Component annotation tells Dagger what Modules
// to include when building the graph
@Component(modules = NetworkModule.class)
public interface ApplicationComponent {
    ...
}
Dagger 그래프에 유형을 추가하는 권장 방법은 생성자 삽입을 사용하는 것입니다(즉, 클래스의 생성자에 @Inject 주석 사용).
때로 이 방법은 불가능하며, Dagger 모듈을 사용해야 합니다. 예를 들어 Dagger가 계산 결과를 사용하여 객체의 인스턴스를 생성하는 방법을 결정하도록 하려는 때에는 Dagger 모듈을 사용해야 합니다. 동일한 유형의 인스턴스를 제공해야 할 때마다 Dagger는 @Provides 메서드 내에서 코드를 실행합니다.
다음은 예시의 Dagger 그래프가 현재 표시되는 모습입니다.
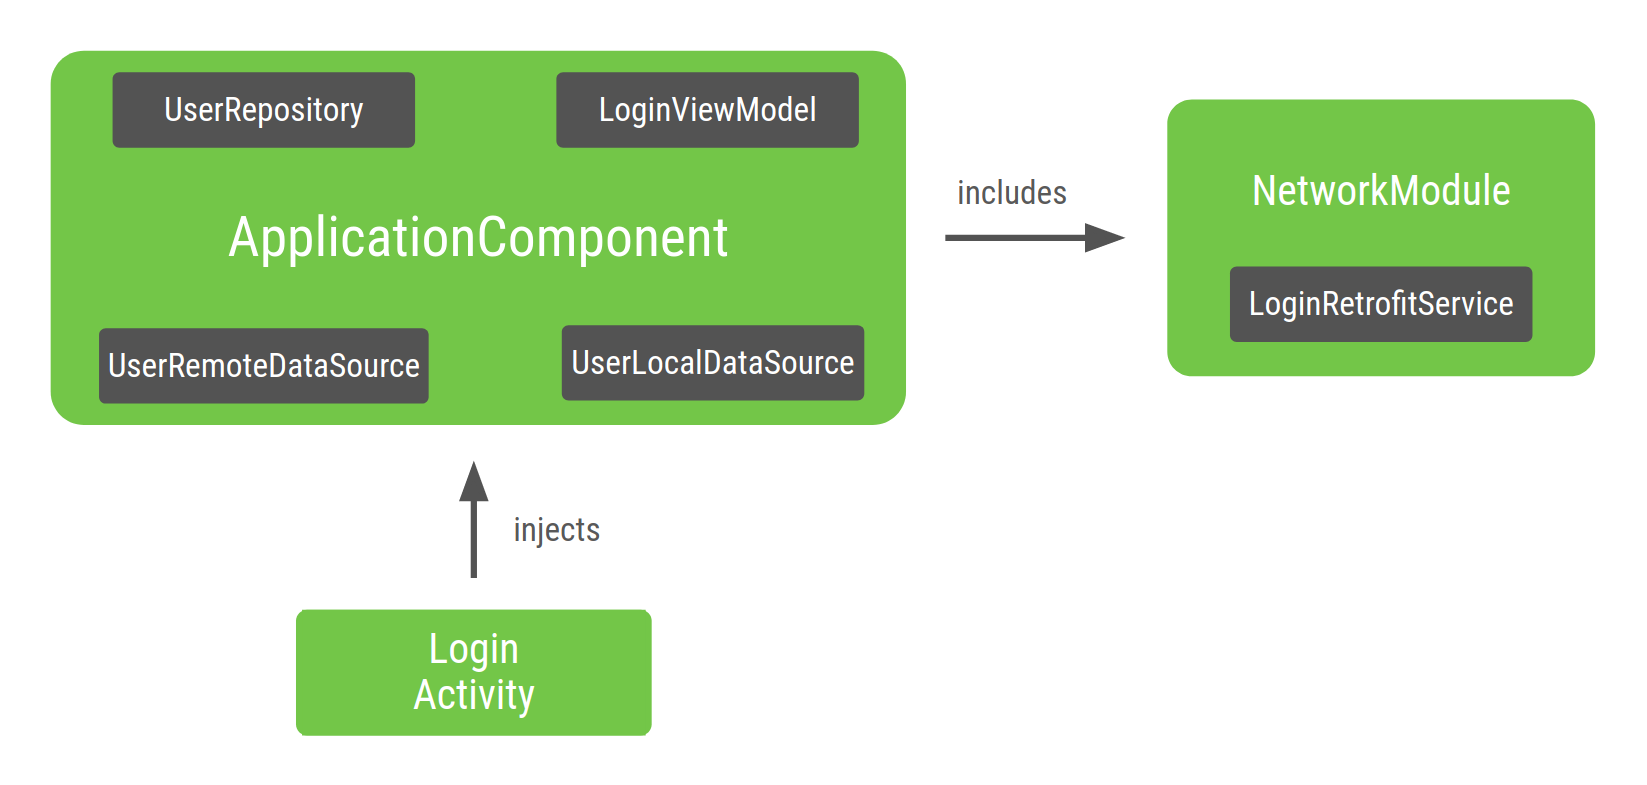
그림 2. Dagger에서 LoginActivity를 삽입한 그래프 표현
그래프의 진입점은 LoginActivity입니다. LoginActivity는 LoginViewModel을 삽입하기 때문에 Dagger는 LoginViewModel 및 종속 항목의 인스턴스를 반복적으로 제공하는 방법을 알고 있는 그래프를 빌드합니다. Dagger는 클래스 생성자의 @Inject 주석으로 인해 이 실행 방법을 알고 있습니다.
Dagger가 생성한 ApplicationComponent 내에는 제공 방법을 알고 있는 모든 클래스의 인스턴스를 가져오는 팩토리 유형 메서드가 있습니다. 이 예에서 Dagger는 ApplicationComponent에 포함된 NetworkModule에 위임하여 LoginRetrofitService의 인스턴스를 얻습니다.
Dagger 범위
Dagger 기본사항 페이지에서 범위는 구성요소에서 유형의 고유한 인스턴스를 갖는 방법으로 언급되어 있습니다. 유형의 범위를 구성요소의 수명 주기로 지정하는 것입니다.
앱의 다른 기능에서 UserRepository를 사용하려고 하지만 필요할 때마다 새 객체를 생성하고 싶지 않을 수 있으므로 이 객체를 전체 앱에 고유한 인스턴스로 지정할 수 있습니다. 이는 LoginRetrofitService도 마찬가지입니다. 생성 비용이 많이 들 수 있으므로 이 객체의 고유한 인스턴스를 재사용할 수 있습니다. UserRemoteDataSource의 인스턴스 생성은 그렇게 비용이 많이 들지 않으므로 구성요소의 수명 주기로 객체 범위를 지정할 필요는 없습니다.
@Singleton은 javax.inject 패키지와 함께 제공되는 유일한 범위 주석입니다. 이 주석을 사용하여 ApplicationComponent 및 전체 애플리케이션에서 재사용하려는 객체에 주석을 달 수 있습니다.
Kotlin
@Singleton
@Component(modules = [NetworkModule::class])
interface ApplicationComponent {
    fun inject(activity: LoginActivity)
}

@Singleton
class UserRepository @Inject constructor(
    private val localDataSource: UserLocalDataSource,
    private val remoteDataSource: UserRemoteDataSource
) { ... }

@Module
class NetworkModule {
    // Way to scope types inside a Dagger Module
    @Singleton
    @Provides
    fun provideLoginRetrofitService(): LoginRetrofitService { ... }
}
자바
@Singleton
@Component(modules = NetworkModule.class)
public interface ApplicationComponent {
    void inject(LoginActivity loginActivity);
}

@Singleton
public class UserRepository {

    private final UserLocalDataSource userLocalDataSource;
    private final UserRemoteDataSource userRemoteDataSource;

    @Inject
    public UserRepository(UserLocalDataSource userLocalDataSource, UserRemoteDataSource userRemoteDataSource) {
        this.userLocalDataSource = userLocalDataSource;
        this.userRemoteDataSource = userRemoteDataSource;
    }
}

@Module
public class NetworkModule {

    @Singleton
    @Provides
    public LoginRetrofitService provideLoginRetrofitService() { ... }
}
객체에 범위를 적용할 때 메모리 누수가 발생하지 않도록 주의하세요. 범위가 지정된 구성요소가 메모리에 있는 한 생성된 객체도 메모리에 있습니다. ApplicationComponent는 앱이 시작될 때(Application 클래스에서) 생성되므로 앱이 소멸되면 소멸됩니다. 따라서 UserRepository의 고유한 인스턴스는 애플리케이션이 소멸될 때까지 메모리에 항상 남아 있습니다.
Dagger 하위 구성요소
로그인 흐름(단일 LoginActivity로 관리)이 여러 프래그먼트로 구성되어 있다면 모든 프래그먼트에서 동일한 LoginViewModel 인스턴스를 재사용해야 합니다. @Singleton은 다음과 같은 이유로 LoginViewModel에 주석을 지정하여 인스턴스를 재사용할 수 없습니다.
흐름이 완료된 후
LoginViewModel인스턴스는 메모리에 지속됩니다.로그인 흐름마다 다른
LoginViewModel인스턴스를 원합니다. 예를 들어 사용자가 로그아웃하면 사용자가 처음 로그인했을 때와 동일한 인스턴스가 아닌 다른LoginViewModel인스턴스를 원합니다.
LoginViewModel의 범위를 LoginActivity의 수명 주기로 지정하려면 로그인 흐름의 새 구성요소(새 하위 그래프) 및 새 범위를 생성해야 합니다.
로그인 흐름과 관련된 그래프를 만들어 보겠습니다.
Kotlin
@Component
interface LoginComponent {}
자바
@Component
public interface LoginComponent {
}
이제 LoginActivity는 로그인별 구성이 있으므로 LoginComponent에서 삽입을 가져와야 합니다. 이렇게 하면 ApplicationComponent 클래스에서 LoginActivity를 삽입하지 않아도 됩니다.
Kotlin
@Component
interface LoginComponent {
    fun inject(activity: LoginActivity)
}
자바
@Component
public interface LoginComponent {
    void inject(LoginActivity loginActivity);
}
LoginViewModel은 UserRepository에 종속되므로 LoginComponent는 ApplicationComponent의 객체에 액세스할 수 있어야 합니다. 새 구성요소가 다른 구성요소의 일부를 사용하도록 Dagger에 알리는 방법은 Dagger 하위 구성요소를 사용하는 것입니다. 새 구성요소는 공유 리소스가 포함된 구성요소의 하위 구성요소여야 합니다.
하위 구성요소는 상위 구성요소의 객체 그래프를 상속 및 확장하는 구성요소입니다. 따라서 상위 구성요소에 제공된 모든 객체는 하위 구성요소에도 제공됩니다. 이러한 방식으로 하위 구성요소의 객체는 상위 구성요소에서 제공하는 객체에 종속될 수 있습니다.
하위 구성요소의 인스턴스를 생성하려면 상위 구성요소의 인스턴스가 필요합니다. 따라서 상위 구성요소가 하위 구성요소에 제공하는 객체는 여전히 상위 구성요소로 범위가 지정됩니다.
다음 예에서는 LoginComponent를 ApplicationComponent의 하위 구성요소로 정의해야 합니다. 이렇게 하려면 LoginComponent에 @Subcomponent로 주석을 지정합니다.
Kotlin
// @Subcomponent annotation informs Dagger this interface is a Dagger Subcomponent
@Subcomponent
interface LoginComponent {

    // This tells Dagger that LoginActivity requests injection from LoginComponent
    // so that this subcomponent graph needs to satisfy all the dependencies of the
    // fields that LoginActivity is injecting
    fun inject(loginActivity: LoginActivity)
}
자바
// @Subcomponent annotation informs Dagger this interface is a Dagger Subcomponent
@Subcomponent
public interface LoginComponent {

    // This tells Dagger that LoginActivity requests injection from LoginComponent
    // so that this subcomponent graph needs to satisfy all the dependencies of the
    // fields that LoginActivity is injecting
    void inject(LoginActivity loginActivity);
}
또한 ApplicationComponent가 LoginComponent의 인스턴스를 생성하는 방법을 알 수 있도록 LoginComponent 내에 하위 구성요소 팩토리를 정의해야 합니다.
Kotlin
@Subcomponent
interface LoginComponent {

    // Factory that is used to create instances of this subcomponent
    @Subcomponent.Factory
    interface Factory {
        fun create(): LoginComponent
    }

    fun inject(loginActivity: LoginActivity)
}
자바
@Subcomponent
public interface LoginComponent {

    // Factory that is used to create instances of this subcomponent
    @Subcomponent.Factory
    interface Factory {
        LoginComponent create();
    }

    void inject(LoginActivity loginActivity);
}
LoginComponent가 ApplicationComponent의 하위 구성요소임을 Dagger에 알리려면 다음과 같이 함으로써 그 사실을 나타내야 합니다.
하위 구성요소의 클래스를 주석의
subcomponents속성에 전달하는 새로운 Dagger 모듈(예:SubcomponentsModule)을 만듭니다.Kotlin
// The "subcomponents" attribute in the @Module annotation tells Dagger what
// Subcomponents are children of the Component this module is included in.
@Module(subcomponents = LoginComponent::class)
class SubcomponentsModule {}
자바
// The "subcomponents" attribute in the @Module annotation tells Dagger what
// Subcomponents are children of the Component this module is included in.
@Module(subcomponents = LoginComponent.class)
public class SubcomponentsModule {
}
다음과 같이 새 모듈(즉,
SubcomponentsModule)을ApplicationComponent에 추가합니다.Kotlin
// Including SubcomponentsModule, tell ApplicationComponent that
// LoginComponent is its subcomponent.
@Singleton
@Component(modules = [NetworkModule::class, SubcomponentsModule::class])
interface ApplicationComponent {
}
자바
// Including SubcomponentsModule, tell ApplicationComponent that
// LoginComponent is its subcomponent.
@Singleton
@Component(modules = {NetworkModule.class, SubcomponentsModule.class})
public interface ApplicationComponent {
}
책임은 이제
LoginComponent에 속하기 때문에ApplicationComponent는LoginActivity를 더 이상 삽입할 필요가 없으므로ApplicationComponent에서inject()메서드를 삭제할 수 있습니다.ApplicationComponent의 소비자는LoginComponent인스턴스를 생성하는 방법을 알아야 합니다. 상위 구성요소는 소비자가 상위 구성요소의 인스턴스에서 하위 구성요소의 인스턴스를 만들 수 있도록 인터페이스에 메서드를 추가해야 합니다.다음과 같이 인터페이스에서
LoginComponent인스턴스를 생성하는 팩토리를 노출합니다.Kotlin
@Singleton
@Component(modules = [NetworkModule::class, SubcomponentsModule::class])
interface ApplicationComponent {
// This function exposes the LoginComponent Factory out of the graph so consumers
// can use it to obtain new instances of LoginComponent
fun loginComponent(): LoginComponent.Factory
}
Java
@Singleton
@Component(modules = { NetworkModule.class, SubcomponentsModule.class} )
public interface ApplicationComponent {
// This function exposes the LoginComponent Factory out of the graph so consumers
// can use it to obtain new instances of LoginComponent
LoginComponent.Factory loginComponent();
}
하위 구성요소에 범위 할당
프로젝트를 빌드하면 ApplicationComponent 및 LoginComponent의 인스턴스를 모두 생성할 수 있습니다. 애플리케이션이 메모리에 있는 한 동일한 그래프 인스턴스를 사용하려고 하므로 ApplicationComponent는 애플리케이션의 수명 주기에 연결됩니다.
LoginComponent의 수명 주기는 무엇인가요? LoginComponent가 필요한 이유 중 하나는 로그인 관련 프래그먼트 간에 동일한 LoginViewModel 인스턴스를 공유해야 하기 때문입니다. 그러나 새 로그인 흐름이 있을 때마다 다른 LoginViewModel 인스턴스도 원합니다. LoginActivity는 LoginComponent의 적절한 전체 기간입니다. 모든 새 활동에는 LoginComponent의 새 인스턴스와 이 LoginComponent 인스턴스를 사용할 수 있는 프래그먼트가 필요합니다.
LoginComponent는 LoginActivity 수명 주기에 연결되어 있으므로 Application 클래스의 applicationComponent 참조를 유지한 것과 동일한 방식으로 활동의 구성요소 참조를 유지해야 합니다. 그렇게 하면 프래그먼트가 참조에 액세스할 수 있습니다.
Kotlin
class LoginActivity: Activity() {
    // Reference to the Login graph
    lateinit var loginComponent: LoginComponent
    ...
}
자바
public class LoginActivity extends Activity {

    // Reference to the Login graph
    LoginComponent loginComponent;

    ...
}
Dagger에서 loginComponent 변수를 제공할 것으로 예상되지 않으므로 이 변수에는 @Inject로 주석이 지정되지 않습니다.
ApplicationComponent를 사용하여 LoginComponent 참조를 가져온 후 다음과 같이 LoginActivity를 삽입할 수 있습니다.
Kotlin
class LoginActivity: Activity() {
    // Reference to the Login graph
    lateinit var loginComponent: LoginComponent

    // Fields that need to be injected by the login graph
    @Inject lateinit var loginViewModel: LoginViewModel

    override fun onCreate(savedInstanceState: Bundle?) {
        // Creation of the login graph using the application graph
        loginComponent = (applicationContext as MyDaggerApplication)
                            .appComponent.loginComponent().create()

        // Make Dagger instantiate @Inject fields in LoginActivity
        loginComponent.inject(this)

        // Now loginViewModel is available

        super.onCreate(savedInstanceState)
    }
}
자바
public class LoginActivity extends Activity {

    // Reference to the Login graph
    LoginComponent loginComponent;

    // Fields that need to be injected by the login graph
    @Inject
    LoginViewModel loginViewModel;

    @Override
    protected void onCreate(Bundle savedInstanceState) {
        // Creation of the login graph using the application graph
        loginComponent = ((MyApplication) getApplicationContext())
                                .appComponent.loginComponent().create();

        // Make Dagger instantiate @Inject fields in LoginActivity
        loginComponent.inject(this);

        // Now loginViewModel is available

        super.onCreate(savedInstanceState);
    }
}
LoginComponent는 활동의 onCreate() 메서드에서 생성되며 활동이 폐기되면 암시적으로 폐기됩니다.
LoginComponent는 요청될 때마다 항상 동일한 LoginViewModel 인스턴스를 제공해야 합니다. 이렇게 하려면 맞춤 주석 범위를 생성하고 LoginComponent와 LoginViewModel에 모두 그 범위로 주석을 지정해야 합니다. @Singleton 주석은 상위 구성요소에서 이미 사용하고 있으며 객체를 애플리케이션 싱글톤(전체 앱의 고유 인스턴스)으로 만들었기 때문에 사용할 수 없습니다. 따라서 다른 주석 범위를 생성해야 합니다.
이 경우 이 범위를 @LoginScope로 호출했을 수 있지만 이는 권장되지 않습니다. 범위 주석의 이름은 이행하는 목적에 관해 명시적이어서는 안 됩니다. 대신 주석은 RegistrationComponent 및 SettingsComponent와 같은 동위 구성요소에 의해 재사용될 수 있으므로 범위 주석은 전체 기간에 따라 이름을 지정해야 합니다. 이러한 이유로 @LoginScope 대신 @ActivityScope로 호출해야 합니다.
Kotlin
// Definition of a custom scope called ActivityScope
@Scope
@Retention(value = AnnotationRetention.RUNTIME)
annotation class ActivityScope

// Classes annotated with @ActivityScope are scoped to the graph and the same
// instance of that type is provided every time the type is requested.
@ActivityScope
@Subcomponent
interface LoginComponent { ... }

// A unique instance of LoginViewModel is provided in Components
// annotated with @ActivityScope
@ActivityScope
class LoginViewModel @Inject constructor(
    private val userRepository: UserRepository
) { ... }
자바
// Definition of a custom scope called ActivityScope
@Scope
@Retention(RetentionPolicy.RUNTIME)
public @interface ActivityScope {}

// Classes annotated with @ActivityScope are scoped to the graph and the same
// instance of that type is provided every time the type is requested.
@ActivityScope
@Subcomponent
public interface LoginComponent { ... }

// A unique instance of LoginViewModel is provided in Components
// annotated with @ActivityScope
@ActivityScope
public class LoginViewModel {

    private final UserRepository userRepository;

    @Inject
    public LoginViewModel(UserRepository userRepository) {
        this.userRepository = userRepository;
    }
}
이제 LoginViewModel이 필요한 두 개의 프래그먼트가 있다면 두 프래그먼트 모두 동일한 인스턴스와 함께 제공됩니다. 예를 들어 LoginUsernameFragment 및 LoginPasswordFragment가 있다면 둘 다 LoginComponent에 의해 삽입되어야 합니다.
Kotlin
@ActivityScope
@Subcomponent
interface LoginComponent {

    @Subcomponent.Factory
    interface Factory {
        fun create(): LoginComponent
    }

    // All LoginActivity, LoginUsernameFragment and LoginPasswordFragment
    // request injection from LoginComponent. The graph needs to satisfy
    // all the dependencies of the fields those classes are injecting
    fun inject(loginActivity: LoginActivity)
    fun inject(usernameFragment: LoginUsernameFragment)
    fun inject(passwordFragment: LoginPasswordFragment)
}
자바
@ActivityScope
@Subcomponent
public interface LoginComponent {

    @Subcomponent.Factory
    interface Factory {
        LoginComponent create();
    }

    // All LoginActivity, LoginUsernameFragment and LoginPasswordFragment
    // request injection from LoginComponent. The graph needs to satisfy
    // all the dependencies of the fields those classes are injecting
    void inject(LoginActivity loginActivity);
    void inject(LoginUsernameFragment loginUsernameFragment);
    void inject(LoginPasswordFragment loginPasswordFragment);
}
구성요소는 LoginActivity 객체에 존재하는 구성요소의 인스턴스에 액세스합니다. LoginUserNameFragment의 예시 코드는 다음 코드 스니펫에 나와 있습니다.
Kotlin
class LoginUsernameFragment: Fragment() {

    // Fields that need to be injected by the login graph
    @Inject lateinit var loginViewModel: LoginViewModel

    override fun onAttach(context: Context) {
        super.onAttach(context)

        // Obtaining the login graph from LoginActivity and instantiate
        // the @Inject fields with objects from the graph
        (activity as LoginActivity).loginComponent.inject(this)

        // Now you can access loginViewModel here and onCreateView too
        // (shared instance with the Activity and the other Fragment)
    }
}
자바
public class LoginUsernameFragment extends Fragment {

    // Fields that need to be injected by the login graph
    @Inject
    LoginViewModel loginViewModel;

    @Override
    public void onAttach(Context context) {
        super.onAttach(context);

        // Obtaining the login graph from LoginActivity and instantiate
        // the @Inject fields with objects from the graph
        ((LoginActivity) getActivity()).loginComponent.inject(this);

        // Now you can access loginViewModel here and onCreateView too
        // (shared instance with the Activity and the other Fragment)
    }
}
그리고 LoginPasswordFragment의 예시 코드는 다음 코드 스니펫에 나와 있습니다.
Kotlin
class LoginPasswordFragment: Fragment() {

    // Fields that need to be injected by the login graph
    @Inject lateinit var loginViewModel: LoginViewModel

    override fun onAttach(context: Context) {
        super.onAttach(context)

        (activity as LoginActivity).loginComponent.inject(this)

        // Now you can access loginViewModel here and onCreateView too
        // (shared instance with the Activity and the other Fragment)
    }
}
자바
public class LoginPasswordFragment extends Fragment {

    // Fields that need to be injected by the login graph
    @Inject
    LoginViewModel loginViewModel;

    @Override
    public void onAttach(Context context) {
        super.onAttach(context);

        ((LoginActivity) getActivity()).loginComponent.inject(this);

        // Now you can access loginViewModel here and onCreateView too
        // (shared instance with the Activity and the other Fragment)
    }
}
그림 3은 Dagger 그래프가 새 하위 구성요소와 함께 어떻게 표시되는지 보여줍니다. 흰색 점이 있는 클래스(UserRepository, LoginRetrofitService 및 LoginViewModel)는 고유한 인스턴스의 범위가 각각의 구성요소로 지정된 클래스입니다.
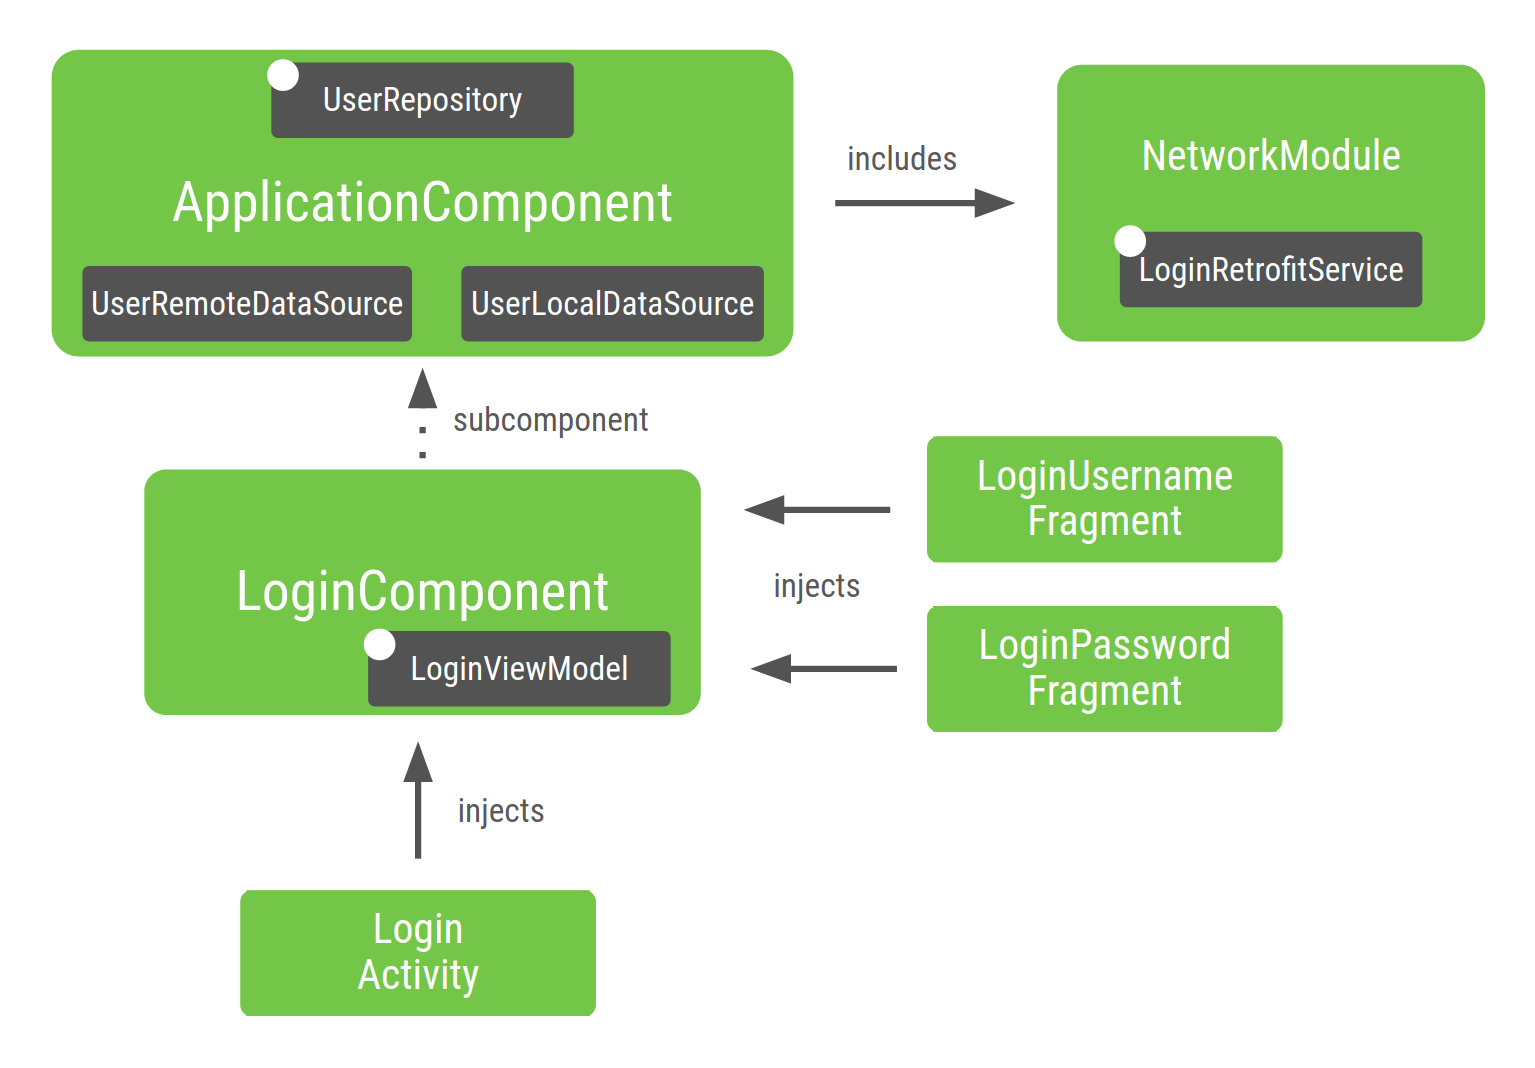
그림 3. Android 앱 예시용으로 빌드한 그래프 표현
그래프의 요소를 분석해 보겠습니다.
NetworkModule(따라서LoginRetrofitService)은 구성요소에서 지정되었기 때문에ApplicationComponent에 포함됩니다.UserRepository는ApplicationComponent로 범위가 지정되었으므로ApplicationComponent에 남아 있습니다. 프로젝트가 커지면 다른 기능(예: 등록)에서 동일한 인스턴스를 공유하려고 합니다.UserRepository는ApplicationComponent의 일부이므로UserRepository의 인스턴스를 제공할 수 있으려면 종속 항목(즉,UserLocalDataSource및UserRemoteDataSource)도 이 구성요소에 있어야 합니다.LoginViewModel은LoginComponent에서 삽입한 클래스에만 필요하므로LoginComponent에 포함되어 있습니다.ApplicationComponent의 종속 항목은LoginViewModel이 필요하지 않으므로LoginViewModel은ApplicationComponent에 포함되어 있지 않습니다.마찬가지로
UserRepository의 범위를ApplicationComponent로 지정하지 않았다면 Dagger는UserRepository및 종속 항목을LoginComponent의 일부로 자동으로 포함합니다. 이 구성요소가 현재UserRepository가 사용되는 유일한 위치이기 때문입니다.
객체의 범위를 다양한 수명 주기로 지정하는 것 외에도 하위 구성요소를 생성하는 것은 애플리케이션의 다양한 요소를 서로 캡슐화하는 좋은 방법입니다.
앱의 흐름에 따라 다양한 Dagger 하위 그래프를 생성하도록 앱을 구성하면 메모리 및 시작 시간 측면에서 더욱 성능이 뛰어나고 확장성이 탁월한 애플리케이션을 만들 수 있습니다.
Dagger 그래프 빌드 시 권장사항
애플리케이션의 Dagger 그래프 빌드 시:
구성요소를 생성할 때 구성요소의 전체 기간을 담당하는 요소를 고려해야 합니다. 이 경우
Application클래스가ApplicationComponent를 담당하고LoginActivity가LoginComponent를 담당합니다.타당할 때에만 범위 지정을 사용합니다. 범위 지정을 과도하게 사용하면 앱의 런타임 성능에 부정적인 영향을 줄 수 있습니다. 구성요소가 메모리에 있고 범위가 지정된 객체를 얻는 것이 비용이 더 많이 드는 한 객체는 메모리에 있습니다. Dagger는 객체를 제공할 때 팩토리 유형 제공자 대신
DoubleCheck잠금을 사용합니다.
Dagger를 사용하는 프로젝트 테스트
Dagger와 같은 종속 항목 삽입 프레임워크를 사용하는 이점 중 하나는 코드를 더 쉽게 테스트할 수 있다는 점입니다.
단위 테스트
단위 테스트에 Dagger를 사용할 필요는 없습니다. 생성자 삽입을 사용하는 클래스를 테스트할 때 이 클래스를 인스턴스화하는 데 Dagger를 사용할 필요가 없습니다. 주석이 지정되지 않은 경우와 마찬가지로 직접 가짜 또는 모의 종속 항목을 전달하는 생성자를 바로 호출할 수 있습니다.
예를 들어 LoginViewModel 테스트 시 다음과 같습니다.
Kotlin
@ActivityScope
class LoginViewModel @Inject constructor(
    private val userRepository: UserRepository
) { ... }

class LoginViewModelTest {

    @Test
    fun `Happy path`() {
        // You don't need Dagger to create an instance of LoginViewModel
        // You can pass a fake or mock UserRepository
        val viewModel = LoginViewModel(fakeUserRepository)
        assertEquals(...)
    }
}
Java
@ActivityScope
public class LoginViewModel {

    private final UserRepository userRepository;

    @Inject
    public LoginViewModel(UserRepository userRepository) {
        this.userRepository = userRepository;
    }
}

public class LoginViewModelTest {

    @Test
    public void happyPath() {
        // You don't need Dagger to create an instance of LoginViewModel
        // You can pass a fake or mock UserRepository
        LoginViewModel viewModel = new LoginViewModel(fakeUserRepository);
        assertEquals(...);
    }
}
엔드 투 엔드 테스트
통합 테스트의 경우 테스트를 위한 TestApplicationComponent를 생성하는 것이 좋습니다.
프로덕션 및 테스트에서는 다양한 구성요소 설정을 사용합니다.
이를 위해서는 애플리케이션에 더 많은 사전 모듈 디자인이 필요합니다. 테스트 구성요소는 프로덕션 구성요소를 확장하고 다양한 모듈 세트를 설치합니다.
Kotlin
// TestApplicationComponent extends from ApplicationComponent to have them both
// with the same interface methods. You need to include the modules of the
// component here as well, and you can replace the ones you want to override.
// This sample uses FakeNetworkModule instead of NetworkModule
@Singleton
@Component(modules = [FakeNetworkModule::class, SubcomponentsModule::class])
interface TestApplicationComponent : ApplicationComponent {
}
자바
// TestApplicationComponent extends from ApplicationComponent to have them both
// with the same interface methods. You need to include the modules of the
// Component here as well, and you can replace the ones you want to override.
// This sample uses FakeNetworkModule instead of NetworkModule
@Singleton
@Component(modules = {FakeNetworkModule.class, SubcomponentsModule.class})
public interface TestApplicationComponent extends ApplicationComponent {
}
FakeNetworkModule에는 원래 NetworkModule의 가짜 구현이 있습니다.
여기에서 대체하려는 가짜 또는 모의 인스턴스를 원하는 대로 제공할 수 있습니다.
Kotlin
// In the FakeNetworkModule, pass a fake implementation of LoginRetrofitService
// that you can use in your tests.
@Module
class FakeNetworkModule {
    @Provides
    fun provideLoginRetrofitService(): LoginRetrofitService {
        return FakeLoginService()
    }
}
자바
// In the FakeNetworkModule, pass a fake implementation of LoginRetrofitService
// that you can use in your tests.
@Module
public class FakeNetworkModule {

    @Provides
    public LoginRetrofitService provideLoginRetrofitService() {
        return new FakeLoginService();
    }
}
통합 테스트 또는 엔드 투 엔드 테스트에서는 ApplicationComponent 대신 TestApplicationComponent를 생성하는 TestApplication을 사용합니다.
Kotlin
// Your test application needs an instance of the test graph
class MyTestApplication: MyApplication() {
    override val appComponent = DaggerTestApplicationComponent.create()
}
자바
// Your test application needs an instance of the test graph
public class MyTestApplication extends MyApplication {
    ApplicationComponent appComponent = DaggerTestApplicationComponent.create();
}
그런 다음, 이 테스트 애플리케이션은 계측 테스트를 실행하는 데 사용할 맞춤 TestRunner에서 사용됩니다. 이 주제에 관한 자세한 내용은 Android 앱에서 Dagger 사용 Codelab을 참조하세요.
Dagger 모듈 작업
Dagger 모듈은 시맨틱 방식으로 객체를 제공하는 방식을 캡슐화하는 방법입니다. 구성요소에 모듈을 포함할 수 있지만 다른 모듈 내에 모듈을 포함할 수도 있습니다. 이 방법은 강력하지만 쉽게 오용될 수 있습니다.
모듈이 구성요소 또는 다른 모듈에 추가되었다면 그 모듈은 이미 Dagger 그래프에 있습니다. Dagger는 그 구성요소에 이러한 객체를 제공할 수 있습니다. 모듈을 추가하기 전에 모듈이 구성요소에 이미 추가되었는지 확인하거나 프로젝트를 컴파일하고 Dagger가 이 모듈에 필요한 종속 항목을 찾을 수 있는지 확인하여 모듈이 이미 Dagger 그래프의 일부인지 확인합니다.
모범 사례에 따르면 모듈은 한 구성요소에서 한 번만 선언되어야 합니다(특정 고급 Dagger 사용 사례 제외).
이 방법으로 그래프를 구성했다고 가정해 보겠습니다. ApplicationComponent는 Module1 및 Module2를 포함하고 Module1은 ModuleX를 포함합니다.
Kotlin
@Component(modules = [Module1::class, Module2::class])
interface ApplicationComponent { ... }

@Module(includes = [ModuleX::class])
class Module1 { ... }

@Module
class Module2 { ... }
자바
@Component(modules = {Module1.class, Module2.class})
public interface ApplicationComponent { ... }

@Module(includes = {ModuleX.class})
public class Module1 { ... }

@Module
public class Module2 { ... }
이제 Module2는 ModuleX에서 제공하는 클래스에 종속됩니다. 다음 코드 스니펫에서 볼 수 있듯이 ModuleX가 그래프에 두 번 포함되므로 Module2에 ModuleX를 포함하는 것은 잘못된 사례입니다.
Kotlin
// Bad practice: ModuleX is declared multiple times in this Dagger graph
@Component(modules = [Module1::class, Module2::class])
interface ApplicationComponent { ... }

@Module(includes = [ModuleX::class])
class Module1 { ... }

@Module(includes = [ModuleX::class])
class Module2 { ... }
자바
// Bad practice: ModuleX is declared multiple times in this Dagger graph.
@Component(modules = {Module1.class, Module2.class})
public interface ApplicationComponent { ... }

@Module(includes = ModuleX.class)
public class Module1 { ... }

@Module(includes = ModuleX.class)
public class Module2 { ... }
대신 다음 중 하나를 실행해야 합니다.
- 모듈을 리팩터링하고 공통 모듈을 구성요소로 추출합니다.
- 두 모듈이 모두 공유하는 객체를 사용해 새 모듈을 생성하고 이 모듈을 구성요소로 추출합니다.
이러한 방식으로 리팩터링하지 않으면 명확한 조직 구성을 인식하지 않으면서 서로를 포함하는 모듈이 많아져서 각 종속 항목의 출처를 파악하기가 더 어려워집니다.
모범 사례(옵션 1): ModuleX는 Dagger 그래프에서 한 번만 선언됩니다.
Kotlin
@Component(modules = [Module1::class, Module2::class, ModuleX::class])
interface ApplicationComponent { ... }

@Module
class Module1 { ... }

@Module
class Module2 { ... }
자바
@Component(modules = {Module1.class, Module2.class, ModuleX.class})
public interface ApplicationComponent { ... }

@Module
public class Module1 { ... }

@Module
public class Module2 { ... }
모범 사례(옵션 2): ModuleX에서 Module1 및 Module2의 공통 종속 항목은 구성요소에 포함된 ModuleXCommon이라는 새 모듈로 추출됩니다. 그런 다음, ModuleXWithModule1Dependencies 및 ModuleXWithModule2Dependencies라는 두 개의 다른 모듈이 각 모듈과 관련된 종속 항목과 함께 생성됩니다. 모든 모듈은 Dagger 그래프에서 한 번만 선언됩니다.
Kotlin
@Component(modules = [Module1::class, Module2::class, ModuleXCommon::class])
interface ApplicationComponent { ... }

@Module
class ModuleXCommon { ... }

@Module
class ModuleXWithModule1SpecificDependencies { ... }

@Module
class ModuleXWithModule2SpecificDependencies { ... }

@Module(includes = [ModuleXWithModule1SpecificDependencies::class])
class Module1 { ... }

@Module(includes = [ModuleXWithModule2SpecificDependencies::class])
class Module2 { ... }
Java
@Component(modules = {Module1.class, Module2.class, ModuleXCommon.class})
public interface ApplicationComponent { ... }

@Module
public class ModuleXCommon { ... }

@Module
public class ModuleXWithModule1SpecificDependencies { ... }

@Module
public class ModuleXWithModule2SpecificDependencies { ... }

@Module(includes = ModuleXWithModule1SpecificDependencies.class)
public class Module1 { ... }

@Module(includes = ModuleXWithModule2SpecificDependencies.class)
public class Module2 { ... }
지원되는 삽입
지원되는 삽입은 DI 프레임워크에서 일부 매개변수를 제공하고 다른 매개변수는 사용자가 생성 시 전달해야 하는 객체를 구성하는 데 사용되는 DI 패턴입니다.
Android에서 이 패턴은 표시할 요소의 ID를 런타임에만 알 수 있고 Dagger가 DI 그래프를 생성하는 컴파일 시간에는 알 수 없는 세부정보 화면에서 일반적입니다. Dagger를 사용한 지원되는 삽입에 관한 자세한 내용은 Dagger 문서를 참고하세요.
결론
아직 검토하지 않았다면 권장사항 섹션을 검토하세요. Android 앱에서 Dagger를 사용하는 방법을 알아보려면 Android 앱에서 Dagger 사용 Codelab을 참조하세요.