使用可因應不同版本的元件
透過集合功能整理內容
你可以依據偏好儲存及分類內容。
現在,您已有兩個 TabHelper
和 CompatTab
的實作 (一個適用於 Android 3.0 及以上版本,另一個適用於早期的平台),接著就要使用這些實作項目做些什麼。本課程將說明如何建立邏輯,以便在這些實作項目之間進行切換、建立版本感知的版面配置,最後使用回溯相容的 UI 元件。
新增切換邏輯
TabHelper
抽象類別可做為工廠,根據目前裝置的平台版本建立適合的 TabHelper
和 CompatTab
例項:
Kotlin
sealed class TabHelper(protected val mActivity: FragmentActivity, protected val tag: String) {
abstract fun setUp()
abstract fun addTab(tab: CompatTab)
// Usage is tabHelper.newTab("tag")
fun newTab(tag: String): CompatTab =
if (Build.VERSION.SDK_INT >= Build.VERSION_CODES.HONEYCOMB) {
CompatTabHoneycomb(mActivity, tag)
} else {
CompatTabEclair(mActivity, tag)
}
companion object {
// Usage is TabHelper.createInstance(activity)
fun createInstance(activity: FragmentActivity): TabHelper =
if (Build.VERSION.SDK_INT >= Build.VERSION_CODES.HONEYCOMB) {
TabHelperHoneycomb(activity)
} else {
TabHelperEclair(activity)
}
}
}
Java
public abstract class TabHelper {
...
// Usage is TabHelper.createInstance(activity)
public static TabHelper createInstance(FragmentActivity activity) {
if (Build.VERSION.SDK_INT >= Build.VERSION_CODES.HONEYCOMB) {
return new TabHelperHoneycomb(activity);
} else {
return new TabHelperEclair(activity);
}
}
// Usage is tabHelper.newTab("tag")
public CompatTab newTab(String tag) {
if (Build.VERSION.SDK_INT >= Build.VERSION_CODES.HONEYCOMB) {
return new CompatTabHoneycomb(mActivity, tag);
} else {
return new CompatTabEclair(mActivity, tag);
}
}
...
}
建立可因應版本的活動版面配置
下一步是為活動提供版面配置,以便支援這兩個分頁實作。如果是舊版實作項目 (TabHelperEclair
),您必須確保活動版面配置包含 TabWidget
和 TabHost
,以及分頁內容的容器:
res/layout/main.xml:
<!-- This layout is for API level 5-10 only. -->
<TabHost xmlns:android="http://schemas.android.com/apk/res/android"
android:id="@android:id/tabhost"
android:layout_width="match_parent"
android:layout_height="match_parent">
<LinearLayout
android:orientation="vertical"
android:layout_width="match_parent"
android:layout_height="match_parent"
android:padding="5dp">
<TabWidget
android:id="@android:id/tabs"
android:layout_width="match_parent"
android:layout_height="wrap_content" />
<FrameLayout
android:id="@android:id/tabcontent"
android:layout_width="match_parent"
android:layout_height="0dp"
android:layout_weight="1" />
</LinearLayout>
</TabHost>
針對 TabHelperHoneycomb
實作,只需在 FrameLayout
中納入分頁內容,因為分頁指標是由 ActionBar
提供:
res/layout-v11/main.xml:
<FrameLayout xmlns:android="http://schemas.android.com/apk/res/android"
android:id="@android:id/tabcontent"
android:layout_width="match_parent"
android:layout_height="match_parent" />
在執行階段,Android 會根據平台版本決定要加載哪個 main.xml
版面配置版本。這與前一節顯示的邏輯相同,會決定要使用哪一個 TabHelper
實作。
在活動中使用 TabHelper
在活動的 onCreate()
方法中,您可以取得 TabHelper
物件,並新增含有以下程式碼的分頁:
Kotlin
override fun onCreate(savedInstanceState: Bundle?) {
...
setContentView(R.layout.main)
TabHelper.createInstance(this).apply {
setUp()
newTab("photos")
.setText(R.string.tab_photos)
.also { photosTab ->
addTab(photosTab)
}
newTab("videos")
.setText(R.string.tab_videos)
.also { videosTab ->
addTab(videosTab)
}
}
}
Java
@Override
public void onCreate(Bundle savedInstanceState) {
setContentView(R.layout.main);
TabHelper tabHelper = TabHelper.createInstance(this);
tabHelper.setUp();
CompatTab photosTab = tabHelper
.newTab("photos")
.setText(R.string.tab_photos);
tabHelper.addTab(photosTab);
CompatTab videosTab = tabHelper
.newTab("videos")
.setText(R.string.tab_videos);
tabHelper.addTab(videosTab);
}
執行應用程式時,這個程式碼會加載正確的活動版面配置,並將 TabHelperHoneycomb
或 TabHelperEclair
物件例項化。實際使用的具體類別與活動共用,因為兩者共用通用的 TabHelper
介面,因此對活動來說是不透明的類別。
以下是這項實作在 Android 2.3 和 Android 4.0 裝置上執行的兩張螢幕截圖。
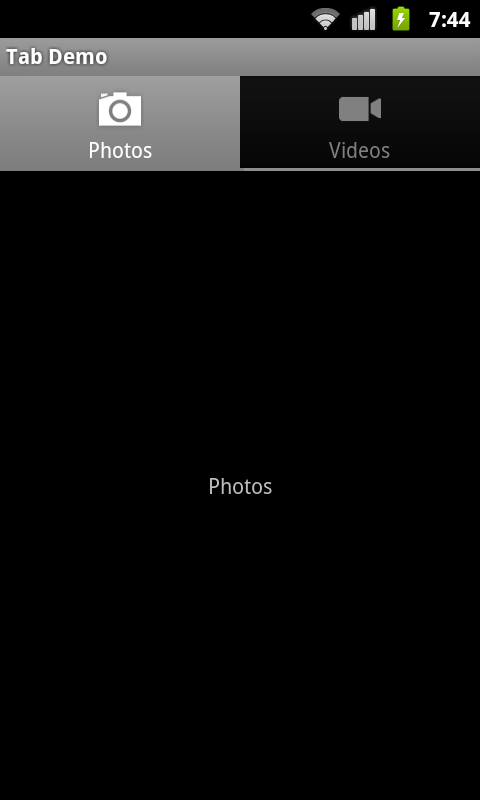
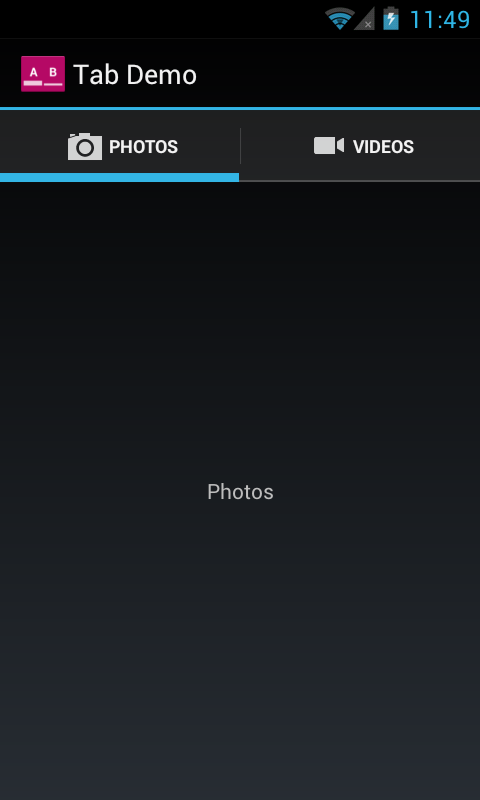
圖 1. 在 Android 2.3 裝置 (使用 TabHelperEclair
) 和 Android 4.0 裝置 (使用 TabHelperHoneycomb
) 上執行的回溯相容分頁螢幕截圖範例。
這個頁面中的內容和程式碼範例均受《內容授權》中的授權所規範。Java 與 OpenJDK 是 Oracle 和/或其關係企業的商標或註冊商標。
上次更新時間:2025-07-27 (世界標準時間)。
[[["容易理解","easyToUnderstand","thumb-up"],["確實解決了我的問題","solvedMyProblem","thumb-up"],["其他","otherUp","thumb-up"]],[["缺少我需要的資訊","missingTheInformationINeed","thumb-down"],["過於複雜/步驟過多","tooComplicatedTooManySteps","thumb-down"],["過時","outOfDate","thumb-down"],["翻譯問題","translationIssue","thumb-down"],["示例/程式碼問題","samplesCodeIssue","thumb-down"],["其他","otherDown","thumb-down"]],["上次更新時間:2025-07-27 (世界標準時間)。"],[],[],null,["# Use the version-aware component\n\nNow that you have two implementations of `TabHelper` and `CompatTab`---one for Android 3.0 and later and one for earlier versions of the platform---it's time to do something with these implementations. This lesson discusses creating the logic for switching between these implementations, creating version-aware layouts, and finally using the backward-compatible UI component.\n\nAdd the switching logic\n-----------------------\n\nThe `TabHelper` abstract class acts as a [factory](https://en.wikipedia.org/wiki/Factory_(software_concept)) for creating version-appropriate `TabHelper` and `CompatTab` instances, based on the current device's platform version: \n\n### Kotlin\n\n```kotlin\nsealed class TabHelper(protected val mActivity: FragmentActivity, protected val tag: String) {\n\n abstract fun setUp()\n\n abstract fun addTab(tab: CompatTab)\n\n // Usage is tabHelper.newTab(\"tag\")\n fun newTab(tag: String): CompatTab =\n if (Build.VERSION.SDK_INT \u003e= Build.VERSION_CODES.HONEYCOMB) {\n CompatTabHoneycomb(mActivity, tag)\n } else {\n CompatTabEclair(mActivity, tag)\n }\n\n companion object {\n // Usage is TabHelper.createInstance(activity)\n fun createInstance(activity: FragmentActivity): TabHelper =\n if (Build.VERSION.SDK_INT \u003e= Build.VERSION_CODES.HONEYCOMB) {\n TabHelperHoneycomb(activity)\n } else {\n TabHelperEclair(activity)\n }\n }\n}\n```\n\n### Java\n\n```java\npublic abstract class TabHelper {\n ...\n // Usage is TabHelper.createInstance(activity)\n public static TabHelper createInstance(FragmentActivity activity) {\n if (Build.VERSION.SDK_INT \u003e= Build.VERSION_CODES.HONEYCOMB) {\n return new TabHelperHoneycomb(activity);\n } else {\n return new TabHelperEclair(activity);\n }\n }\n\n // Usage is tabHelper.newTab(\"tag\")\n public CompatTab newTab(String tag) {\n if (Build.VERSION.SDK_INT \u003e= Build.VERSION_CODES.HONEYCOMB) {\n return new CompatTabHoneycomb(mActivity, tag);\n } else {\n return new CompatTabEclair(mActivity, tag);\n }\n }\n ...\n}\n```\n\nCreate a version-aware activity layout\n--------------------------------------\n\nThe next step is to provide layouts for your activity that can support the two tab implementations. For the older implementation (`TabHelperEclair`), you need to ensure that your activity layout contains a [TabWidget](/reference/android/widget/TabWidget) and [TabHost](/reference/android/widget/TabHost), along with a container for tab contents:\n\n**res/layout/main.xml:** \n\n```xml\n\u003c!-- This layout is for API level 5-10 only. --\u003e\n\u003cTabHost xmlns:android=\"http://schemas.android.com/apk/res/android\"\n android:id=\"@android:id/tabhost\"\n android:layout_width=\"match_parent\"\n android:layout_height=\"match_parent\"\u003e\n\n \u003cLinearLayout\n android:orientation=\"vertical\"\n android:layout_width=\"match_parent\"\n android:layout_height=\"match_parent\"\n android:padding=\"5dp\"\u003e\n\n \u003cTabWidget\n android:id=\"@android:id/tabs\"\n android:layout_width=\"match_parent\"\n android:layout_height=\"wrap_content\" /\u003e\n\n \u003cFrameLayout\n android:id=\"@android:id/tabcontent\"\n android:layout_width=\"match_parent\"\n android:layout_height=\"0dp\"\n android:layout_weight=\"1\" /\u003e\n\n \u003c/LinearLayout\u003e\n\u003c/TabHost\u003e\n```\n\nFor the `TabHelperHoneycomb` implementation, all you need is a [FrameLayout](/reference/android/widget/FrameLayout) to contain the tab contents, since the tab indicators are provided by the [ActionBar](/reference/android/app/ActionBar):\n\n**res/layout-v11/main.xml:** \n\n```xml\n\u003cFrameLayout xmlns:android=\"http://schemas.android.com/apk/res/android\"\n android:id=\"@android:id/tabcontent\"\n android:layout_width=\"match_parent\"\n android:layout_height=\"match_parent\" /\u003e\n```\n\nAt runtime, Android will decide which version of the `main.xml` layout to inflate depending on the platform version. This is the same logic shown in the previous section to determine which `TabHelper` implementation to use.\n\nUse TabHelper in your activity\n------------------------------\n\nIn your activity's [onCreate()](/reference/android/app/Activity#onCreate(android.os.Bundle)) method, you can obtain a `TabHelper` object and add tabs with the following code: \n\n### Kotlin\n\n```kotlin\noverride fun onCreate(savedInstanceState: Bundle?) {\n ...\n setContentView(R.layout.main)\n\n TabHelper.createInstance(this).apply {\n setUp()\n\n newTab(\"photos\")\n .setText(R.string.tab_photos)\n .also { photosTab -\u003e\n addTab(photosTab)\n }\n\n newTab(\"videos\")\n .setText(R.string.tab_videos)\n .also { videosTab -\u003e\n addTab(videosTab)\n }\n }\n}\n```\n\n### Java\n\n```java\n@Override\npublic void onCreate(Bundle savedInstanceState) {\n setContentView(R.layout.main);\n\n TabHelper tabHelper = TabHelper.createInstance(this);\n tabHelper.setUp();\n\n CompatTab photosTab = tabHelper\n .newTab(\"photos\")\n .setText(R.string.tab_photos);\n tabHelper.addTab(photosTab);\n\n CompatTab videosTab = tabHelper\n .newTab(\"videos\")\n .setText(R.string.tab_videos);\n tabHelper.addTab(videosTab);\n}\n```\n\nWhen running the application, this code inflates the correct activity layout and instantiates either a `TabHelperHoneycomb` or `TabHelperEclair` object. The concrete class that's actually used is opaque to the activity, since they share the common `TabHelper` interface.\n\nBelow are two screenshots of this implementation running on an Android 2.3 and Android 4.0 device.\n\n**Figure 1.** Example screenshots of backward-compatible tabs running on an Android 2.3 device (using `TabHelperEclair`) and an Android 4.0 device (using `TabHelperHoneycomb`)."]]