
Anmeldeabläufe, Assistenten oder andere Unterabläufe in Ihrer App werden in der Regel am besten als verschachtelte Navigationsdiagramme dargestellt. Durch das Einbetten in sich geschlossener Subnavigationsflüsse auf diese Weise ist der Hauptfluss der Benutzeroberfläche Ihrer App leichter zu verstehen und zu verwalten.
Außerdem können verschachtelte Grafiken wiederverwendet werden. Sie bieten auch eine gewisse Kapselung: Ziele außerhalb des verschachtelten Diagramms haben keinen direkten Zugriff auf Ziele innerhalb des verschachtelten Diagramms. Stattdessen sollten sie navigate() für das verschachtelte Diagramm selbst verwenden, da sich die interne Logik ändern kann, ohne dass sich dies auf den Rest des Diagramms auswirkt.
Beispiel
Der Navigation-Graph der obersten Ebene Ihrer App sollte mit dem ersten Ziel beginnen, das der Nutzer beim Starten der App sieht, und die Ziele enthalten, die er beim Navigieren in Ihrer App sieht.
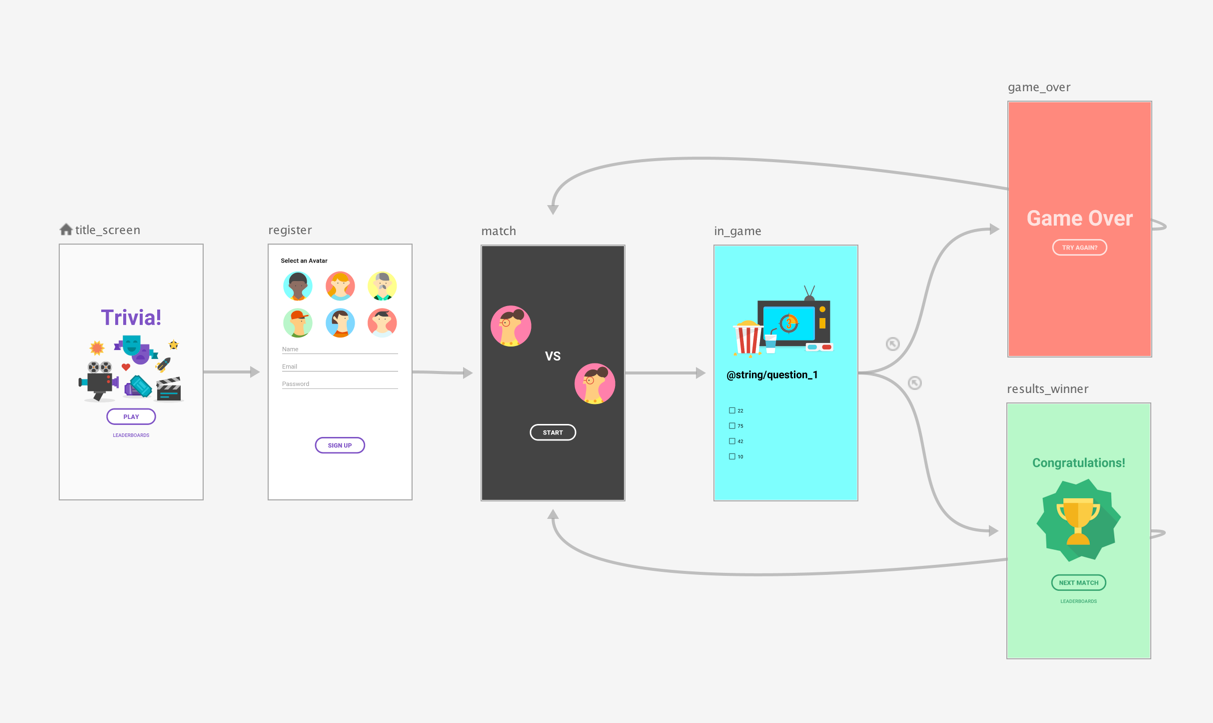
Angenommen, Sie möchten, dass der Nutzer die Bildschirme title_screen und register nur beim ersten Starten der App sieht. Anschließend werden die Nutzerinformationen gespeichert. Bei nachfolgenden Starts der App sollten Sie den Nutzer direkt zum Bildschirm Match weiterleiten.
Als Best Practice sollten Sie den match-Bildschirm als Startziel des Navigationsdiagramms der obersten Ebene festlegen und die Titel- und Registrierungsbildschirme in ein verschachteltes Diagramm verschieben, wie in Abbildung 1 dargestellt:

Prüfen Sie, ob ein registrierter Nutzer vorhanden ist, wenn der Bildschirm für die Suche nach Übereinstimmungen angezeigt wird. Wenn der Nutzer nicht registriert ist, leiten Sie ihn zum Registrierungsbildschirm weiter.
Weitere Informationen zu bedingten Navigationsszenarien finden Sie unter Bedingte Navigation.
Schreiben
Wenn Sie mit Compose einen verschachtelten Navigationsgraphen erstellen möchten, verwenden Sie die Funktion NavGraphBuilder.navigation(). Sie verwenden navigation() wie die Funktionen NavGraphBuilder.composable() und NavGraphBuilder.dialog(), wenn Sie einem Diagramm Ziele hinzufügen.
Der Hauptunterschied besteht darin, dass mit navigation ein verschachteltes Diagramm anstelle eines neuen Ziels erstellt wird. Anschließend rufen Sie composable() und dialog() innerhalb des Lambdas von navigation() auf, um dem verschachtelten Diagramm Ziele hinzuzufügen.
Sehen Sie sich an, wie das Diagramm in Abbildung 2 im folgenden Snippet mit Compose implementiert wird:
// Routes
@Serializable object Title
@Serializable object Register

// Route for nested graph
@Serializable object Game

// Routes inside nested graph
@Serializable object Match
@Serializable object InGame
@Serializable object ResultsWinner
@Serializable object GameOver

NavHost(navController, startDestination = Title) {
   composable<Title> {
       TitleScreen(
           onPlayClicked = { navController.navigate(route = Register) },
           onLeaderboardsClicked = { /* Navigate to leaderboards */ }
       )
   }
   composable<Register> {
       RegisterScreen(
           onSignUpComplete = { navController.navigate(route = Game) }
       )
   }
   navigation<Game>(startDestination = Match) {
       composable<Match> {
           MatchScreen(
               onStartGame = { navController.navigate(route = InGame) }
           )
       }
       composable<InGame> {
           InGameScreen(
               onGameWin = { navController.navigate(route = ResultsWinner) },
               onGameLose = { navController.navigate(route = GameOver) }
           )
       }
       composable<ResultsWinner> {
           ResultsWinnerScreen(
               onNextMatchClicked = {
                   navController.navigate(route = Match) {
                       popUpTo(route = Match) { inclusive = true }
                   }
               },
               onLeaderboardsClicked = { /* Navigate to leaderboards */ }
           )
       }
       composable<GameOver> {
           GameOverScreen(
               onTryAgainClicked = {
                   navController.navigate(route = Match) {
                       popUpTo(route = Match) { inclusive = true }
                   }
               }
           )
       }
   }
}
Wenn Sie direkt zu einem untergeordneten Ziel navigieren möchten, verwenden Sie einen Routentyp wie bei jedem anderen Ziel. Das liegt daran, dass Routen ein globales Konzept sind, mit dem Ziele identifiziert werden, zu denen jeder Bildschirm navigieren kann:
navController.navigate(route = Match)
XML
Wenn Sie XML verwenden, können Sie den Navigationseditor verwenden, um den verschachtelten Graphen zu erstellen. Gehen Sie dazu so vor:
- Halten Sie im Navigationseditor die Umschalttaste gedrückt und klicken Sie auf die Ziele, die Sie in den verschachtelten Graphen aufnehmen möchten.
Klicken Sie mit der rechten Maustaste, um das Kontextmenü zu öffnen, und wählen Sie Move to Nested Graph > New Graph (In untergeordnetes Diagramm verschieben > Neues Diagramm) aus. Die Ziele sind in einem verschachtelten Diagramm enthalten. Abbildung 2 zeigt ein verschachteltes Diagramm im Navigationseditor:
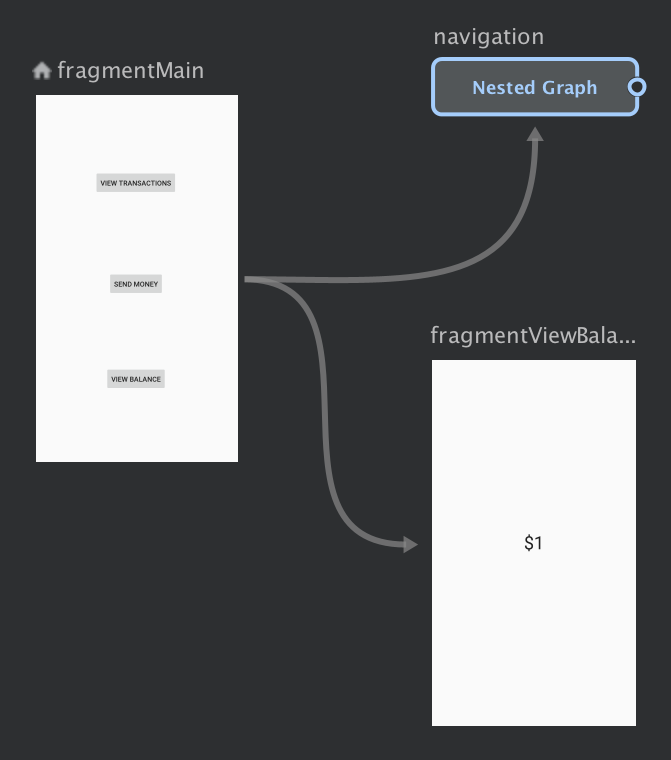
Abbildung 2. Verschachtelte Grafiken im Navigationseditor Klicken Sie auf das geschachtelte Diagramm. Die folgenden Attribute werden im Bereich Attribute angezeigt:
- Typ, der „Verschachteltes Diagramm“ enthält
- ID: Enthält eine vom System zugewiesene ID für das verschachtelte Diagramm. Mit dieser ID wird im Code auf das verschachtelte Diagramm verwiesen.
Doppelklicken Sie auf das verschachtelte Diagramm, um die zugehörigen Ziele aufzurufen.
Klicken Sie auf den Tab Text, um zur XML-Ansicht zu wechseln. Dem Diagramm wurde ein verschachteltes Navigationsdiagramm hinzugefügt. Dieser Navigationsgraph hat eigene
navigation-Elemente sowie eine eigene ID und einstartDestination-Attribut, das auf das erste Ziel im verschachtelten Graphen verweist:<?xml version="1.0" encoding="utf-8"?> <navigation xmlns:app="http://schemas.android.com/apk/res-auto" xmlns:tools="http://schemas.android.com/tools" xmlns:android="http://schemas.android.com/apk/res/android" app:startDestination="@id/mainFragment"> <fragment android:id="@+id/mainFragment" android:name="com.example.cashdog.cashdog.MainFragment" android:label="fragment_main" tools:layout="@layout/fragment_main" > <action android:id="@+id/action_mainFragment_to_sendMoneyGraph" app:destination="@id/sendMoneyGraph" /> <action android:id="@+id/action_mainFragment_to_viewBalanceFragment" app:destination="@id/viewBalanceFragment" /> </fragment> <fragment android:id="@+id/viewBalanceFragment" android:name="com.example.cashdog.cashdog.ViewBalanceFragment" android:label="fragment_view_balance" tools:layout="@layout/fragment_view_balance" /> <navigation android:id="@+id/sendMoneyGraph" app:startDestination="@id/chooseRecipient"> <fragment android:id="@+id/chooseRecipient" android:name="com.example.cashdog.cashdog.ChooseRecipient" android:label="fragment_choose_recipient" tools:layout="@layout/fragment_choose_recipient"> <action android:id="@+id/action_chooseRecipient_to_chooseAmountFragment" app:destination="@id/chooseAmountFragment" /> </fragment> <fragment android:id="@+id/chooseAmountFragment" android:name="com.example.cashdog.cashdog.ChooseAmountFragment" android:label="fragment_choose_amount" tools:layout="@layout/fragment_choose_amount" /> </navigation> </navigation>Übergeben Sie in Ihrem Code die Ressourcen-ID der Aktion, die den Stammgraphen mit dem verschachtelten Graphen verbindet:
Kotlin
view.findNavController().navigate(R.id.action_mainFragment_to_sendMoneyGraph)
Java
Navigation.findNavController(view).navigate(R.id.action_mainFragment_to_sendMoneyGraph);
- Kehren Sie auf dem Tab Design zum Stammdiagramm zurück, indem Sie auf Stamm klicken.
Mit „include“ auf andere Navigationsdiagramme verweisen
Eine weitere Möglichkeit, die Diagrammstruktur zu modularisieren, besteht darin, ein Diagramm in ein anderes einzufügen. Dazu verwenden Sie ein <include>-Element im übergeordneten Navigationsdiagramm. So kann das enthaltene Diagramm in einem separaten Modul oder Projekt definiert werden, was die Wiederverwendbarkeit maximiert.
Das folgende Snippet zeigt, wie Sie <include> verwenden können:
<!-- (root) nav_graph.xml -->
<?xml version="1.0" encoding="utf-8"?>
<navigation xmlns:android="http://schemas.android.com/apk/res/android"
    xmlns:app="http://schemas.android.com/apk/res-auto"
    xmlns:tools="http://schemas.android.com/tools"
    android:id="@+id/nav_graph"
    app:startDestination="@id/fragment">

    <include app:graph="@navigation/included_graph" />

    <fragment
        android:id="@+id/fragment"
        android:name="com.example.myapplication.BlankFragment"
        android:label="Fragment in Root Graph"
        tools:layout="@layout/fragment_blank">
        <action
            android:id="@+id/action_fragment_to_second_graph"
            app:destination="@id/second_graph" />
    </fragment>

    ...
</navigation>
<!-- included_graph.xml -->
<?xml version="1.0" encoding="utf-8"?>
<navigation xmlns:android="http://schemas.android.com/apk/res/android"
    xmlns:app="http://schemas.android.com/apk/res-auto"
    xmlns:tools="http://schemas.android.com/tools"
    android:id="@+id/second_graph"
    app:startDestination="@id/includedStart">

    <fragment
        android:id="@+id/includedStart"
        android:name="com.example.myapplication.IncludedStart"
        android:label="fragment_included_start"
        tools:layout="@layout/fragment_included_start" />
</navigation>