
Le composant Navigation est une bibliothèque capable de gérer la navigation complexe, les animations de transition, les liens profonds et la transmission d'arguments vérifiés au moment de la compilation, entre les écrans de votre application.
Ce document sert de guide général pour migrer une application existante afin d'utiliser le composant Navigation.
De manière générale, la migration comprend les étapes suivantes :
Séparer les activités de la logique d'UI propre à chaque écran : séparez la logique d'UI de votre application afin que chaque activité ne soit rattachée qu'à la logique des composants d'UI de navigation globale (
Toolbar, par exemple). L'implémentation de chaque écran est déléguée à un fragment ou une destination personnalisée.Intégrer le composant Navigation : pour chaque activité, créez un graphique de navigation contenant un ou plusieurs fragments gérés par cette activité. Remplacez les transactions de fragment par des opérations du composant Navigation
Ajouter des destinations d'activité : remplacez les appels
startActivity()par des actions à l'aide des destinations d'activité.Combiner les activités : combinez des graphiques de navigation dans les cas où plusieurs activités partagent une mise en page commune.
Conditions préalables
Ce guide suppose que vous avez déjà migré votre application pour utiliser des bibliothèques AndroidX. Si vous ne l'avez pas déjà fait, migrez votre projet pour utiliser AndroidX avant de continuer.
Séparer les activités de la logique d'UI propre à chaque écran
Les activités sont des composants système qui facilitent une interaction graphique entre votre application et Android. Les activités sont enregistrées dans le fichier manifeste de votre application afin qu'Android sache quelles activités sont disponibles pour le lancement. La classe d'activité permet également à votre application de réagir aux changements liés à Android, par exemple lorsque l'interface utilisateur de votre application arrive au premier plan, qu'elle sort du premier plan, qu'elle pivote, etc. Les activités peuvent aussi servir à partager des états entre des écrans.
Dans le contexte de votre application, les activités doivent servir d'hôte pour la navigation. Elles doivent également contenir la logique et les connaissances concernant la transition entre les écrans, la transmission de données, etc. Toutefois, il est préférable de gérer les détails de votre interface utilisateur dans une partie plus petite et réutilisable de celle-ci. Pour cela, nous vous recommandons d'utiliser des fragments. Pour en savoir plus sur les avantages des fragments, regardez la vidéo Une seule activité : pourquoi, quand et comment. Le composant Navigation prend en charge les fragments via la dépendance navigation-fragment. Il prend également en charge les types de destinations personnalisés.
Si votre application n'utilise pas de fragments, vous devez d'abord migrer chaque écran de celle-ci dans le but d'utiliser des fragments. Vous ne supprimez pas l'activité pour le moment. Vous allez plutôt créer un fragment pour représenter l'écran et diviser votre logique d'UI par responsabilité.
Présentation des fragments
Pour présenter les fragments, prenons un exemple d'application composée de deux écrans : une liste de produits et une page d'informations détaillées sur le produit. Lorsque l'utilisateur clique sur un produit dans la liste, il est redirigé vers un écran d'informations sur le produit en question.
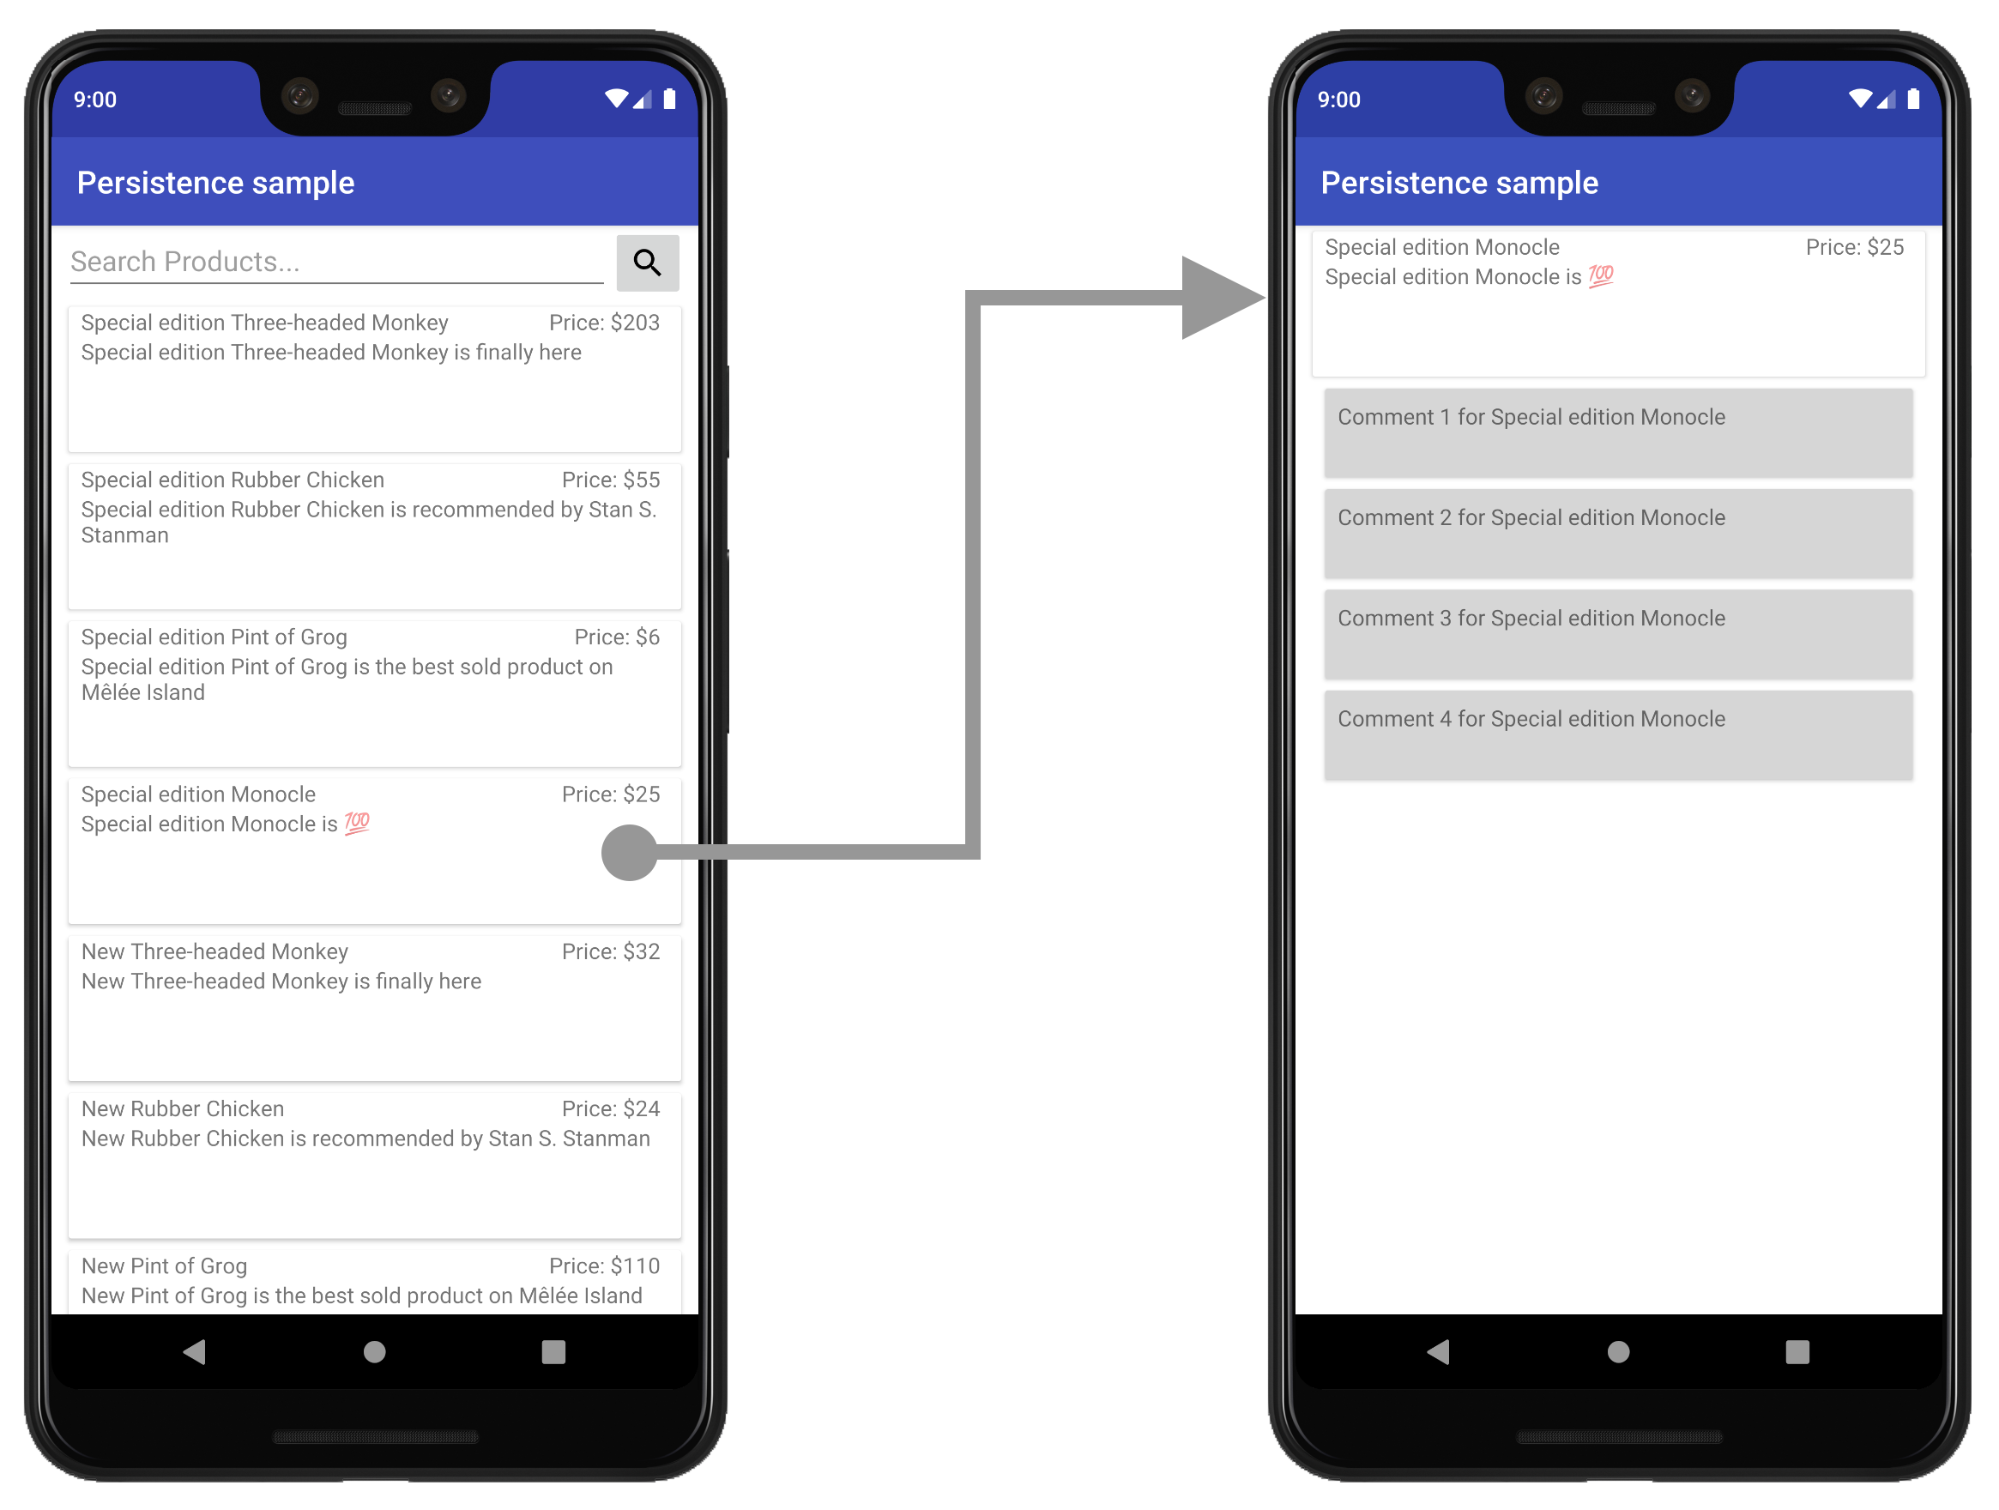
Dans cet exemple, les écrans de liste et d'informations sont actuellement des activités distinctes.
Créer une mise en page pour héberger l'UI
Pour introduire un fragment, commencez par créer un fichier de mise en page pour l'activité qui hébergera le fragment. Ce fichier remplacera la mise en page actuelle de l'activité.
Pour une vue simple, vous pouvez utiliser un FrameLayout, comme illustré dans l'exemple product_list_host suivant :
<FrameLayout
   xmlns:app="http://schemas.android.com/apk/res-auto"
   xmlns:android="http://schemas.android.com/apk/res/android"
   android:id="@+id/main_content"
   android:layout_height="match_parent"
   android:layout_width="match_parent" />
L'attribut id fait référence à la section de contenu dans laquelle nous ajouterons ultérieurement le fragment.
Ensuite, dans la fonction onCreate() de votre activité, modifiez la référence au fichier de mise en page dans la fonction onCreate de votre activité pour qu'elle pointe vers ce nouveau fichier de mise en page :
Kotlin
class ProductListActivity : AppCompatActivity() {
    ...
    override fun onCreate(savedInstanceState: Bundle?) {
        ...
        // Replace setContentView(R.layout.product_list) with the line below
        setContentView(R.layout.product_list_host)
        ...
    }
}
Java
public class ProductListActivity extends AppCompatActivity {
    ...
    @Override
    public void onCreate(@Nullable Bundle savedInstanceState) {
        ...
        // Replace setContentView(R.layout.product_list); with the line below
        setContentView(R.layout.product_list_host);
        ...
    }
}
La mise en page existante (product_list, dans cet exemple) est utilisée comme vue racine du fragment que vous êtes sur le point de créer.
Créer un fragment
Créez un fragment pour gérer l'UI de votre écran. Nous vous recommandons de rester cohérent avec le nom de l'activité hôte. L'extrait ci-dessous s'appelle ProductListFragment, par exemple :
Kotlin
class ProductListFragment : Fragment() {
    // Leave empty for now.
}
Java
public class ProductListFragment extends Fragment {
    // Leave empty for now.
}
Déplacer la logique d'activité dans un fragment
Maintenant que nous avons vu ce qu'est un fragment, l'étape suivante consiste à séparer l'activité de la logique d'interface utilisateur de cet écran et d'utiliser à la place le nouveau fragment. Si vous venez d'une architecture basée sur l'activité, vous avez probablement créé beaucoup de vues dans la fonction onCreate() de votre activité.
Voici un exemple d'écran basé sur l'activité avec une logique d'interface utilisateur que nous devons déplacer :
Kotlin
class ProductListActivity : AppCompatActivity() {

    // Views and/or ViewDataBinding references, Adapters...
    private lateinit var productAdapter: ProductAdapter
    private lateinit var binding: ProductListActivityBinding

    ...

    // ViewModels, System Services, other Dependencies...
    private val viewModel: ProductListViewModel by viewModels()

    ...

    override fun onCreate(savedInstanceState: Bundle?) {
        super.onCreate(savedInstanceState)

        // View initialization logic
        DataBindingUtil.setContentView(this, R.layout.product_list_activity)

        // Post view initialization logic
        // Connect adapters
        productAdapter = ProductAdapter(productClickCallback)
        binding.productsList.setAdapter(productAdapter)

        // Initialize view properties, set click listeners, etc.
        binding.productsSearchBtn.setOnClickListener {...}

        // Subscribe to state
        viewModel.products.observe(this, Observer { myProducts ->
            ...
        })

        // ...and so on
    }
   ...
}
Java
public class ProductListActivity extends AppCompatActivity {

    // Views and/or ViewDataBinding references, adapters...
    private ProductAdapter productAdapter;
    private ProductListActivityBinding binding;

    ...

    // ViewModels, system services, other dependencies...
    private ProductListViewModel viewModel;

    ...

    @Override
    protected void onCreate(@Nullable Bundle savedInstanceState) {
        super.onCreate(savedInstanceState);

        // View initialization logic
        DataBindingUtil.setContentView(this, R.layout.product_list_activity);

        // Post view initialization logic
        // Connect adapters
        productAdapter = new ProductAdapter(productClickCallback);
        binding.productsList.setAdapter(productAdapter);

        // Initialize ViewModels and other dependencies
        ProductListViewModel viewModel = new ViewModelProvider(this).get(ProductListViewModel.java);

        // Initialize view properties, set click listeners, etc.
        binding.productsSearchBtn.setOnClickListener(v -> { ... });

        // Subscribe to state
        viewModel.getProducts().observe(this, myProducts ->
            ...
       );

       // ...and so on
   }
Votre activité peut également contrôler quand et comment l'utilisateur accède à l'écran suivant, comme illustré dans l'exemple ci-après :
Kotlin
    // Provided to ProductAdapter in ProductListActivity snippet.
    private val productClickCallback = ProductClickCallback { product ->
        show(product)
    }

    fun show(product: Product) {
        val intent = Intent(this, ProductActivity::class.java)
        intent.putExtra(ProductActivity.KEY_PRODUCT_ID, product.id)
        startActivity(intent)
    }
Java
// Provided to ProductAdapter in ProductListActivity snippet.
private ProductClickCallback productClickCallback = this::show;

private void show(Product product) {
    Intent intent = new Intent(this, ProductActivity.class);
    intent.putExtra(ProductActivity.KEY_PRODUCT_ID, product.getId());
    startActivity(intent);
}
Dans votre fragment, vous répartissez ce travail entre onCreateView() et onViewCreated(). Seule la logique de navigation reste dans l'activité :
Kotlin
class ProductListFragment : Fragment() {

    private lateinit var binding: ProductListFragmentBinding
    private val viewModel: ProductListViewModel by viewModels()

     // View initialization logic
    override fun onCreateView(inflater: LayoutInflater,
            container: ViewGroup?,
            savedInstanceState: Bundle?): View? {
        binding = DataBindingUtil.inflate(
                inflater,
                R.layout.product_list,
                container,
                false
        )
        return binding.root
    }

    // Post view initialization logic
    override fun onViewCreated(view: View, savedInstanceState: Bundle?) {
        // Connect adapters
        productAdapter = ProductAdapter(productClickCallback)
        binding.productsList.setAdapter(productAdapter)

        // Initialize view properties, set click listeners, etc.
        binding.productsSearchBtn.setOnClickListener {...}

        // Subscribe to state
        viewModel.products.observe(this, Observer { myProducts ->
            ...
        })

        // ...and so on
    }

    // Provided to ProductAdapter
    private val productClickCallback = ProductClickCallback { product ->
        if (lifecycle.currentState.isAtLeast(Lifecycle.State.STARTED)) {
            (requireActivity() as ProductListActivity).show(product)
        }
    }
    ...
}
Java
public class ProductListFragment extends Fragment {

    private ProductAdapter productAdapter;
    private ProductListFragmentBinding binding;

    // View initialization logic
    @Nullable
    @Override
    public View onCreateView(@NonNull LayoutInflater inflater,
            @Nullable ViewGroup container,
            @Nullable Bundle savedInstanceState) {
        binding = DataBindingUtil.inflate(
                inflater,
                R.layout.product_list_fragment,
                container,
                false);
        return binding.getRoot();
    }

    // Post view initialization logic
    @Override
    public void onViewCreated(@NonNull View view,
            @Nullable Bundle savedInstanceState) {

        // Connect adapters
        binding.productsList.setAdapter(productAdapter);

        // Initialize ViewModels and other dependencies
        ProductListViewModel viewModel = new ViewModelProvider(this)
                .get(ProductListViewModel.class);

        // Initialize view properties, set click listeners, etc.
        binding.productsSearchBtn.setOnClickListener(...)

        // Subscribe to state
        viewModel.getProducts().observe(this, myProducts -> {
            ...
       });

       // ...and so on

    // Provided to ProductAdapter
    private ProductClickCallback productClickCallback = new ProductClickCallback() {
        @Override
        public void onClick(Product product) {
            if (getLifecycle().getCurrentState().isAtLeast(Lifecycle.State.STARTED)) {
                ((ProductListActivity) requireActivity()).show(product);
            }
        }
    };
    ...
}
Dans ProductListFragment, notez qu'il n'y a pas d'appel à setContentView() pour gonfler et connecter la mise en page. Dans un fragment, onCreateView() initialise la vue racine. onCreateView() utilise une instance de LayoutInflater qui peut être utilisée pour gonfler la vue racine en fonction d'un fichier de ressources de mise en page. Cet exemple réutilise la mise en page product_list existante utilisée par l'activité, car aucune modification n'est nécessaire.
Si une logique d'interface utilisateur existe dans les fonctions onStart(), onResume(), onPause() ou onStop() de votre activité et qu'elle n'est pas liée à la navigation, vous pouvez la déplacer vers les fonctions correspondantes du même nom sur le fragment.
Initialiser le fragment dans l'activité hôte
Une fois que vous avez déplacé toute la logique d'interface utilisateur vers le fragment, seule la logique de navigation doit rester dans l'activité.
Kotlin
class ProductListActivity : AppCompatActivity() {

    override fun onCreate(savedInstanceState: Bundle?) {
        super.onCreate(savedInstanceState)
        setContentView(R.layout.product_list_host)
    }

    fun show(product: Product) {
        val intent = Intent(this, ProductActivity::class.java)
        intent.putExtra(ProductActivity.KEY_PRODUCT_ID, product.id)
        startActivity(intent)
    }
}
Java
public class ProductListActivity extends AppCompatActivity {

    @Override
    protected void onCreate(@Nullable Bundle savedInstanceState) {
        super.onCreate(savedInstanceState);
        setContentView(R.layout.product_list_host);
    }

    public void show(Product product) {
        Intent intent = new Intent(this, ProductActivity.class);
        intent.putExtra(ProductActivity.KEY_PRODUCT_ID, product.getId());
        startActivity(intent);
    }
}
La dernière étape consiste à créer une instance du fragment dans onCreate(), juste après avoir défini la vue du contenu :
Kotlin
override fun onCreate(savedInstanceState: Bundle?) {
    super.onCreate(savedInstanceState)
    setContentView(R.layout.product_list_host)

    if (savedInstanceState == null) {
        val fragment = ProductListFragment()
        supportFragmentManager
                .beginTransaction()
                .add(R.id.main_content, fragment)
                .commit()
    }
}
Java
@Override
protected void onCreate(@Nullable Bundle savedInstanceState) {
    super.onCreate(savedInstanceState);
    setContentView(R.layout.product_list_host);

    if (savedInstanceState == null) {
        ProductListFragment fragment = new ProductListFragment();
        getSupportFragmentManager()
                .beginTransaction()
                .add(R.id.main_content, fragment)
                .commit();
    }
}
Comme le montre cet exemple, FragmentManager enregistre et restaure automatiquement les fragments en cas de modification de la configuration. Vous ne devez donc ajouter le fragment que si la valeur de savedInstanceState est nulle.
Transmettre des extras d'intent au fragment
Si votre activité reçoit des Extras via un intent, vous pouvez les transmettre directement au fragment en tant qu'arguments.
Dans cet exemple, ProductDetailsFragment reçoit ses arguments directement à partir des extras d'intent de l'activité :
Kotlin
...

if (savedInstanceState == null) {
    val fragment = ProductDetailsFragment()

    // Intent extras and Fragment Args are both of type android.os.Bundle.
    fragment.arguments = intent.extras

    supportFragmentManager
            .beginTransaction()
            .add(R.id.main_content, fragment)
            .commit()
}

...
Java
...

if (savedInstanceState == null) {
    ProductDetailsFragment fragment = new ProductDetailsFragment();

    // Intent extras and fragment Args are both of type android.os.Bundle.
    fragment.setArguments(getIntent().getExtras());

    getSupportFragmentManager()
            .beginTransaction()
            .add(R.id.main_content, fragment)
            .commit();
}

...
À ce stade, vous devriez pouvoir tester votre application avec un premier écran qui utilise un fragment. Continuez à migrer le reste de vos écrans basés sur l'activité, en prenant le temps de tester après chaque itération.
Intégrer le composant Navigation
Une fois que vous utilisez une architecture basée sur des fragments, vous pouvez commencer à intégrer le composant Navigation.
Tout d'abord, ajoutez les dépendances du composant Navigation les plus récentes à votre projet en suivant les instructions décrites dans les notes de version de la bibliothèque Navigation.
Créer un graphique de navigation
Le composant Navigation représente la configuration de navigation de votre application dans un fichier de ressources sous la forme d'un graphique, tout comme les vues de votre application. Cela facilite l'organisation de la navigation dans votre application en dehors de votre codebase et vous permet de modifier visuellement la navigation dans l'application.
Pour créer un graphique de navigation, commencez par créer un dossier de ressources appelé navigation. Pour ajouter le graphique, faites un clic droit sur ce répertoire, puis sélectionnez New > Navigation resource file (Nouveau > Fichier de ressources de navigation).

Le composant Navigation utilise une activité en tant qu'hôte de navigation et échange les fragments individuels dans cet hôte au fur et à mesure que les utilisateurs parcourent votre application. Avant de pouvoir commencer à mettre en page la navigation de votre application, vous devez configurer un NavHost dans l'activité qui hébergera ce graphique. Comme nous utilisons des fragments, nous pouvons utiliser l'implémentation NavHost par défaut du composant Navigation, NavHostFragment.
Un NavHostFragment est configuré via un FragmentContainerView placé dans une activité hôte, comme illustré dans l'exemple suivant :
<androidx.fragment.app.FragmentContainerView
   android:name="androidx.navigation.fragment.NavHostFragment"
   app:navGraph="@navigation/product_list_graph"
   app:defaultNavHost="true"
   android:id="@+id/main_content"
   android:layout_width="match_parent"
   android:layout_height="match_parent" />
L'attribut app:NavGraph pointe vers le graphique de navigation associé à cet hôte de navigation. Cette propriété permet de gonfler le graphique de navigation. Elle est définie sur le NavHostFragment. L'attribut app:defaultNavHost garantit que votre NavHostFragment intercepte le bouton "Retour" du système.
Si vous utilisez une navigation de premier niveau, comme DrawerLayout ou BottomNavigationView, FragmentContainerView remplace votre élément de vue de contenu principal. Pour obtenir des exemples, consultez Mettre à jour les composants de l'UI avec NavigationUI.
Pour une mise en page simple, vous pouvez inclure cet élément FragmentContainerView en tant qu'enfant de la racine ViewGroup :
<FrameLayout
   xmlns:app="http://schemas.android.com/apk/res-auto"
   xmlns:android="http://schemas.android.com/apk/res/android"
   android:layout_height="match_parent"
   android:layout_width="match_parent">

<androidx.fragment.app.FragmentContainerView
   android:id="@+id/main_content"
   android:name="androidx.navigation.fragment.NavHostFragment"
   app:navGraph="@navigation/product_list_graph"
   app:defaultNavHost="true"
   android:layout_width="match_parent"
   android:layout_height="match_parent" />

</FrameLayout>
Si vous cliquez sur l'onglet Design (Conception) en bas de l'écran, un graphique semblable à celui ci-dessous doit s'afficher. En haut à gauche du graphique, sous Destinations, vous pouvez voir une référence à l'activité NavHost sous la forme layout_name (resource_id).
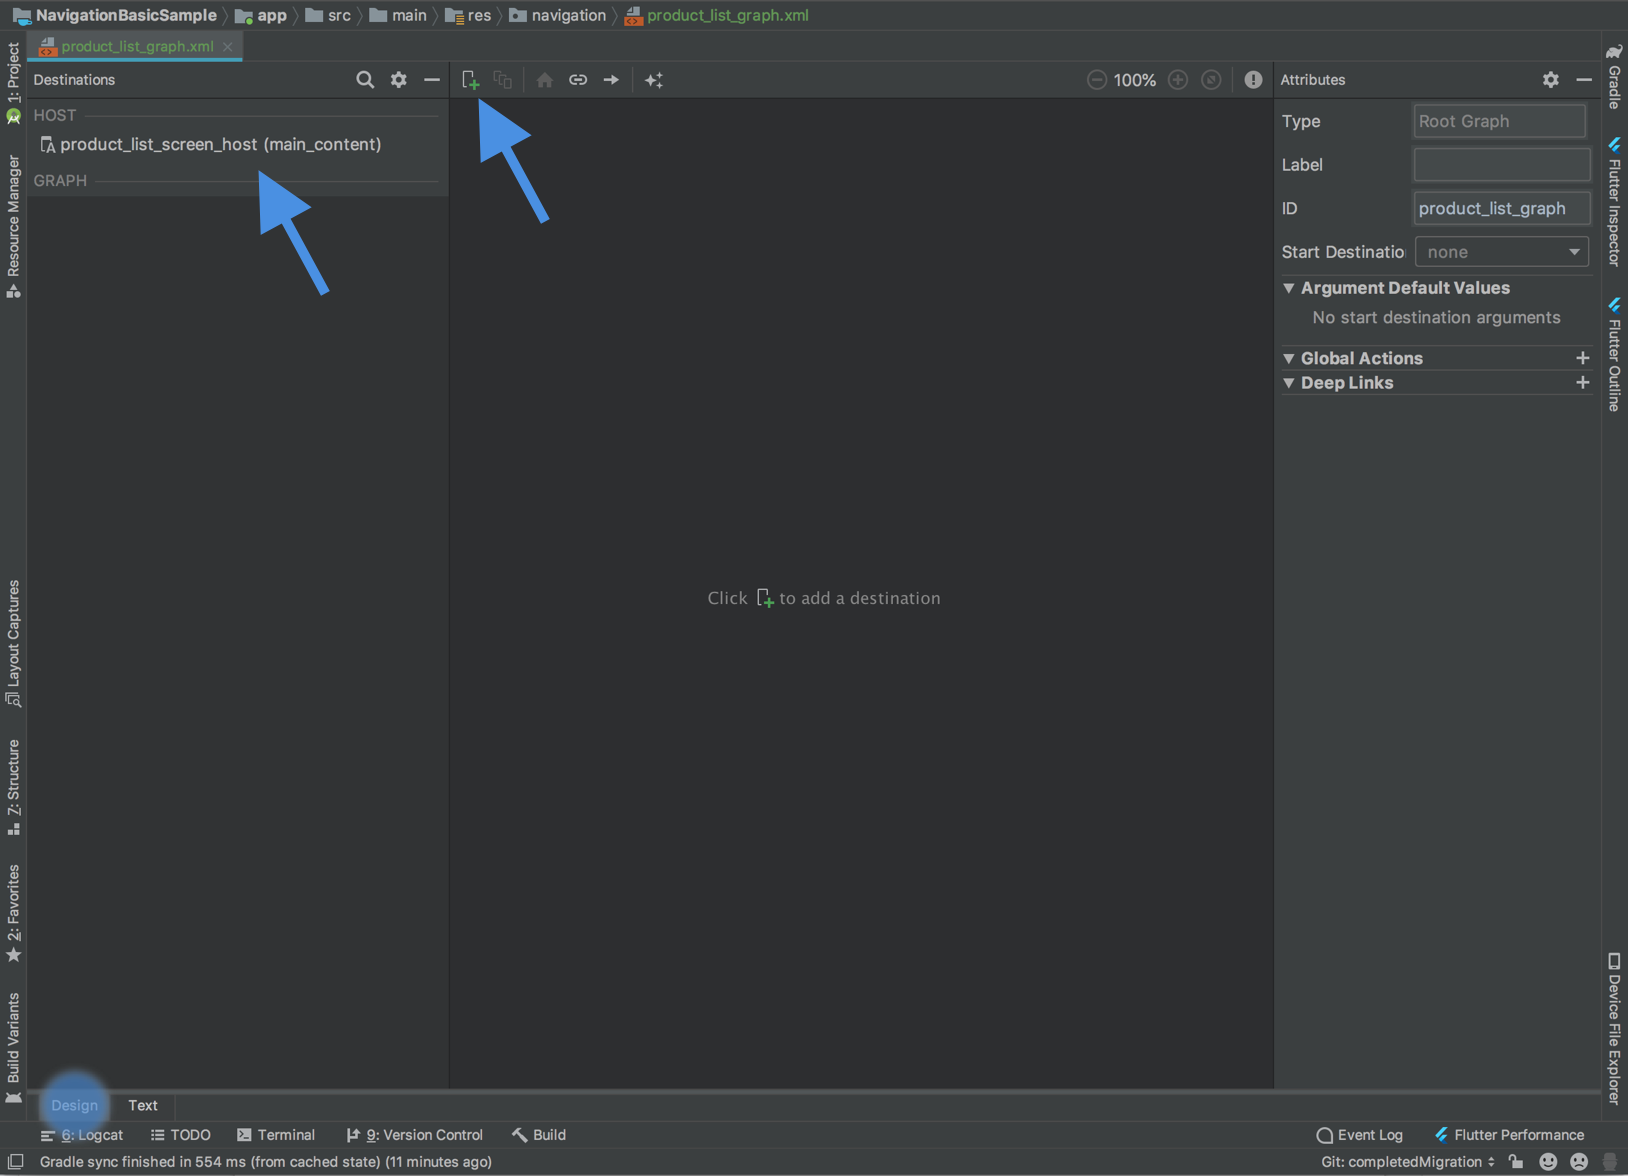
Cliquez sur le bouton Plus ![]() en haut de la page pour ajouter vos fragments à ce graphique.
en haut de la page pour ajouter vos fragments à ce graphique.
Le composant Navigation désigne les écrans individuels comme des destinations. Les destinations peuvent être des fragments, des activités ou des destinations personnalisées. Vous pouvez ajouter n'importe quel type de destination à votre graphique, mais sachez que les destinations d'activités sont considérées comme des destinations de terminal, car une fois que vous avez accédé à une destination d'activité, vous opérez dans un hôte et un graphique de navigation distincts.
Le composant Navigation désigne la manière dont les utilisateurs passent d'une destination à une autre avec des actions. Les actions peuvent également décrire des animations de transition et le comportement pop.
Supprimer des transactions de fragment
Maintenant que vous utilisez le composant Navigation, vous pouvez supprimer les interactions FragmentManager si vous naviguez entre des écrans basés sur des fragments dans la même activité.
Si votre application utilise plusieurs fragments dans la même activité ou une navigation de niveau supérieur telle qu'une mise en page de panneaux ou une navigation en bas de page, vous utilisez probablement FragmentManager et FragmentTransactions pour ajouter ou remplacer des fragments dans la section de contenu principal de votre interface utilisateur. Vous pouvez désormais remplacer et simplifier ce système à l'aide du composant Navigation en fournissant des actions permettant d'associer des destinations dans votre graphique, puis en naviguant à l'aide de NavController.
Voici quelques scénarios que vous pouvez rencontrer, ainsi que la façon dont vous pouvez aborder la migration pour chaque scénario.
Gérer plusieurs fragments avec une seule activité
Si une seule activité gère plusieurs fragments, votre code d'activité peut se présenter comme suit :
Kotlin
class MainActivity : AppCompatActivity() {

    override fun onCreate(savedInstanceState: Bundle?) {
        super.onCreate(savedInstanceState)
        setContentView(R.layout.activity_main)

        // Logic to load the starting destination
        //  when the Activity is first created
        if (savedInstanceState == null) {
            val fragment = ProductListFragment()
            supportFragmentManager.beginTransaction()
                    .add(R.id.fragment_container, fragment, ProductListFragment.TAG)
                    .commit()
        }
    }

    // Logic to navigate the user to another destination.
    // This may include logic to initialize and set arguments on the destination
    // fragment or even transition animations between the fragments (not shown here).
    fun navigateToProductDetail(productId: String) {
        val fragment = new ProductDetailsFragment()
        val args = Bundle().apply {
            putInt(KEY_PRODUCT_ID, productId)
        }
        fragment.arguments = args

        supportFragmentManager.beginTransaction()
                .addToBackStack(ProductDetailsFragment.TAG)
                .replace(R.id.fragment_container, fragment, ProductDetailsFragment.TAG)
                .commit()
    }
}
Java
public class MainActivity extends AppCompatActivity {

    @Override
    protected void onCreate(@Nullable Bundle savedInstanceState) {
        super.onCreate(savedInstanceState);
        setContentView(R.layout.activity_main);

        // Logic to load the starting destination when the activity is first created.
        if (savedInstanceState == null) {
            val fragment = ProductListFragment()
            supportFragmentManager.beginTransaction()
                    .add(R.id.fragment_container, fragment, ProductListFragment.TAG)
                    .commit();
        }
    }

    // Logic to navigate the user to another destination.
    // This may include logic to initialize and set arguments on the destination
    // fragment or even transition animations between the fragments (not shown here).
    public void navigateToProductDetail(String productId) {
        Fragment fragment = new ProductDetailsFragment();
        Bundle args = new Bundle();
        args.putInt(KEY_PRODUCT_ID, productId);
        fragment.setArguments(args);

        getSupportFragmentManager().beginTransaction()
                .addToBackStack(ProductDetailsFragment.TAG)
                .replace(R.id.fragment_container, fragment, ProductDetailsFragment.TAG)
                .commit();
    }
}
Dans la destination source, vous pouvez appeler une fonction de navigation en réponse à un événement, comme indiqué ci-dessous :
Kotlin
class ProductListFragment : Fragment() {
    ...
    override fun onViewCreated(view: View, savedInstanceState: Bundle?) {
        // In this example a callback is passed to respond to an item clicked
        //  in a RecyclerView
        productAdapter = ProductAdapter(productClickCallback)
        binding.productsList.setAdapter(productAdapter)
    }
    ...

    // The callback makes the call to the activity to make the transition.
    private val productClickCallback = ProductClickCallback { product ->
            (requireActivity() as MainActivity).navigateToProductDetail(product.id)
    }
}
Java
public class ProductListFragment extends Fragment  {
    ...
    @Override
    public void onViewCreated(@NonNull View view,
            @Nullable Bundle savedInstanceState) {
    // In this example a callback is passed to respond to an item clicked in a RecyclerView
        productAdapter = new ProductAdapter(productClickCallback);
        binding.productsList.setAdapter(productAdapter);
    }
    ...

    // The callback makes the call to the activity to make the transition.
    private ProductClickCallback productClickCallback = product -> (
        ((MainActivity) requireActivity()).navigateToProductDetail(product.getId())
    );
}
À la place, vous pouvez mettre à jour le graphique de navigation et définir la destination de départ et les actions à associer à vos destinations, et définir des arguments si nécessaire :
<navigation xmlns:android="http://schemas.android.com/apk/res/android"
    xmlns:app="http://schemas.android.com/apk/res-auto"
    xmlns:tools="http://schemas.android.com/tools"
    android:id="@+id/product_list_graph"
    app:startDestination="@id/product_list">

    <fragment
        android:id="@+id/product_list"
        android:name="com.example.android.persistence.ui.ProductListFragment"
        android:label="Product List"
        tools:layout="@layout/product_list">
        <action
            android:id="@+id/navigate_to_product_detail"
            app:destination="@id/product_detail" />
    </fragment>
    <fragment
        android:id="@+id/product_detail"
        android:name="com.example.android.persistence.ui.ProductDetailFragment"
        android:label="Product Detail"
        tools:layout="@layout/product_detail">
        <argument
            android:name="product_id"
            app:argType="integer" />
    </fragment>
</navigation>
Vous pouvez ensuite mettre à jour votre activité :
Kotlin
class MainActivity : AppCompatActivity() {

    // No need to load the start destination, handled automatically by the Navigation component
    override fun onCreate(savedInstanceState: Bundle?) {
        super.onCreate(savedInstanceState)
        setContentView(R.layout.activity_main)
    }
}
Java
public class MainActivity extends AppCompatActivity {

    // No need to load the start destination, handled automatically by the Navigation component
    @Override
    protected void onCreate(@Nullable Bundle savedInstanceState) {
        super.onCreate(savedInstanceState);
        setContentView(R.layout.activity_main);
    }
}
L'activité n'a plus besoin d'une méthode navigateToProductDetail(). Dans la section suivante, nous mettons à jour ProductListFragment pour utiliser NavController afin d'accéder à l'écran suivant contenant des informations détaillées sur le produit.
Transmettre des arguments en toute sécurité
Le composant Navigation dispose d'un plug-in Gradle, appelé Safe Args, qui génère des classes d'objets et de compilateurs simples pour un accès avec sûreté du typage aux arguments spécifiés pour les destinations et les actions.
Une fois le plug-in appliqué, tous les arguments définis sur une destination dans votre graphique de navigation font que le framework du composant Navigation génère une classe Arguments qui fournit des arguments avec sûreté du typage à la destination cible.
Lorsque vous définissez une action, le plug-in génère une classe de configuration Directions qui peut être utilisée pour indiquer à NavController comment rediriger l'utilisateur vers la destination cible. Lorsqu'une action pointe vers une destination nécessitant des arguments, la classe Directions générée inclut des méthodes de constructeur qui nécessitent ces paramètres.
Dans le fragment, utilisez NavController et la classe Directions générée pour fournir des arguments avec sûreté du typage à la destination cible, comme illustré dans l'exemple suivant :
Kotlin
class ProductListFragment : Fragment() {

    override fun onViewCreated(view: View, savedInstanceState: Bundle?) {
        // In this example a callback is passed to respond to an item clicked in a RecyclerView
        productAdapter = ProductAdapter(productClickCallback)
        binding.productsList.setAdapter(productAdapter)
    }
    ...

    // The callback makes the call to the NavController to make the transition.
    private val productClickCallback = ProductClickCallback { product ->
        val directions = ProductListDirections.navigateToProductDetail(product.id)
        findNavController().navigate(directions)
    }
}
Java
public class ProductListFragment extends Fragment  {
    ...
    @Override
    public void onViewCreated(@NonNull View view,
            @Nullable Bundle savedInstanceState) {
        // In this example a callback is passed to respond to an item clicked in a RecyclerView
        productAdapter = new ProductAdapter(productClickCallback);
        binding.productsList.setAdapter(productAdapter);
    }
    ...

    // The callback makes the call to the activity to make the transition.
    private ProductClickCallback productClickCallback = product -> {
        ProductListDirections.ViewProductDetails directions =
                ProductListDirections.navigateToProductDetail(product.getId());
        NavHostFragment.findNavController(this).navigate(directions);
    };
}
Navigation de premier niveau
Si votre application utilise un DrawerLayout, votre activité peut comporter une grande partie de la logique de configuration permettant de gérer l'ouverture et la fermeture du panneau, ainsi que la navigation vers d'autres destinations.
Votre activité peut se présenter comme suit :
Kotlin
class MainActivity : AppCompatActivity(),
    NavigationView.OnNavigationItemSelectedListener {

    override fun onCreate(savedInstanceState: Bundle?) {
        super.onCreate(savedInstanceState)
        setContentView(R.layout.activity_main)

        val toolbar: Toolbar = findViewById(R.id.toolbar)
        setSupportActionBar(toolbar)

        val drawerLayout: DrawerLayout = findViewById(R.id.drawer_layout)
        val navView: NavigationView = findViewById(R.id.nav_view)
        val toggle = ActionBarDrawerToggle(
                this,
                drawerLayout,
                toolbar,
                R.string.navigation_drawer_open,
                R.string.navigation_drawer_close
        )
        drawerLayout.addDrawerListener(toggle)
        toggle.syncState()

        navView.setNavigationItemSelectedListener(this)
    }

    override fun onBackPressed() {
        val drawerLayout: DrawerLayout = findViewById(R.id.drawer_layout)
        if (drawerLayout.isDrawerOpen(GravityCompat.START)) {
            drawerLayout.closeDrawer(GravityCompat.START)
        } else {
            super.onBackPressed()
        }
    }

    override fun onNavigationItemSelected(item: MenuItem): Boolean {
        // Handle navigation view item clicks here.
        when (item.itemId) {
            R.id.home -> {
                val homeFragment = HomeFragment()
                show(homeFragment)
            }
            R.id.gallery -> {
                val galleryFragment = GalleryFragment()
                show(galleryFragment)
            }
            R.id.slide_show -> {
                val slideShowFragment = SlideShowFragment()
                show(slideShowFragment)
            }
            R.id.tools -> {
                val toolsFragment = ToolsFragment()
                show(toolsFragment)
            }
        }
        val drawerLayout: DrawerLayout = findViewById(R.id.drawer_layout)
        drawerLayout.closeDrawer(GravityCompat.START)
        return true
    }
}

private fun show(fragment: Fragment) {

    val drawerLayout = drawer_layout as DrawerLayout
    val fragmentManager = supportFragmentManager

    fragmentManager
            .beginTransaction()
            .replace(R.id.main_content, fragment)
            .commit()

    drawerLayout.closeDrawer(GravityCompat.START)
}
Java
public class MainActivity extends AppCompatActivity
        implements NavigationView.OnNavigationItemSelectedListener {

    @Override
    protected void onCreate(Bundle savedInstanceState) {
        super.onCreate(savedInstanceState);
        setContentView(R.layout.activity_main);

        Toolbar toolbar = findViewById(R.id.toolbar);
        setSupportActionBar(toolbar);

        DrawerLayout drawer = findViewById(R.id.drawer_layout);
        NavigationView navigationView = findViewById(R.id.nav_view);
        ActionBarDrawerToggle toggle = new ActionBarDrawerToggle(
                this,
                drawer,
                toolbar,
                R.string.navigation_drawer_open,
                R.string.navigation_drawer_close);
        drawer.addDrawerListener(toggle);
        toggle.syncState();

        navigationView.setNavigationItemSelectedListener(this);
    }

    @Override
    public void onBackPressed() {
        DrawerLayout drawer = findViewById(R.id.drawer_layout);
        if (drawer.isDrawerOpen(GravityCompat.START)) {
            drawer.closeDrawer(GravityCompat.START);
        } else {
            super.onBackPressed();
        }
    }

    @Override
    public boolean onNavigationItemSelected(MenuItem item) {
        // Handle navigation view item clicks here.
        int id = item.getItemId();

        if (id == R.id.home) {
            Fragment homeFragment = new HomeFragment();
            show(homeFragment);
        } else if (id == R.id.gallery) {
            Fragment galleryFragment = new GalleryFragment();
            show(galleryFragment);
        } else if (id == R.id.slide_show) {
            Fragment slideShowFragment = new SlideShowFragment();
            show(slideShowFragment);
        } else if (id == R.id.tools) {
            Fragment toolsFragment = new ToolsFragment();
            show(toolsFragment);
        }

        DrawerLayout drawer = findViewById(R.id.drawer_layout);
        drawer.closeDrawer(GravityCompat.START);
        return true;
    }

    private void show(Fragment fragment) {

        DrawerLayout drawerLayout = findViewById(R.id.drawer_layout);
        FragmentManager fragmentManager = getSupportFragmentManager();

        fragmentManager
                .beginTransaction()
                .replace(R.id.main_content, fragment)
                .commit();

        drawerLayout.closeDrawer(GravityCompat.START);
    }
}
Une fois que vous avez ajouté le composant Navigation à votre projet et créé un graphique de navigation, ajoutez chacune des destinations de contenu de votre graphique (par exemple, Home (Accueil), Gallery (Galerie), SlideShow (Diaporama) et Tools (Outils) dans l'exemple ci-dessus). Assurez-vous que les valeurs id de votre élément de menu correspondent aux valeurs id de destination associées, comme indiqué ci-dessous :
<!-- activity_main_drawer.xml -->
<menu xmlns:android="http://schemas.android.com/apk/res/android"
    xmlns:tools="http://schemas.android.com/tools"
    tools:showIn="navigation_view">

    <group android:checkableBehavior="single">
        <item
            android:id="@+id/home"
            android:icon="@drawable/ic_menu_camera"
            android:title="@string/menu_home" />
        <item
            android:id="@+id/gallery"
            android:icon="@drawable/ic_menu_gallery"
            android:title="@string/menu_gallery" />
        <item
            android:id="@+id/slide_show"
            android:icon="@drawable/ic_menu_slideshow"
            android:title="@string/menu_slideshow" />
        <item
            android:id="@+id/tools"
            android:icon="@drawable/ic_menu_manage"
            android:title="@string/menu_tools" />
    </group>
</menu>
<!-- activity_main_graph.xml -->
<navigation xmlns:android="http://schemas.android.com/apk/res/android"
    xmlns:app="http://schemas.android.com/apk/res-auto"
    xmlns:tools="http://schemas.android.com/tools"
    android:id="@+id/main_graph"
    app:startDestination="@id/home">

    <fragment
        android:id="@+id/home"
        android:name="com.example.HomeFragment"
        android:label="Home"
        tools:layout="@layout/home" />

    <fragment
        android:id="@+id/gallery"
        android:name="com.example.GalleryFragment"
        android:label="Gallery"
        tools:layout="@layout/gallery" />

    <fragment
        android:id="@+id/slide_show"
        android:name="com.example.SlideShowFragment"
        android:label="Slide Show"
        tools:layout="@layout/slide_show" />

    <fragment
        android:id="@+id/tools"
        android:name="com.example.ToolsFragment"
        android:label="Tools"
        tools:layout="@layout/tools" />

</navigation>
Si vous faites correspondre les valeurs id de votre menu et de votre graphique, vous pouvez intégrer NavController pour cette activité afin de gérer automatiquement la navigation en fonction de l'élément de menu. NavController gère également l'ouverture et la fermeture de DrawerLayout, ainsi que le comportement approprié des boutons "Haut" et "Retour".
Votre MainActivity peut ensuite être mise à jour pour intégrer NavController à la Toolbar et à la NavigationView.
Voici un exemple :
Kotlin
class MainActivity : AppCompatActivity()  {

    val drawerLayout by lazy { findViewById<DrawerLayout>(R.id.drawer_layout) }
    val navController by lazy {
      (supportFragmentManager.findFragmentById(R.id.main_content) as NavHostFragment).navController
    }
    val navigationView by lazy { findViewById<NavigationView>(R.id.nav_view) }

    override fun onCreate(savedInstanceState: Bundle?) {
        super.onCreate(savedInstanceState)
        setContentView(R.layout.activity_main)

        val toolbar = findViewById<Toolbar>(R.id.toolbar)
        setSupportActionBar(toolbar)

        // Show and Manage the Drawer and Back Icon
        setupActionBarWithNavController(navController, drawerLayout)

        // Handle Navigation item clicks
        // This works with no further action on your part if the menu and destination id’s match.
        navigationView.setupWithNavController(navController)

    }

    override fun onSupportNavigateUp(): Boolean {
        // Allows NavigationUI to support proper up navigation or the drawer layout
        // drawer menu, depending on the situation
        return navController.navigateUp(drawerLayout)
    }
}
Java
public class MainActivity extends AppCompatActivity {

    private DrawerLayout drawerLayout;
    private NavController navController;
    private NavigationView navigationView;

    @Override
    protected void onCreate(@Nullable Bundle savedInstanceState) {

        super.onCreate(savedInstanceState);
        setContentView(R.layout.activity_main);

        drawerLayout = findViewById(R.id.drawer_layout);
        NavHostFragment navHostFragment = (NavHostFragment)
            getSupportFragmentManager().findFragmentById(R.id.main_content);
        navController = navHostFragment.getNavController();
        navigationView = findViewById(R.id.nav_view);

        Toolbar toolbar = findViewById(R.id.toolbar);
        setSupportActionBar(toolbar);

        // Show and Manage the Drawer and Back Icon
        NavigationUI.setupActionBarWithNavController(this, navController, drawerLayout);

        // Handle Navigation item clicks
        // This works with no further action on your part if the menu and destination id’s match.
        NavigationUI.setupWithNavController(navigationView, navController);

    }

    @Override
    public boolean onSupportNavigateUp() {
        // Allows NavigationUI to support proper up navigation or the drawer layout
        // drawer menu, depending on the situation.
        return NavigationUI.navigateUp(navController, drawerLayout);

    }
}
Vous pouvez utiliser cette même technique avec la navigation basée sur BottomNavigationView et la navigation basée sur un menu. Consultez la page Mettre à jour les composants de l'UI avec NavigationUI pour obtenir d'autres exemples.
Ajouter des destinations d'activité
Une fois que chaque écran de votre application est câblé pour utiliser le composant Navigation, et que vous n'utilisez plus FragmentTransactions pour naviguer entre les destinations basées sur des fragments, l'étape suivante consiste à éliminer les appels startActivity.
Tout d'abord, identifiez les emplacements de votre application où vous avez deux graphiques de navigation distincts et où vous utilisez startActivity pour passer de l'un à l'autre.
Cet exemple contient deux graphiques (A et B) et un appel startActivity() de transition de A à B.
Kotlin
fun navigateToProductDetails(productId: String) {
    val intent = Intent(this, ProductDetailsActivity::class.java)
    intent.putExtra(KEY_PRODUCT_ID, productId)
    startActivity(intent)
}
Java
private void navigateToProductDetails(String productId) {
    Intent intent = new Intent(this, ProductDetailsActivity.class);
    intent.putExtra(KEY_PRODUCT_ID, productId);
    startActivity(intent);
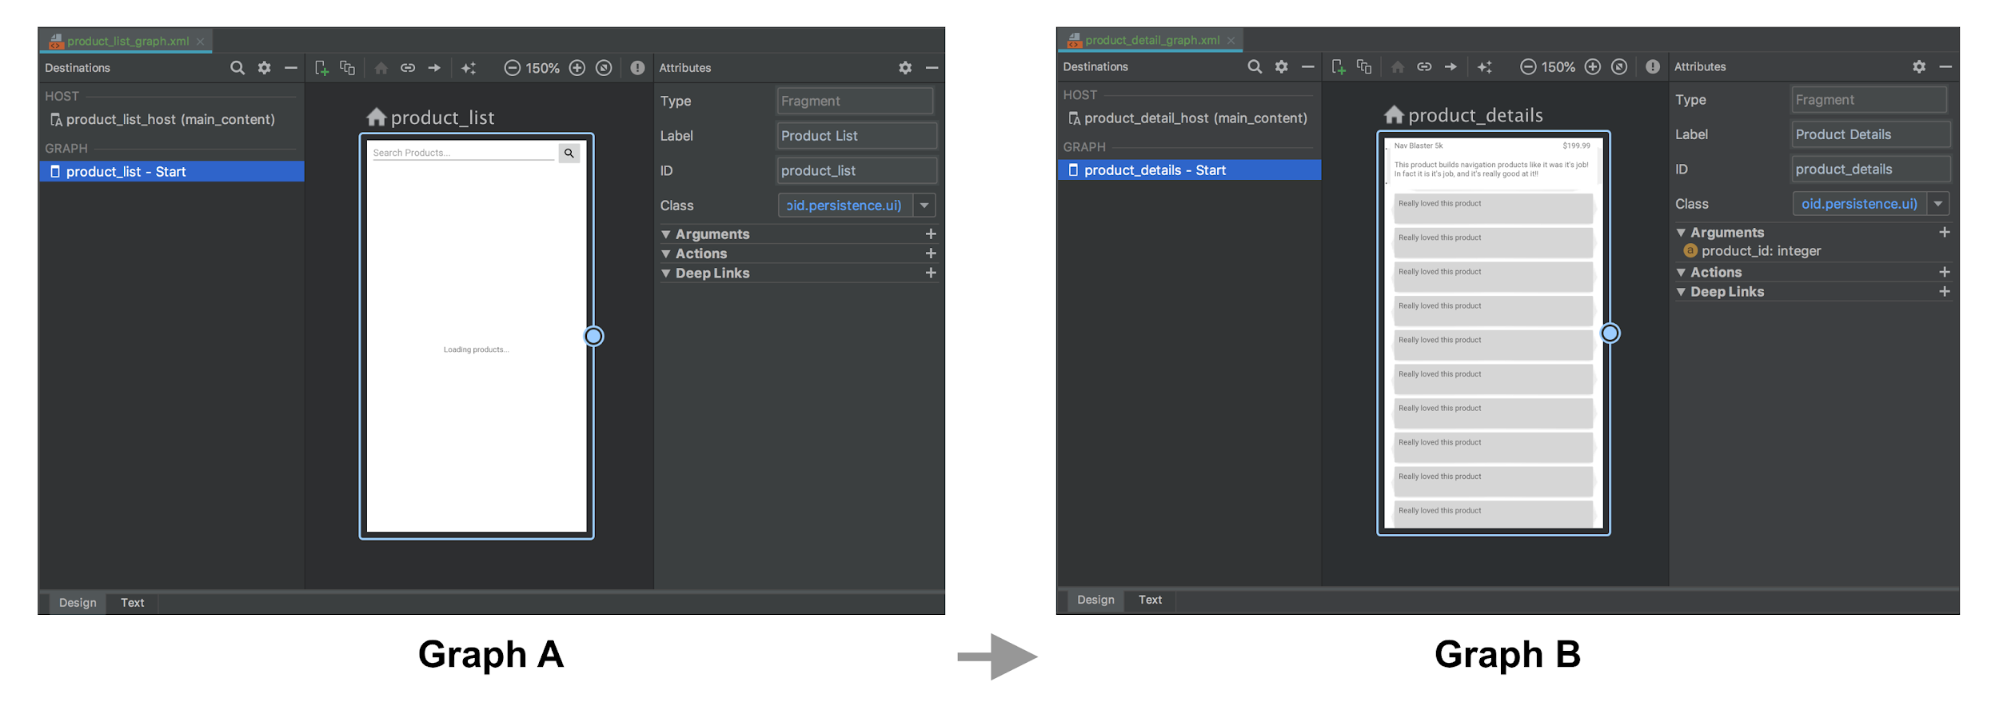
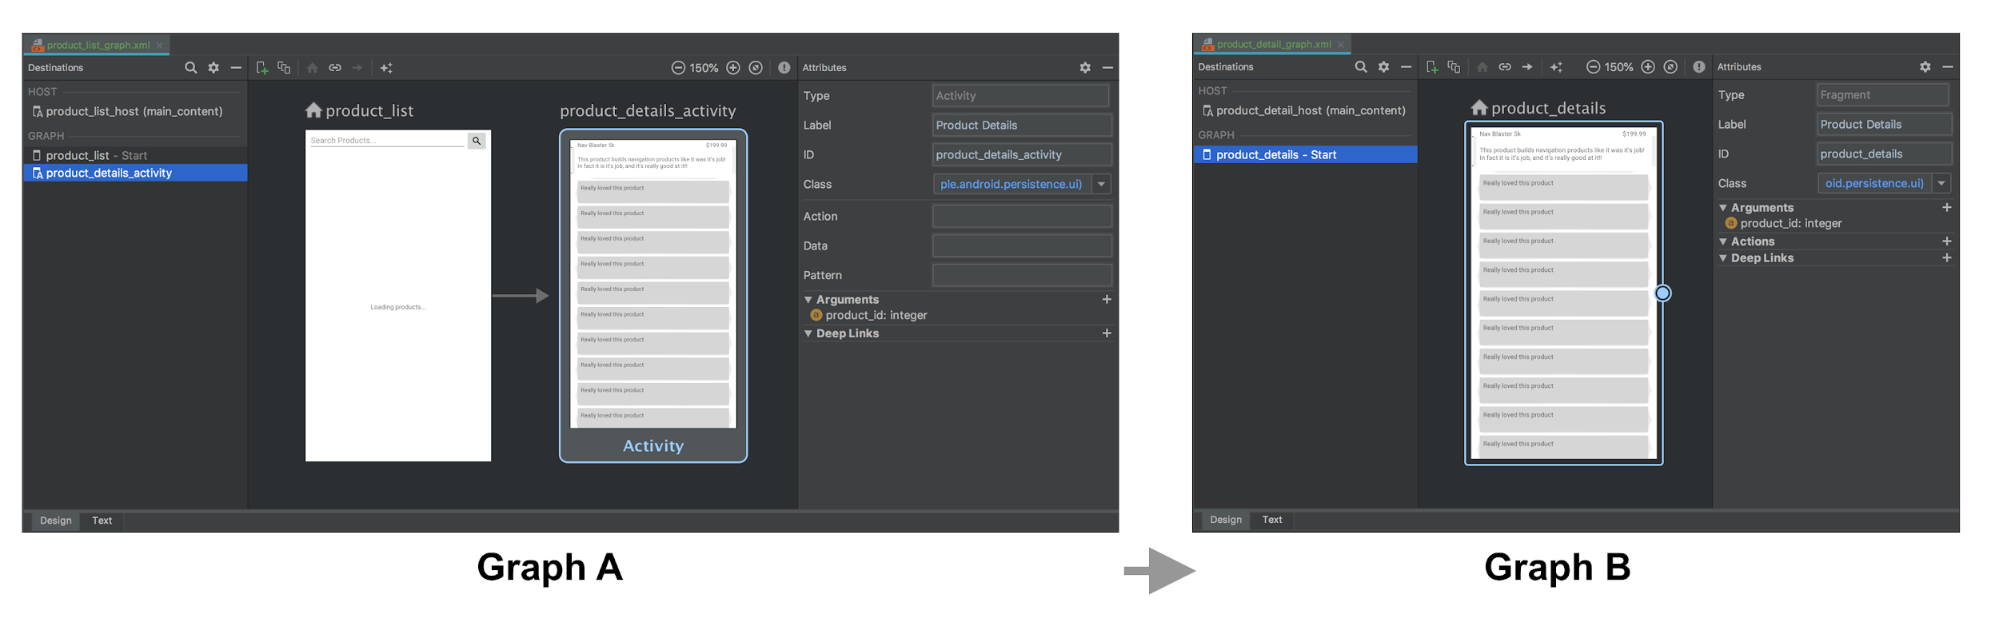
Remplacez-les ensuite par une destination d'activité du graphique A qui représente la navigation vers l'activité hôte du graphique B. Si vous avez des arguments à transmettre à la destination de départ du graphique B, vous pouvez les désigner dans la définition de la destination d'activité.
Dans l'exemple suivant, le graphique A définit une destination d'activité qui accepte un argument product_id avec une action. Le graphique B ne comporte aucune modification.
La représentation XML des graphiques A et B peut se présenter comme suit :
<!-- Graph A -->
<navigation xmlns:android="http://schemas.android.com/apk/res/android"
    xmlns:app="http://schemas.android.com/apk/res-auto"
    xmlns:tools="http://schemas.android.com/tools"
    android:id="@+id/product_list_graph"
    app:startDestination="@id/product_list">

    <fragment
        android:id="@+id/product_list"
        android:name="com.example.android.persistence.ui.ProductListFragment"
        android:label="Product List"
        tools:layout="@layout/product_list_fragment">
        <action
            android:id="@+id/navigate_to_product_detail"
            app:destination="@id/product_details_activity" />
    </fragment>

    <activity
        android:id="@+id/product_details_activity"
        android:name="com.example.android.persistence.ui.ProductDetailsActivity"
        android:label="Product Details"
        tools:layout="@layout/product_details_host">

        <argument
            android:name="product_id"
            app:argType="integer" />

    </activity>

</navigation>
<!-- Graph B -->
<navigation xmlns:android="http://schemas.android.com/apk/res/android"
    xmlns:app="http://schemas.android.com/apk/res-auto"
    xmlns:tools="http://schemas.android.com/tools"
    app:startDestination="@id/product_details">

    <fragment
        android:id="@+id/product_details"
        android:name="com.example.android.persistence.ui.ProductDetailsFragment"
        android:label="Product Details"
        tools:layout="@layout/product_details_fragment">
        <argument
            android:name="product_id"
            app:argType="integer" />
    </fragment>

</navigation>
Vous pouvez naviguer dans l'activité hôte du graphique B en utilisant les mêmes mécanismes que pour accéder aux destinations des fragments :
Kotlin
fun navigateToProductDetails(productId: String) {
    val directions = ProductListDirections.navigateToProductDetail(productId)
    findNavController().navigate(directions)
}
Java
private void navigateToProductDetails(String productId) {
    ProductListDirections.NavigateToProductDetail directions =
            ProductListDirections.navigateToProductDetail(productId);
    Navigation.findNavController(getView()).navigate(directions);
Transmettre des arguments de destination d'activité à un fragment de destination de départ
Si l'activité de destination reçoit des extras, comme dans l'exemple précédent, vous pouvez les transmettre directement à la destination de départ en tant qu'arguments, mais vous devez définir manuellement le graphique de navigation de votre hôte dans la méthode onCreate() de l'activité hôte afin de transmettre les extras d'intent en tant qu'arguments au fragment, comme indiqué ci-dessous :
Kotlin
class ProductDetailsActivity : AppCompatActivity() {

    override fun onCreate(savedInstanceState: Bundle?) {
        super.onCreate(savedInstanceState)
        setContentView(R.layout.product_details_host)
        val navHostFragment = supportFragmentManager.findFragmentById(R.id.main_content) as NavHostFragment
        val navController = navHostFragment.navController
        navController
                .setGraph(R.navigation.product_detail_graph, intent.extras)
    }

}
Java
public class ProductDetailsActivity extends AppCompatActivity {

    @Override
    protected void onCreate(@Nullable Bundle savedInstanceState) {
        super.onCreate(savedInstanceState);

        setContentView(R.layout.product_details_host);
        NavHostFragment navHostFragment = (NavHostFragment)
            getSupportFragmentManager().findFragmentById(R.id.main_content);
        NavController navController = navHostFragment.getNavController();
        navController
                .setGraph(R.navigation.product_detail_graph, getIntent().getExtras());
    }

}
Les données peuvent être extraites du Bundle des arguments de fragment à l'aide de la classe d'arguments générée, comme illustré dans l'exemple suivant :
Kotlin
class ProductDetailsFragment : Fragment() {

    val args by navArgs<ProductDetailsArgs>()

    override fun onViewCreated(view: View, savedInstanceState: Bundle?) {
        val productId = args.productId
        ...
    }
    ...
Java
public class ProductDetailsFragment extends Fragment {

    ProductDetailsArgs args;

    @Override
    public void onCreate(@Nullable Bundle savedInstanceState) {
        super.onCreate(savedInstanceState);
        args = ProductDetailsArgs.fromBundle(requireArguments());
    }

    @Override
    public void onViewCreated(@NonNull View view,
            @Nullable Bundle savedInstanceState) {
       int productId = args.getProductId();
       ...
    }
    ...
Combiner des activités
Vous pouvez combiner des graphiques de navigation dans les cas où plusieurs activités partagent la même mise en page, par exemple un FrameLayout simple contenant un seul fragment. Dans la plupart des cas, il vous suffit de combiner tous les éléments de chaque graphique de navigation et de mettre à jour tous les éléments de destination des activités pour les fragmenter.
L'exemple suivant combine les graphiques A et B de la section précédente :
Avant la combinaison :
<!-- Graph A -->
<navigation xmlns:android="http://schemas.android.com/apk/res/android"
    xmlns:app="http://schemas.android.com/apk/res-auto"
    xmlns:tools="http://schemas.android.com/tools"
    android:id="@+id/product_list_graph"
    app:startDestination="@id/product_list">

    <fragment
        android:id="@+id/product_list"
        android:name="com.example.android.persistence.ui.ProductListFragment"
        android:label="Product List Fragment"
        tools:layout="@layout/product_list">
        <action
            android:id="@+id/navigate_to_product_detail"
            app:destination="@id/product_details_activity" />
    </fragment>
    <activity
        android:id="@+id/product_details_activity"
        android:name="com.example.android.persistence.ui.ProductDetailsActivity"
        android:label="Product Details Host"
        tools:layout="@layout/product_details_host">
        <argument android:name="product_id"
            app:argType="integer" />
    </activity>

</navigation>
<!-- Graph B -->
<navigation xmlns:android="http://schemas.android.com/apk/res/android"
    xmlns:app="http://schemas.android.com/apk/res-auto"
    xmlns:tools="http://schemas.android.com/tools"
    android:id="@+id/product_detail_graph"
    app:startDestination="@id/product_details">

    <fragment
        android:id="@+id/product_details"
        android:name="com.example.android.persistence.ui.ProductDetailsFragment"
        android:label="Product Details"
        tools:layout="@layout/product_details">
        <argument
            android:name="product_id"
            app:argType="integer" />
    </fragment>
</navigation>
Après la combinaison :
<!-- Combined Graph A and B -->
<navigation xmlns:android="http://schemas.android.com/apk/res/android"
    xmlns:app="http://schemas.android.com/apk/res-auto"
    xmlns:tools="http://schemas.android.com/tools"
    android:id="@+id/product_list_graph"
    app:startDestination="@id/product_list">

    <fragment
        android:id="@+id/product_list"
        android:name="com.example.android.persistence.ui.ProductListFragment"
        android:label="Product List Fragment"
        tools:layout="@layout/product_list">
        <action
            android:id="@+id/navigate_to_product_detail"
            app:destination="@id/product_details" />
    </fragment>

    <fragment
        android:id="@+id/product_details"
        android:name="com.example.android.persistence.ui.ProductDetailsFragment"
        android:label="Product Details"
        tools:layout="@layout/product_details">
        <argument
            android:name="product_id"
            app:argType="integer" />
    </fragment>

</navigation>
Vous pouvez simplifier ce processus en conservant les mêmes noms d'action lors de la fusion. Vous n'aurez alors pas à modifier votre codebase existant. Par exemple, navigateToProductDetail reste ici le même. La seule différence est que cette action représente désormais la navigation vers une destination de fragment dans le même NavHost au lieu d'une destination d'activité :
Kotlin
fun navigateToProductDetails(productId: String) {
    val directions = ProductListDirections.navigateToProductDetail(productId)
    findNavController().navigate(directions)
}
Java
private void navigateToProductDetails(String productId) {
    ProductListDirections.NavigateToProductDetail directions =
            ProductListDirections.navigateToProductDetail(productId);
    Navigation.findNavController(getView()).navigate(directions);
Autres ressources
Pour en savoir plus sur la navigation, consultez les rubriques suivantes :
- Mettre à jour les composants de l'UI avec NavigationUI : découvrez comment gérer la navigation à l'aide de la barre d'application supérieure, le panneau de navigation et la barre de navigation inférieure.
- Tester la navigation : découvrez comment tester les workflows de navigation pour votre application.