
ספריית Android זהה מבחינה מבנית למודול של אפליקציית Android. הוא כולל את כל מה שצריך כדי ליצור אפליקציה, כולל קוד מקור, קובצי משאבים ומניפסט של Android.
עם זאת, במקום קומפילציה ל-APK שפועל במכשיר, ספריית Android עוברת קומפילציה לקובץ Android Archive (AAR) שאפשר להשתמש בו כתלות במודול של אפליקציית Android. בניגוד לקובצי JAR, קובצי AAR מציעים את הפונקציונליות הבאה לאפליקציות ל-Android:
- קובצי AAR יכולים להכיל משאבי Android וקובץ מניפסט, שמאפשרים לכם לארוז משאבים משותפים כמו פריסות ומשאבים מסוג drawable, בנוסף למחלקות ולשיטות של Kotlin או Java.
- קובצי AAR יכולים להכיל ספריות C/C++ לשימוש בקוד C/C++ של מודול האפליקציה.
מודול ספרייה שימושי במצבים הבאים:
- כשמפתחים כמה אפליקציות שמשתמשות בחלק מאותם רכיבים, כמו פעילויות, שירותים או פריסות של ממשק משתמש
- כשמפתחים אפליקציה שקיימות לה כמה גרסאות APK, למשל גרסה חינמית וגרסה בתשלום, שמשתפות רכיבי ליבה
בכל מקרה, מעבירים את הקבצים שרוצים לעשות בהם שימוש חוזר למודול ספרייה ואז מוסיפים את הספרייה כתלות לכל מודול אפליקציה.
בדף הזה מוסבר איך ליצור מודול של ספריית Android ואיך להשתמש בו. הוראות לפרסום ספרייה מופיעות במאמר פרסום הספרייה
יצירת מודול של ספרייה
כדי ליצור מודול ספרייה חדש בפרויקט:
- לוחצים על קובץ > חדש > מודול חדש.
- בתיבת הדו-שיח Create New Module שמופיעה, לוחצים על Android Library ואז על Next.
יש גם אפשרות ליצור ספריית Kotlin או Java, שיוצרת קובץ JAR מסורתי. קובץ JAR שימושי להרבה פרויקטים – במיוחד כשרוצים לשתף קוד עם פלטפורמות אחרות – אבל אי אפשר לכלול בו משאבים של Android או קובצי מניפסט, וזה מאוד שימושי לשימוש חוזר בקוד בפרויקטים של Android. המדריך הזה מתמקד ביצירת ספריות Android.
- נותנים שם לספרייה, בוחרים גרסת SDK מינימלית לקוד בספרייה ולוחצים על סיום.
אחרי שהסנכרון של פרויקט Gradle יסתיים, מודול הספרייה יופיע בחלונית Project. אם לא רואים את תיקיית המודול החדש, צריך לוודא שבחלונית מוצג התצוגה של Android.
המרת מודול אפליקציה למודול ספרייה
אם יש לכם מודול אפליקציה קיים עם קוד שאתם רוצים לעשות בו שימוש חוזר, אתם יכולים להפוך אותו למודול ספרייה באופן הבא:
- פותחים את הקובץ
build.gradleברמת המודול אם משתמשים ב-Groovy, או את הקובץbuild.gradle.ktsאם משתמשים בסקריפט Kotlin. - מחיקת השורה של
applicationId. רק מודול של אפליקציית Android יכול להגדיר את זה. - מחפשים את הבלוק plugins בחלק העליון של הקובץ, שנראה כך:
מגניב
  plugins {
      id 'com.android.application'
  }
Kotlin
  plugins {
      id("com.android.application")
  }
משנים אותו לערך הבא:
מגניב
  plugins {
      id 'com.android.library'
  }
Kotlin
  plugins {
      id("com.android.library")
  }
- שומרים את הקובץ ולוחצים על File > Sync Project with Gradle Files (קובץ > סנכרון הפרויקט עם קובצי Gradle).
המבנה של המודול נשאר זהה, אבל עכשיו הוא פועל כספריית Android. ה-build יוצר קובץ AAR במקום קובץ APK.
כשרוצים ליצור את קובץ ה-AAR, בוחרים את מודול הספרייה בחלון Project (פרויקט) ולוחצים על Build > Build APK (יצירת APK).
הוספת תלויות באמצעות תיבת הדו-שיח Project Structure (מבנה הפרויקט)
אפשר להשתמש בתיבת הדו-שיח Project Structure כדי להוסיף תלויות לפרויקט. בקטעים הבאים מוסבר איך להשתמש בתיבת הדו-שיח כדי להוסיף תלויות.
שימוש בספרייה מתוך אותו פרויקט
כדי להשתמש בקוד של ספריית Android החדשה באפליקציה אחרת או במודול ספרייה באותו פרויקט, מוסיפים תלות ברמת הפרויקט:
- עוברים אל קובץ > מבנה הפרויקט > תלויות.
- בוחרים את המודול שרוצים להוסיף לו את הספרייה.
- בכרטיסייה Declared Dependencies (תלויות מוצהרות), לוחצים על
 ובוחרים באפשרות
Module Dependency (תלות במודול) מהתפריט.
ובוחרים באפשרות
Module Dependency (תלות במודול) מהתפריט.
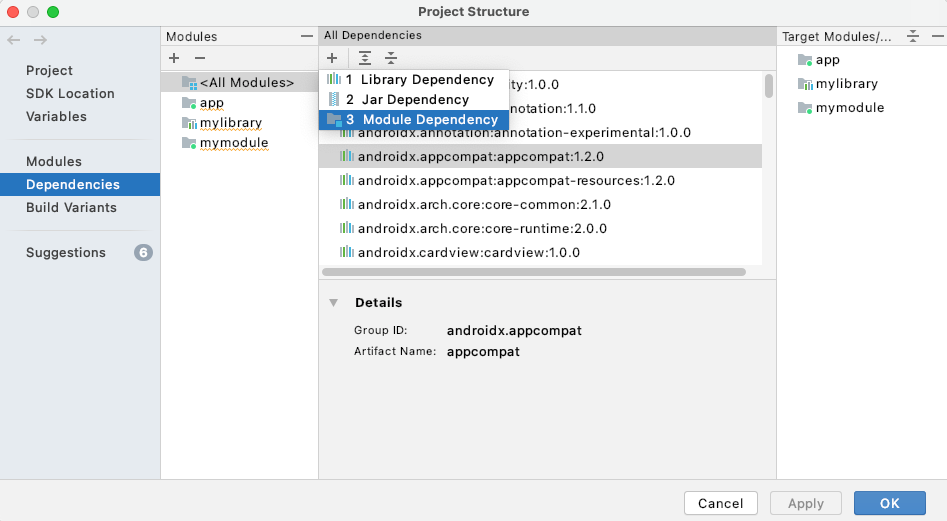
בתיבת הדו-שיח Add Module Dependency (הוספת תלות של מודול), בוחרים את מודול הספרייה.
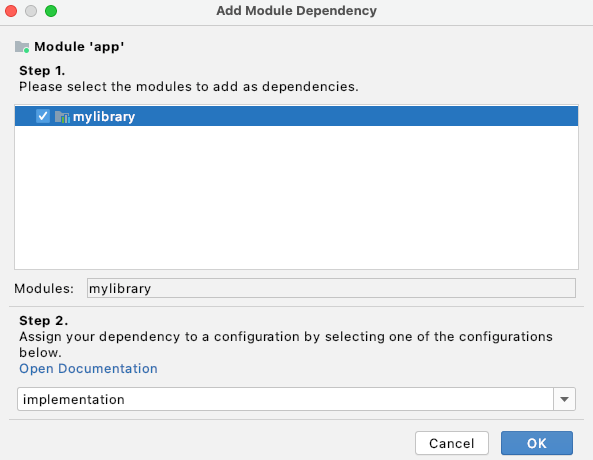
בוחרים את ההגדרה שדורשת את התלות הזו או בוחרים באפשרות implementation (הטמעה) אם היא חלה על כל ההגדרות, ואז לוחצים על OK (אישור).
Android Studio עורך את הקובץ build.gradle או build.gradle.kts של המודול כדי להוסיף את התלות, בפורמט הבא:
מגניב
implementation project(path: ":example-library")
Kotlin
implementation(project(":example-library"))
שימוש בספרייה בפרויקטים אחרים
הדרך המומלצת לשתף תלויות (JAR ו-AAR) היא באמצעות מאגר Maven, שמתארח בשירות כמו Maven Central, או באמצעות מבנה ספריות בדיסק המקומי. מידע נוסף על שימוש במאגרי Maven זמין במאמר מאגרים מרוחקים.
כשספריית Android מתפרסמת במאגר Maven, המטא-נתונים נכללים כדי שהפריטים בקשרי התלות של הספרייה ייכללו בגרסת ה-build שצורכת את הספרייה. כך אפשר לבטל כפילויות בספרייה באופן אוטומטי אם משתמשים בה בכמה מקומות.
כדי להשתמש בקוד של ספריית Android במודול אחר של אפליקציה בפרויקט אחר, צריך לפעול באופן הבא:
- עוברים אל File > Project Structure > Dependencies.
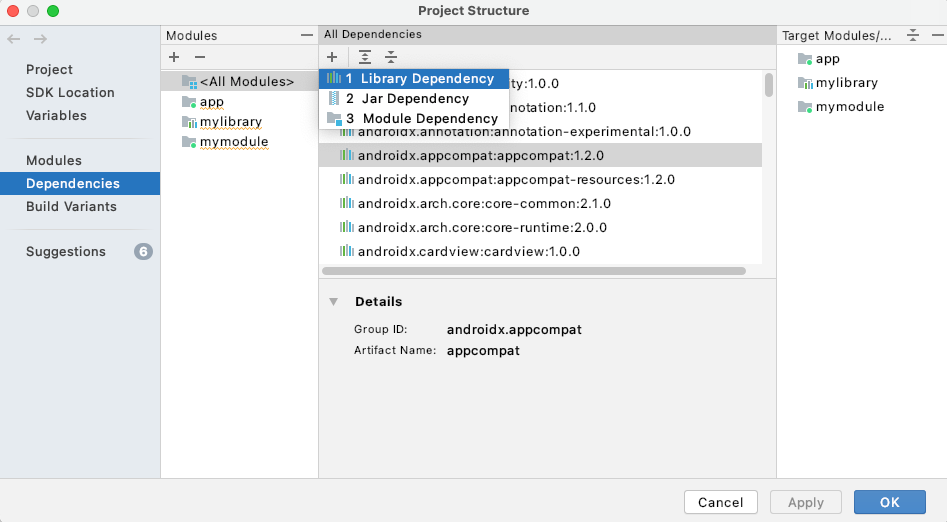
- בכרטיסייה Declared Dependencies (תלויות מוצהרות), לוחצים על ובוחרים באפשרות Library Dependency (תלות בספרייה) בתפריט.
בתיבת הדו-שיח Add Library Dependency (הוספת תלות בספרייה), משתמשים בתיבת החיפוש כדי למצוא את הספרייה שרוצים להוסיף. בטופס הזה מתבצע חיפוש במאגרי המידע שצוינו בבלוק
dependencyResolutionManagement { repositories {...}}בקובץsettings.gradleאוsettings.gradle.kts.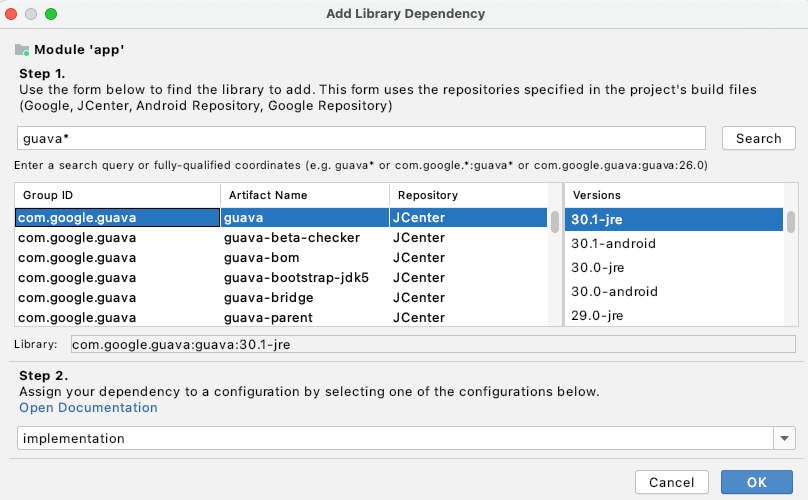
בוחרים את ההגדרה שדורשת את התלות הזו או בוחרים באפשרות implementation (הטמעה) אם היא חלה על כל ההגדרות, ואז לוחצים על OK (אישור).
בודקים את הקובץ build.gradle או build.gradle.kts של האפליקציה כדי לוודא שמופיעה הצהרה דומה להצהרה הבאה (בהתאם להגדרת ה-build שבחרתם):
מגניב
implementation 'com.example:examplelibrary:1.0.0'
Kotlin
implementation("com.example:examplelibrary:1.0.0")
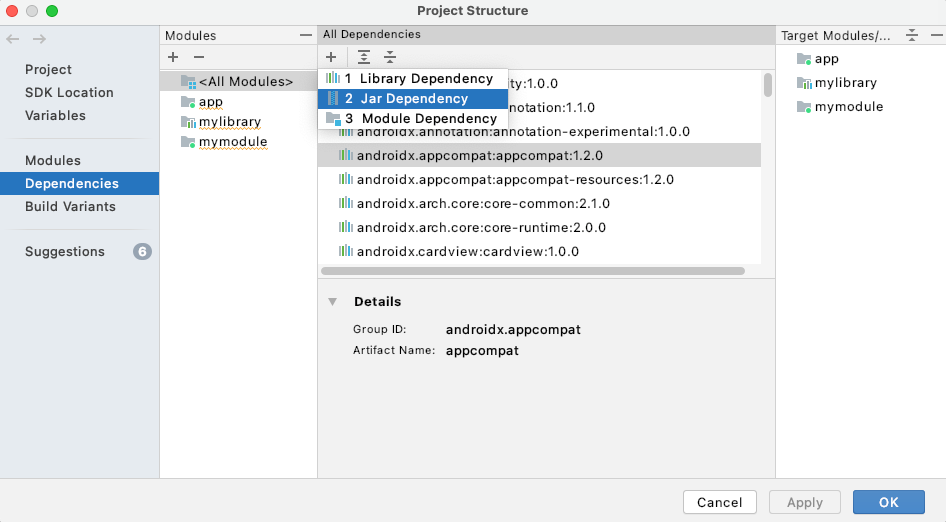
הוספה של קובץ AAR או JAR כתלות
כדי להשתמש בקוד של ספריית Android במודול אחר של אפליקציה, פועלים לפי השלבים הבאים:
- עוברים אל קובץ > מבנה הפרויקט > תלויות.
- בכרטיסייה Declared Dependencies (תלויות מוצהרות), לוחצים על ובוחרים באפשרות Jar
Dependency (תלות ב-Jar) בתפריט.
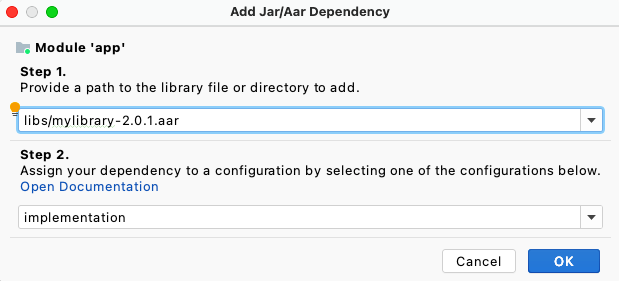
בתיבת הדו-שיח Add Jar/Aar Dependency (הוספת תלות Jar/Aar), מזינים את הנתיב לקובץ AAR או JAR ובוחרים את התצורה שאליה התלות חלה. אם רוצים שהספרייה תהיה זמינה לכל ההגדרות, בוחרים בהגדרת ההטמעה.
בודקים את הקובץ
build.gradleאוbuild.gradle.ktsשל האפליקציה כדי לוודא שמופיעה הצהרה דומה לזו (בהתאם להגדרת ה-build שבחרתם):מגניב
implementation files('my_path/my_lib.aar')
Kotlin
implementation(files("my_path/my_lib.aar"))
כדי לייבא תלות ב-Gradle build שפועל מחוץ ל-Android Studio, צריך להוסיף נתיב לתלות בקובץ build.gradle או build.gradle.kts של האפליקציה. לדוגמה:
מגניב
dependencies {
    implementation fileTree(dir: "libs", include: ["*.jar", "*.aar"])
}
Kotlin
dependencies {
    implementation(fileTree(mapOf("dir" to "libs", "include" to listOf("*.jar", "*.aar"))))
}
מידע נוסף על הוספת יחסי תלות ב-Gradle זמין במאמר הוספת יחסי תלות ב-build.
הצהרה על משאב ציבורי
המשאבים כוללים את כל הקבצים בספרייה res/ של הפרויקט, כמו תמונות. כל המשאבים בספרייה מוגדרים כברירת מחדל כציבוריים. כדי להגדיר את כל המשאבים כפרטיים באופן מרומז, צריך להגדיר לפחות מאפיין ספציפי אחד כציבורי.
כדי להצהיר על משאב ציבורי, מוסיפים הצהרת <public> לקובץ public.xml של הספרייה. אם לא הוספתם בעבר משאבים ציבוריים, אתם צריכים ליצור את הקובץ public.xml בספרייה res/values/ של הספרייה שלכם.
בדוגמת הקוד הבאה נוצרים שני משאבי מחרוזות ציבוריים עם השמות mylib_app_name ו-mylib_public_string:
<resources>
    <public name="mylib_app_name" type="string"/>
    <public name="mylib_public_string" type="string"/>
</resources>
כדי למנוע ממשתמשים בספרייה שלכם לגשת למשאבים שמיועדים לשימוש פנימי בלבד, אתם יכולים להשתמש במנגנון הזה של הגדרה אוטומטית של משאבים כפרטיים. לשם כך, צריך להצהיר על משאב ציבורי אחד או יותר. לחלופין, אפשר להגדיר את כל המשאבים כפרטיים על ידי הוספת תג <public /> ריק. הפעולה הזו לא מסמנת שום דבר כציבורי והופכת את כל המשאבים לפרטיים.
כל המשאבים שרוצים שיישארו גלויים למפתחים שמשתמשים בספרייה צריכים להיות ציבוריים.
הפיכת מאפיינים לפרטיים באופן מרומז מונעת ממשתמשים בספרייה שלכם לקבל הצעות להשלמת קוד ממקורות פנימיים של הספרייה, ומאפשרת למשתמשים לשנות את השם של מקורות פרטיים או להסיר אותם בלי לשבור את הלקוחות של הספרייה. משאבים פרטיים מסוננים מהשלמת הקוד, וכלי ה-lint מציג אזהרה כשמנסים להפנות למשאב פרטי.
כשיוצרים ספרייה, פלאגין של Android Gradle מקבל את ההגדרות של המשאבים הציבוריים ומחלץ אותן לקובץ public.txt, שנארז בקובץ AAR.
שיקולים בפיתוח מודולים של ספריות
במהלך פיתוח מודולי הספרייה והאפליקציות התלויות, חשוב לשים לב להתנהגויות ולהגבלות הבאות.
הספריות מוזגו לפי סדר העדיפות.
אחרי שמוסיפים הפניות למודולים של הספרייה למודול של אפליקציית Android, אפשר להגדיר את העדיפות היחסית שלהם. במשך זמן של תהליך build, הספריות מתמזגות עם האפליקציה אחת בכל פעם, מהעדיפות הנמוכה ביותר לגבוהה ביותר.
הפניות למשאבים בספרייה יתייחסו למשאב הממוזג, ולא בהכרח למשאב בספרייה. מודול של ספרייה לא יכול לאכוף את השימוש במשאבים שלו על פני המשאבים של האפליקציה או של ספריות אחרות, אם יש משאבים עם אותו שם.
מניעת קונפליקטים במיזוג משאבים
כלי ה-build ממזגים משאבים ממודול של ספרייה עם משאבים ממודול של אפליקציה שתלויה בספרייה. אם שם משאב מסוים מוגדר בשני המודולים, המערכת משתמשת במשאב מהאפליקציה.
אם יש סתירות בין כמה ספריות AAR, המערכת משתמשת במשאב מהספרייה שמופיעה ראשונה ברשימת יחסי התלות (הכי קרוב לחלק העליון של הבלוק
dependencies).כדי להימנע מקונפליקטים במשאבים, מומלץ להשתמש בקידומת או בסכמת שמות עקבית אחרת שייחודית למודול (או ייחודית בכל מודולי הפרויקט).
בגרסאות build של כמה מודולים, יחסי תלות ב-JAR נחשבים ליחסי תלות טרנזיטיביים.
כשמוסיפים תלות ב-JAR לפרויקט ספריה שמפיק AAR, מודול הספריה מעבד את ה-JAR ואורז אותו עם ה-AAR.
עם זאת, אם הפרויקט כולל מודול ספרייה שמשמש מודול אפליקציה, מודול האפליקציה מתייחס ליחסי התלות המקומיים של הספרייה ב-JAR כיחסי תלות טרנזיטיביים. במקרה כזה, מודול האפליקציה שמשתמש ב-JAR המקומי מעבד אותו, ולא מודול הספרייה. הפעולה הזו מאיצה גרסאות build מצטברות שנגרמות כתוצאה משינויים בקוד של ספרייה.
צריך לפתור כל בעיה של התנגשות במשאבי Java שנגרמת בגלל תלות ב-JAR מקומי במודול האפליקציה שמשתמש בספרייה.
מודול ספרייה יכול להיות תלוי בספריית JAR חיצונית.
אתם יכולים לפתח מודול ספרייה שתלוי בספרייה חיצונית. במקרה כזה, המודול התלוי חייב להיבנות על בסיס יעד שכולל את הספרייה החיצונית.
חשוב לשים לב שגם מודול הספרייה וגם האפליקציה התלויה חייבים להצהיר על הספרייה החיצונית בקובצי המניפסט שלהם ברכיב
<uses-library>.הערך של
minSdkVersionבמודול האפליקציה צריך להיות שווה לגרסה שמוגדרת בספרייה או גדול ממנה.ספרייה עוברת קומפילציה כחלק ממודול האפליקציה שתלוי בה, ולכן ממשקי ה-API שנעשה בהם שימוש במודול הספרייה צריכים להיות תואמים לגרסת הפלטפורמה שהמודול של האפליקציה תומך בה.
כל מודול של ספרייה יוצר מחלקה משלו
R.כשיוצרים את המודולים של האפליקציה שתלויים בספריות, המודולים של הספריות עוברים קומפילציה לקובץ AAR ואז מתווספים למודול של האפליקציה. לכן, לכל ספרייה יש מחלקה משלה, שנקראת על שם שם החבילה של הספרייה.
Rהמחלקות
Rשנוצרות מהמודול הראשי וממודול הספרייה נוצרות בכל החבילות הנדרשות, כולל החבילה של המודול הראשי והחבילות של הספריות.מודול של ספרייה עשוי לכלול קובץ תצורה משלו של ProGuard.
אם יש לכם פרויקט ספריה שבו אתם משתמשים כדי ליצור ולפרסם AAR, אתם יכולים להוסיף קובץ תצורה של ProGuard להגדרות ה-build של הספריה. אם כן, הפלאגין של Android Gradle יחיל את כללי ProGuard שציינתם. כלי ה-build מטמיעים את הקובץ הזה בקובץ ה-AAR שנוצר עבור מודול הספרייה. כשמוסיפים את הספרייה למודול של אפליקציה, קובץ ProGuard של הספרייה מצורף לקובץ התצורה של ProGuard (
proguard.txt) של מודול האפליקציה.הטמעה של קובץ ProGuard במודול הספרייה עוזרת לוודא שמודולים של אפליקציות שתלויים בספרייה לא יצטרכו לעדכן ידנית את קובצי ProGuard כדי להשתמש בספרייה. כשמערכת ה-Build של Android Studio יוצרת את האפליקציה, היא משתמשת בהוראות ממודול האפליקציה ומהספרייה. לכן, אין צורך להפעיל כלי להקטנת קוד בספרייה בשלב נפרד.
כדי להוסיף את כללי ProGuard לפרויקט הספרייה, מציינים את שם הקובץ עם המאפיין
consumerProguardFilesבתוך הבלוקdefaultConfigשל קובץbuild.gradleאוbuild.gradle.ktsשל הספרייה.לדוגמה, קטע הקוד הבא מגדיר את
lib-proguard-rules.txtכקובץ התצורה של ProGuard בספרייה:מגניב
android {
    defaultConfig {
        consumerProguardFiles 'lib-proguard-rules.txt'
    }
    ...
}
Kotlin
android {
    defaultConfig {
        consumerProguardFiles("lib-proguard-rules.txt")
    }
    ...
}
עם זאת, אם מודול הספרייה הוא חלק מגרסת build מרובת מודולים שעוברת קומפילציה ל-APK ולא יוצרת AAR, צריך להפעיל את תהליך צמצום הקוד רק במודול האפליקציה שמשתמש בספרייה. מידע נוסף על כללי ProGuard ועל השימוש בהם זמין במאמר כיווץ, ערפול קוד ואופטימיזציה של האפליקציה.
-
בדיקה של מודול ספרייה דומה מאוד לבדיקה של אפליקציה.
ההבדל העיקרי הוא שהספרייה ויחסי התלות שלה נכללים באופן אוטומטי כיחסי תלות של קובץ ה-APK של הבדיקה. כלומר, חבילת ה-APK של הבדיקה כוללת לא רק את הקוד שלה, אלא גם את קובץ ה-AAR של הספרייה ואת כל יחסי התלות שלה. מכיוון שאין אפליקציה נפרדת שנבדקת, המשימה
androidTestמתקינה (ומסירה) רק את קובץ ה-APK של הבדיקה.כשממזגים כמה קובצי מניפסט, Gradle פועל לפי סדר העדיפות שמוגדר כברירת מחדל וממזג את המניפסט של הספרייה עם המניפסט הראשי של ה-APK לבדיקה.
המבנה של קובץ AAR
סיומת הקובץ של קובץ AAR היא .aar, וסוג הפריט מידע שנוצר בתהליך פיתוח (Artifact) ב-Maven הוא aar. הקובץ עצמו הוא קובץ ZIP. הערך היחיד שחובה להזין הוא
/AndroidManifest.xml.
קובץ AAR יכול לכלול גם אחת או יותר מהרשומות האופציונליות הבאות:
/classes.jar/res//R.txt/public.txt/assets//libs/name.jar/jni/abi_name/name.so(כאשר abi_name הוא אחד מממשקי ה-ABI שנתמכים ב-Android)/proguard.txt/lint.jar/api.jar-
/prefab/לייצוא ספריות מקוריות