No Android 11 e em versões mais recentes, o recurso Controles de dispositivo de acesso rápido permite ao usuário ver e controlar rapidamente dispositivos externos, como luzes, termostatos e câmeras, em uma interface do usuário com até três interações em uma tela de início padrão. O OEM do dispositivo escolhe qual tela de início usar. Agregadores de dispositivos, por exemplo, o Google Home, e apps de fornecedores terceirizados podem oferecer dispositivos para exibição nesse espaço. Esta página mostra como usar os controles do dispositivo nesse espaço e vinculá-los ao app de controle.
Para adicionar esse suporte, crie e declare um ControlsProviderService. Crie os
controles compatíveis com seu app com base em tipos de controle predefinidos e crie
editores para esses controles.
Interface do usuário
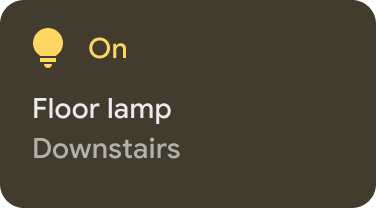
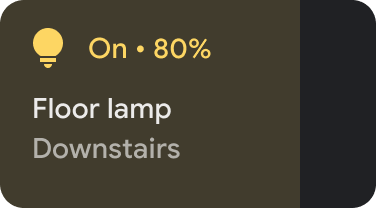
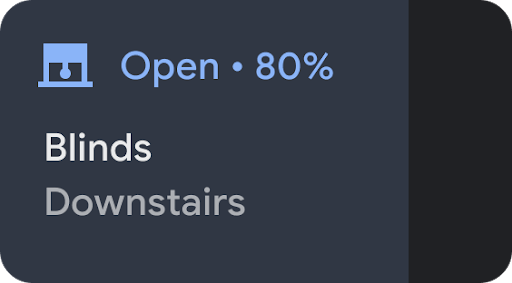
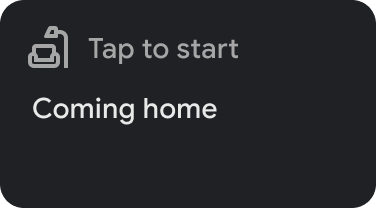
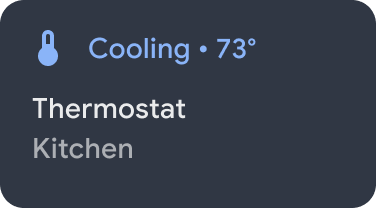
Os dispositivos são exibidos em Controles do dispositivo como widgets com modelo. Cinco widgets de controle de dispositivos estão disponíveis, conforme mostrado na figura a seguir:
|
|
|
|
|
Tocar e manter pressionado um widget leva você ao app para ter um controle mais profundo. Você pode personalizar o ícone e a cor em cada widget, mas, para ter a melhor experiência do usuário, use o ícone e a cor padrão se o conjunto padrão corresponder ao dispositivo.
Criar o serviço
Esta seção mostra como criar o
ControlsProviderService.
Esse serviço informa à interface do sistema Android que seu app contém controles de dispositivo
que precisam ser exibidos na área Controles do dispositivo da interface do Android.
A API ControlsProviderService pressupõe familiaridade com streams reativos, conforme
definido no projeto GitHub de streams
reativos
e implementado nas interfaces de fluxo do Java
9.
A API foi criada com base nos seguintes conceitos:
- Editor:seu aplicativo é o editor.
- Assinante:a interface do sistema é o assinante e pode solicitar vários controles do editor.
- Assinatura:o período em que o editor pode enviar atualizações para a interface do sistema. O editor ou o assinante podem fechar essa janela.
Declarar o serviço
Seu app precisa declarar um serviço, como MyCustomControlService, no
manifesto do app.
O serviço precisa incluir um filtro de intent para ControlsProviderService. Esse
filtro permite que os aplicativos contribuam com controles para a interface do sistema.
Você também precisa de um label que seja exibido nos controles da interface do sistema.
O exemplo a seguir mostra como declarar um serviço:
<service
    android:name="MyCustomControlService"
    android:label="My Custom Controls"
    android:permission="android.permission.BIND_CONTROLS"
    android:exported="true"
    >
    <intent-filter>
      <action android:name="android.service.controls.ControlsProviderService" />
    </intent-filter>
</service>
Em seguida, crie um arquivo Kotlin chamado MyCustomControlService.kt e faça com que ele
estenda ControlsProviderService():
Kotlin
    class MyCustomControlService : ControlsProviderService() {
        ...
    }
Java
    public class MyCustomJavaControlService extends ControlsProviderService {
        ...
    }
Selecione o tipo de controle correto
A API fornece métodos do builder para criar os controles. Para preencher o builder, determine o dispositivo que você quer controlar e como o usuário interage com ele. Siga estas etapas:
- Escolha o tipo de dispositivo que o controle representa. A classe
DeviceTypesé uma enumeração de todos os dispositivos compatíveis. O tipo é usado para determinar os ícones e as cores do dispositivo na interface. - Determine o nome do usuário, a localização do dispositivo (por exemplo, cozinha) e outros elementos textuais da interface associados ao controle.
- Escolha o melhor modelo para oferecer suporte à interação do usuário. Os controles recebem um
ControlTemplatedo aplicativo. Esse modelo mostra diretamente o estado de controle para o usuário, bem como os métodos de entrada disponíveis, ou seja, oControlAction. A tabela a seguir descreve alguns dos modelos disponíveis e as ações compatíveis:
| Modelo | Ação | Descrição |
ControlTemplate.getNoTemplateObject()
|
None
|
O aplicativo pode usar isso para transmitir informações sobre o controle, mas o usuário não pode interagir com ele. |
ToggleTemplate
|
BooleanAction
|
Representa um controle que pode ser alternado entre estados ativados e desativados. O objeto BooleanAction contém um campo que muda para representar o novo estado solicitado quando o usuário toca no controle.
|
RangeTemplate
|
FloatAction
|
Representa um widget de controle deslizante com os valores mínimo, máximo e de etapa especificados. Quando
o usuário interage com o controle deslizante, envie um novo objeto FloatAction
de volta ao aplicativo com o valor atualizado.
|
ToggleRangeTemplate
|
BooleanAction, FloatAction
|
Esse modelo é uma combinação de ToggleTemplate e RangeTemplate. Ele é compatível com eventos de toque, bem como um controle deslizante, por exemplo, para controlar luzes reguláveis.
|
TemperatureControlTemplate
|
ModeAction, BooleanAction, FloatAction
|
Além de encapsular as ações anteriores, esse modelo permite que o usuário defina um modo, como calor, frio, calor/frio, ecológico ou desativado. |
StatelessTemplate
|
CommandAction
|
Usado para indicar um controle que fornece a capacidade de toque, mas cujo estado não pode ser determinado, como um controle remoto de televisão de infravermelho. Você pode usar esse modelo para definir uma rotina ou macro, que é uma agregação de mudanças de controle e estado. |
Com essas informações, você pode criar o controle:
- Use a
classe de builder
Control.StatelessBuilderquando o estado do controle for desconhecido. - Use a
classe de builder
Control.StatefulBuilderquando o estado do controle for conhecido.
Por exemplo, para controlar uma iluminação inteligente e um termostato, adicione as seguintes
constantes ao seu MyCustomControlService:
Kotlin
    private const val LIGHT_ID = 1234
    private const val LIGHT_TITLE = "My fancy light"
    private const val LIGHT_TYPE = DeviceTypes.TYPE_LIGHT
    private const val THERMOSTAT_ID = 5678
    private const val THERMOSTAT_TITLE = "My fancy thermostat"
    private const val THERMOSTAT_TYPE = DeviceTypes.TYPE_THERMOSTAT

    class MyCustomControlService : ControlsProviderService() {
      ...
    }
Java
    public class MyCustomJavaControlService extends ControlsProviderService {

    private final int LIGHT_ID = 1337;
    private final String LIGHT_TITLE = "My fancy light";
    private final int LIGHT_TYPE = DeviceTypes.TYPE_LIGHT;
    private final int THERMOSTAT_ID = 1338;
    private final String THERMOSTAT_TITLE = "My fancy thermostat";
    private final int THERMOSTAT_TYPE = DeviceTypes.TYPE_THERMOSTAT;

    ...
    }
Criar editores para os controles
Depois que o controle for criado, ele precisa de um editor. O editor informa a IU do sistema sobre a existência do controle. A classe ControlsProviderService
tem dois métodos de editor que você precisa modificar no código do aplicativo:
createPublisherForAllAvailable(): cria umPublisherpara todos os controles disponíveis no seu app. UseControl.StatelessBuilder()para criar objetosControlpara este editor.createPublisherFor(): cria umPublisherpara uma lista de determinados controles, conforme identificado pelos identificadores de string. UseControl.StatefulBuilderpara criar esses objetosControl, já que o publisher precisa atribuir um estado a cada controle.
Criar o editor
Quando o app publica controles pela primeira vez na IU do sistema, ele desconhece
o estado de cada controle. Reconhecer o estado pode ser uma operação demorada que envolve muitos saltos na rede do provedor de dispositivos. Use o método createPublisherForAllAvailable() para anunciar os controles disponíveis para o sistema. Esse método usa a classe de builder Control.StatelessBuilder, já que o estado de cada controle é desconhecido.
Quando os controles aparecerem na interface do Android , o usuário poderá selecionar os controles favoritos.
Para usar corrotinas do Kotlin e criar um ControlsProviderService, adicione uma nova
dependência ao seu build.gradle:
Groovy
dependencies {
    implementation "org.jetbrains.kotlinx:kotlinx-coroutines-jdk9:1.6.4"
}
Kotlin
dependencies {
    implementation("org.jetbrains.kotlinx:kotlinx-coroutines-jdk9:1.6.4")
}
Depois de sincronizar os arquivos do Gradle, adicione o seguinte snippet ao Service para
implementar createPublisherForAllAvailable():
Kotlin
class MyCustomControlService : ControlsProviderService() { override fun createPublisherForAllAvailable(): Flow.Publisher= flowPublish { send(createStatelessControl(LIGHT_ID, LIGHT_TITLE, LIGHT_TYPE)) send(createStatelessControl(THERMOSTAT_ID, THERMOSTAT_TITLE, THERMOSTAT_TYPE)) } private fun createStatelessControl(id: Int, title: String, type: Int): Control { val intent = Intent(this, MainActivity::class.java) .putExtra(EXTRA_MESSAGE, title) .addFlags(Intent.FLAG_ACTIVITY_NEW_TASK) val action = PendingIntent.getActivity( this, id, intent, PendingIntent.FLAG_UPDATE_CURRENT or PendingIntent.FLAG_IMMUTABLE ) return Control.StatelessBuilder(id.toString(), action) .setTitle(title) .setDeviceType(type) .build() } override fun createPublisherFor(controlIds: List ): Flow.Publisher { TODO() } override fun performControlAction( controlId: String, action: ControlAction, consumer: Consumer ) { TODO() } }
Java
    public class MyCustomJavaControlService extends ControlsProviderService {

        private final int LIGHT_ID = 1337;
        private final String LIGHT_TITLE = "My fancy light";
        private final int LIGHT_TYPE = DeviceTypes.TYPE_LIGHT;
        private final int THERMOSTAT_ID = 1338;
        private final String THERMOSTAT_TITLE = "My fancy thermostat";
        private final int THERMOSTAT_TYPE = DeviceTypes.TYPE_THERMOSTAT;

        private boolean toggleState = false;
        private float rangeState = 18f;
        private final Map<String, ReplayProcessor> controlFlows = new HashMap<>();

        @NonNull
        @Override
        public Flow.Publisher createPublisherForAllAvailable() {
            List controls = new ArrayList<>();
            controls.add(createStatelessControl(LIGHT_ID, LIGHT_TITLE, LIGHT_TYPE));
            controls.add(createStatelessControl(THERMOSTAT_ID, THERMOSTAT_TITLE, THERMOSTAT_TYPE));
            return FlowAdapters.toFlowPublisher(Flowable.fromIterable(controls));
        }

        @NonNull
        @Override
        public Flow.Publisher createPublisherFor(@NonNull List controlIds) {
            ReplayProcessor updatePublisher = ReplayProcessor.create();

            controlIds.forEach(control -> {
                controlFlows.put(control, updatePublisher);
                updatePublisher.onNext(createLight());
                updatePublisher.onNext(createThermostat());
            });

            return FlowAdapters.toFlowPublisher(updatePublisher);
        }
    }
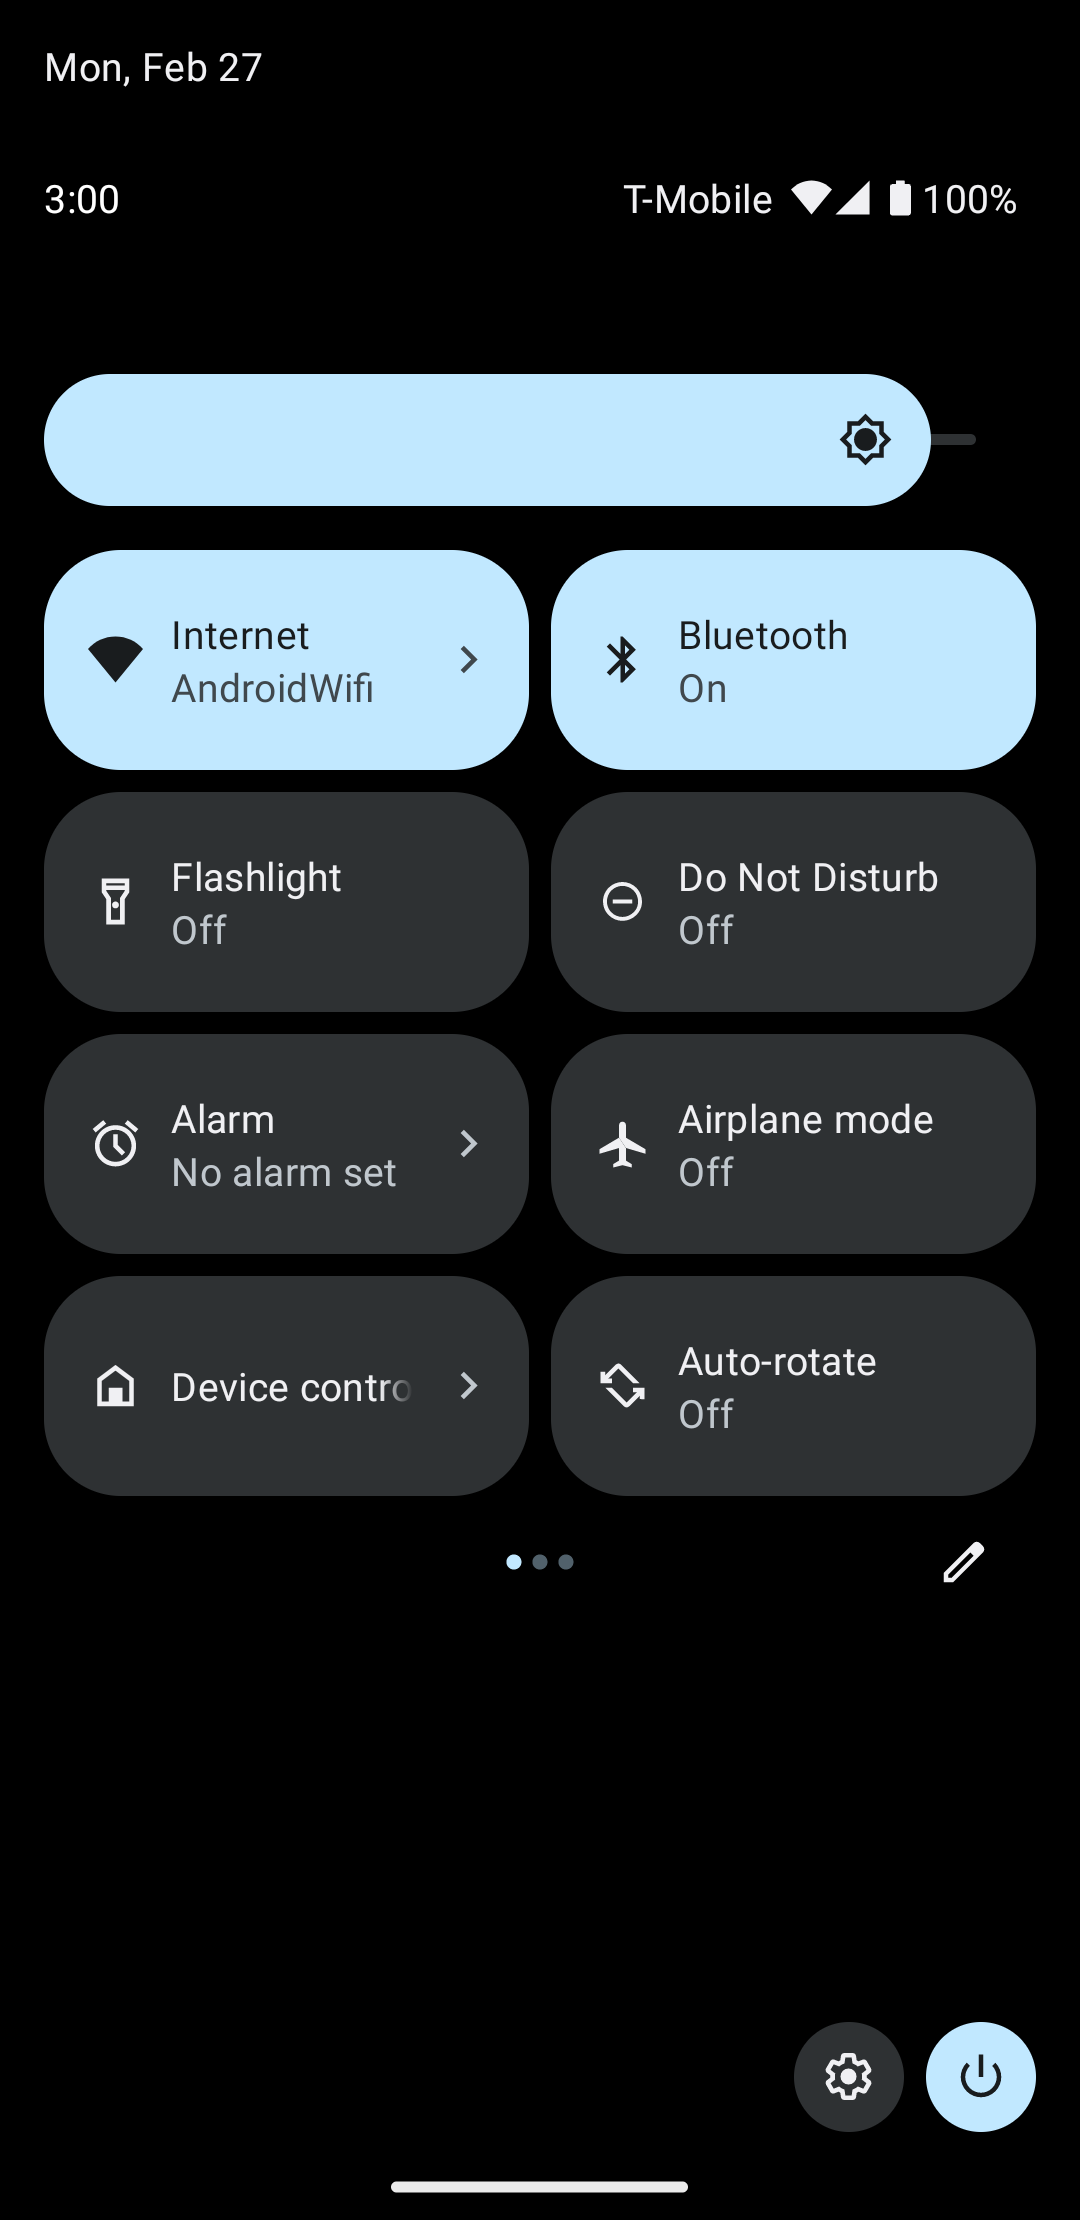
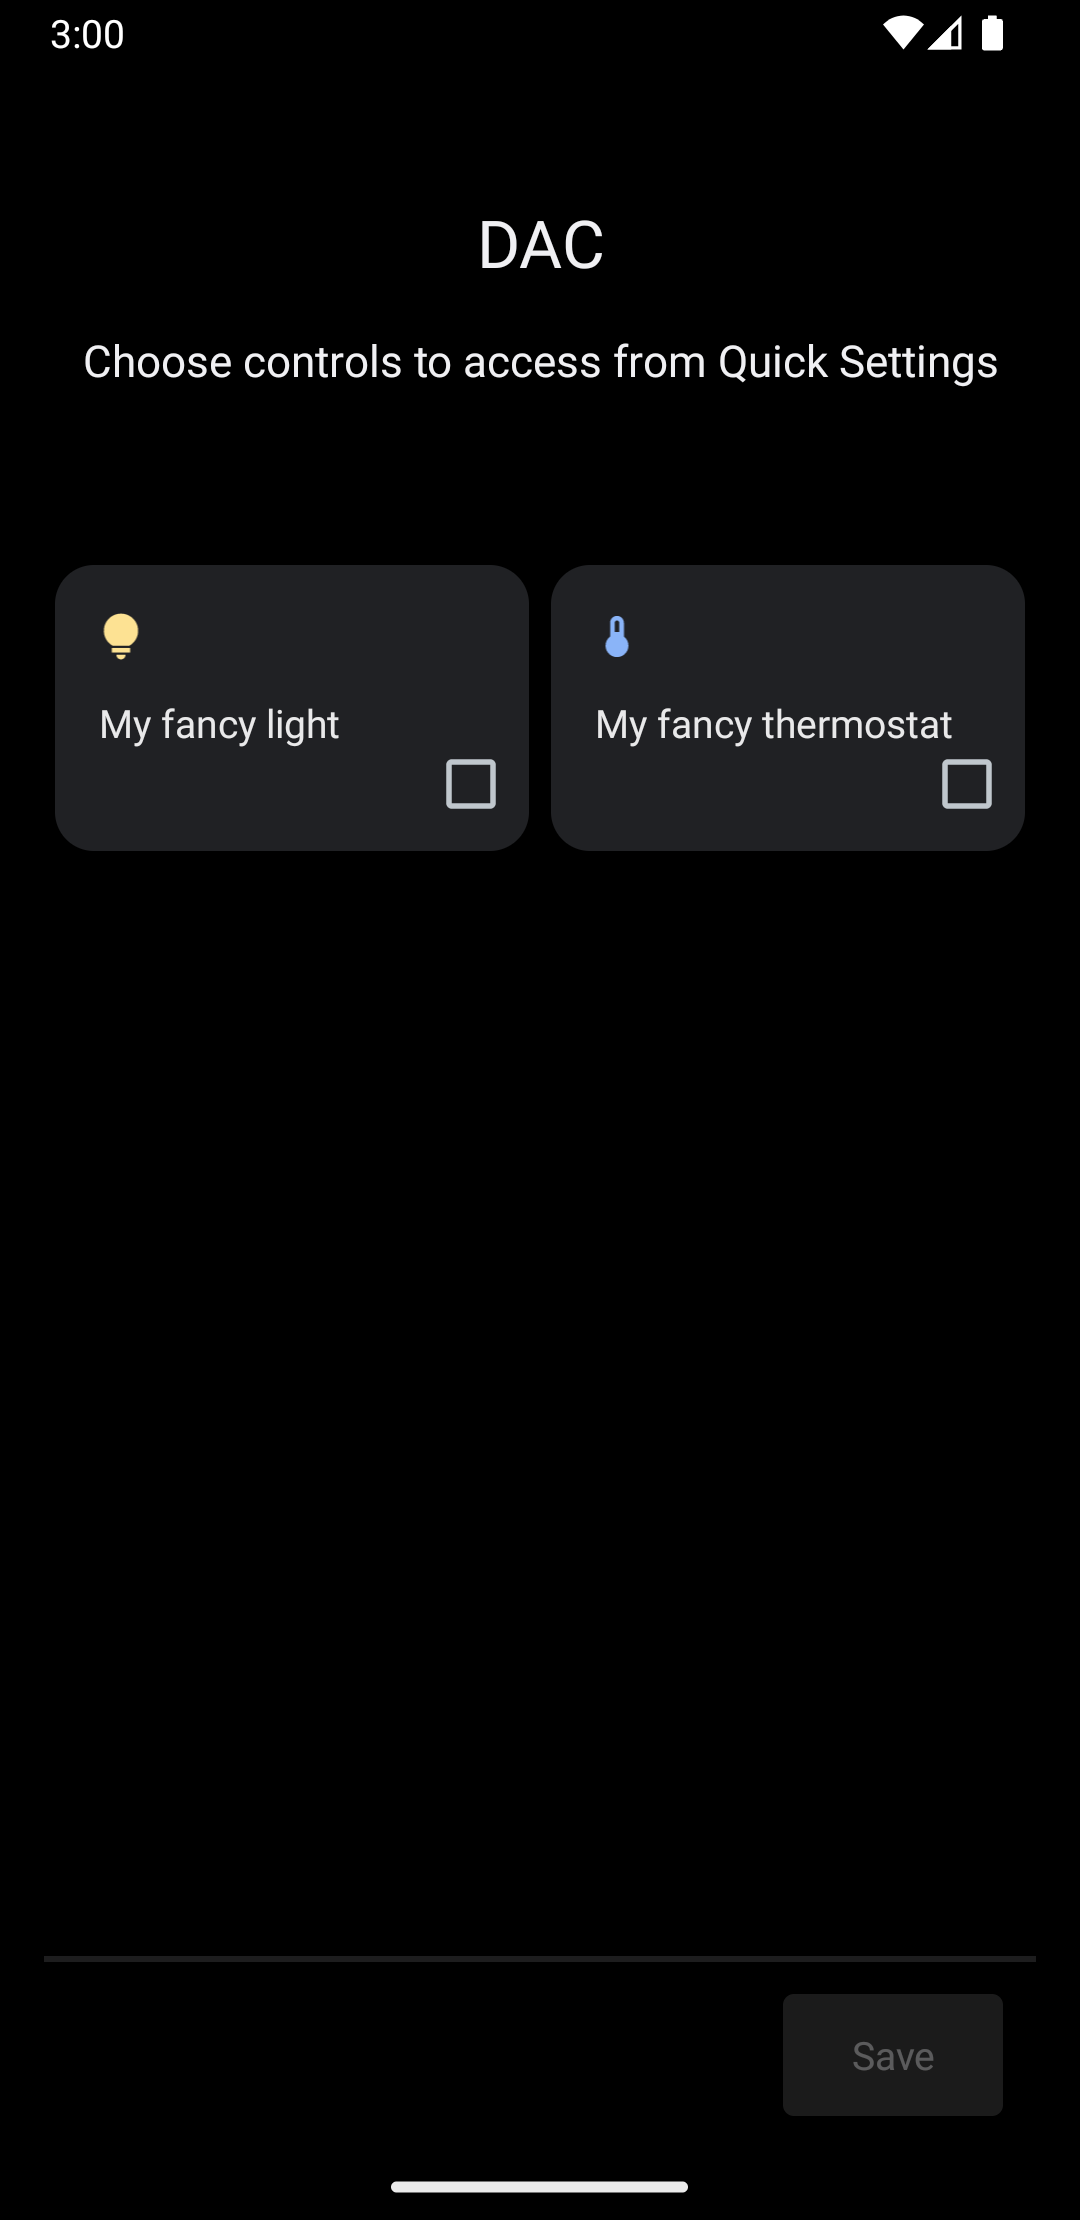
Deslize para baixo no menu do sistema e localize o botão Controles do dispositivo, mostrado na figura 4:
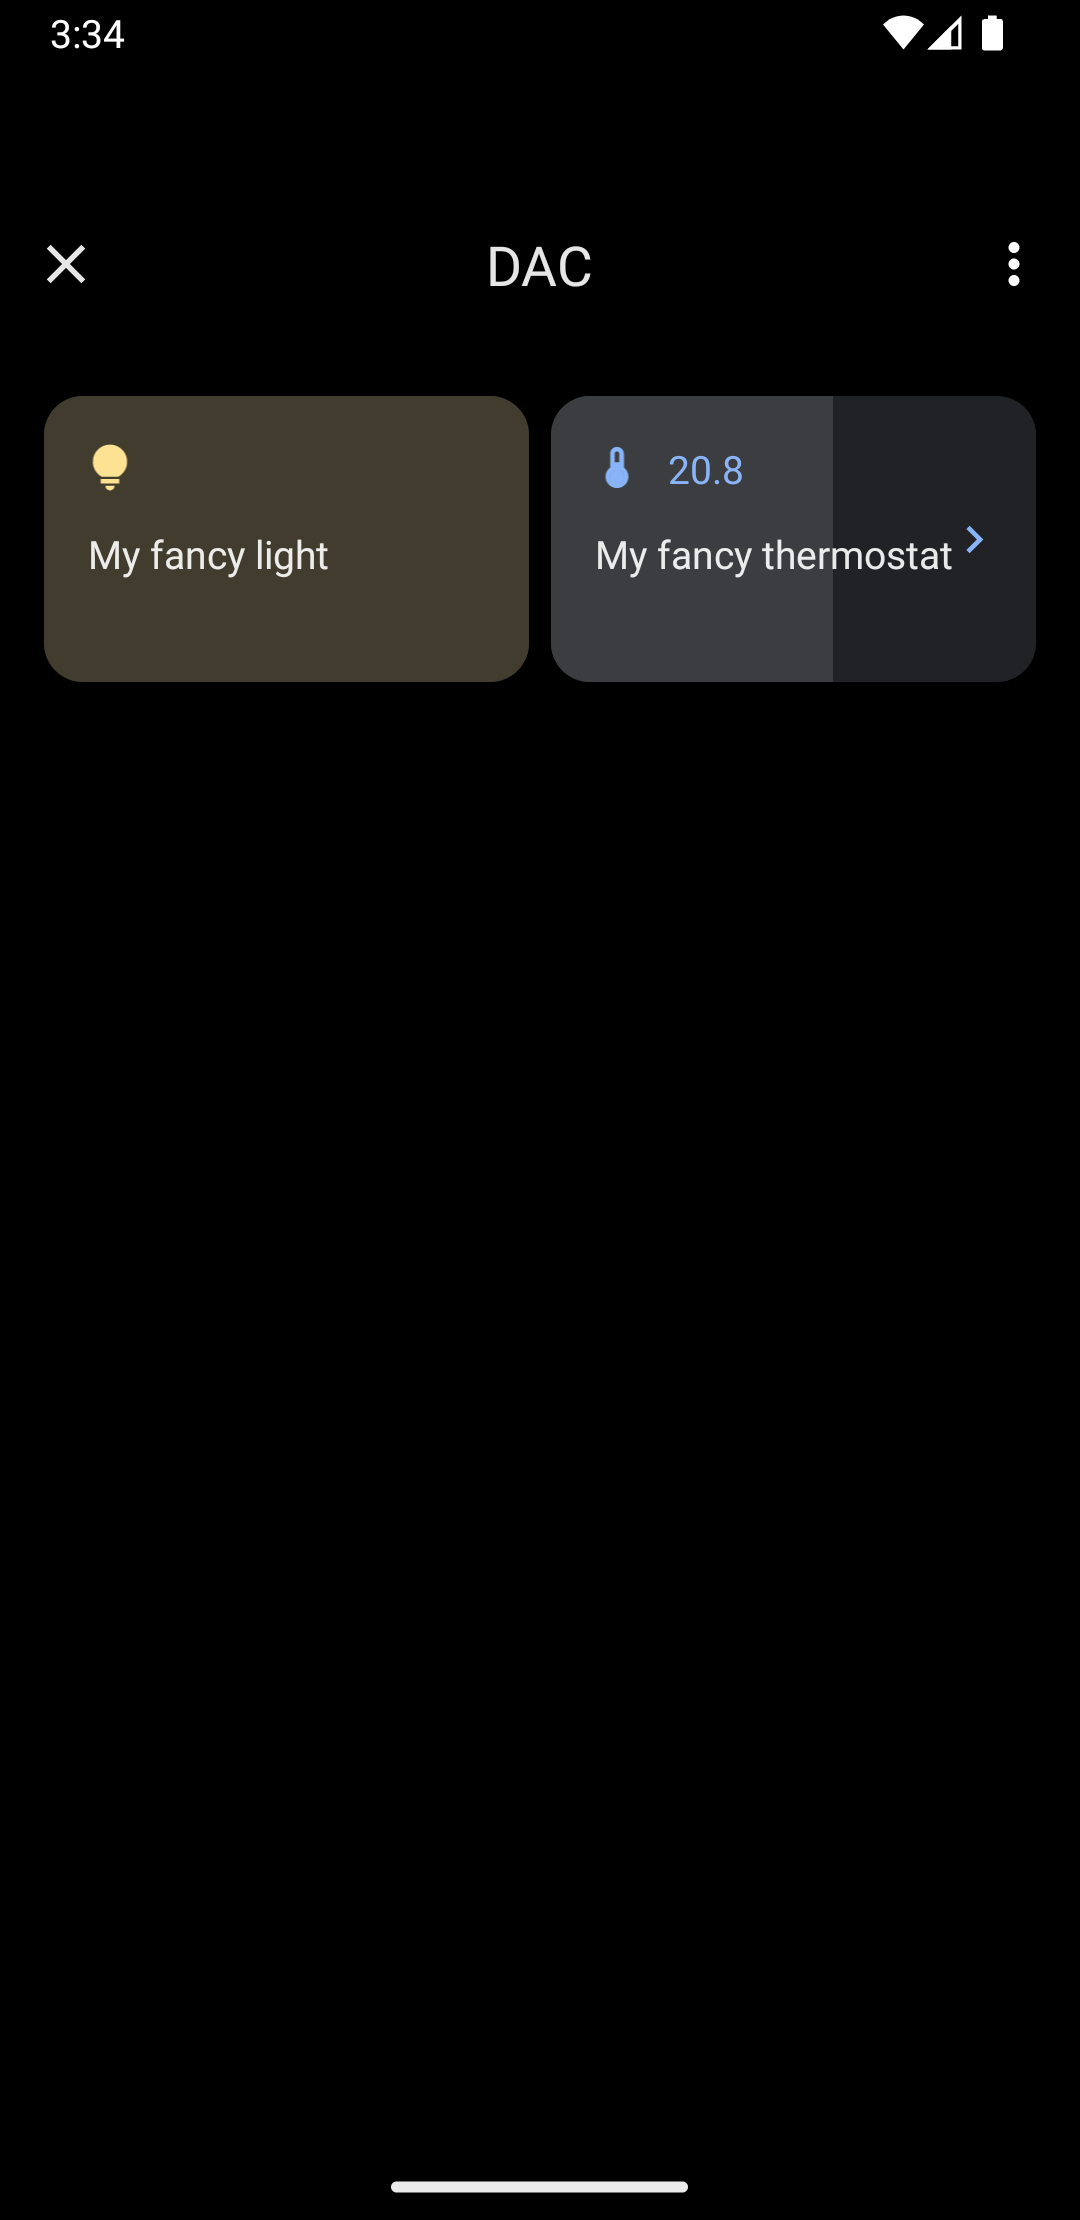
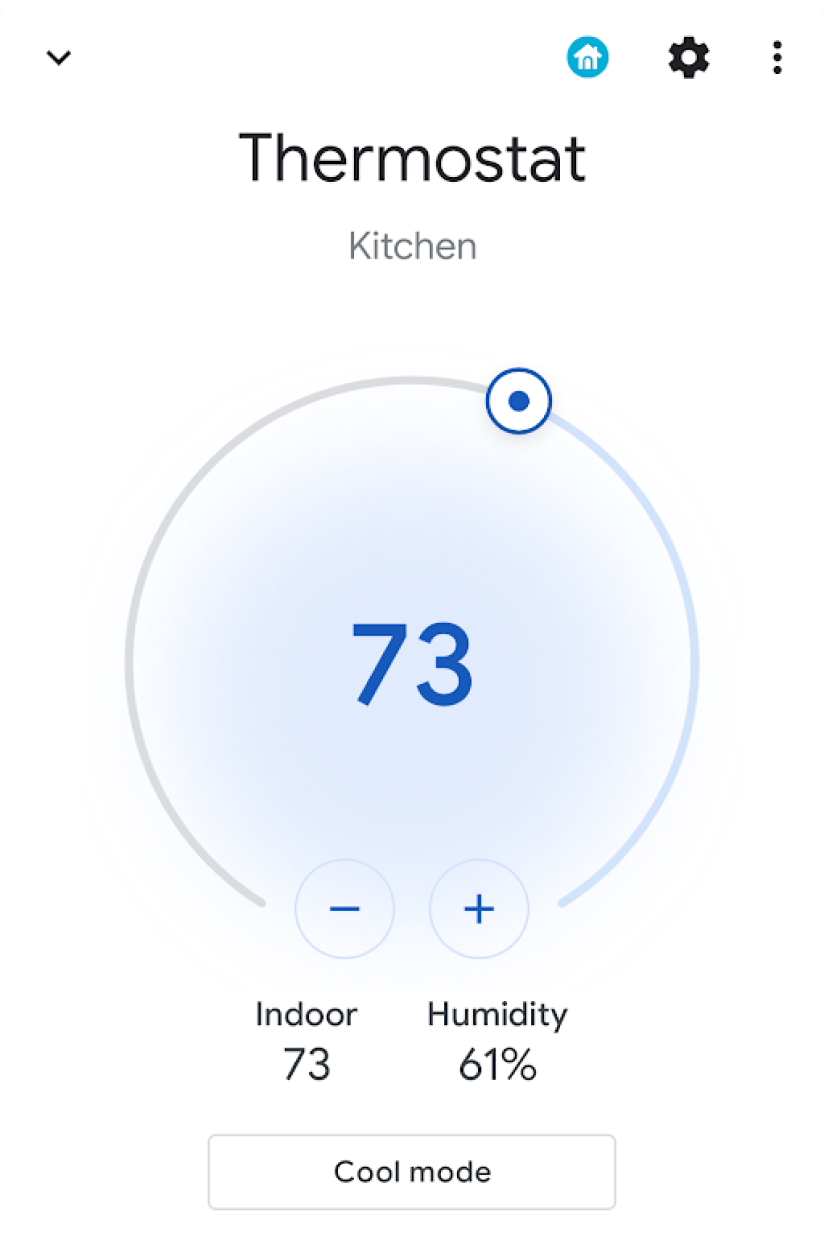
Ao tocar em Controles do dispositivo, você navega para uma segunda tela em que pode selecionar seu app. Depois de selecionar o app, você vê como o snippet anterior cria um menu do sistema personalizado mostrando seus novos controles, como mostrado na figura 5:
Agora, implemente o método createPublisherFor(), adicionando o seguinte à sua
Service:
Kotlin
private val job = SupervisorJob() private val scope = CoroutineScope(Dispatchers.IO + job) private val controlFlows = mutableMapOf<String, MutableSharedFlow>() private var toggleState = false private var rangeState = 18f override fun createPublisherFor(controlIds: List ): Flow.Publisher { val flow = MutableSharedFlow (replay = 2, extraBufferCapacity = 2) controlIds.forEach { controlFlows[it] = flow } scope.launch { delay(1000) // Retrieving the toggle state. flow.tryEmit(createLight()) delay(1000) // Retrieving the range state. flow.tryEmit(createThermostat()) } return flow.asPublisher() } private fun createLight() = createStatefulControl( LIGHT_ID, LIGHT_TITLE, LIGHT_TYPE, toggleState, ToggleTemplate( LIGHT_ID.toString(), ControlButton( toggleState, toggleState.toString().uppercase(Locale.getDefault()) ) ) ) private fun createThermostat() = createStatefulControl( THERMOSTAT_ID, THERMOSTAT_TITLE, THERMOSTAT_TYPE, rangeState, RangeTemplate( THERMOSTAT_ID.toString(), 15f, 25f, rangeState, 0.1f, "%1.1f" ) ) private fun createStatefulControl(id: Int, title: String, type: Int, state: T, template: ControlTemplate): Control { val intent = Intent(this, MainActivity::class.java) .putExtra(EXTRA_MESSAGE, "$title $state") .addFlags(Intent.FLAG_ACTIVITY_NEW_TASK) val action = PendingIntent.getActivity( this, id, intent, PendingIntent.FLAG_UPDATE_CURRENT or PendingIntent.FLAG_IMMUTABLE ) return Control.StatefulBuilder(id.toString(), action) .setTitle(title) .setDeviceType(type) .setStatus(Control.STATUS_OK) .setControlTemplate(template) .build() } override fun onDestroy() { super.onDestroy() job.cancel() }
Java
@NonNull @Override public Flow.PublishercreatePublisherFor(@NonNull List controlIds) { ReplayProcessor updatePublisher = ReplayProcessor.create(); controlIds.forEach(control -> { controlFlows.put(control, updatePublisher); updatePublisher.onNext(createLight()); updatePublisher.onNext(createThermostat()); }); return FlowAdapters.toFlowPublisher(updatePublisher); } private Control createStatelessControl(int id, String title, int type) { Intent intent = new Intent(this, MainActivity.class) .putExtra(EXTRA_MESSAGE, title) .addFlags(Intent.FLAG_ACTIVITY_NEW_TASK); PendingIntent action = PendingIntent.getActivity( this, id, intent, PendingIntent.FLAG_UPDATE_CURRENT | PendingIntent.FLAG_IMMUTABLE ); return new Control.StatelessBuilder(id + "", action) .setTitle(title) .setDeviceType(type) .build(); } private Control createLight() { return createStatefulControl( LIGHT_ID, LIGHT_TITLE, LIGHT_TYPE, toggleState, new ToggleTemplate( LIGHT_ID + "", new ControlButton( toggleState, String.valueOf(toggleState).toUpperCase(Locale.getDefault()) ) ) ); } private Control createThermostat() { return createStatefulControl( THERMOSTAT_ID, THERMOSTAT_TITLE, THERMOSTAT_TYPE, rangeState, new RangeTemplate( THERMOSTAT_ID + "", 15f, 25f, rangeState, 0.1f, "%1.1f" ) ); } private Control createStatefulControl(int id, String title, int type, T state, ControlTemplate template) { Intent intent = new Intent(this, MainActivity.class) .putExtra(EXTRA_MESSAGE, "$title $state") .addFlags(Intent.FLAG_ACTIVITY_NEW_TASK); PendingIntent action = PendingIntent.getActivity( this, id, intent, PendingIntent.FLAG_UPDATE_CURRENT | PendingIntent.FLAG_IMMUTABLE ); return new Control.StatefulBuilder(id + "", action) .setTitle(title) .setDeviceType(type) .setStatus(Control.STATUS_OK) .setControlTemplate(template) .build(); }
Neste exemplo, o método createPublisherFor() contém uma implementação
falsa do que o app precisa fazer: se comunicar com o dispositivo para
recuperar o status dele e emitir esse status para o sistema.
O método createPublisherFor() usa corrotinas e fluxos Kotlin para atender à API Reactive Streams necessária fazendo o seguinte:
- Cria uma
Flow. - Aguarde um segundo.
- Cria e emite o estado da iluminação inteligente.
- Aguarde mais um segundo.
- Cria e emite o estado do termostato.
Processar ações
O método performControlAction() indica quando o usuário interage com um controle publicado. A ação é determinada pelo tipo de ControlAction enviado.
Execute a ação apropriada para o controle fornecido e atualize o estado do dispositivo na interface do Android.
Para concluir o exemplo, adicione o seguinte ao seu Service:
Kotlin
override fun performControlAction( controlId: String, action: ControlAction, consumer: Consumer) { controlFlows[controlId]?.let { flow -> when (controlId) { LIGHT_ID.toString() -> { consumer.accept(ControlAction.RESPONSE_OK) if (action is BooleanAction) toggleState = action.newState flow.tryEmit(createLight()) } THERMOSTAT_ID.toString() -> { consumer.accept(ControlAction.RESPONSE_OK) if (action is FloatAction) rangeState = action.newValue flow.tryEmit(createThermostat()) } else -> consumer.accept(ControlAction.RESPONSE_FAIL) } } ?: consumer.accept(ControlAction.RESPONSE_FAIL) }
Java
@Override public void performControlAction(@NonNull String controlId, @NonNull ControlAction action, @NonNull Consumerconsumer) { ReplayProcessor processor = controlFlows.get(controlId); if (processor == null) return; if (controlId.equals(LIGHT_ID + "")) { consumer.accept(ControlAction.RESPONSE_OK); if (action instanceof BooleanAction) toggleState = ((BooleanAction) action).getNewState(); processor.onNext(createLight()); } if (controlId.equals(THERMOSTAT_ID + "")) { consumer.accept(ControlAction.RESPONSE_OK); if (action instanceof FloatAction) rangeState = ((FloatAction) action).getNewValue() processor.onNext(createThermostat()); } }
Execute o app, acesse o menu Controles do dispositivo e confira os controles de luz e termostato.