
إذا كنت تستخدم تنسيقًا مستندًا إلى View، هناك ثلاثة خيارات رئيسية
لتنفيذ عمليات التبديل. ننصحك باستخدام العنصر
SwitchMaterial
من مكتبة Material
Components:
<androidx.constraintlayout.widget.ConstraintLayout xmlns:android="http://schemas.android.com/apk/res/android"
    xmlns:app="http://schemas.android.com/apk/res-auto"
    android:layout_width="match_parent"
    android:layout_height="match_parent"
    android:padding="16dp">

    <com.google.android.material.switchmaterial.SwitchMaterial
        android:id="@+id/material_switch"
        android:layout_width="wrap_content"
        android:layout_height="wrap_content"
        android:text="@string/material_switch"
        app:layout_constraintEnd_toEndOf="parent"
        app:layout_constraintStart_toStartOf="parent"
        app:layout_constraintTop_toTopOf="parent" />

</androidx.constraintlayout.widget.ConstraintLayout>
قد تظل التطبيقات القديمة تستخدم مكوّن
SwitchCompat AppCompat القديم،
كما هو موضَّح في المثال التالي:
<androidx.constraintlayout.widget.ConstraintLayout xmlns:android="http://schemas.android.com/apk/res/android"
    xmlns:app="http://schemas.android.com/apk/res-auto"
    android:layout_width="match_parent"
    android:layout_height="match_parent"
    android:padding="16dp">

    <androidx.appcompat.widget.SwitchCompat
        android:id="@+id/switchcompat"
        android:layout_width="wrap_content"
        android:layout_height="wrap_content"
        android:text="@string/switchcompat"
        app:layout_constraintEnd_toEndOf="parent"
        app:layout_constraintStart_toStartOf="parent"
        app:layout_constraintTop_toTopOf="parent" />

</androidx.constraintlayout.widget.ConstraintLayout>
يعرض المثال التالي AppCompatToggleButton، وهو مكوّن قديم آخر يتميز بواجهة مستخدم مختلفة بشكل ملحوظ:
<androidx.constraintlayout.widget.ConstraintLayout xmlns:android="http://schemas.android.com/apk/res/android"
    xmlns:app="http://schemas.android.com/apk/res-auto"
    android:layout_width="match_parent"
    android:layout_height="match_parent"
    android:padding="16dp">

    <TextView
        android:id="@+id/toggle_button_label"
        android:layout_width="wrap_content"
        android:layout_height="wrap_content"
        app:layout_constraintStart_toStartOf="parent"
        app:layout_constraintEnd_toStartOf="@id/toggle"
        app:layout_constraintHorizontal_chainStyle="packed"
        app:layout_constraintBaseline_toBaselineOf="@id/toggle"
        android:text="@string/toggle_button" />

    <androidx.appcompat.widget.AppCompatToggleButton
        android:id="@+id/toggle"
        android:layout_width="wrap_content"
        android:layout_height="wrap_content"
        app:layout_constraintEnd_toEndOf="parent"
        app:layout_constraintStart_toEndOf="@id/toggle_button_label"
        app:layout_constraintTop_toTopOf="parent"
        app:layout_constraintBottom_toBottomOf="parent"/>

</androidx.constraintlayout.widget.ConstraintLayout>
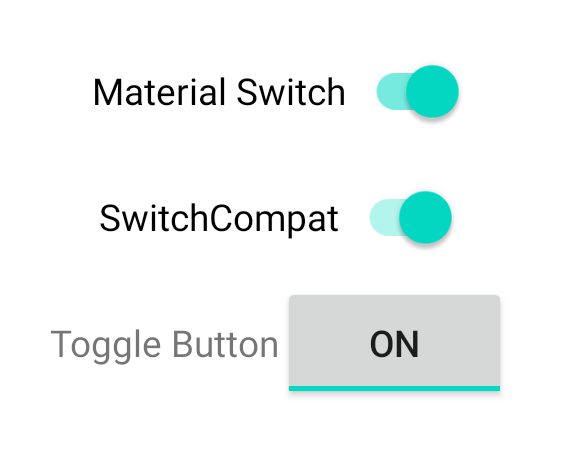
تقدّم هذه المكوّنات الثلاثة السلوك نفسه ولكنّها تبدو مختلفة. إنّ اختلافاتSwitchMaterial وSwitchCompat طفيفة، ولكنAppCompatToggleButton يختلف بشكل ملحوظ:
التعامل مع تغييرات الحالة
SwitchMaterial وSwitchCompat وAppCompatToggleButton هي جميعًا فئات فرعية
من CompoundButton، ما
يمنحهم آلية شائعة للتعامل مع تغييرات الحالة التي تم التحقّق منها. يمكنك تنفيذ
نسخة من
CompoundButton.OnCheckedChangeListener
وإضافتها إلى الزر، كما هو موضّح في المثال التالي:
Kotlin
class MainActivity : AppCompatActivity() {
    override fun onCreate(savedInstanceState: Bundle?) {
        super.onCreate(savedInstanceState)

        val binding: SwitchLayoutBinding = SwitchLayoutBinding.inflate(layoutInflater)
        setContentView(binding.root)

        binding.materialSwitch.setOnCheckedChangeListener { _, isChecked ->
            if (isChecked) {
                // The switch is checked.
            } else {
                // The switch isn't checked.
            }
        }
    }
}
Java
public class MainActivity extends AppCompatActivity {

    @Override
    protected void onCreate(Bundle savedInstanceState) {
        super.onCreate(savedInstanceState);

        SwitchLayoutBinding binding = SwitchLayoutBinding.inflate(getLayoutInflater());
        setContentView(binding.getRoot());

        binding.materialSwitch.setOnCheckedChangeListener((buttonView, isChecked) -> {
            if (isChecked) {
                // The switch is checked.
            } else {
                // The switch isn't checked.
            }
        });
    }
}
CompoundButton.OnCheckedChangeListener هي واجهة تجريدية واحدة
(أو واجهة SAM)، لذا يمكنك تنفيذها باعتبارها lambda. يتمّ استدعاء دالة lambda
عند تغيُّر حالة التحقّق، وتشير قيمة القيمة المنطقية isChecked
التي يتم تمريرها إلى دالة lambda إلى حالة التحقّق الجديدة.