
Los widgets de colección se especializan en mostrar muchos elementos del mismo tipo, como colecciones de imágenes de una app de galería, artículos de una app de noticias o mensajes de una app de comunicación. Por lo general, se enfocan en dos casos de uso: explorar la colección y abrir un elemento de la colección en su vista de detalles. Los widgets de colección se pueden desplazar de forma vertical.
Estos widgets usan RemoteViewsService para mostrar colecciones respaldadas por datos remotos, como los de un proveedor de contenido. El widget presenta los datos con uno de los siguientes tipos de vista, conocidos como vistas de colección:
ListView- Una vista que muestra elementos en una lista de desplazamiento vertical.
GridView- Una vista que muestra elementos en una cuadrícula de desplazamiento bidimensional.
StackView- Una vista de tarjetas apiladas (una especie de fichero), donde el usuario puede mover la tarjeta frontal hacia arriba o abajo para ver la tarjeta anterior o la siguiente.
AdapterViewFlipper- Un
ViewAnimatorsimple respaldado por adaptador que reproduce una animación entre dos o más vistas. Solo se muestra un hijo o hija a la vez.
Debido a que estas vistas de colección muestran colecciones respaldadas por datos remotos, usan un Adapter para vincular su interfaz de usuario con sus datos. Un Adapter vincula elementos individuales de un conjunto de datos a objetos View individuales.
Debido a que estas vistas de colección están respaldadas por adaptadores, el marco de trabajo de Android debe incluir arquitectura adicional para admitir su uso en los widgets. En el contexto de un widget, el Adapter se reemplaza por un RemoteViewsFactory, que es un wrapper liviano que rodea la interfaz del Adapter. Cuando se solicita un elemento específico de la colección, RemoteViewsFactory crea y muestra el elemento de la colección como un objeto RemoteViews. Para incluir una vista de colección en tu widget, implementa RemoteViewsService y RemoteViewsFactory.
RemoteViewsService es un servicio que permite que un adaptador remoto solicite objetos RemoteViews. RemoteViewsFactory es una interfaz para un adaptador entre una vista de colección, como ListView, GridView y StackView, y los datos subyacentes de esa vista. En la muestra de StackWidget, aquí puedes ver un ejemplo del código estándar para implementar este servicio y esta interfaz:
Kotlin
class StackWidgetService : RemoteViewsService() {

    override fun onGetViewFactory(intent: Intent): RemoteViewsFactory {
        return StackRemoteViewsFactory(this.applicationContext, intent)
    }
}

class StackRemoteViewsFactory(
        private val context: Context,
        intent: Intent
) : RemoteViewsService.RemoteViewsFactory {

// See the RemoteViewsFactory API reference for the full list of methods to
// implement.

}
Java
public class StackWidgetService extends RemoteViewsService {
    @Override
    public RemoteViewsFactory onGetViewFactory(Intent intent) {
        return new StackRemoteViewsFactory(this.getApplicationContext(), intent);
    }
}

class StackRemoteViewsFactory implements RemoteViewsService.RemoteViewsFactory {

// See the RemoteViewsFactory API reference for the full list of methods to
// implement.

}
Aplicación de ejemplo
Los extractos de código de esta sección también se tomaron de la muestra de StackWidget:
StackWidget.Este ejemplo consta de una pila de diez vistas que muestran los valores del cero al nueve. El widget de ejemplo tiene estos comportamientos principales:
El usuario puede desplazar de forma vertical la vista superior en el widget para mostrar la vista siguiente o anterior. Este es un comportamiento integrado de
StackView.Sin interacción del usuario, el widget avanza automáticamente por sus vistas en una secuencia, como una presentación de diapositivas. Esto se debe a la configuración
android:autoAdvanceViewId="@id/stack_view"en el archivores/xml/stackwidgetinfo.xml. Este parámetro de configuración se aplica al ID de la vista, que, en este caso, es el ID de la vista de pila.Si el usuario presiona la vista superior, el widget muestra el mensaje
Toast"Vista presionada n", donde n es el índice (posición) de la vista que se presionó. Para obtener más información sobre cómo implementar comportamientos, consulta la sección Cómo agregar comportamientos a elementos individuales.
Implementa widgets con colecciones
Para implementar un widget con colecciones, sigue el procedimiento para implementar cualquier widget y, luego, realiza algunos pasos adicionales: modifica el manifiesto, agrega una vista de colección al diseño del widget y modifica tu subclase AppWidgetProvider.
Manifiesto para widgets con colecciones
Además de los requisitos que se enumeran en Cómo declarar un widget en el manifiesto, debes permitir que los widgets con colecciones se vinculen a tu RemoteViewsService. Para ello, declara el servicio en tu archivo de manifiesto con el permiso BIND_REMOTEVIEWS.
Esto evita que otras aplicaciones accedan libremente a los datos de tu widget.
Por ejemplo, cuando crees un widget que use RemoteViewsService para propagar una vista de colección, es posible que la entrada del manifiesto tenga este aspecto:
<service android:name="MyWidgetService"
    android:permission="android.permission.BIND_REMOTEVIEWS" />
En este ejemplo, android:name="MyWidgetService" hace referencia a tu subclase de RemoteViewsService.
Diseño de widgets con colecciones
El principal requisito para el archivo XML de diseño de widgets es que incluya una de las vistas de colección: ListView, GridView, StackView o AdapterViewFlipper. Este es el archivo widget_layout.xml del ejemplo de StackWidget:
<FrameLayout xmlns:android="http://schemas.android.com/apk/res/android"
    android:layout_width="match_parent"
    android:layout_height="match_parent">
    <StackView
        android:id="@+id/stack_view"
        android:layout_width="match_parent"
        android:layout_height="match_parent"
        android:gravity="center"
        android:loopViews="true" />
    <TextView
        android:id="@+id/empty_view"
        android:layout_width="match_parent"
        android:layout_height="match_parent"
        android:gravity="center"
        android:background="@drawable/widget_item_background"
        android:textColor="#ffffff"
        android:textStyle="bold"
        android:text="@string/empty_view_text"
        android:textSize="20sp" />
</FrameLayout>
Ten en cuenta que las vistas vacías deben ser equivalentes a la vista de colección para la que la vista vacía representa el estado vacío.
Además del archivo de diseño para todo el widget, crea otro archivo de diseño que defina el diseño de cada elemento de la colección, por ejemplo, un diseño para cada libro de una colección de libros. La muestra de StackWidget solo tiene un archivo de diseño de elementos, widget_item.xml, ya que todos los elementos usan el mismo diseño.
Clase AppWidgetProvider para widgets con colecciones
Al igual que con los widgets normales, la mayor parte del código de tu subclase AppWidgetProvider suele ir en onUpdate().
La mayor diferencia en la implementación de onUpdate() al crear un widget con colecciones es que debes llamar a setRemoteAdapter(). Esto le indica a la vista de colección dónde debe obtener los datos.
Luego, el RemoteViewsService puede mostrar tu implementación de RemoteViewsFactory y el widget puede entregar los datos adecuados. Cuando llames a este método, pasa un intent que apunte a tu implementación de RemoteViewsService y el ID del widget que especifica qué widget se debe actualizar.
Por ejemplo, a continuación, se muestra cómo la muestra de StackWidget implementa el método de devolución de llamada onUpdate() para establecer el RemoteViewsService como el adaptador remoto para la colección de widgets:
Kotlin
override fun onUpdate(
        context: Context,
        appWidgetManager: AppWidgetManager,
        appWidgetIds: IntArray
) {
    // Update each of the widgets with the remote adapter.
    appWidgetIds.forEach { appWidgetId ->

        // Set up the intent that starts the StackViewService, which
        // provides the views for this collection.
        val intent = Intent(context, StackWidgetService::class.java).apply {
            // Add the widget ID to the intent extras.
            putExtra(AppWidgetManager.EXTRA_APPWIDGET_ID, appWidgetId)
            data = Uri.parse(toUri(Intent.URI_INTENT_SCHEME))
        }
        // Instantiate the RemoteViews object for the widget layout.
        val views = RemoteViews(context.packageName, R.layout.widget_layout).apply {
            // Set up the RemoteViews object to use a RemoteViews adapter.
            // This adapter connects to a RemoteViewsService through the
            // specified intent.
            // This is how you populate the data.
            setRemoteAdapter(R.id.stack_view, intent)

            // The empty view is displayed when the collection has no items.
            // It must be in the same layout used to instantiate the
            // RemoteViews object.
            setEmptyView(R.id.stack_view, R.id.empty_view)
        }

        // Do additional processing specific to this widget.

        appWidgetManager.updateAppWidget(appWidgetId, views)
    }
    super.onUpdate(context, appWidgetManager, appWidgetIds)
}
Java
public void onUpdate(Context context, AppWidgetManager appWidgetManager, int[] appWidgetIds) {
    // Update each of the widgets with the remote adapter.
    for (int i = 0; i < appWidgetIds.length; ++i) {

        // Set up the intent that starts the StackViewService, which
        // provides the views for this collection.
        Intent intent = new Intent(context, StackWidgetService.class);
        // Add the widget ID to the intent extras.
        intent.putExtra(AppWidgetManager.EXTRA_APPWIDGET_ID, appWidgetIds[i]);
        intent.setData(Uri.parse(intent.toUri(Intent.URI_INTENT_SCHEME)));
        // Instantiate the RemoteViews object for the widget layout.
        RemoteViews views = new RemoteViews(context.getPackageName(), R.layout.widget_layout);
        // Set up the RemoteViews object to use a RemoteViews adapter.
        // This adapter connects to a RemoteViewsService through the specified
        // intent.
        // This is how you populate the data.
        views.setRemoteAdapter(R.id.stack_view, intent);

        // The empty view is displayed when the collection has no items.
        // It must be in the same layout used to instantiate the RemoteViews
        // object.
        views.setEmptyView(R.id.stack_view, R.id.empty_view);

        // Do additional processing specific to this widget.

        appWidgetManager.updateAppWidget(appWidgetIds[i], views);
    }
    super.onUpdate(context, appWidgetManager, appWidgetIds);
}
Cómo conservar los datos
Como se describe en esta página, la subclase RemoteViewsService proporciona la RemoteViewsFactory que se usa para propagar la vista de colección remota.
En particular, sigue estos pasos:
Subclase
RemoteViewsService.RemoteViewsServicees el servicio a través del cual un adaptador remoto puede solicitarRemoteViews.En tu subclase
RemoteViewsService, incluye una clase que implemente la interfazRemoteViewsFactory.RemoteViewsFactoryes una interfaz para un adaptador entre una vista de colección remota (comoListView,GridViewoStackView) y los datos subyacentes de esa vista. Tu implementación es responsable de crear un objetoRemoteViewspara cada elemento del conjunto de datos. Esta interfaz es un wrapper liviano que rodea aAdapter.
No puedes basarte en una sola instancia del servicio, ni en los datos que contiene, para que sea persistente. No almacenes datos en tu RemoteViewsService, a menos que sean estáticos. Si deseas que los datos del widget sean persistentes, el mejor enfoque es utilizar un ContentProvider cuyos datos sean persistentes más allá del ciclo de vida del proceso. Por ejemplo, un widget de tienda de comestibles puede almacenar el estado de cada elemento de la lista de compras en una ubicación persistente, como una base de datos SQL.
El contenido principal de la implementación de RemoteViewsService es su RemoteViewsFactory, que se describe en la siguiente sección.
Interfaz de RemoteViewsFactory
La clase personalizada que implementa la interfaz de RemoteViewsFactory proporciona al widget los datos para los elementos de su colección. Para lograrlo, combina el archivo de diseño XML de elementos del widget con una fuente de datos. Esta fuente de datos puede ser desde una base de datos a un simple arreglo. En la muestra de StackWidget, la fuente de datos es un array de WidgetItems. La función RemoteViewsFactory actúa como un adaptador para unir los datos a la vista de colección remota.
Los dos métodos más importantes que debes implementar para la subclase RemoteViewsFactory son onCreate() y getViewAt().
El sistema llama a onCreate() cuando crea tu fábrica por primera vez.
Aquí debes configurar las conexiones o los cursores para tu fuente de datos. Por ejemplo, la muestra StackWidget usa onCreate() para inicializar un array de objetos WidgetItem. Cuando el widget está activo, el sistema accede a estos objetos utilizando la posición de índice en el array y muestra el texto que contienen.
Este es un extracto de la implementación de RemoteViewsFactory de la muestra de StackWidget que muestra partes del método onCreate():
Kotlin
private const val REMOTE_VIEW_COUNT: Int = 10

class StackRemoteViewsFactory(
        private val context: Context
) : RemoteViewsService.RemoteViewsFactory {

    private lateinit var widgetItems: List<WidgetItem>

    override fun onCreate() {
        // In onCreate(), set up any connections or cursors to your data
        // source. Heavy lifting, such as downloading or creating content,
        // must be deferred to onDataSetChanged() or getViewAt(). Taking
        // more than 20 seconds on this call results in an ANR.
        widgetItems = List(REMOTE_VIEW_COUNT) { index -> WidgetItem("$index!") }
        ...
    }
    ...
}
Java
class StackRemoteViewsFactory implements RemoteViewsService.RemoteViewsFactory {
    private static final int REMOTE_VIEW_COUNT = 10;
    private List<WidgetItem> widgetItems = new ArrayList<WidgetItem>();

    public void onCreate() {
        // In onCreate(), setup any connections or cursors to your data
        // source. Heavy lifting, such as downloading or creating content,
        // must be deferred to onDataSetChanged() or getViewAt(). Taking
        // more than 20 seconds on this call results in an ANR.
        for (int i = 0; i < REMOTE_VIEW_COUNT; i++) {
            widgetItems.add(new WidgetItem(i + "!"));
        }
        ...
    }
...
El elemento getViewAt() del método RemoteViewsFactory muestra un objeto RemoteViews correspondiente a los datos en el position especificado en el conjunto de datos. A continuación, se incluye un extracto de la implementación de RemoteViewsFactory de la muestra de StackWidget:
Kotlin
override fun getViewAt(position: Int): RemoteViews {
    // Construct a remote views item based on the widget item XML file
    // and set the text based on the position.
    return RemoteViews(context.packageName, R.layout.widget_item).apply {
        setTextViewText(R.id.widget_item, widgetItems[position].text)
    }
}
Java
public RemoteViews getViewAt(int position) {
    // Construct a remote views item based on the widget item XML file
    // and set the text based on the position.
    RemoteViews views = new RemoteViews(context.getPackageName(), R.layout.widget_item);
    views.setTextViewText(R.id.widget_item, widgetItems.get(position).text);
    return views;
}
Cómo agregar comportamientos a elementos individuales
En las secciones anteriores, se muestra cómo vincular tus datos a la colección de widgets. Pero ¿qué sucede si deseas agregar un comportamiento dinámico a los elementos individuales de la vista de tu colección?
Como se describe en Cómo controlar eventos con la clase onUpdate(), por lo general, se usa setOnClickPendingIntent() para establecer el comportamiento de un objeto, como hacer que un botón inicie una Activity. Sin embargo, este enfoque no está permitido para las vistas secundarias de un elemento de colección individual.
Por ejemplo, puedes usar setOnClickPendingIntent() para configurar un botón global en el widget de Gmail que inicie la app, por ejemplo, pero no en los elementos de la lista individuales.
En cambio, para agregar un comportamiento de clic a elementos individuales de una colección, usa setOnClickFillInIntent(). Esto implica configurar una plantilla de intents pendientes para la vista de colección y, luego, establecer un intent de relleno en cada elemento de la colección a través de tu RemoteViewsFactory.
En esta sección, se usa la muestra de StackWidget para describir cómo agregar comportamiento a elementos individuales. En la muestra de StackWidget, si el usuario presiona la vista superior, el widget muestra el mensaje Toast "Vista presionada n", donde n es el índice (posición) de la vista que se presionó. Así funciona:
El
StackWidgetProvider, una subclase deAppWidgetProvider, crea un intent pendiente con una acción personalizada llamadaTOAST_ACTION.Cuando el usuario presiona una vista, el intent se activa y transmite
TOAST_ACTION.El método
onReceive()de la claseStackWidgetProviderintercepta esta emisión y el widget muestra el mensajeToastpara la vista que se presionó.RemoteViewsFactoryproporciona los datos para los elementos de la colección a través deRemoteViewsService.
Cómo configurar la plantilla de intents pendientes
El StackWidgetProvider (una subclase AppWidgetProvider) configura un intent pendiente. Los elementos individuales de una colección no pueden configurar sus propios intents pendientes. En cambio, la colección en su conjunto establece una plantilla de intents pendientes y los elementos individuales establecen un intent de relleno para crear un comportamiento único para cada elemento.
Esta clase también recibe la emisión que se envía cuando el usuario presiona una vista. Procesa este evento en el método onReceive(). Si la acción del intent es TOAST_ACTION, el widget muestra un mensaje Toast para la vista actual.
Kotlin
const val TOAST_ACTION = "com.example.android.stackwidget.TOAST_ACTION"
const val EXTRA_ITEM = "com.example.android.stackwidget.EXTRA_ITEM"

class StackWidgetProvider : AppWidgetProvider() {

    ...

    // Called when the BroadcastReceiver receives an Intent broadcast.
    // Checks whether the intent's action is TOAST_ACTION. If it is, the
    // widget displays a Toast message for the current item.
    override fun onReceive(context: Context, intent: Intent) {
        val mgr: AppWidgetManager = AppWidgetManager.getInstance(context)
        if (intent.action == TOAST_ACTION) {
            val appWidgetId: Int = intent.getIntExtra(
                    AppWidgetManager.EXTRA_APPWIDGET_ID,
                    AppWidgetManager.INVALID_APPWIDGET_ID
            )
            // EXTRA_ITEM represents a custom value provided by the Intent
            // passed to the setOnClickFillInIntent() method to indicate the
            // position of the clicked item. See StackRemoteViewsFactory in
            // Set the fill-in Intent for details.
            val viewIndex: Int = intent.getIntExtra(EXTRA_ITEM, 0)
            Toast.makeText(context, "Touched view $viewIndex", Toast.LENGTH_SHORT).show()
        }
        super.onReceive(context, intent)
    }

    override fun onUpdate(
            context: Context,
            appWidgetManager: AppWidgetManager,
            appWidgetIds: IntArray
    ) {
        // Update each of the widgets with the remote adapter.
        appWidgetIds.forEach { appWidgetId ->

            // Sets up the intent that points to the StackViewService that
            // provides the views for this collection.
            val intent = Intent(context, StackWidgetService::class.java).apply {
                putExtra(AppWidgetManager.EXTRA_APPWIDGET_ID, appWidgetId)
                // When intents are compared, the extras are ignored, so embed
                // the extra sinto the data so that the extras are not ignored.
                data = Uri.parse(toUri(Intent.URI_INTENT_SCHEME))
            }
            val rv = RemoteViews(context.packageName, R.layout.widget_layout).apply {
                setRemoteAdapter(R.id.stack_view, intent)

                // The empty view is displayed when the collection has no items.
                // It must be a sibling of the collection view.
                setEmptyView(R.id.stack_view, R.id.empty_view)
            }

            // This section makes it possible for items to have individualized
            // behavior. It does this by setting up a pending intent template.
            // Individuals items of a collection can't set up their own pending
            // intents. Instead, the collection as a whole sets up a pending
            // intent template, and the individual items set a fillInIntent
            // to create unique behavior on an item-by-item basis.
            val toastPendingIntent: PendingIntent = Intent(
                    context,
                    StackWidgetProvider::class.java
            ).run {
                // Set the action for the intent.
                // When the user touches a particular view, it has the effect of
                // broadcasting TOAST_ACTION.
                action = TOAST_ACTION
                putExtra(AppWidgetManager.EXTRA_APPWIDGET_ID, appWidgetId)
                data = Uri.parse(toUri(Intent.URI_INTENT_SCHEME))

                PendingIntent.getBroadcast(context, 0, this, PendingIntent.FLAG_UPDATE_CURRENT)
            }
            rv.setPendingIntentTemplate(R.id.stack_view, toastPendingIntent)

            appWidgetManager.updateAppWidget(appWidgetId, rv)
        }
        super.onUpdate(context, appWidgetManager, appWidgetIds)
    }
}
Java
public class StackWidgetProvider extends AppWidgetProvider {
    public static final String TOAST_ACTION = "com.example.android.stackwidget.TOAST_ACTION";
    public static final String EXTRA_ITEM = "com.example.android.stackwidget.EXTRA_ITEM";

    ...

    // Called when the BroadcastReceiver receives an Intent broadcast.
    // Checks whether the intent's action is TOAST_ACTION. If it is, the
    // widget displays a Toast message for the current item.
    @Override
    public void onReceive(Context context, Intent intent) {
        AppWidgetManager mgr = AppWidgetManager.getInstance(context);
        if (intent.getAction().equals(TOAST_ACTION)) {
            int appWidgetId = intent.getIntExtra(AppWidgetManager.EXTRA_APPWIDGET_ID,
                AppWidgetManager.INVALID_APPWIDGET_ID);
            // EXTRA_ITEM represents a custom value provided by the Intent
            // passed to the setOnClickFillInIntent() method to indicate the
            // position of the clicked item. See StackRemoteViewsFactory in
            // Set the fill-in Intent for details.
            int viewIndex = intent.getIntExtra(EXTRA_ITEM, 0);
            Toast.makeText(context, "Touched view " + viewIndex, Toast.LENGTH_SHORT).show();
        }
        super.onReceive(context, intent);
    }

    @Override
    public void onUpdate(Context context, AppWidgetManager appWidgetManager, int[] appWidgetIds) {
        // Update each of the widgets with the remote adapter.
        for (int i = 0; i < appWidgetIds.length; ++i) {

            // Sets up the intent that points to the StackViewService that
            // provides the views for this collection.
            Intent intent = new Intent(context, StackWidgetService.class);
            intent.putExtra(AppWidgetManager.EXTRA_APPWIDGET_ID, appWidgetIds[i]);
            // When intents are compared, the extras are ignored, so embed
            // the extras into the data so that the extras are not
            // ignored.
            intent.setData(Uri.parse(intent.toUri(Intent.URI_INTENT_SCHEME)));
            RemoteViews rv = new RemoteViews(context.getPackageName(), R.layout.widget_layout);
            rv.setRemoteAdapter(appWidgetIds[i], R.id.stack_view, intent);

            // The empty view is displayed when the collection has no items. It
            // must be a sibling of the collection view.
            rv.setEmptyView(R.id.stack_view, R.id.empty_view);

            // This section makes it possible for items to have individualized
            // behavior. It does this by setting up a pending intent template.
            // Individuals items of a collection can't set up their own pending
            // intents. Instead, the collection as a whole sets up a pending
            // intent template, and the individual items set a fillInIntent
            // to create unique behavior on an item-by-item basis.
            Intent toastIntent = new Intent(context, StackWidgetProvider.class);
            // Set the action for the intent.
            // When the user touches a particular view, it has the effect of
            // broadcasting TOAST_ACTION.
            toastIntent.setAction(StackWidgetProvider.TOAST_ACTION);
            toastIntent.putExtra(AppWidgetManager.EXTRA_APPWIDGET_ID, appWidgetIds[i]);
            intent.setData(Uri.parse(intent.toUri(Intent.URI_INTENT_SCHEME)));
            PendingIntent toastPendingIntent = PendingIntent.getBroadcast(context, 0, toastIntent,
                PendingIntent.FLAG_UPDATE_CURRENT);
            rv.setPendingIntentTemplate(R.id.stack_view, toastPendingIntent);

            appWidgetManager.updateAppWidget(appWidgetIds[i], rv);
        }
        super.onUpdate(context, appWidgetManager, appWidgetIds);
    }
}
Cómo establecer el intent de relleno
Tu RemoteViewsFactory debe establecer un intent de relleno en cada elemento de la colección. Esto permite distinguir la acción individual que se lleva a cabo cuando se hace clic en un elemento determinado. Luego, el intent de relleno se combina con la plantilla PendingIntent para determinar el intent final que se ejecuta cuando se presiona el elemento.
Kotlin
private const val REMOTE_VIEW_COUNT: Int = 10

class StackRemoteViewsFactory(
        private val context: Context,
        intent: Intent
) : RemoteViewsService.RemoteViewsFactory {

    private lateinit var widgetItems: List<WidgetItem>
    private val appWidgetId: Int = intent.getIntExtra(
            AppWidgetManager.EXTRA_APPWIDGET_ID,
            AppWidgetManager.INVALID_APPWIDGET_ID
    )

    override fun onCreate() {
        // In onCreate(), set up any connections or cursors to your data source.
        // Heavy lifting, such as downloading or creating content, must be
        // deferred to onDataSetChanged() or getViewAt(). Taking more than 20
        // seconds on this call results in an ANR.
        widgetItems = List(REMOTE_VIEW_COUNT) { index -> WidgetItem("$index!") }
        ...
    }
    ...

    override fun getViewAt(position: Int): RemoteViews {
        // Construct a remote views item based on the widget item XML file
        // and set the text based on the position.
        return RemoteViews(context.packageName, R.layout.widget_item).apply {
            setTextViewText(R.id.widget_item, widgetItems[position].text)

            // Set a fill-intent to fill in the pending intent template.
            // that is set on the collection view in StackWidgetProvider.
            val fillInIntent = Intent().apply {
                Bundle().also { extras ->
                    extras.putInt(EXTRA_ITEM, position)
                    putExtras(extras)
                }
            }
            // Make it possible to distinguish the individual on-click
            // action of a given item.
            setOnClickFillInIntent(R.id.widget_item, fillInIntent)
            ...
        }
    }
    ...
}
Java
public class StackWidgetService extends RemoteViewsService {
    @Override
    public RemoteViewsFactory onGetViewFactory(Intent intent) {
        return new StackRemoteViewsFactory(this.getApplicationContext(), intent);
    }
}

class StackRemoteViewsFactory implements RemoteViewsService.RemoteViewsFactory {
    private static final int count = 10;
    private List<WidgetItem> widgetItems = new ArrayList<WidgetItem>();
    private Context context;
    private int appWidgetId;

    public StackRemoteViewsFactory(Context context, Intent intent) {
        this.context = context;
        appWidgetId = intent.getIntExtra(AppWidgetManager.EXTRA_APPWIDGET_ID,
                AppWidgetManager.INVALID_APPWIDGET_ID);
    }

    // Initialize the data set.
    public void onCreate() {
        // In onCreate(), set up any connections or cursors to your data
        // source. Heavy lifting, such as downloading or creating
        // content, must be deferred to onDataSetChanged() or
        // getViewAt(). Taking more than 20 seconds on this call results
        // in an ANR.
        for (int i = 0; i < count; i++) {
            widgetItems.add(new WidgetItem(i + "!"));
        }
        ...
    }

    // Given the position (index) of a WidgetItem in the array, use the
    // item's text value in combination with the widget item XML file to
    // construct a RemoteViews object.
    public RemoteViews getViewAt(int position) {
        // Position always ranges from 0 to getCount() - 1.

        // Construct a RemoteViews item based on the widget item XML
        // file and set the text based on the position.
        RemoteViews rv = new RemoteViews(context.getPackageName(), R.layout.widget_item);
        rv.setTextViewText(R.id.widget_item, widgetItems.get(position).text);

        // Set a fill-intent to fill in the pending
        // intent template that is set on the collection view in
        // StackWidgetProvider.
        Bundle extras = new Bundle();
        extras.putInt(StackWidgetProvider.EXTRA_ITEM, position);
        Intent fillInIntent = new Intent();
        fillInIntent.putExtras(extras);
        // Make it possible to distinguish the individual on-click
        // action of a given item.
        rv.setOnClickFillInIntent(R.id.widget_item, fillInIntent);

        // Return the RemoteViews object.
        return rv;
    }
    ...
}
Mantén actualizados los datos de las colecciones
En la figura 2, se ilustra el flujo de actualización en un widget que usa colecciones. Se muestra cómo interactúa el código del widget con RemoteViewsFactory y cómo puedes activar las actualizaciones:
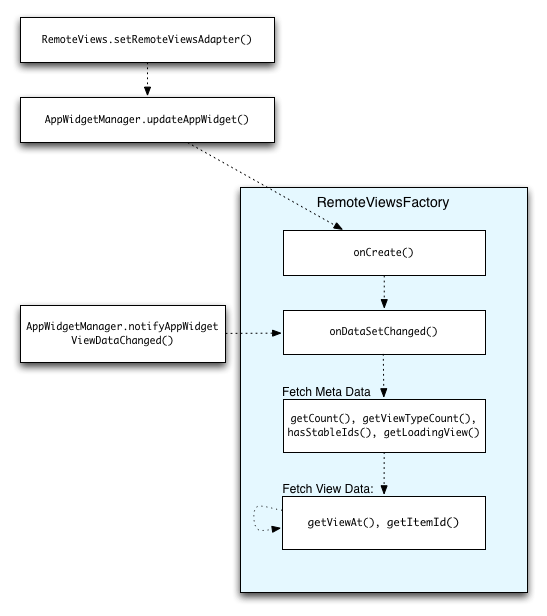
RemoteViewsFactory durante las actualizaciones.Los widgets que usan colecciones pueden proporcionar a los usuarios contenido actualizado. Por ejemplo, el widget de Gmail les brinda a los usuarios una instantánea de su carpeta Recibidos. Para poder hacer esto, activa tu RemoteViewsFactory y la vista de colecciones de modo que obtengan y muestren datos nuevos.
Para ello, usa AppWidgetManager para llamar a notifyAppWidgetViewDataChanged(). Esta llamada genera una devolución de llamada al método onDataSetChanged() del objeto RemoteViewsFactory, que te permite recuperar datos nuevos.
Puedes realizar operaciones de procesamiento intensivo de manera síncrona dentro de la devolución de llamada onDataSetChanged(). Se garantiza que esta llamada se completará antes de que los metadatos o los datos de vista se obtengan del RemoteViewsFactory. También puedes realizar operaciones de procesamiento intensivo dentro del método getViewAt(). Si esta llamada tarda mucho, se mostrará la vista de carga (especificada por el método getLoadingView() del objeto RemoteViewsFactory) en la posición correspondiente de la vista de colección hasta que se muestre un resultado.
Usa RemoteCollectionItems para pasar una colección directamente
Android 12 (nivel de API 31) agrega el método setRemoteAdapter(int viewId,
RemoteViews.RemoteCollectionItems
items), que le permite a tu app pasar una colección directamente cuando se propaga una vista de colección. Si configuras tu adaptador con este método, no necesitas implementar un RemoteViewsFactory ni llamar a notifyAppWidgetViewDataChanged().
Además de facilitar el proceso de completar tu adaptador, este enfoque también elimina la latencia para completar elementos nuevos cuando los usuarios se desplazan hacia abajo en la lista para revelar un elemento nuevo. Este enfoque para configurar el adaptador es preferible siempre y cuando tu conjunto de elementos de la colección sea relativamente pequeño. Sin embargo, por ejemplo, este enfoque no funciona bien si tu colección contiene numerosos Bitmaps que se pasan a setImageViewBitmap.
Si la colección no usa un conjunto constante de diseños (es decir, si algunos elementos solo están presentes a veces), usa setViewTypeCount para especificar la cantidad máxima de diseños únicos que puede incluir la colección. Esto permite que el adaptador se reutilice en las actualizaciones del widget de tu app.
A continuación, se muestra un ejemplo de cómo implementar colecciones RemoteViews simplificadas.
Kotlin
val itemLayouts = listOf(
        R.layout.item_type_1,
        R.layout.item_type_2,
        ...
)

remoteView.setRemoteAdapter(
        R.id.list_view,
        RemoteViews.RemoteCollectionItems.Builder()
            .addItem(/* id= */ ID_1, RemoteViews(context.packageName, R.layout.item_type_1))
            .addItem(/* id= */ ID_2, RemoteViews(context.packageName, R.layout.item_type_2))
            ...
            .setViewTypeCount(itemLayouts.count())
            .build()
)
Java
List<Integer> itemLayouts = Arrays.asList(
    R.layout.item_type_1,
    R.layout.item_type_2,
    ...
);

remoteView.setRemoteAdapter(
    R.id.list_view,
    new RemoteViews.RemoteCollectionItems.Builder()
        .addItem(/* id= */ ID_1, new RemoteViews(context.getPackageName(), R.layout.item_type_1))
        .addItem(/* id= */ ID_2, new RemoteViews(context.getPackageName(), R.layout.item_type_2))
        ...
        .setViewTypeCount(itemLayouts.size())
        .build()
);