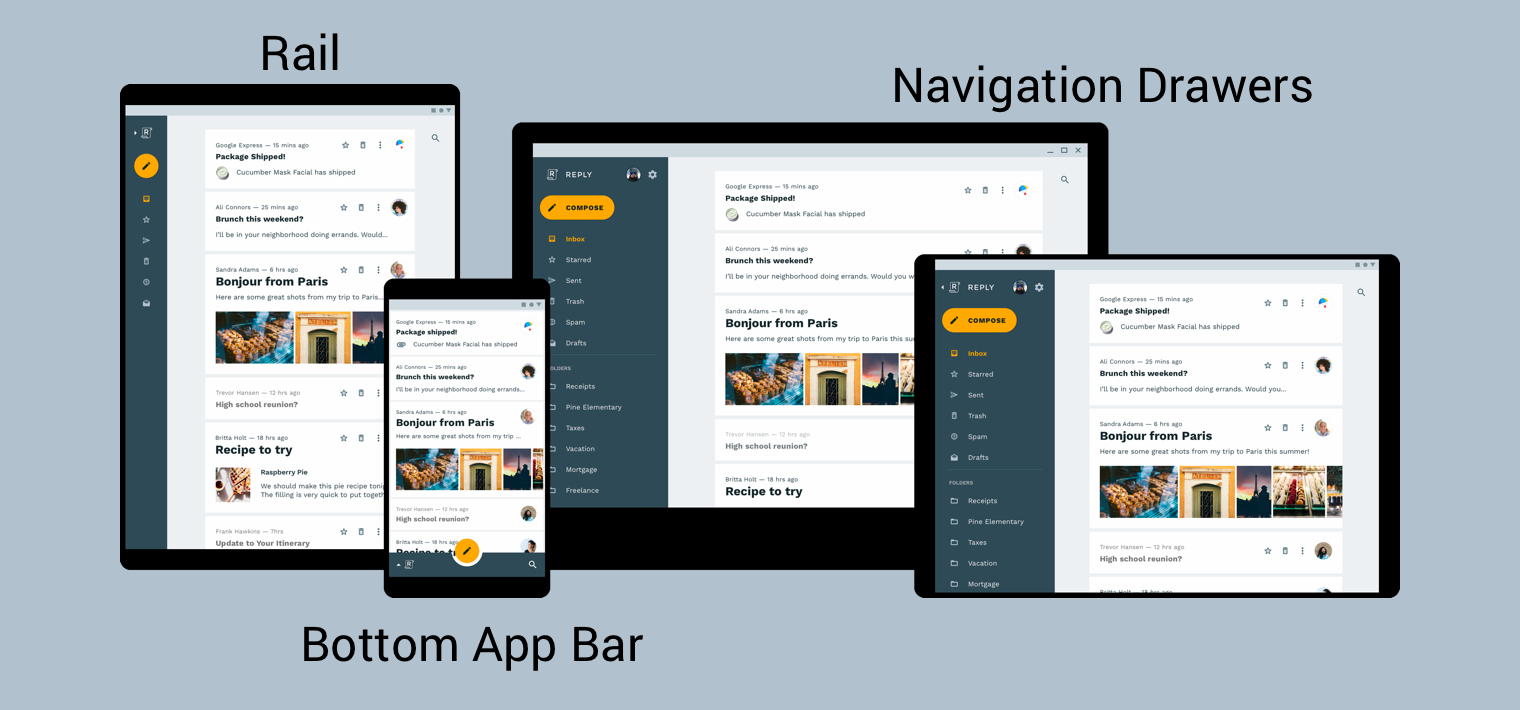
UI และการนำทางที่ปรับเปลี่ยนตามอุปกรณ์
หากต้องการให้ผู้ใช้ได้รับประสบการณ์การนำทางที่ดีที่สุด คุณควร มี UI การนำทาง ที่ปรับแต่งให้เข้ากับความกว้าง ความสูง และ ความกว้างที่เล็กที่สุดของอุปกรณ์ของผู้ใช้ คุณอาจต้องใช้ แถบแอปด้านล่าง ปรากฏเสมอหรือยุบได้ ลิ้นชักการนำทาง รถไฟ หรือมีอะไรใหม่ๆ ไปเลย โดยอิงตามพื้นที่หน้าจอที่มีอยู่และ ในแบบที่ไม่ซ้ำใครของแอป

ดีไซน์ Material คู่มือสถาปัตยกรรมผลิตภัณฑ์ จะให้บริบทและข้อควรพิจารณาเพิ่มเติมในการสร้าง UI ที่ปรับเปลี่ยนตามอุปกรณ์ เป็น UI ที่ปรับตามการเปลี่ยนแปลงของสภาพแวดล้อมแบบไดนามิก ตัวอย่างบางส่วนของ การเปลี่ยนแปลงด้านสิ่งแวดล้อมรวมถึงการปรับความกว้าง ความสูง การวางแนว ค่ากำหนดภาษาของผู้ใช้ สมบัติทางสิ่งแวดล้อมเหล่านี้เรียกรวมกันว่า ซึ่งเรียกว่าการกำหนดค่าของอุปกรณ์
เมื่อคุณสมบัติเหล่านี้อย่างน้อย 1 รายการเปลี่ยนแปลงขณะรันไทม์ ระบบปฏิบัติการ Android จะตอบสนอง โดย ทำลายแล้วสร้างกิจกรรมและส่วนย่อยของแอปอีกครั้ง ดังนั้น สิ่งที่ดีที่สุดที่คุณสามารถทำได้เพื่อสนับสนุน UI ที่ตอบสนองตามอุปกรณ์ใน Android คือ ให้ตรวจสอบว่าคุณใช้ ตัวระบุการกำหนดค่าทรัพยากร ตามความเหมาะสมและ หลีกเลี่ยงการใช้ขนาดเลย์เอาต์แบบฮาร์ดโค้ด
การใช้การนำทางทั่วโลกใน UI ที่ปรับเปลี่ยนตามอุปกรณ์
การใช้การนำทางทั่วโลกในฐานะส่วนหนึ่งของ UI ที่ปรับเปลี่ยนตามอุปกรณ์จะเริ่มต้นด้วย
กิจกรรมที่โฮสต์กราฟการนำทางของคุณ สำหรับตัวอย่างเชิงปฏิบัติ โปรดดูที่
ออก
Codelab การนำทาง
Codelab ใช้ NavigationView
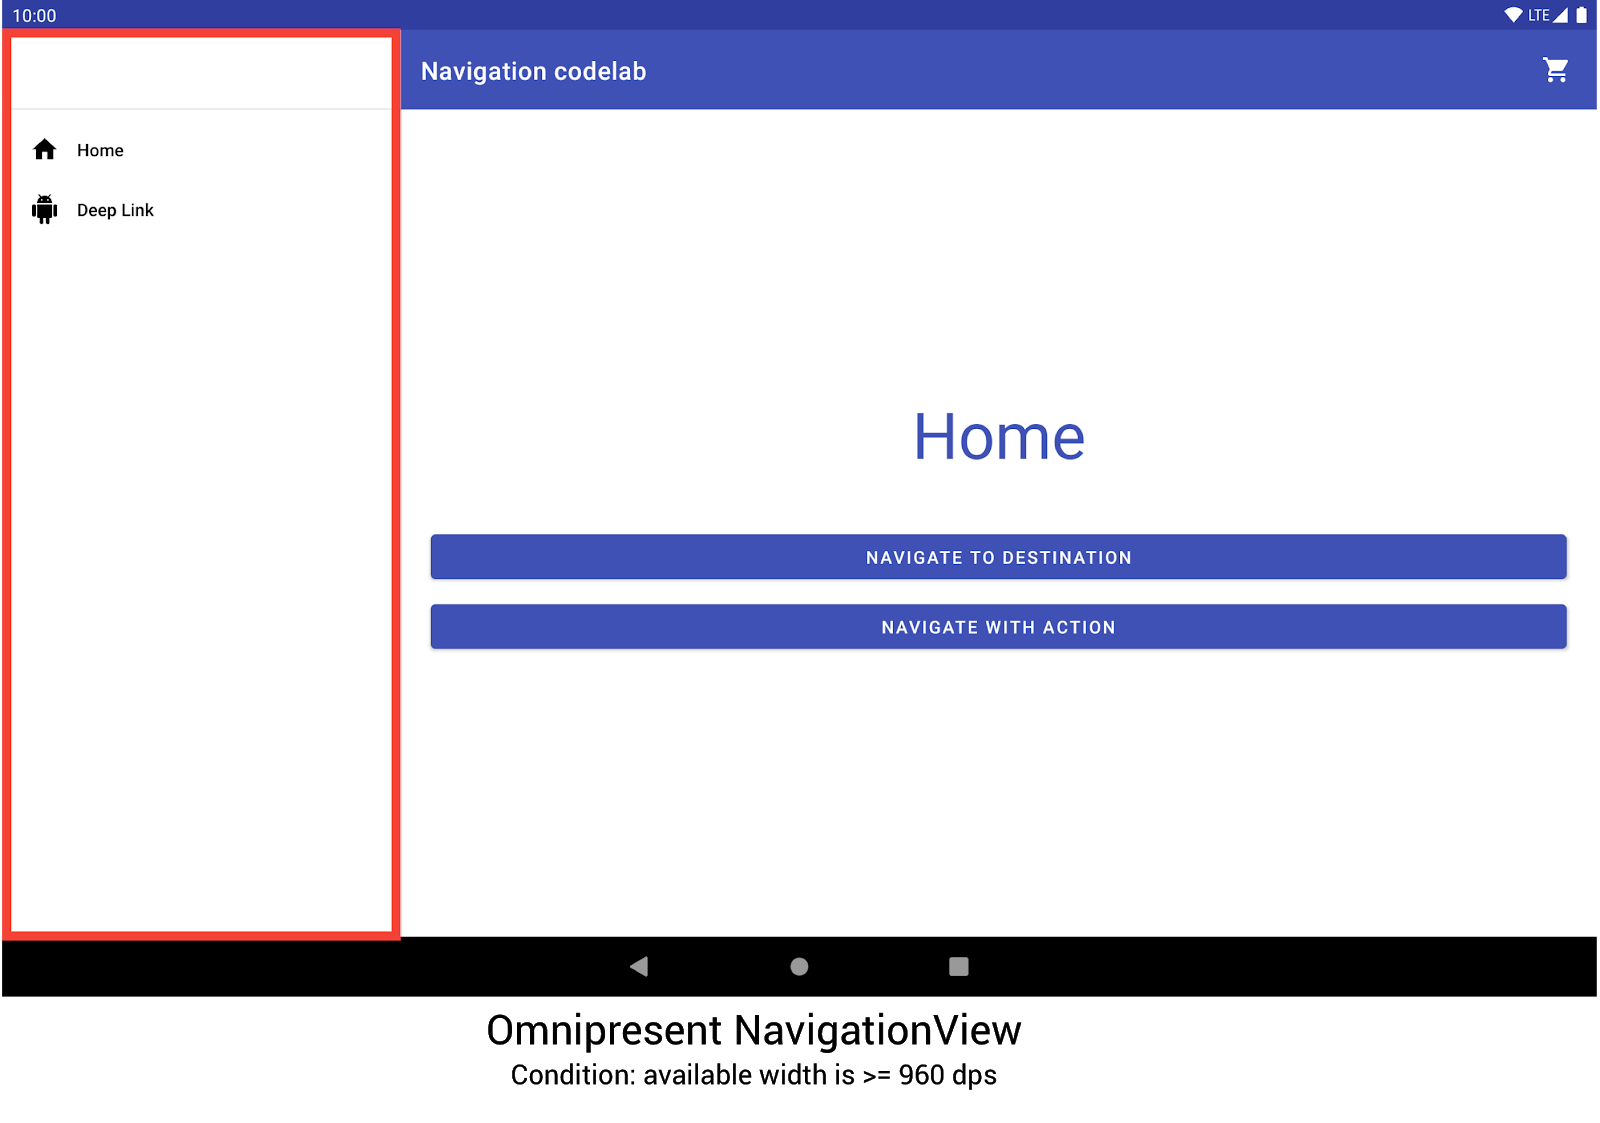
เพื่อแสดงเมนูการนำทางดังที่แสดงในรูปที่ 2 เมื่อทำงานบนอุปกรณ์
ที่แสดงผลที่ความกว้างอย่างน้อย 960dp NavigationView นี้จะแสดงผลเสมอ
บนหน้าจอ

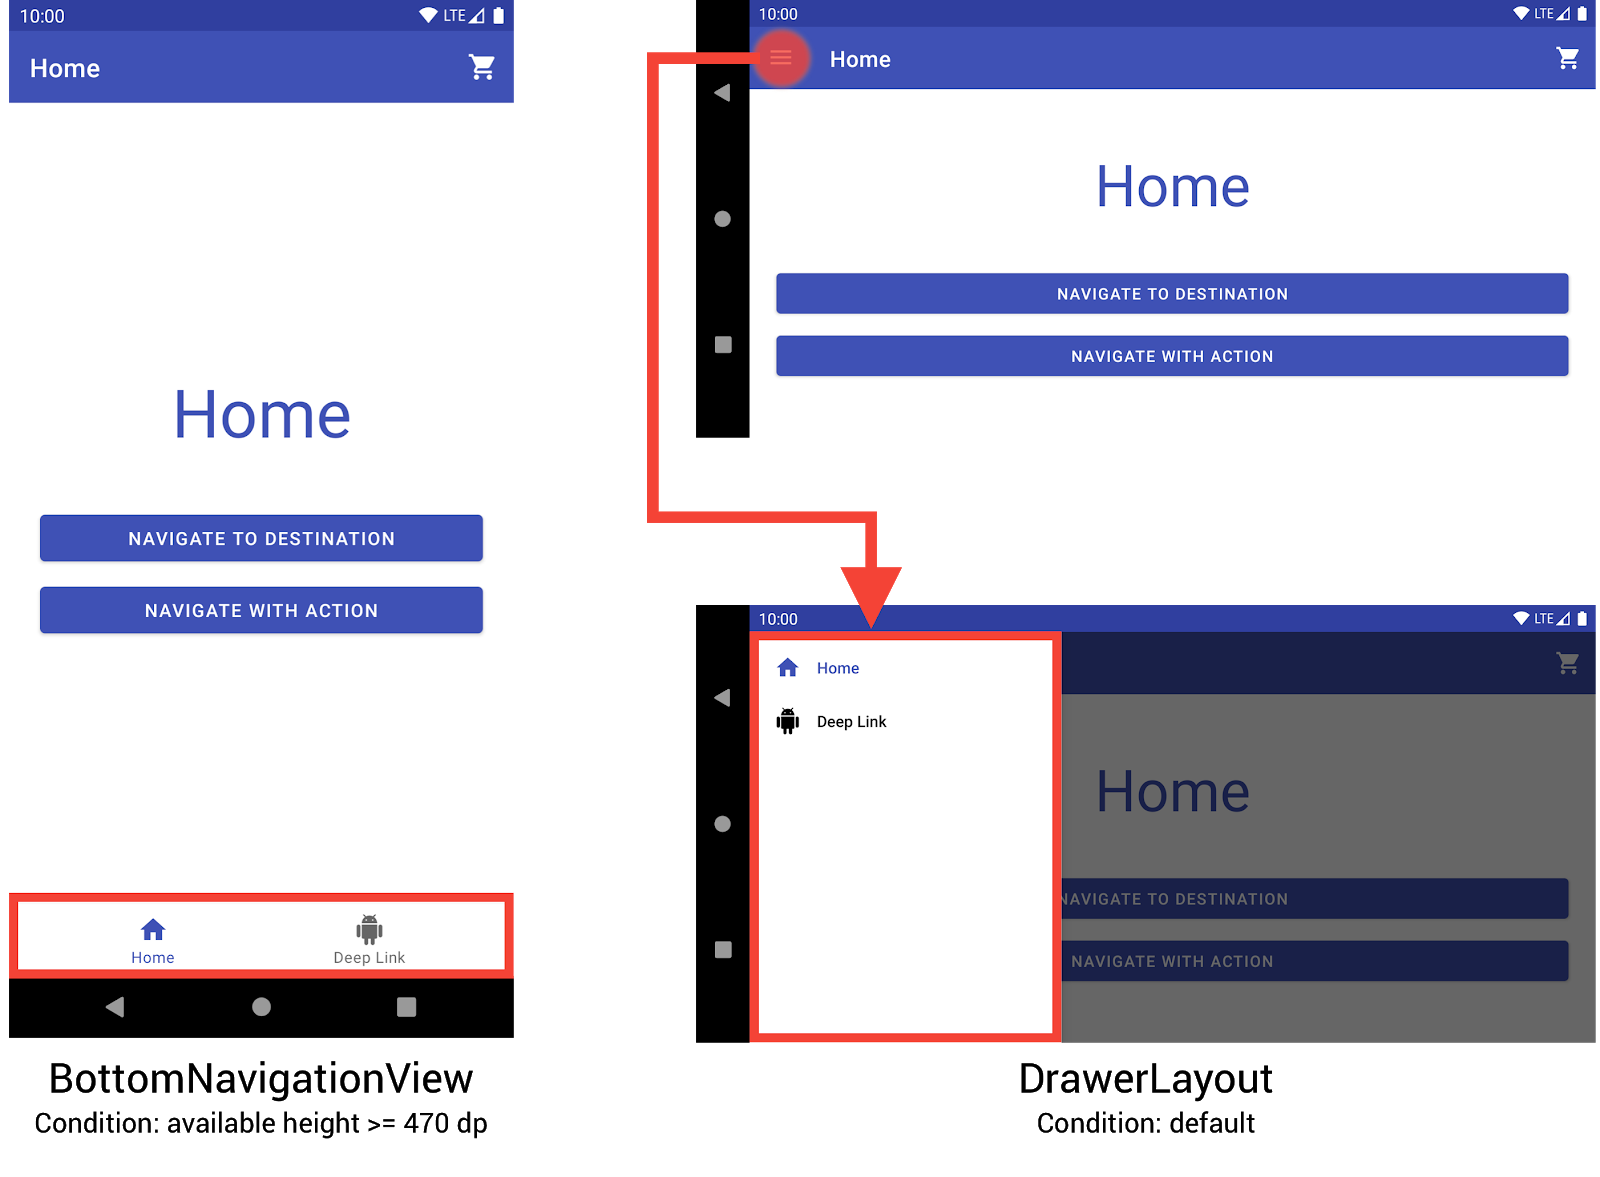
NavigationView เพื่อแสดงเมนูการนำทางขนาดและการวางแนวอื่นๆ ของอุปกรณ์จะสลับสับเปลี่ยนไปมาระหว่างแบบไดนามิก
DrawerLayout หรือ
BottomNavigationView
ตามความจำเป็น

BottomNavigationViewและDrawerLayoutเพื่อแสดง
เมนูการนำทางในอุปกรณ์ขนาดเล็กคุณสามารถนำลักษณะการทำงานนี้ไปใช้ได้ด้วยการสร้างเลย์เอาต์ 3 รูปแบบ โดยแต่ละเลย์เอาต์ จะกำหนดองค์ประกอบการนำทางที่ต้องการและดูลำดับชั้นตาม การกำหนดค่าอุปกรณ์ปัจจุบัน
ไดเรกทอรีจะกำหนดการกำหนดค่าที่จะใช้เลย์เอาต์แต่ละรายการ
โครงสร้างในการวางไฟล์เลย์เอาต์ ตัวอย่างเช่น NavigationView
พบไฟล์เลย์เอาต์ในไดเรกทอรี res/layout-w960dp
<!-- res/layout-w960dp/navigation_activity.xml -->
<RelativeLayout
   xmlns:android="http://schemas.android.com/apk/res/android"
   xmlns:app="http://schemas.android.com/apk/res-auto"
   xmlns:tools="http://schemas.android.com/tools"
   android:layout_width="match_parent"
   android:layout_height="match_parent"
   tools:context="com.example.android.codelabs.navigation.MainActivity">

   <com.google.android.material.navigation.NavigationView
       android:id="@+id/nav_view"
       android:layout_width="wrap_content"
       android:layout_height="match_parent"
       android:layout_alignParentStart="true"
       app:elevation="0dp"
       app:headerLayout="@layout/nav_view_header"
       app:menu="@menu/nav_drawer_menu" />

   <View
       android:layout_width="1dp"
       android:layout_height="match_parent"
       android:layout_toEndOf="@id/nav_view"
       android:background="?android:attr/listDivider" />

   <androidx.appcompat.widget.Toolbar
       android:id="@+id/toolbar"
       android:layout_width="match_parent"
       android:layout_height="wrap_content"
       android:layout_alignParentTop="true"
       android:layout_toEndOf="@id/nav_view"
       android:background="@color/colorPrimary"
       android:theme="@style/ThemeOverlay.MaterialComponents.Dark.ActionBar" />

   <androidx.fragment.app.FragmentContainerView
       android:id="@+id/my_nav_host_fragment"
       android:name="androidx.navigation.fragment.NavHostFragment"
       android:layout_width="match_parent"
       android:layout_height="match_parent"
       android:layout_below="@id/toolbar"
       android:layout_toEndOf="@id/nav_view"
       app:defaultNavHost="true"
       app:navGraph="@navigation/mobile_navigation" />
</RelativeLayout>
มุมมองการนำทางด้านล่างจะอยู่ในไดเรกทอรี res/layout-h470dp:
<!-- res/layout-h470dp/navigation_activity.xml -->
<LinearLayout
   xmlns:android="http://schemas.android.com/apk/res/android"
   xmlns:app="http://schemas.android.com/apk/res-auto"
   xmlns:tools="http://schemas.android.com/tools"
   android:layout_width="match_parent"
   android:layout_height="match_parent"
   android:orientation="vertical"
   tools:context="com.example.android.codelabs.navigation.MainActivity">

   <androidx.appcompat.widget.Toolbar
       android:id="@+id/toolbar"
       android:layout_width="match_parent"
       android:layout_height="wrap_content"
       android:background="@color/colorPrimary"
       android:theme="@style/ThemeOverlay.MaterialComponents.Dark.ActionBar" />

   <androidx.fragment.app.FragmentContainerView
       android:id="@+id/my_nav_host_fragment"
       android:name="androidx.navigation.fragment.NavHostFragment"
       android:layout_width="match_parent"
       android:layout_height="0dp"
       android:layout_weight="1"
       app:defaultNavHost="true"
       app:navGraph="@navigation/mobile_navigation" />

   <com.google.android.material.bottomnavigation.BottomNavigationView
       android:id="@+id/bottom_nav_view"
       android:layout_width="match_parent"
       android:layout_height="wrap_content"
       app:menu="@menu/bottom_nav_menu" />
</LinearLayout>
พบเลย์เอาต์ลิ้นชักในไดเรกทอรี res/layout ใช้ไดเรกทอรีนี้สำหรับ
เลย์เอาต์เริ่มต้นที่ไม่มีตัวระบุเฉพาะการกำหนดค่า
<!-- res/layout/navigation_activity.xml -->
<androidx.drawerlayout.widget.DrawerLayout
   xmlns:android="http://schemas.android.com/apk/res/android"
   xmlns:app="http://schemas.android.com/apk/res-auto"
   xmlns:tools="http://schemas.android.com/tools"
   android:id="@+id/drawer_layout"
   android:layout_width="match_parent"
   android:layout_height="match_parent"
   tools:context="com.example.android.codelabs.navigation.MainActivity">

   <LinearLayout
       android:layout_width="match_parent"
       android:layout_height="match_parent"
       android:orientation="vertical">

       <androidx.appcompat.widget.Toolbar
           android:id="@+id/toolbar"
           android:layout_width="match_parent"
           android:layout_height="wrap_content"
           android:background="@color/colorPrimary"
           android:theme="@style/ThemeOverlay.MaterialComponents.Dark.ActionBar" />

       <androidx.fragment.app.FragmentContainerView
           android:id="@+id/my_nav_host_fragment"
           android:name="androidx.navigation.fragment.NavHostFragment"
           android:layout_width="match_parent"
           android:layout_height="match_parent"
           app:defaultNavHost="true"
           app:navGraph="@navigation/mobile_navigation" />
   </LinearLayout>

   <com.google.android.material.navigation.NavigationView
       android:id="@+id/nav_view"
       android:layout_width="wrap_content"
       android:layout_height="match_parent"
       android:layout_gravity="start"
       app:menu="@menu/nav_drawer_menu" />
</androidx.drawerlayout.widget.DrawerLayout>
Android เป็นไปตาม
ลำดับความสำคัญ
เมื่อเลือกทรัพยากรที่จะใช้ เฉพาะสำหรับตัวอย่างนี้ -w960dp
(หรือความกว้างที่พร้อมใช้งาน >= 960dp) มีลำดับความสำคัญเหนือกว่า -h470dp (หรือที่ใช้ได้)
สูง >= 470) หากการกำหนดค่าอุปกรณ์ไม่ตรงกับรายการใดรายการหนึ่ง
เงื่อนไข แล้วเลือกทรัพยากรเลย์เอาต์เริ่มต้น
(res/layout/navigation_activity.xml) แล้ว
ในการจัดการเหตุการณ์การนําทาง คุณต้องจัดเรียงเฉพาะเหตุการณ์ที่สอดคล้องกับเหตุการณ์ วิดเจ็ตที่ปรากฏ ดังที่ปรากฏในตัวอย่างต่อไปนี้
Kotlin
class MainActivity : AppCompatActivity() {

   private lateinit var appBarConfiguration : AppBarConfiguration

   override fun onCreate(savedInstanceState: Bundle?) {
      super.onCreate(savedInstanceState)
      setContentView(R.layout.navigation_activity)
      val drawerLayout : DrawerLayout? = findViewById(R.id.drawer_layout)
      appBarConfiguration = AppBarConfiguration(
                  setOf(R.id.home_dest, R.id.deeplink_dest),
                  drawerLayout)

      ...

      // Initialize the app bar with the navigation drawer if present.
      // If the drawerLayout is not null here, a Navigation button will be added
      // to the app bar whenever the user is on a top-level destination.
      setupActionBarWithNavController(navController, appBarConfig)

      // Initialize the NavigationView if it is present,
      // so that clicking an item takes
      // the user to the appropriate destination.
      val sideNavView = findViewById<NavigationView>(R.id.nav_view)
      sideNavView?.setupWithNavController(navController)

      // Initialize the BottomNavigationView if it is present,
      // so that clicking an item takes
      // the user to the appropriate destination.
      val bottomNav = findViewById<BottomNavigationView>(R.id.bottom_nav_view)
      bottomNav?.setupWithNavController(navController)

      ...
    }

    ...
}
Java
public class MainActivity extends AppCompatActivity {

   private AppBarConfiguration appBarConfiguration;

   @Override
   protected void onCreate(@Nullable Bundle savedInstanceState) {
       super.onCreate(savedInstanceState);
       setContentView(R.layout.navigation_activity);
       NavHostFragment host = (NavHostFragment) getSupportFragmentManager()
               .findFragmentById(R.id.my_nav_host_fragment);
       NavController navController = host.getNavController();

       DrawerLayout drawerLayout = findViewById(R.id.drawer_layout);
       appBarConfiguration = new AppBarConfiguration.Builder(
               R.id.home_dest, R.id.deeplink_dest)
               .setDrawerLayout(drawerLayout)
               .build();

       // Initialize the app bar with the navigation drawer if present.
       // If the drawerLayout is not null here, a Navigation button will be added to
       // the app bar whenever the user is on a top-level destination.
       NavigationUI.setupActionBarWithNavController(
               this, navController, appBarConfiguration);


       // Initialize the NavigationView if it is present,
       // so that clicking an item takes
       // the user to the appropriate destination.
       NavigationView sideNavView = findViewById(R.id.nav_view);
       if(sideNavView != null) {
           NavigationUI.setupWithNavController(sideNavView, navController);
       }

       // Initialize the BottomNavigationView if it is present,
       // so that clicking an item takes
       // the user to the appropriate destination.
       BottomNavigationView bottomNav = findViewById(R.id.bottom_nav_view);
       if(bottomNav != null) {
           NavigationUI.setupWithNavController(bottomNav, navController);
       }

   }
}
หากการกำหนดค่าอุปกรณ์มีการเปลี่ยนแปลง ยกเว้นกรณีที่เจาะจง
กำหนดค่าเป็นอย่างอื่น
Android จะทำลายกิจกรรมจากการกำหนดค่าก่อนหน้านี้
ข้อมูลพร็อพเพอร์ตี้ที่เกี่ยวข้อง จากนั้นจะสร้างกิจกรรมใหม่โดยใช้ทรัพยากรที่ออกแบบมาเพื่อ
การกำหนดค่าใหม่ ระบบจะทำลายกิจกรรม และสร้างขึ้นใหม่
จะเรียงองค์ประกอบการนำทางส่วนกลางที่เหมาะสมใน onCreate() ให้โดยอัตโนมัติ
พิจารณาใช้ทางเลือกอื่นแทนเลย์เอาต์แบบแยกมุมมอง
เลย์เอาต์แบบมุมมองแยก หรือเลย์เอาต์หลัก/รายละเอียดแบบเดิมนั้น วิธียอดนิยมและแนะนำสำหรับการออกแบบแท็บเล็ตและหน้าจอขนาดใหญ่อื่นๆ อุปกรณ์
นับตั้งแต่มีการเปิดตัวแท็บเล็ต Android ระบบนิเวศของอุปกรณ์ต่างๆ ได้เติบโตขึ้น อย่างรวดเร็ว ปัจจัยหนึ่งที่มีอิทธิพลอย่างมากต่อการออกแบบพื้นที่สำหรับ อุปกรณ์หน้าจอคือการแนะนำโหมดหลายหน้าต่าง โดยเฉพาะอย่างยิ่ง หน้าต่างรูปแบบอิสระที่ปรับขนาดได้เต็มรูปแบบ เช่น หน้าต่างในอุปกรณ์ ChromeOS วิธีนี้จะให้ความสำคัญกับทุกหน้าจอของแอปมากขึ้น ปรับเปลี่ยนตามอุปกรณ์ แทนที่จะเปลี่ยนโครงสร้างการนำทางตามหน้าจอ ขนาด
แม้ว่าคุณจะสามารถใช้อินเทอร์เฟซเลย์เอาต์แบบมุมมองแบบแยกโดยใช้ ไลบรารีการนำทาง คุณควร พิจารณาทางเลือกอื่นๆ
ชื่อจุดหมาย
หากคุณระบุชื่อจุดหมายในกราฟโดยใช้ android:label
อย่าลืมใช้ค่าทรัพยากรเสมอเพื่อให้เนื้อหาของคุณยังคง
แปลได้
<navigation ...>
    <fragment
        android:id="@+id/my_dest"
        android:name="com.example.MyFragment"
        android:label="@string/my_dest_label"
        tools:layout="@layout/my_fragment" />
    ...
เมื่อใช้ค่าทรัพยากร ปลายทางจะมีแอตทริบิวต์ ใช้ทรัพยากรทุกครั้งที่มีการเปลี่ยนแปลงการกำหนดค่า
