रिस्पॉन्सिव यूज़र इंटरफ़ेस (यूआई) और नेविगेशन
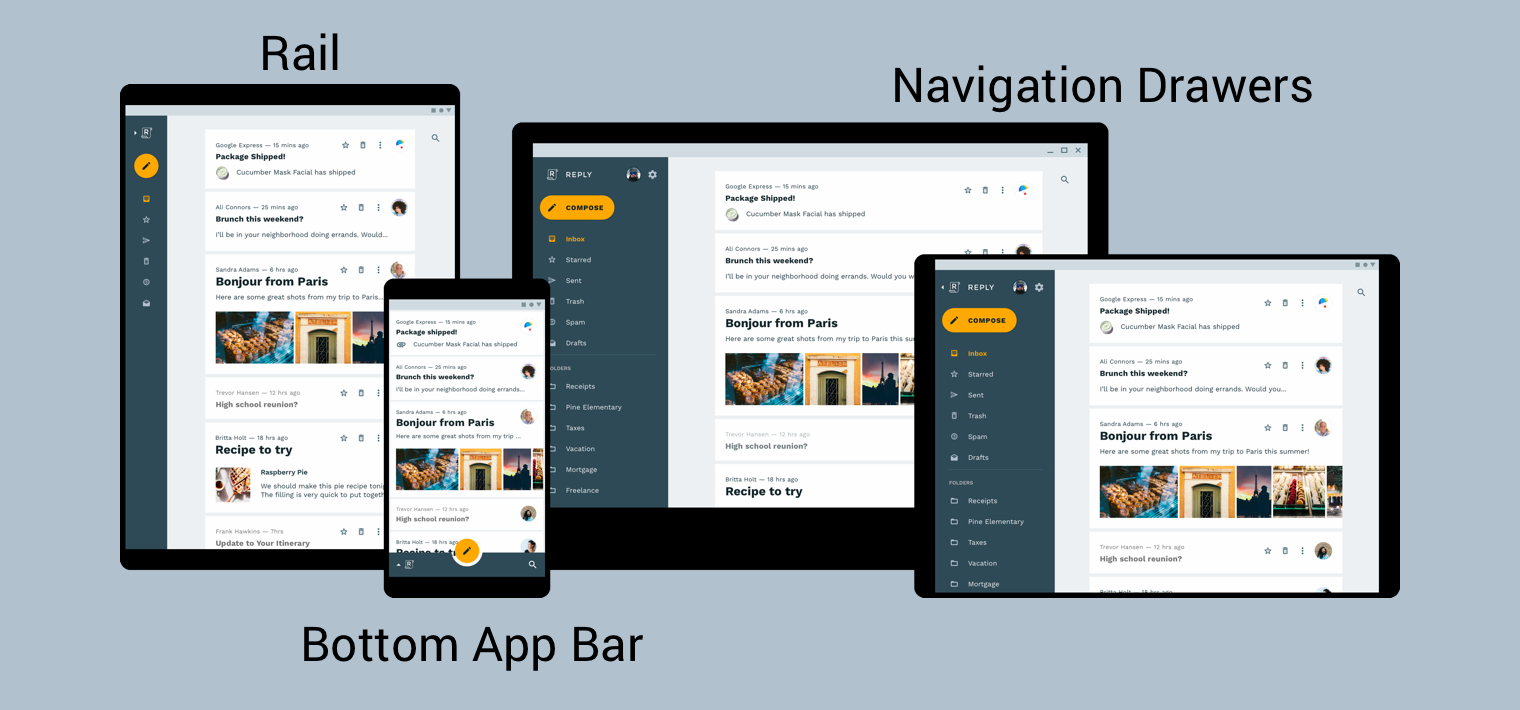
अपने उपयोगकर्ताओं को सबसे अच्छा नेविगेशन अनुभव देने के लिए, आपको नेविगेशन यूज़र इंटरफ़ेस (यूआई) उपलब्ध कराने के लिए, जिसमें स्क्रीन की चौड़ाई, ऊंचाई, और उपयोगकर्ता के डिवाइस की कम से कम चौड़ाई वाली इमेज. आपके पास सबसे नीचे मौजूद ऐप्लिकेशन बार, हमेशा-मौजूद या छोटा किया जा सकने वाला नेविगेशन पैनल, एक रेल, या शायद यह कुछ नया है, जो आपके लिए उपलब्ध स्क्रीन स्पेस और ऐप की स्टाइल को बदलकर खास बनाया जा सकता है.

मटीरियल डिज़ाइन प्रॉडक्ट के आर्किटेक्चर के लिए गाइड रिस्पॉन्सिव यूज़र इंटरफ़ेस (यूआई) बनाने के लिए अतिरिक्त संदर्भ और ज़रूरी बातें बताता है—यह एक ऐसा यूज़र इंटरफ़ेस (यूआई) है जो पर्यावरण में होने वाले बदलावों के हिसाब से ढल जाता है. इसके कुछ उदाहरण आस-पास होने वाले बदलावों में वीडियो की चौड़ाई, ऊंचाई, स्क्रीन की दिशा, और उपयोगकर्ता की भाषा प्राथमिकता. पर्यावरण से जुड़े ये गुण एक साथ इसे डिवाइस का कॉन्फ़िगरेशन कहा जाता है.
जब रनटाइम के दौरान इनमें से एक या उससे ज़्यादा प्रॉपर्टी बदलती हैं, तो Android OS जवाब देता है लेखक अपने ऐप्लिकेशन की गतिविधियों और फ़्रैगमेंट को खत्म करना और फिर उन्हें फिर से बनाना. इसलिए, Android पर रिस्पॉन्सिव यूज़र इंटरफ़ेस (यूआई) दिखाने के लिए, सबसे सही तरीका यह है कि पक्का करें कि आपके पास रिसॉर्स कॉन्फ़िगरेशन क्वालीफ़ायर जहां ज़रूरी हो और हार्ड कोड किए गए लेआउट साइज़ के इस्तेमाल से बचना.
रिस्पॉन्सिव यूज़र इंटरफ़ेस (यूआई) में ग्लोबल नेविगेशन को लागू करना
रिस्पॉन्सिव यूज़र इंटरफ़ेस (यूआई) के हिस्से के तौर पर ग्लोबल नेविगेशन को लागू करने की शुरुआत
उस गतिविधि की जानकारी दें जिसमें आपका नेविगेशन ग्राफ़ होस्ट किया गया है. उदाहरण के लिए,
में
नेविगेशन कोडलैब.
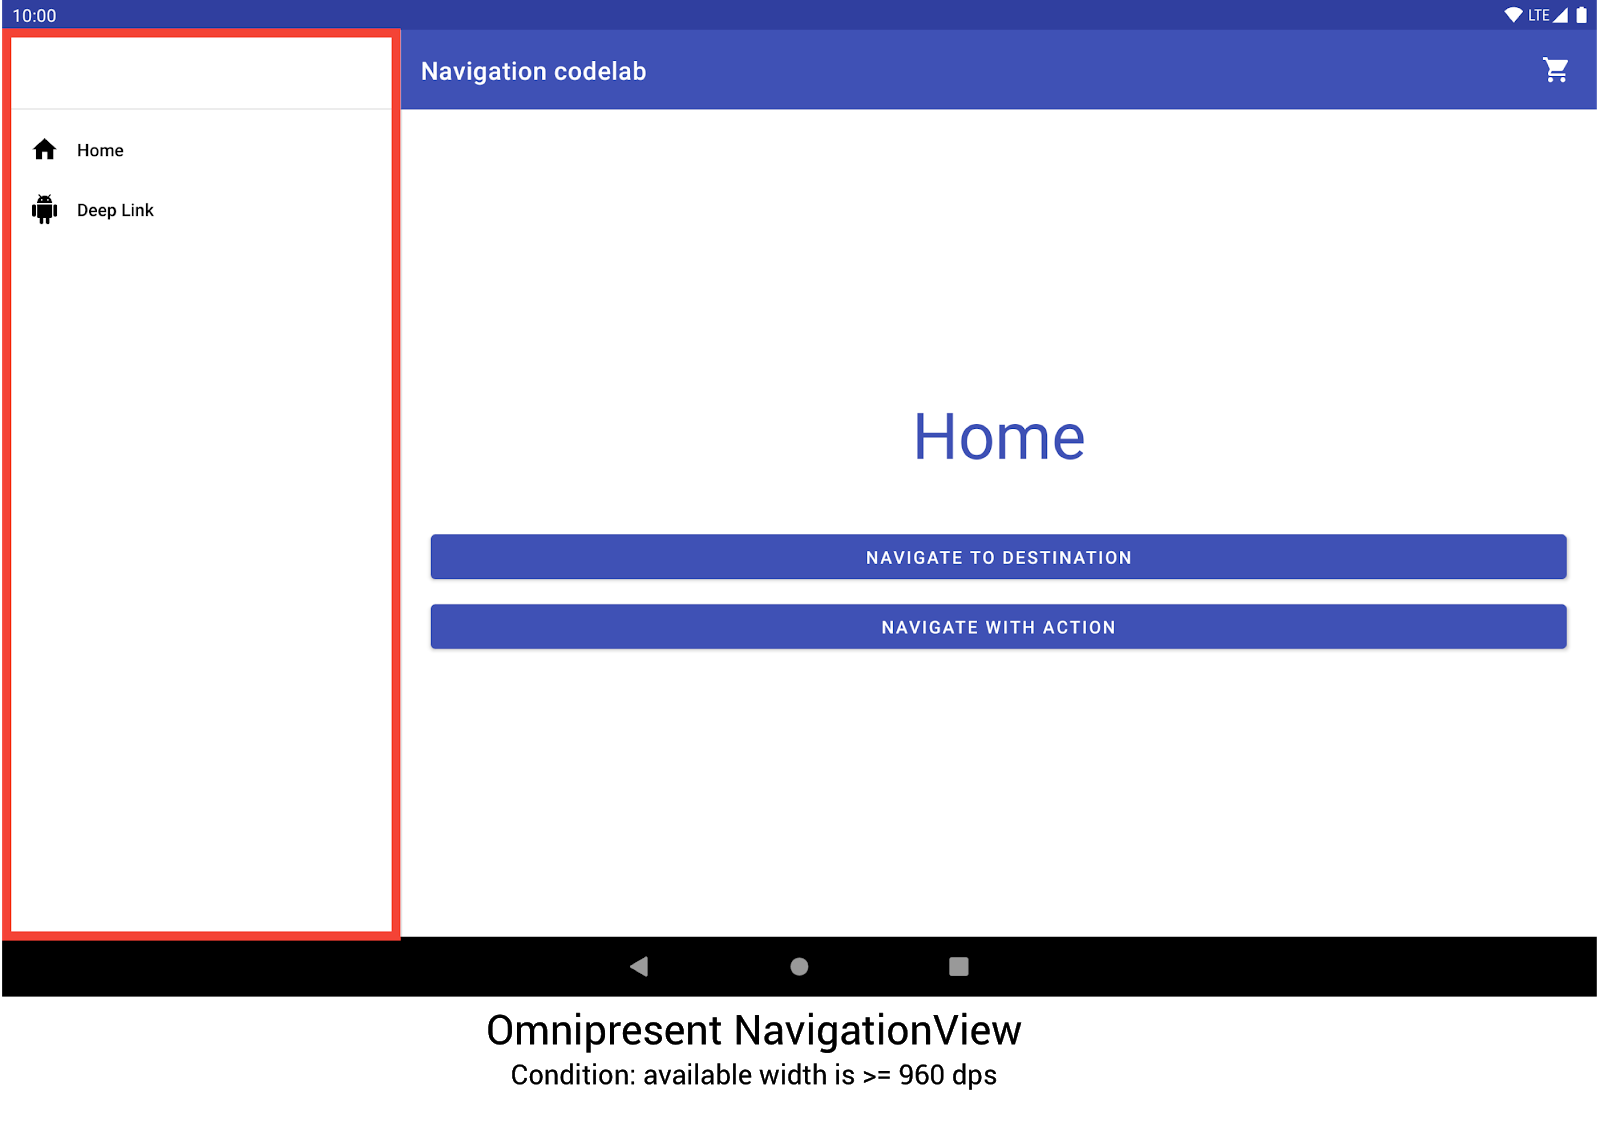
कोडलैब NavigationView का इस्तेमाल करता है
पर क्लिक करें. जब किसी डिवाइस पर चलाया जा रहा हो
जो कम से कम 960dp की चौड़ाई में रेंडर करता है. यह NavigationView हमेशा
दिखाई देता है.

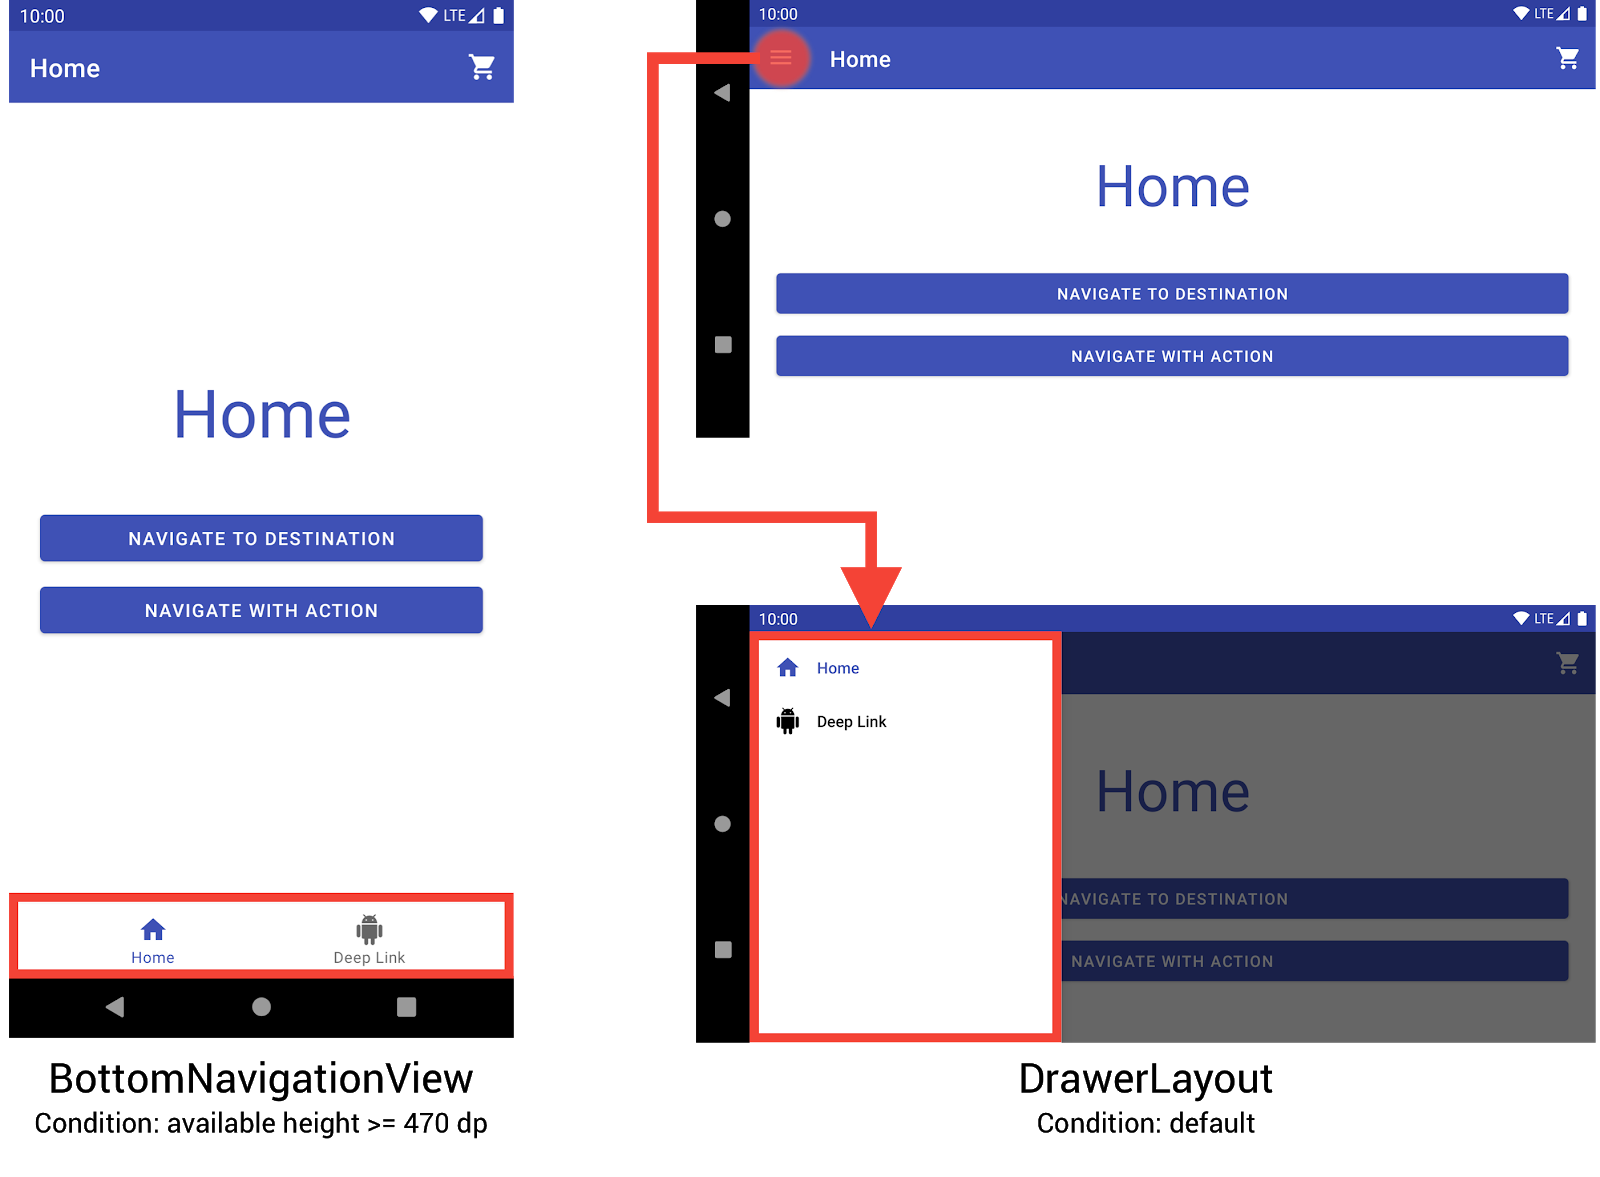
NavigationView.अन्य डिवाइस के साइज़ और ओरिएंटेशन डाइनैमिक तौर पर एक-दूसरे से बदलते हैं
DrawerLayout या
BottomNavigationView
.

BottomNavigationView और DrawerLayout
छोटे डिवाइसों पर नेविगेशन मेन्यू.इस व्यवहार को लागू करने के लिए, तीन अलग-अलग लेआउट बनाए जा सकते हैं, जिनमें हर लेआउट, नेविगेशन एलिमेंट को तय करता है और मौजूदा डिवाइस कॉन्फ़िगरेशन.
हर लेआउट किस कॉन्फ़िगरेशन पर लागू होता है, यह डायरेक्ट्री से तय होती है
वह स्ट्रक्चर जिसमें लेआउट फ़ाइल रखी जाती है. उदाहरण के लिए, NavigationView
लेआउट फ़ाइल, res/layout-w960dp डायरेक्ट्री में मिली है.
<!-- res/layout-w960dp/navigation_activity.xml -->
<RelativeLayout
   xmlns:android="http://schemas.android.com/apk/res/android"
   xmlns:app="http://schemas.android.com/apk/res-auto"
   xmlns:tools="http://schemas.android.com/tools"
   android:layout_width="match_parent"
   android:layout_height="match_parent"
   tools:context="com.example.android.codelabs.navigation.MainActivity">

   <com.google.android.material.navigation.NavigationView
       android:id="@+id/nav_view"
       android:layout_width="wrap_content"
       android:layout_height="match_parent"
       android:layout_alignParentStart="true"
       app:elevation="0dp"
       app:headerLayout="@layout/nav_view_header"
       app:menu="@menu/nav_drawer_menu" />

   <View
       android:layout_width="1dp"
       android:layout_height="match_parent"
       android:layout_toEndOf="@id/nav_view"
       android:background="?android:attr/listDivider" />

   <androidx.appcompat.widget.Toolbar
       android:id="@+id/toolbar"
       android:layout_width="match_parent"
       android:layout_height="wrap_content"
       android:layout_alignParentTop="true"
       android:layout_toEndOf="@id/nav_view"
       android:background="@color/colorPrimary"
       android:theme="@style/ThemeOverlay.MaterialComponents.Dark.ActionBar" />

   <androidx.fragment.app.FragmentContainerView
       android:id="@+id/my_nav_host_fragment"
       android:name="androidx.navigation.fragment.NavHostFragment"
       android:layout_width="match_parent"
       android:layout_height="match_parent"
       android:layout_below="@id/toolbar"
       android:layout_toEndOf="@id/nav_view"
       app:defaultNavHost="true"
       app:navGraph="@navigation/mobile_navigation" />
</RelativeLayout>
सबसे नीचे वाला नेविगेशन व्यू, res/layout-h470dp डायरेक्ट्री में मौजूद है:
<!-- res/layout-h470dp/navigation_activity.xml -->
<LinearLayout
   xmlns:android="http://schemas.android.com/apk/res/android"
   xmlns:app="http://schemas.android.com/apk/res-auto"
   xmlns:tools="http://schemas.android.com/tools"
   android:layout_width="match_parent"
   android:layout_height="match_parent"
   android:orientation="vertical"
   tools:context="com.example.android.codelabs.navigation.MainActivity">

   <androidx.appcompat.widget.Toolbar
       android:id="@+id/toolbar"
       android:layout_width="match_parent"
       android:layout_height="wrap_content"
       android:background="@color/colorPrimary"
       android:theme="@style/ThemeOverlay.MaterialComponents.Dark.ActionBar" />

   <androidx.fragment.app.FragmentContainerView
       android:id="@+id/my_nav_host_fragment"
       android:name="androidx.navigation.fragment.NavHostFragment"
       android:layout_width="match_parent"
       android:layout_height="0dp"
       android:layout_weight="1"
       app:defaultNavHost="true"
       app:navGraph="@navigation/mobile_navigation" />

   <com.google.android.material.bottomnavigation.BottomNavigationView
       android:id="@+id/bottom_nav_view"
       android:layout_width="match_parent"
       android:layout_height="wrap_content"
       app:menu="@menu/bottom_nav_menu" />
</LinearLayout>
ड्रॉर लेआउट, res/layout डायरेक्ट्री में मौजूद है. इस डायरेक्ट्री का इस्तेमाल इसके लिए करें
ऐसे डिफ़ॉल्ट लेआउट जिनमें कॉन्फ़िगरेशन के लिए कोई क्वालीफ़ायर नहीं है:
<!-- res/layout/navigation_activity.xml -->
<androidx.drawerlayout.widget.DrawerLayout
   xmlns:android="http://schemas.android.com/apk/res/android"
   xmlns:app="http://schemas.android.com/apk/res-auto"
   xmlns:tools="http://schemas.android.com/tools"
   android:id="@+id/drawer_layout"
   android:layout_width="match_parent"
   android:layout_height="match_parent"
   tools:context="com.example.android.codelabs.navigation.MainActivity">

   <LinearLayout
       android:layout_width="match_parent"
       android:layout_height="match_parent"
       android:orientation="vertical">

       <androidx.appcompat.widget.Toolbar
           android:id="@+id/toolbar"
           android:layout_width="match_parent"
           android:layout_height="wrap_content"
           android:background="@color/colorPrimary"
           android:theme="@style/ThemeOverlay.MaterialComponents.Dark.ActionBar" />

       <androidx.fragment.app.FragmentContainerView
           android:id="@+id/my_nav_host_fragment"
           android:name="androidx.navigation.fragment.NavHostFragment"
           android:layout_width="match_parent"
           android:layout_height="match_parent"
           app:defaultNavHost="true"
           app:navGraph="@navigation/mobile_navigation" />
   </LinearLayout>

   <com.google.android.material.navigation.NavigationView
       android:id="@+id/nav_view"
       android:layout_width="wrap_content"
       android:layout_height="match_parent"
       android:layout_gravity="start"
       app:menu="@menu/nav_drawer_menu" />
</androidx.drawerlayout.widget.DrawerLayout>
Android,
प्राथमिकता का क्रम
लागू करें. इस उदाहरण के लिए, -w960dp
(या उपलब्ध चौड़ाई >= 960dp) को -h470dp (या उपलब्ध) से ज़्यादा प्राथमिकता दी जाती है
लंबाई >= 470). अगर डिवाइस का कॉन्फ़िगरेशन इनमें से किसी से भी मेल नहीं खाता है
शर्तों, फिर डिफ़ॉल्ट लेआउट संसाधन,
(res/layout/navigation_activity.xml) का इस्तेमाल किया गया है.
नेविगेशन इवेंट को मैनेज करने के लिए, आपको सिर्फ़ एक-दूसरे से जुड़े इवेंट को वायर अप करना होगा मौजूदा विजेट पर भी लागू होती हैं, जैसा कि नीचे दिए गए उदाहरण में दिखाया गया है.
Kotlin
class MainActivity : AppCompatActivity() {

   private lateinit var appBarConfiguration : AppBarConfiguration

   override fun onCreate(savedInstanceState: Bundle?) {
      super.onCreate(savedInstanceState)
      setContentView(R.layout.navigation_activity)
      val drawerLayout : DrawerLayout? = findViewById(R.id.drawer_layout)
      appBarConfiguration = AppBarConfiguration(
                  setOf(R.id.home_dest, R.id.deeplink_dest),
                  drawerLayout)

      ...

      // Initialize the app bar with the navigation drawer if present.
      // If the drawerLayout is not null here, a Navigation button will be added
      // to the app bar whenever the user is on a top-level destination.
      setupActionBarWithNavController(navController, appBarConfig)

      // Initialize the NavigationView if it is present,
      // so that clicking an item takes
      // the user to the appropriate destination.
      val sideNavView = findViewById<NavigationView>(R.id.nav_view)
      sideNavView?.setupWithNavController(navController)

      // Initialize the BottomNavigationView if it is present,
      // so that clicking an item takes
      // the user to the appropriate destination.
      val bottomNav = findViewById<BottomNavigationView>(R.id.bottom_nav_view)
      bottomNav?.setupWithNavController(navController)

      ...
    }

    ...
}
Java
public class MainActivity extends AppCompatActivity {

   private AppBarConfiguration appBarConfiguration;

   @Override
   protected void onCreate(@Nullable Bundle savedInstanceState) {
       super.onCreate(savedInstanceState);
       setContentView(R.layout.navigation_activity);
       NavHostFragment host = (NavHostFragment) getSupportFragmentManager()
               .findFragmentById(R.id.my_nav_host_fragment);
       NavController navController = host.getNavController();

       DrawerLayout drawerLayout = findViewById(R.id.drawer_layout);
       appBarConfiguration = new AppBarConfiguration.Builder(
               R.id.home_dest, R.id.deeplink_dest)
               .setDrawerLayout(drawerLayout)
               .build();

       // Initialize the app bar with the navigation drawer if present.
       // If the drawerLayout is not null here, a Navigation button will be added to
       // the app bar whenever the user is on a top-level destination.
       NavigationUI.setupActionBarWithNavController(
               this, navController, appBarConfiguration);


       // Initialize the NavigationView if it is present,
       // so that clicking an item takes
       // the user to the appropriate destination.
       NavigationView sideNavView = findViewById(R.id.nav_view);
       if(sideNavView != null) {
           NavigationUI.setupWithNavController(sideNavView, navController);
       }

       // Initialize the BottomNavigationView if it is present,
       // so that clicking an item takes
       // the user to the appropriate destination.
       BottomNavigationView bottomNav = findViewById(R.id.bottom_nav_view);
       if(bottomNav != null) {
           NavigationUI.setupWithNavController(bottomNav, navController);
       }

   }
}
अगर डिवाइस कॉन्फ़िगरेशन में बदलाव होता है, तो
कॉन्फ़िगर किया गया,
Android, पिछले कॉन्फ़िगरेशन की गतिविधि को इसके साथ ही मिटा देता है
लिंक किए गए व्यू. इसके बाद, वह इस गतिविधि को उन संसाधनों के साथ फिर से बनाता है जो
नया कॉन्फ़िगरेशन. वह गतिविधि जिसे खत्म करके फिर से बनाया जा रहा है, फिर
यह onCreate() में ग्लोबल नेविगेशन एलिमेंट को अपने-आप वायर अप कर देता है.
स्प्लिट व्यू लेआउट के दूसरे विकल्प इस्तेमाल करना
स्प्लिट-व्यू लेआउट या मास्टर/डिटेल लेआउट पहले इस्तेमाल किए जाते थे टैबलेट और दूसरी बड़ी स्क्रीन के लिए, डिज़ाइन करने का सबसे लोकप्रिय और सुझाया गया तरीका डिवाइस.
Android टैबलेट के आने के बाद से, डिवाइसों का नेटवर्क पहले से ज़्यादा विकसित हुआ है तेज़ी से काम करता है. एक ऐसी वजह जिसने बड़ी ऑडियंस के लिए डिज़ाइन स्पेस पर काफ़ी असर डाला है स्क्रीन डिवाइस में मल्टी-विंडो मोड की शुरुआत हो चुकी है, खास तौर पर फ़्री-फ़ॉर्म विंडो, जिनका साइज़ बदला जा सकता है. जैसे, ChromeOS डिवाइसों पर मौजूद विंडो. इससे आपके ऐप्लिकेशन की हर स्क्रीन पर ज़्यादा फ़ोकस बल्कि यह भी बताया गया है कि साइज़.
स्प्लिट व्यू लेआउट इंटरफ़ेस को लागू करने के लिए, नेविगेशन लाइब्रेरी, आपको दूसरे विकल्पों पर विचार करें.
डेस्टिनेशन के नाम
अगर आपने android:label का इस्तेमाल करके, ग्राफ़ में डेस्टिनेशन के नाम डाले हैं, तो
एट्रिब्यूट के लिए, संसाधन वैल्यू का ही इस्तेमाल करें. इससे आपका कॉन्टेंट
स्थानीय भाषा में होगा.
<navigation ...>
    <fragment
        android:id="@+id/my_dest"
        android:name="com.example.MyFragment"
        android:label="@string/my_dest_label"
        tools:layout="@layout/my_fragment" />
    ...
संसाधन वैल्यू का इस्तेमाल करने पर, आपके डेस्टिनेशन अपने-आप सबसे सही संसाधन तब लागू किए जाते हैं, जब भी आपका कॉन्फ़िगरेशन बदलता है.
