
يتوقّع كل حقل نص نوعًا معيّنًا من إدخال النص، مثل عنوان البريد الإلكتروني أو رقم الهاتف أو النص العادي. يجب تحديد نوع الإدخال لكل حقل نص في تطبيقك حتى يعرض النظام طريقة الإدخال المناسبة، مثل لوحة المفاتيح على الشاشة.
بالإضافة إلى نوع الأزرار المتاحة مع طريقة الإدخال، يمكنك تحديد سلوكيات، مثل ما إذا كانت طريقة الإدخال تقدّم اقتراحات إملائية، وما إذا كانت تضع الحرف الأول من الجمل الجديدة كبيرًا، وما إذا كانت تستبدل زرّ الرجوع إلى السطر بزرّ إجراء، مثل تم أو التالي. تعرض هذه الصفحة كيفية تحديد هذه الخصائص.
تحديد نوع لوحة المفاتيح
يجب دائمًا الإعلان عن طريقة الإدخال لحقول النص من خلال إضافة السمة
android:inputType
إلى العنصر
<EditText>.
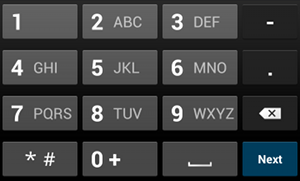
phoneعلى سبيل المثال، إذا كنت تريد طريقة إدخال لإدخال رقم هاتف، استخدِم القيمة "phone":
<EditText
    android:id="@+id/phone"
    android:layout_width="fill_parent"
    android:layout_height="wrap_content"
    android:hint="@string/phone_hint"
    android:inputType="phone" />
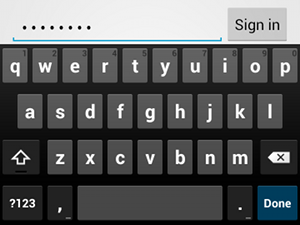
textPasswordإذا كان حقل النص مخصّصًا لكلمة مرور، استخدِم القيمة "textPassword" حتى يخفي حقل النص ما يدخله المستخدم:
<EditText
    android:id="@+id/password"
    android:hint="@string/password_hint"
    android:inputType="textPassword"
    ... />
هناك عدة قيم محتمَلة موثّقة مع السمة android:inputType، ويمكنك الجمع بين بعض القيم لتحديد مظهر طريقة الإدخال والسلوكيات الإضافية.
تفعيل الاقتراحات الإملائية والسلوكيات الأخرى
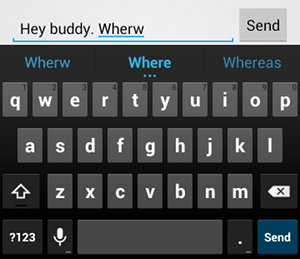
textAutoCorrect إلى توفير التصحيح التلقائي للأخطاء الإملائية.تتيح لك السمة android:inputType تحديد سلوكيات مختلفة لطريقة الإدخال. الأهم من ذلك، إذا كان حقل النص مخصّصًا لإدخال نص أساسي، مثل رسالة نصية، فعِّل التصحيح التلقائي للأخطاء الإملائية باستخدام القيمة "textAutoCorrect".
يمكنك الجمع بين سلوكيات مختلفة وأنماط طريقة الإدخال باستخدام السمة android:inputType. على سبيل المثال، إليك كيفية إنشاء حقل نص يضع الحرف الأول من الكلمة الأولى في الجملة كبيرًا ويصحّح أيضًا الأخطاء الإملائية تلقائيًا:
<EditText
    android:id="@+id/message"
    android:layout_width="wrap_content"
    android:layout_height="wrap_content"
    android:inputType=
        "textCapSentences|textAutoCorrect"
    ... />
تحديد إجراء طريقة الإدخال
توفّر معظم طرق الإدخال على الشاشة زرّ إجراء للمستخدم في أسفل الزاوية المناسبة لحقل النص الحالي. تلقائيًا، يستخدم النظام هذا الزرّ لإجراء التالي أو تم ما لم يكن حقل النص يتيح إدخال نص متعدد الأسطر، مثل android:inputType="textMultiLine"، وفي هذه الحالة يكون زرّ الإجراء هو الرجوع إلى السطر. ومع ذلك، يمكنك تحديد إجراءات أخرى قد تكون أكثر ملاءمةً لحقل النص، مثل إرسال أو انتقال.
لتحديد زرّ إجراء لوحة المفاتيح، استخدِم السمة
android:imeOptions
مع قيمة إجراء، مثل "actionSend" أو "actionSearch". على سبيل المثال:

android:imeOptions="actionSend".<EditText android:id="@+id/search" android:layout_width="fill_parent" android:layout_height="wrap_content" android:hint="@string/search_hint" android:inputType="text" android:imeOptions="actionSend" />
يمكنك بعد ذلك الاستماع إلى عمليات الضغط على زرّ الإجراء من خلال تحديد TextView.OnEditorActionListener لعنصر EditText. في المستمع، استجِب لمعرّف إجراء IME المناسب المحدّد في الفئة EditorInfo، مثل IME_ACTION_SEND، كما هو موضّح في المثال التالي:
Kotlin
findViewById<EditText>(R.id.search).setOnEditorActionListener { v, actionId, event ->
    return@setOnEditorActionListener when (actionId) {
        EditorInfo.IME_ACTION_SEND -> {
            sendMessage()
            true
        }
        else -> false
    }
}
Java
EditText editText = (EditText) findViewById(R.id.search);
editText.setOnEditorActionListener(new OnEditorActionListener() {
    @Override
    public boolean onEditorAction(TextView v, int actionId, KeyEvent event) {
        boolean handled = false;
        if (actionId == EditorInfo.IME_ACTION_SEND) {
            sendMessage();
            handled = true;
        }
        return handled;
    }
});
توفير اقتراحات الإكمال التلقائي
إذا كنت تريد تقديم اقتراحات للمستخدمين أثناء الكتابة، يمكنك استخدام فئة فرعية من EditText تُسمى AutoCompleteTextView.
لتنفيذ ميزة الإكمال التلقائي، يجب تحديد Adapter يقدّم الاقتراحات النصية. تتوفّر عدة محوّلات، حسب مصدر البيانات، مثل قاعدة بيانات أو مصفوفة.

AutoCompleteTextView مع اقتراحات نصيةيصف الإجراء التالي كيفية إعداد AutoCompleteTextView يقدّم اقتراحات من مصفوفة باستخدام ArrayAdapter:
- أضِف
AutoCompleteTextViewإلى تنسيقك. في ما يلي تنسيق يحتوي على حقل النص فقط:<?xml version="1.0" encoding="utf-8"?> <AutoCompleteTextView xmlns:android="http://schemas.android.com/apk/res/android" android:id="@+id/autocomplete_country" android:layout_width="fill_parent" android:layout_height="wrap_content" />
- حدِّد المصفوفة التي تحتوي على جميع الاقتراحات النصية. على سبيل المثال، إليك
مصفوفة بأسماء البلدان:
<?xml version="1.0" encoding="utf-8"?>
<resources>
    <string-array name="countries_array">
        <item>Afghanistan</item>
        <item>Albania</item>
        <item>Algeria</item>
        <item>American Samoa</item>
        <item>Andorra</item>
        <item>Angola</item>
        <item>Anguilla</item>
        <item>Antarctica</item>
        ...
    </string-array>
</resources>
- في
ActivityأوFragment، استخدِم الرمز التالي لتحديد المحوّل الذي يقدّم الاقتراحات:Kotlin
// Get a reference to the AutoCompleteTextView in the layout.
val textView = findViewById(R.id.autocomplete_country) as AutoCompleteTextView
// Get the string array.
val countries: Array<out String> = resources.getStringArray(R.array.countries_array)
// Create the adapter and set it to the AutoCompleteTextView.
ArrayAdapter<String>(this, android.R.layout.simple_list_item_1, countries).also { adapter ->
    textView.setAdapter(adapter)
}
Java
// Get a reference to the AutoCompleteTextView in the layout.
AutoCompleteTextView textView = (AutoCompleteTextView) findViewById(R.id.autocomplete_country);
// Get the string array.
String[] countries = getResources().getStringArray(R.array.countries_array);
// Create the adapter and set it to the AutoCompleteTextView.
ArrayAdapter<String> adapter =
        new ArrayAdapter<String>(this, android.R.layout.simple_list_item_1, countries);
textView.setAdapter(adapter);
في المثال السابق، يتم تهيئة
ArrayAdapterجديد لربط كل عنصر في مصفوفة السلاسل النصيةcountries_arrayبـTextViewموجود في التنسيقsimple_list_item_1. هذا تنسيق يوفّره Android ويقدّم مظهرًا عاديًا للنص في القائمة. -
عيِّن المحوّل لـ
AutoCompleteTextViewمن خلال استدعاءsetAdapter().