التنسيق النسبي
تنظيم صفحاتك في مجموعات
يمكنك حفظ المحتوى وتصنيفه حسب إعداداتك المفضّلة.
تجربة طريقة ComposeAllowed
Jetpack Compose هي مجموعة أدوات واجهة المستخدم التي ننصح بها لنظام التشغيل Android. تعرَّف على كيفية استخدام التنسيقات في Compose.
RelativeLayout
هو مجموعة عرض تعرض مشاهدات الأطفال بشكل نسبي.
المناصب. يمكن تحديد موضع كل طريقة عرض بالنسبة إلى العناصر التابعة (مثل
يسار أو أسفل عرض آخر) أو في مواضع بالنسبة إلى منطقة RelativeLayout
الرئيسية (مثل المحاذاة إلى الأسفل أو اليسار أو الوسط).
ملاحظة:
للحصول على أداء أفضل وإمكانية استخدام الأدوات، يجب بدلاً من ذلك إنشاء تنسيق باستخدام ConstraintLayout.

RelativeLayout
هي أداة فعالة جدًا لتصميم واجهة مستخدم
لأنه يمكن أن يلغي مجموعات طرق العرض المتداخلة والإبقاء على التسلسل الهرمي للتصميم مسطحًا، مما يحسن
أدائه. إذا وجدت نفسك تستخدم عدة مجموعات LinearLayout
مدمجة،
يمكنك استبدالها بـ RelativeLayout
واحد.
طرق عرض المكانة في السوق
يتيح RelativeLayout
لطرق العرض الفرعية تحديد موضعها بالنسبة إلى
الملف الشخصي للوالدَين أو لبعضهما البعض (يتم تحديد ذلك من خلال رقم التعريف) لذا يمكنك محاذاة عنصرين بواسطة الحد الأيمن، أو
جعل واحد أسفل الآخر، في وسط الشاشة، في منتصف اليسار، وهكذا. بشكل تلقائي، يمكن لجميع حسابات الأطفال
يتم رسم طرق العرض في أعلى يسار التخطيط، لذا يجب عليك تحديد موضع كل طريقة عرض
باستخدام خصائص التنسيق المختلفة المتاحة من RelativeLayout.LayoutParams
.
بعض خصائص التنسيق الكثيرة المتاحة للعرض في RelativeLayout
تشمل:
android:layout_alignParentTop
- إذا كانت
"true"
، فستتطابق الحافة العلوية من هذا العرض مع الحافة العلوية للجهاز الرئيسي.
android:layout_centerVertical
- إذا كانت
"true"
، يتم توسيط هذه المجموعة الفرعية عموديًا ضمن العنصر الرئيسي.
android:layout_below
- وضع الحافة العلوية لهذا العرض أسفل العرض المحدد برقم تعريف مورد.
android:layout_toRightOf
- وضع الحافة اليسرى لهذا العرض على يمين العرض المحدد برقم تعريف مورد.
هذه بعض الأمثلة فقط. تم توثيق جميع سمات التنسيق على RelativeLayout.LayoutParams
.
قيمة كل خاصية تخطيط إما منطقية
تفعيل موضع تنسيق بالنسبة إلى العنصر RelativeLayout
الرئيسي أو رقم تعريف
إلى طريقة عرض أخرى في التنسيق الذي ينبغي وضع العرض وفقًا له.
في تنسيق XML، يمكن تعريف التبعيات مقابل طرق العرض الأخرى في التنسيق بأي ترتيب.
على سبيل المثال، يمكنك الإفصاح عن أن "view1" أن يتم وضعها أسفل "view2" حتى إذا كانت "view2" هو الأخير
تم تعريفها في التسلسل الهرمي. يوضح المثال التالي هذا السيناريو.
مثال
يتم التأكيد على كل سمة من السمات التي تتحكم في الموضع النسبي لكل طريقة عرض.
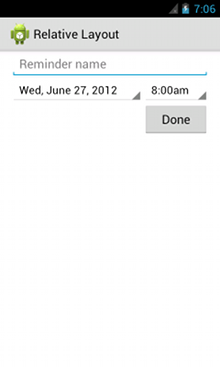
<?xml version="1.0" encoding="utf-8"?>
<RelativeLayout xmlns:android="http://schemas.android.com/apk/res/android"
android:layout_width="match_parent"
android:layout_height="match_parent"
android:paddingLeft="16dp"
android:paddingRight="16dp" >
<EditText
android:id="@+id/name"
android:layout_width="match_parent"
android:layout_height="wrap_content"
android:hint="@string/reminder" />
<Spinner
android:id="@+id/dates"
android:layout_width="0dp"
android:layout_height="wrap_content"
android:layout_below="@id/name"
android:layout_alignParentLeft="true"
android:layout_toLeftOf="@+id/times" />
<Spinner
android:id="@id/times"
android:layout_width="96dp"
android:layout_height="wrap_content"
android:layout_below="@id/name"
android:layout_alignParentRight="true" />
<Button
android:layout_width="96dp"
android:layout_height="wrap_content"
android:layout_below="@id/times"
android:layout_alignParentRight="true"
android:text="@string/done" />
</RelativeLayout>
للحصول على تفاصيل عن جميع سمات التنسيق المتاحة لكل طريقة عرض فرعية لـ "RelativeLayout
"، يُرجى الاطّلاع على RelativeLayout.LayoutParams
.
يخضع كل من المحتوى وعيّنات التعليمات البرمجية في هذه الصفحة للتراخيص الموضحّة في ترخيص استخدام المحتوى. إنّ Java وOpenJDK هما علامتان تجاريتان مسجَّلتان لشركة Oracle و/أو الشركات التابعة لها.
تاريخ التعديل الأخير: 2025-07-27 (حسب التوقيت العالمي المتفَّق عليه)
[[["يسهُل فهم المحتوى.","easyToUnderstand","thumb-up"],["ساعَدني المحتوى في حلّ مشكلتي.","solvedMyProblem","thumb-up"],["غير ذلك","otherUp","thumb-up"]],[["لا يحتوي على المعلومات التي أحتاج إليها.","missingTheInformationINeed","thumb-down"],["الخطوات معقدة للغاية / كثيرة جدًا.","tooComplicatedTooManySteps","thumb-down"],["المحتوى قديم.","outOfDate","thumb-down"],["ثمة مشكلة في الترجمة.","translationIssue","thumb-down"],["مشكلة في العيّنات / التعليمات البرمجية","samplesCodeIssue","thumb-down"],["غير ذلك","otherDown","thumb-down"]],["تاريخ التعديل الأخير: 2025-07-27 (حسب التوقيت العالمي المتفَّق عليه)"],[],[],null,["# Relative Layout\n\nTry the Compose way \nJetpack Compose is the recommended UI toolkit for Android. Learn how to work with layouts in Compose. \n[ConstraintLayout in Compose →](/jetpack/compose/layouts/constraintlayout) \n\n[RelativeLayout](/reference/android/widget/RelativeLayout) is a view group that displays child views in relative\npositions. The position of each view can be specified as relative to sibling elements (such as to\nthe left-of or below another view) or in positions relative to the parent [RelativeLayout](/reference/android/widget/RelativeLayout) area (such as aligned to the bottom, left or center).\n\n**Note:**\nFor better performance and tooling support, you should instead [build your layout with ConstraintLayout](/training/constraint-layout).\n\nA [RelativeLayout](/reference/android/widget/RelativeLayout) is a very powerful utility for designing a user interface\nbecause it can eliminate nested view groups and keep your layout hierarchy flat, which improves\nperformance. If you find yourself using several nested [LinearLayout](/reference/android/widget/LinearLayout) groups,\nyou may be able to replace them with a single [RelativeLayout](/reference/android/widget/RelativeLayout).\n\nPositioning Views\n-----------------\n\n[RelativeLayout](/reference/android/widget/RelativeLayout) lets child views specify their position relative to the\nparent view or to each other (specified by ID). So you can align two elements by right border, or\nmake one below another, centered in the screen, centered left, and so on. By default, all child\nviews are drawn at the top-left of the layout, so you must define the position of each view\nusing the various layout properties available from [RelativeLayout.LayoutParams](/reference/android/widget/RelativeLayout.LayoutParams).\n\nSome of the many layout properties available to views in a [RelativeLayout](/reference/android/widget/RelativeLayout)\ninclude:\n\n[`android:layout_alignParentTop`](/reference/android/widget/RelativeLayout.LayoutParams#attr_android:layout_alignParentTop)\n: If `\"true\"`, makes the top edge of this view match the top edge of the parent.\n\n[`android:layout_centerVertical`](/reference/android/widget/RelativeLayout.LayoutParams#attr_android:layout_centerVertical)\n: If `\"true\"`, centers this child vertically within its parent.\n\n[`android:layout_below`](/reference/android/widget/RelativeLayout.LayoutParams#attr_android:layout_below)\n: Positions the top edge of this view below the view specified with a resource ID.\n\n[`android:layout_toRightOf`](/reference/android/widget/RelativeLayout.LayoutParams#attr_android:layout_toRightOf)\n: Positions the left edge of this view to the right of the view specified with a resource ID.\n\nThese are just a few examples. All layout attributes are documented at [RelativeLayout.LayoutParams](/reference/android/widget/RelativeLayout.LayoutParams).\n\nThe value for each layout property is either a boolean to\nenable a layout position relative to the parent [RelativeLayout](/reference/android/widget/RelativeLayout) or an ID that\nreferences another view in the layout against which the view should be positioned.\n\nIn your XML layout, dependencies against other views in the layout can be declared in any order.\nFor example, you can declare that \"view1\" be positioned below \"view2\" even if \"view2\" is the last\nview declared in the hierarchy. The example below demonstrates such a scenario.\n\nExample\n-------\n\nEach of the attributes that control the relative position of each view are emphasized. \n\n```xml\n\u003c?xml version=\"1.0\" encoding=\"utf-8\"?\u003e\n\u003cRelativeLayout xmlns:android=\"http://schemas.android.com/apk/res/android\"\n android:layout_width=\"match_parent\"\n android:layout_height=\"match_parent\"\n android:paddingLeft=\"16dp\"\n android:paddingRight=\"16dp\" \u003e\n \u003cEditText\n android:id=\"@+id/name\"\n android:layout_width=\"match_parent\"\n android:layout_height=\"wrap_content\"\n android:hint=\"@string/reminder\" /\u003e\n \u003cSpinner\n android:id=\"@+id/dates\"\n android:layout_width=\"0dp\"\n android:layout_height=\"wrap_content\"\n android:layout_below=\"@id/name\"\n android:layout_alignParentLeft=\"true\"\n android:layout_toLeftOf=\"@+id/times\" /\u003e\n \u003cSpinner\n android:id=\"@id/times\"\n android:layout_width=\"96dp\"\n android:layout_height=\"wrap_content\"\n android:layout_below=\"@id/name\"\n android:layout_alignParentRight=\"true\" /\u003e\n \u003cButton\n android:layout_width=\"96dp\"\n android:layout_height=\"wrap_content\"\n android:layout_below=\"@id/times\"\n android:layout_alignParentRight=\"true\"\n android:text=\"@string/done\" /\u003e\n\u003c/RelativeLayout\u003e\n```\n\nFor details about all the layout attributes available to each child view of a [RelativeLayout](/reference/android/widget/RelativeLayout), see [RelativeLayout.LayoutParams](/reference/android/widget/RelativeLayout.LayoutParams)."]]