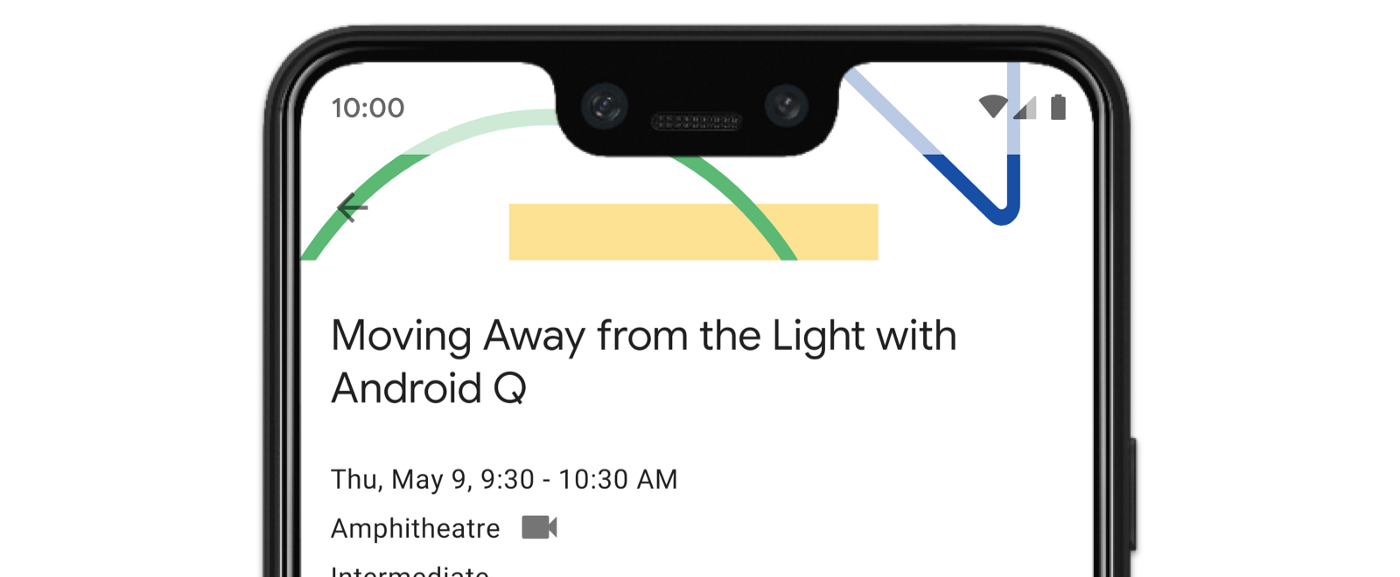
Android 15 以降を搭載するデバイスで SDK 35 以降をターゲットにすると、アプリがエッジ ツー エッジで表示されます。ウィンドウは、システムバーの背後に描画することで、ディスプレイの幅と高さ全体に広がります。システムバーには、ステータスバー、キャプション バー、ナビゲーション バーが含まれます。
多くのアプリにはトップ アプリバーがあります。トップ アプリバーは画面の上端まで広がり、ステータスバーの背後に表示されます。オプションで、コンテンツがスクロールされたときに、上部のアプリバーをステータスバーの高さまで縮小できます。
多くのアプリには、ボトム アプリバーまたはボトム ナビゲーション バーもあります。これらのバーは、画面の下端まで伸び、ナビゲーション バーの背後に表示される必要があります。それ以外の場合、アプリはナビゲーション バーの背後にスクロール コンテンツを表示する必要があります。
アプリにエッジ ツー エッジ レイアウトを実装する際は、次の点に注意してください。
- エッジ ツー エッジ表示を有効にする
- さまざまなフォーム ファクタでユーザー エクスペリエンスを最適化するために、アダプティブ レイアウトを実装する
- 視覚的な重なりに対処する
- システムバーの背後にスクリムを表示することを検討する
エッジ ツー エッジ表示を有効にする
アプリが SDK 35 以降をターゲットとしている場合、Android 15 以降のデバイスではエッジツーエッジが自動的に有効になります。
以前のバージョンの Android でエッジ ツー エッジを有効にするには、Activity の onCreate で enableEdgeToEdge を手動で呼び出します。
Kotlin
 override fun onCreate(savedInstanceState: Bundle?) {
         super.onCreate(savedInstanceState)
         WindowCompat.enableEdgeToEdge(window)
        ...
      }
Java
 @Override
      protected void onCreate(@Nullable Bundle savedInstanceState) {
        super.onCreate(savedInstanceState);
        WindowCompat.enableEdgeToEdge(getWindow());
        ...
      }
デフォルトでは、enableEdgeToEdge() はシステムバーを透明にします。ただし、3 ボタン ナビゲーション モードでは、ナビゲーション バーに半透明のスクリムが適用されます。システム アイコンとスクリムの色は、システムのライトモードまたはダークモードに基づいて調整されます。
enableEdgeToEdge() 関数を使用せずにアプリでエッジ ツー エッジ表示を有効にするには、エッジ ツー エッジ表示を手動で設定するをご覧ください。
インセットを使用してオーバーラップを処理する
図 3 に示すように、アプリのビューの一部がシステムバーの背後に描画される場合があります。
インセットに対応することで、重複に対処できます。インセットは、画面のどの部分がナビゲーション バーやステータスバーなどのシステム UI と交差するかを指定します。交差とは、コンテンツの上に表示されることを意味する場合もありますが、システム ジェスチャーをアプリに通知することもあります。
アプリをエッジツーエッジで表示する場合に適用されるインセットの種類は次のとおりです。
システムバー インセット: タップ可能で、システムバーと重なって隠れてしまわないようにする必要があるビューに最適です。
ディスプレイ カットアウト インセット: デバイスの形状により画面のカットアウトが生じる可能性がある領域。
システム ジェスチャー インセット: システムが使用するジェスチャー ナビゲーション領域で、アプリよりも優先されます。
システムバー インセット
システムバー インセットは、最もよく使用されるインセットです。システム UI がアプリの Z 軸上に表示される領域を表します。タップ可能で、システムバーと重なって隠れてしまわないようにする必要があるアプリ内のビューを移動またはパディングする場合に最適です。
たとえば、図 3 のフローティング アクション ボタン(FAB)は、ナビゲーション バーによって一部が隠されています。
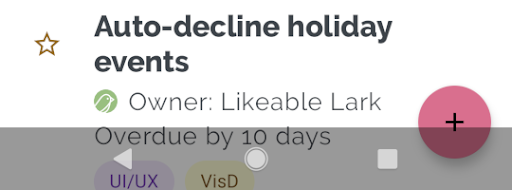
ジェスチャー モードまたはボタンモードでこのような視覚的な重複を回避するには、WindowInsetsCompat.Type.systemBars() を使用して getInsets(int) でビューのマージンを増やすことができます。
次のコード例は、システムバーのインセットを実装する方法を示しています。
Kotlin
ViewCompat.setOnApplyWindowInsetsListener(fab) { v, windowInsets ->
  val insets = windowInsets.getInsets(WindowInsetsCompat.Type.systemBars())
  // Apply the insets as a margin to the view. This solution sets
  // only the bottom, left, and right dimensions, but you can apply whichever
  // insets are appropriate to your layout. You can also update the view padding
  // if that's more appropriate.
  v.updateLayoutParams<MarginLayoutParams> {
      leftMargin = insets.left
      bottomMargin = insets.bottom
      rightMargin = insets.right
  }

  // Return CONSUMED if you don't want the window insets to keep passing
  // down to descendant views.
  WindowInsetsCompat.CONSUMED
}
Java
ViewCompat.setOnApplyWindowInsetsListener(fab, (v, windowInsets) -> {
  Insets insets = windowInsets.getInsets(WindowInsetsCompat.Type.systemBars());
  // Apply the insets as a margin to the view. This solution sets only the
  // bottom, left, and right dimensions, but you can apply whichever insets are
  // appropriate to your layout. You can also update the view padding if that's
  // more appropriate.
  MarginLayoutParams mlp = (MarginLayoutParams) v.getLayoutParams();
  mlp.leftMargin = insets.left;
  mlp.bottomMargin = insets.bottom;
  mlp.rightMargin = insets.right;
  v.setLayoutParams(mlp);

  // Return CONSUMED if you don't want the window insets to keep passing
  // down to descendant views.
    return WindowInsetsCompat.CONSUMED;
});
この解決策を図 3 の例に適用すると、図 4 に示すように、ボタンモードで視覚的な重複が発生しなくなります。
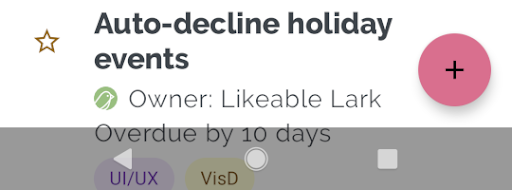
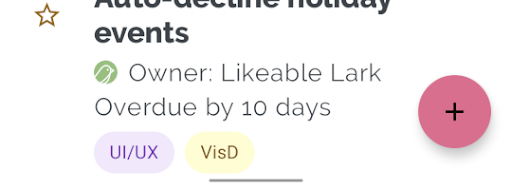
図 5 に示すように、ジェスチャー ナビゲーション モードでも同様です。
ディスプレイ カットアウト インセット
一部のデバイスにはディスプレイ カットアウトがあります。通常、カットアウトは画面の上部にあり、ステータスバーに含まれます。デバイスの画面が横向きモードの場合、切り抜きは縦の端にあることがあります。アプリが画面に表示するコンテンツに応じて、ディスプレイ カットアウトを避けるためにパディングを実装する必要があります。デフォルトでは、アプリはディスプレイ カットアウトに描画されるためです。
たとえば、多くのアプリ画面にはアイテムのリストが表示されます。ディスプレイ カットアウトやシステムバーでリスト項目を隠さないでください。
Kotlin
ViewCompat.setOnApplyWindowInsetsListener(binding.recyclerView) { v, insets ->
  val bars = insets.getInsets(
    WindowInsetsCompat.Type.systemBars()
      or WindowInsetsCompat.Type.displayCutout()
  )
  v.updatePadding(
    left = bars.left,
    top = bars.top,
    right = bars.right,
    bottom = bars.bottom,
  )
  WindowInsetsCompat.CONSUMED
}
Java
ViewCompat.setOnApplyWindowInsetsListener(mBinding.recyclerView, (v, insets) -> {
  Insets bars = insets.getInsets(
    WindowInsetsCompat.Type.systemBars()
    | WindowInsetsCompat.Type.displayCutout()
  );
  v.setPadding(bars.left, bars.top, bars.right, bars.bottom);
  return WindowInsetsCompat.CONSUMED;
});
システムバーとディスプレイ カットアウトのタイプの論理和を取って、WindowInsetsCompat の値を決定します。
clipToPadding を RecyclerView に設定して、パディングがリストアイテムとともにスクロールするようにします。これにより、次の例に示すように、ユーザーがスクロールしたときにアイテムがシステムバーの背後に移動します。
<androidx.recyclerview.widget.RecyclerView
    android:id="@+id/recycler_view"
    android:layout_width="match_parent"
    android:layout_height="match_parent"
    android:clipToPadding="false"
    app:layoutManager="androidx.recyclerview.widget.LinearLayoutManager" />
システム ジェスチャー インセット
システム ジェスチャー インセットは、システム ジェスチャーがアプリより優先されるウィンドウの領域を表します。これらの領域は、図 6 ではオレンジ色で示されています。
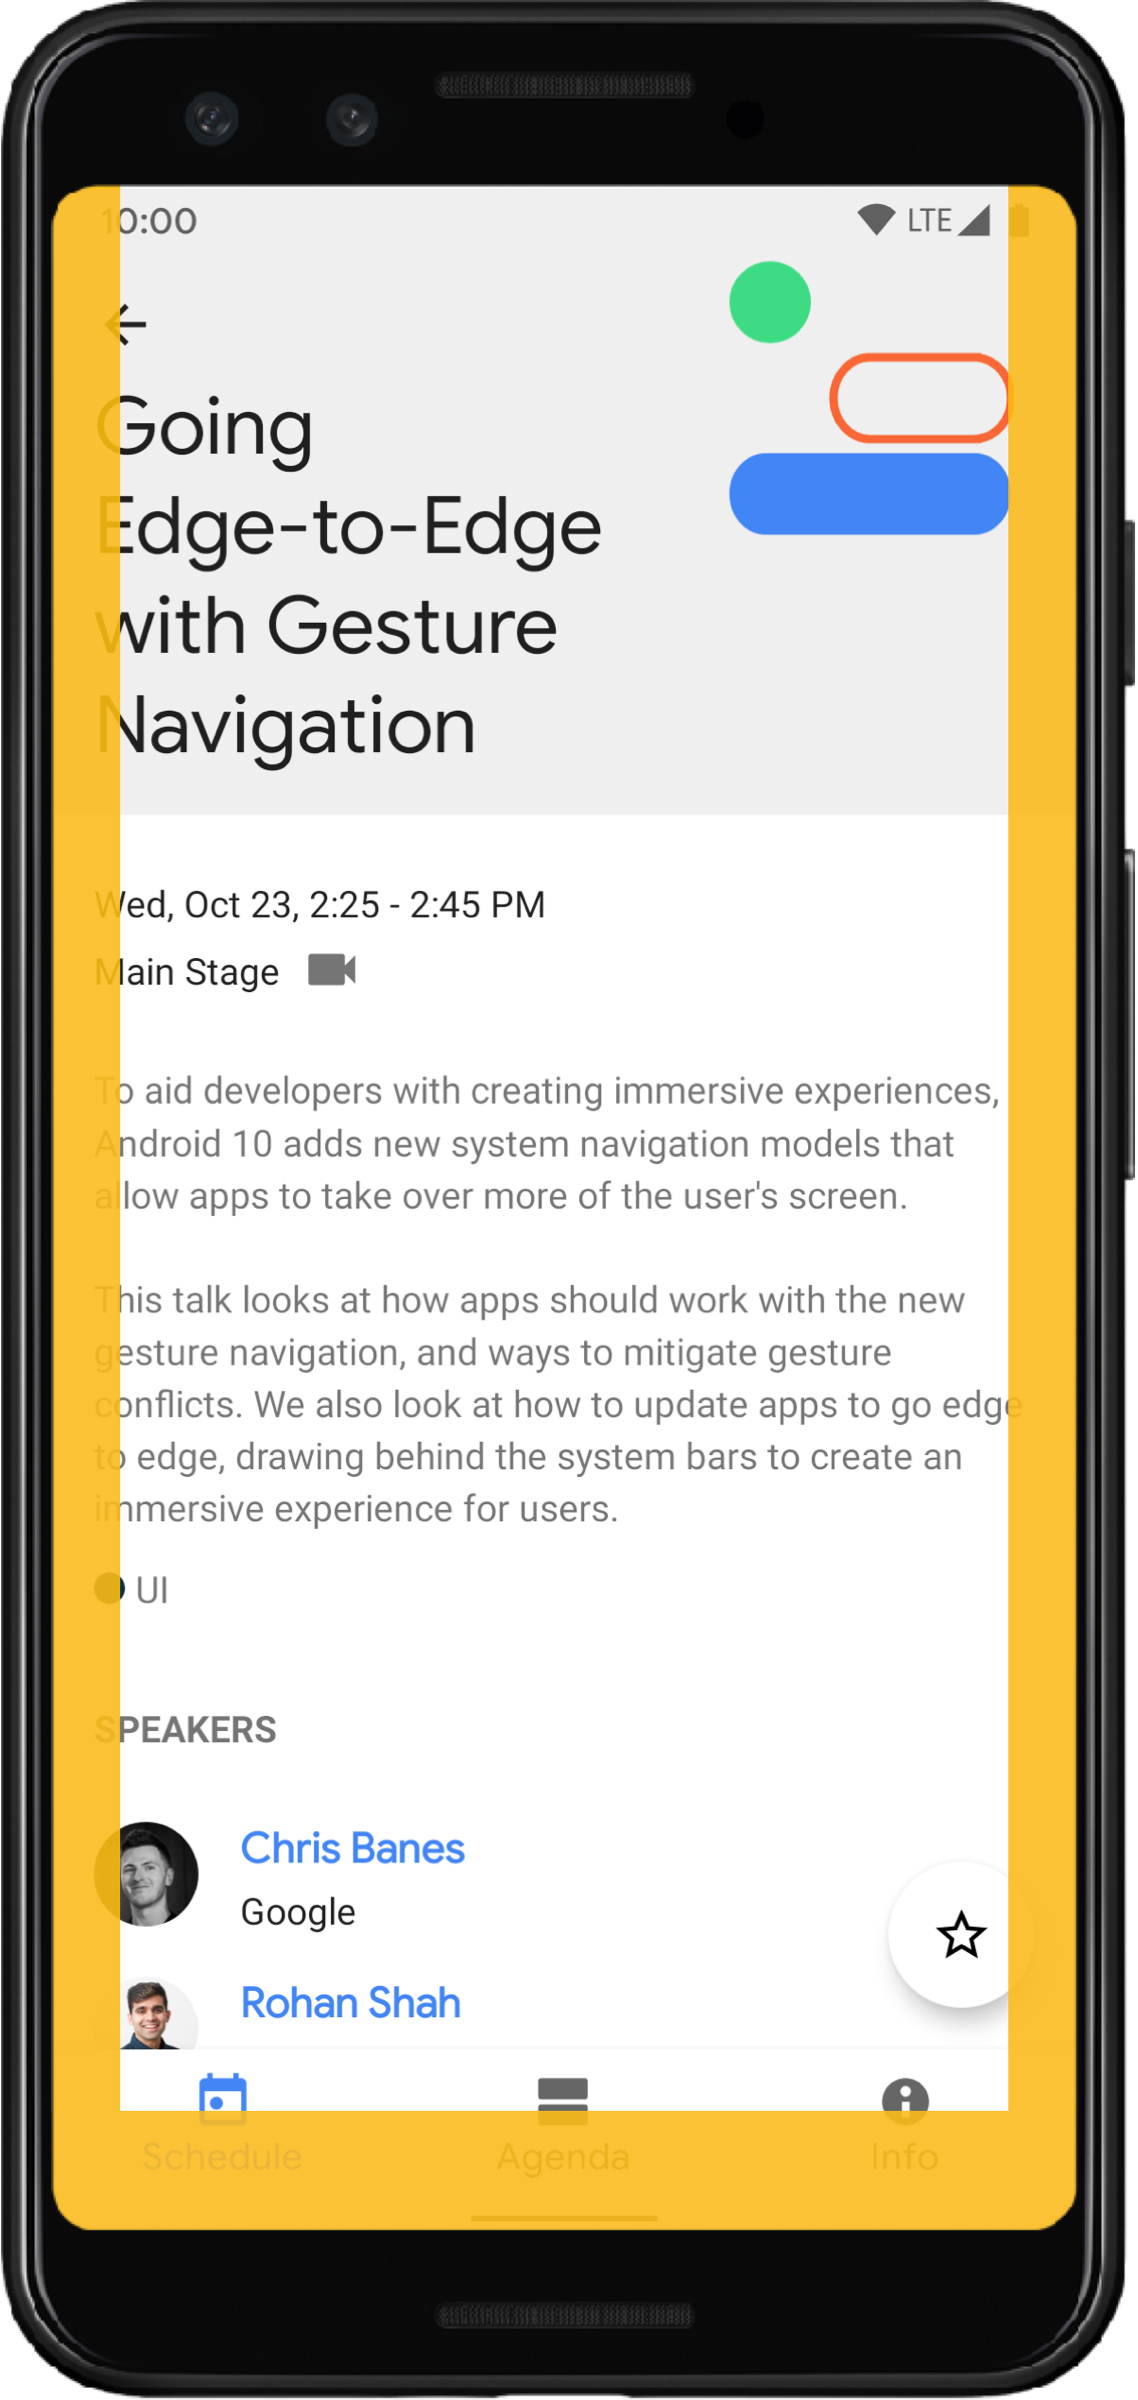
システムバー インセットと同様に、WindowInsetsCompat.Type.systemGestures() を使用して getInsets(int) を使用すると、システム ジェスチャー インセットの重複を回避できます。
このインセットは、スワイプ可能なビューを端から離れた位置に移動またはパディングする場合に使用します。一般的なユースケースには、ボトムシート、ゲームでのスワイプ、ViewPager2 を使用して実装されたカルーセルなどがあります。
Android 10 以降では、システム ジェスチャー インセットには、ホーム表示ジェスチャー用の下部のインセットと、戻るジェスチャー用の左右のインセットが含まれます。
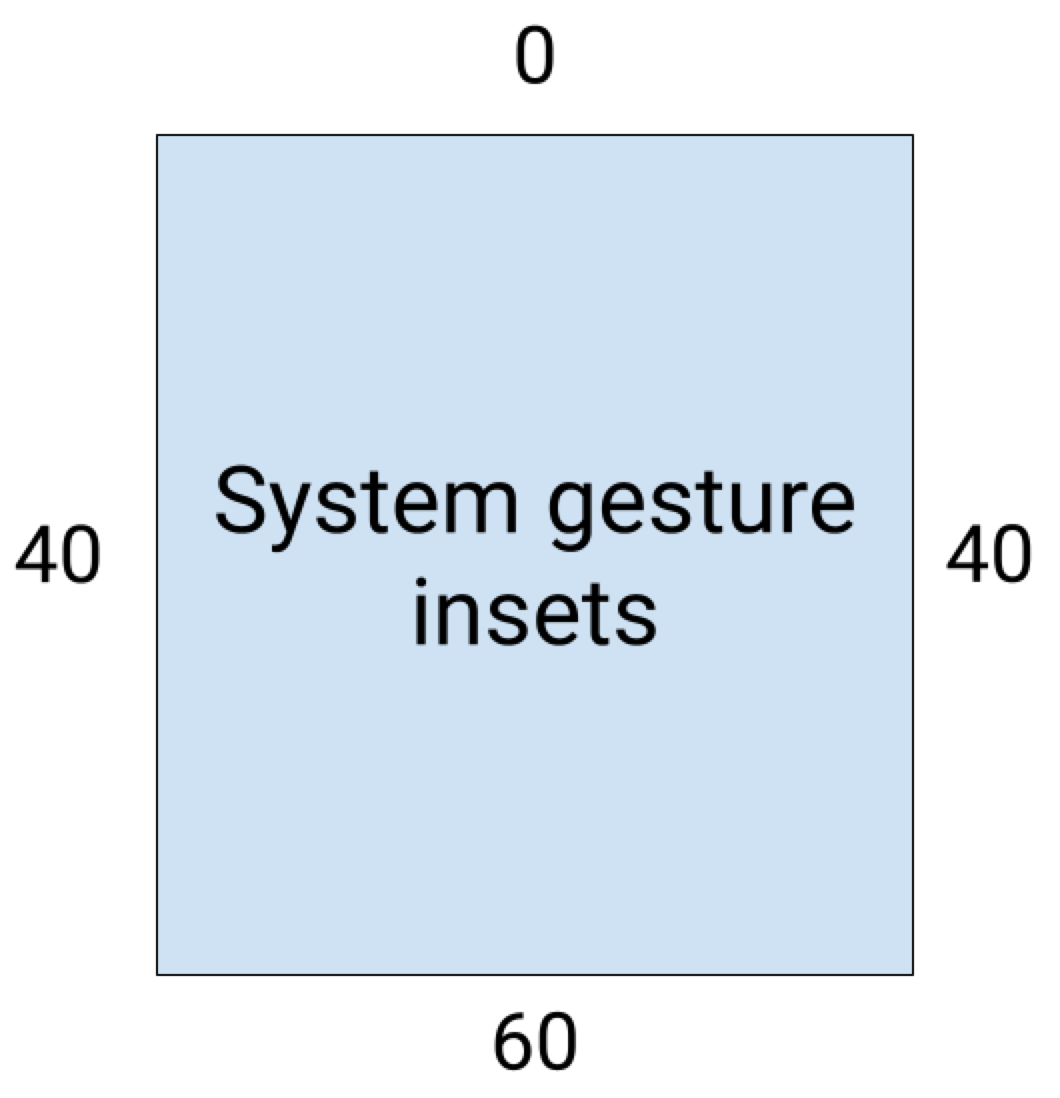
次のコード例は、システム ジェスチャー インセットを実装する方法を示しています。
Kotlin
ViewCompat.setOnApplyWindowInsetsListener(view) { view, windowInsets ->
    val insets = windowInsets.getInsets(WindowInsetsCompat.Type.systemGestures())
    // Apply the insets as padding to the view. Here, set all the dimensions
    // as appropriate to your layout. You can also update the view's margin if
    // more appropriate.
    view.updatePadding(insets.left, insets.top, insets.right, insets.bottom)

    // Return CONSUMED if you don't want the window insets to keep passing down
    // to descendant views.
    WindowInsetsCompat.CONSUMED
}
Java
ViewCompat.setOnApplyWindowInsetsListener(view, (v, windowInsets) -> {
    Insets insets = windowInsets.getInsets(WindowInsetsCompat.Type.systemGestures());
    // Apply the insets as padding to the view. Here, set all the dimensions
    // as appropriate to your layout. You can also update the view's margin if
    // more appropriate.
    view.setPadding(insets.left, insets.top, insets.right, insets.bottom);

    // Return CONSUMED if you don't want the window insets to keep passing down
    // to descendant views.
    return WindowInsetsCompat.CONSUMED;
});
マテリアル コンポーネント
ビューベースの Android マテリアル コンポーネント(com.google.android.material)の多くは、BottomAppBar、BottomNavigationView、NavigationRailView、NavigationView など、インセットを自動的に処理します。
ただし、AppBarLayout はインセットを自動的に処理しません。上部のインセットを処理するために android:fitsSystemWindows="true" を追加します。
Compose のマテリアル コンポーネントでインセットを処理する方法をご覧ください。
下位互換性のあるインセット ディスパッチ
インセットが子ビューにディスパッチされるのを停止し、パディングが過剰になるのを防ぐには、WindowInsetsCompat.CONSUMED 定数を使用してインセットを消費します。ただし、Android 10(API レベル 29 以前)を搭載したデバイスでは、WindowInsetsCompat.CONSUMED の呼び出し後にインセットが兄弟にディスパッチされないため、意図しない視覚的なオーバーラップが発生する可能性があります。
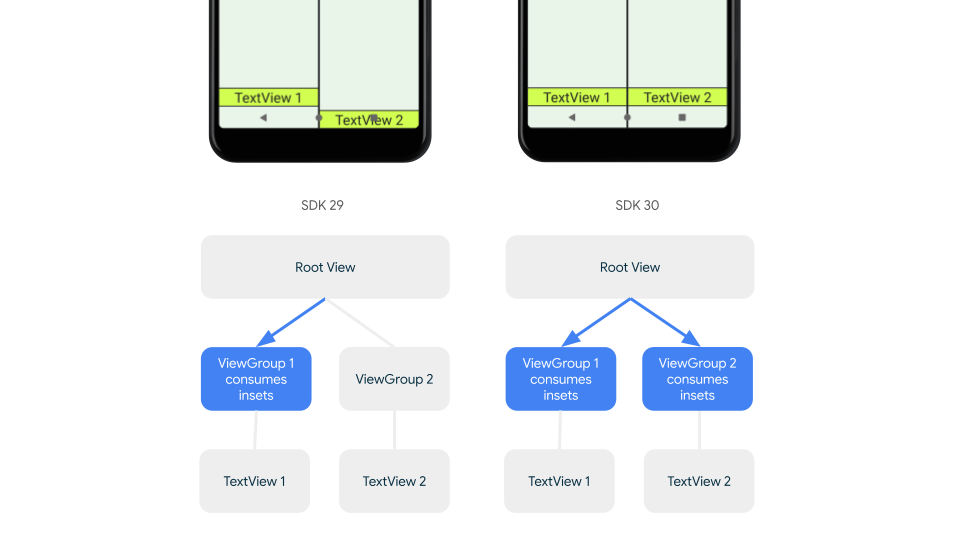
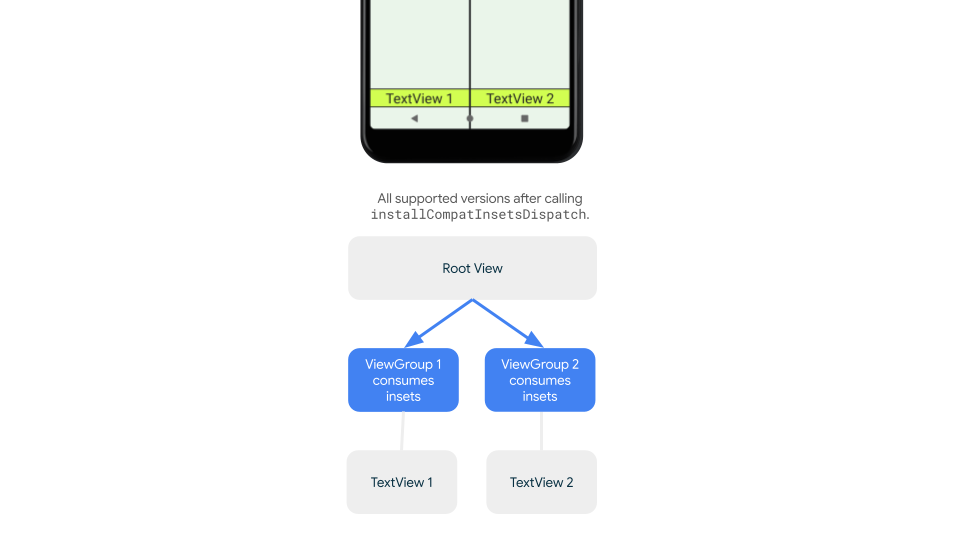
サポートされているすべての Android バージョンでインセットが兄弟にディスパッチされることを確認するには、AndroidX Core および Core-ktx 1.16.0-alpha01 以降で使用可能な ViewGroupCompat#installCompatInsetsDispatch をインセットを消費する前に使用します。
Kotlin
// Use the i.d. assigned to your layout's root view, e.g. R.id.main
val rootView = findViewById(R.id.main)
// Call before consuming insets
ViewGroupCompat.installCompatInsetsDispatch(rootView)
Java
// Use the i.d. assigned to your layout's root view, e.g. R.id.main
LinearLayout rootView = findViewById(R.id.main);
// Call before consuming insets
ViewGroupCompat.installCompatInsetsDispatch(rootView);
没入モード
一部のコンテンツは全画面表示で視聴すると、ユーザーの没入感が高まります。WindowInsetsController ライブラリと WindowInsetsControllerCompat ライブラリを使用して、没入モードのシステムバーを非表示にできます。
Kotlin
val windowInsetsController =
      WindowCompat.getInsetsController(window, window.decorView)

// Hide the system bars.
windowInsetsController.hide(Type.systemBars())

// Show the system bars.
windowInsetsController.show(Type.systemBars())
Java
Window window = getWindow();
WindowInsetsControllerCompat windowInsetsController =
      WindowCompat.getInsetsController(window, window.getDecorView());
if (windowInsetsController == null) {
    return;
  }
// Hide the system bars.
windowInsetsController.hide(WindowInsetsCompat.Type.systemBars());

// Show the system bars.
windowInsetsController.show(WindowInsetsCompat.Type.systemBars());
この機能の実装について詳しくは、没入モードのシステムバーを非表示にするをご覧ください。
システムバー アイコン
enableEdgeToEdge を呼び出すと、デバイスのテーマが変更されたときにシステムバーのアイコンの色が更新されます。
エッジ ツー エッジにするには、アプリの背景とコントラストをなすように、システムバーのアイコンの色を手動で更新する必要がある場合があります。たとえば、ライト ステータス バー アイコンを作成するには:
Kotlin
WindowCompat.getInsetsController(window, window.decorView)
    .isAppearanceLightStatusBars = false
Java
WindowCompat.getInsetsController(window, window.getDecorView())
    .setAppearanceLightStatusBars(false);
システムバーの保護
アプリが SDK 35 以上をターゲットにすると、エッジ ツー エッジが強制適用されます。システム ステータスバーとジェスチャー ナビゲーション バーは透明ですが、3 ボタン ナビゲーション バーは半透明です。enableEdgeToEdge を呼び出して、下位互換性を確保します。
ただし、システム デフォルトがすべてのユースケースで機能するとは限りません。透明なシステムバーと半透明のシステムバーのどちらを使用するかについては、Android システムバーのデザイン ガイダンスとエッジ ツー エッジのデザインを参照してください。
透明なシステムバーを作成する
Android 15(SDK 35)以上をターゲットにするか、以前のバージョンのデフォルト引数で enableEdgeToEdge() を呼び出すことで、透明なステータス バーを作成します。
Android 15 以降をターゲットとするか、以前のバージョンのデフォルト引数で enableEdgeToEdge() を呼び出すことで、透過的なジェスチャー ナビゲーション バーを作成します。3 ボタン ナビゲーション バーの場合、Window.setNavigationBarContrastEnforced を false に設定します。そうしないと、半透明のスクリムが適用されます。
半透明のシステムバーを作成する
半透明のステータスバーを作成するには、次の手順を行います。
androidx-core依存関係を 1.16.0-beta01 以降に更新します。- XML レイアウトを
androidx.core.view.insets.ProtectionLayoutでラップし、ID を割り当てます。 ProtectionLayoutにプログラムでアクセスして保護を設定し、ステータスバーのサイドとGradientProtectionを指定します。
<androidx.core.view.insets.ProtectionLayout xmlns:android="http://schemas.android.com/apk/res/android" android:id="@+id/list_protection" android:layout_width="match_parent" android:layout_height="match_parent"> <ScrollView android:id="@+id/item_list" android:clipToPadding="false" android:layout_width="match_parent" android:layout_height="match_parent"> <!--items--> </ScrollView> </androidx.core.view.insets.ProtectionLayout>
findViewById<ProtectionLayout>(R.id.list_protection) .setProtections( listOf( GradientProtection( WindowInsetsCompat.Side.TOP, // Ideally, this is the pane's background color paneBackgroundColor ) ) )
GradientProtection に渡された ColorInt がコンテンツの背景と一致していることを確認します。たとえば、折りたたみ式デバイスに表示されるリスト / 詳細レイアウトでは、リストパネルと詳細パネルで異なる色の GradientProtections を使用できます。
半透明のジェスチャー ナビゲーション バーを作成しないでください。半透明の 3 ボタン ナビゲーション バーを作成するには、次のいずれかを行います。
- レイアウトがすでに
ProtectionViewでラップされている場合は、追加のColorProtectionまたはGradientProtectionをsetProtectionsメソッドに渡すことができます。その前に、window.isNavigationBarContrastEnforced = falseを確認してください。 - それ以外の場合は、
window.isNavigationBarContrastEnforced = trueを設定します。
その他のヒント
インセットを処理する際のその他のヒント。
スクロール コンテンツを端から端まで表示する
インセットを処理し、clipToPadding を false に設定することで、RecyclerView または NestedScrollView の最後のリスト項目がシステムバーによって隠されないようにします。
次の動画は、エッジ ツー エッジ ディスプレイが無効(左)と有効(右)の RecyclerView を示しています。
コード例については、RecyclerView で動的リストを作成するセクションのコード スニペットをご覧ください。
全画面表示ダイアログをエッジ ツー エッジにする
全画面表示のダイアログを端から端まで表示するには、Dialog で enableEdgeToEdge を呼び出します。
Kotlin
class MyAlertDialogFragment : DialogFragment() {
    override fun onStart(){
        super.onStart()
        dialog?.window?.let { WindowCompat.enableEdgeToEdge(it) }
    }
    ...
}
Java
public class MyAlertDialogFragment extends DialogFragment {
    @Override
    public void onStart() {
        super.onStart();
        Dialog dialog = getDialog();
        if (dialog != null) {
            Window window = dialog.getWindow();
            if (window != null) {
                WindowCompat.enableEdgeToEdge(window);
            }
        }
    }
    ...
}
参考情報
エッジ ツー エッジの詳細については、以下のリファレンスをご覧ください。
ブログ
デザイン
その他のドキュメント
動画

