通知功能可在應用程式處於閒置狀態時,提供有關應用程式事件的簡短即時資訊。本文件將說明如何建立具有各種功能的通知。如需通知在 Android 中的顯示方式簡介,請參閱「通知總覽」。如需使用通知的程式碼範例,請參閱 GitHub 上的人員範例。
本頁的程式碼使用 AndroidX 程式庫的 NotificationCompat API。這些 API 可讓您新增僅適用於較新版本 Android 的功能,同時仍提供與 Android 9 (API 級別 28) 的相容性。不過,有些功能 (例如內嵌回覆動作) 在舊版上會導致免人工管理。
新增 AndroidX Core Library
雖然大多數透過 Android Studio 建立的專案都包含使用 NotificationCompat 所需的依附元件,請確認模組層級的 build.gradle 檔案包含下列依附元件:
Groovy
dependencies {
    implementation "androidx.core:core:2.2.0"
}
Kotlin
dependencies {
    implementation("androidx.core:core-ktx:2.2.0")
}
建立基本通知
以最基本簡潔的形式 (也稱為「收合表單」) 顯示通知,會顯示圖示、標題和少量文字內容。本節說明如何建立通知,讓使用者能夠輕觸以在應用程式中啟動活動。

圖 1:通知內容包含圖示、標題和一些文字。
如要進一步瞭解通知的各個部分,請參閱通知分析。
宣告執行階段權限
Android 13 (API 級別 33) 以上版本支援執行階段權限,以便發布來自應用程式的非豁免 (包括前景服務 (FGS)) 通知。
以下程式碼片段會顯示您需要在應用程式資訊清單檔案中宣告的權限:
<manifest ...>
    <uses-permission android:name="android.permission.POST_NOTIFICATIONS"/>
    <application ...>
        ...
    </application>
</manifest>
如要進一步瞭解執行階段權限,請參閱「通知執行階段權限」。
設定通知內容
如要開始使用,請使用 NotificationCompat.Builder 物件設定通知的內容和管道。以下範例說明如何建立含有以下內容的通知:
由
setSmallIcon()設定的小型圖示。這是唯一需要向使用者顯示的內容。由
setContentTitle()設定的標題。內文,由
setContentText()設定。通知優先順序,由
setPriority()設定。優先順序可決定通知在 Android 7.1 以下版本中的干擾程度。如果是 Android 8.0 以上版本,請改為設定管道重要性 (如下一節所示)。
Kotlin
var builder = NotificationCompat.Builder(this, CHANNEL_ID)
        .setSmallIcon(R.drawable.notification_icon)
        .setContentTitle(textTitle)
        .setContentText(textContent)
        .setPriority(NotificationCompat.PRIORITY_DEFAULT)
Java
NotificationCompat.Builder builder = new NotificationCompat.Builder(this, CHANNEL_ID)
        .setSmallIcon(R.drawable.notification_icon)
        .setContentTitle(textTitle)
        .setContentText(textContent)
        .setPriority(NotificationCompat.PRIORITY_DEFAULT);
NotificationCompat.Builder 建構函式會要求您提供頻道 ID。如要與 Android 8.0 (API 級別 26) 以上版本相容,此為必要條件,但舊版會忽略此選項。
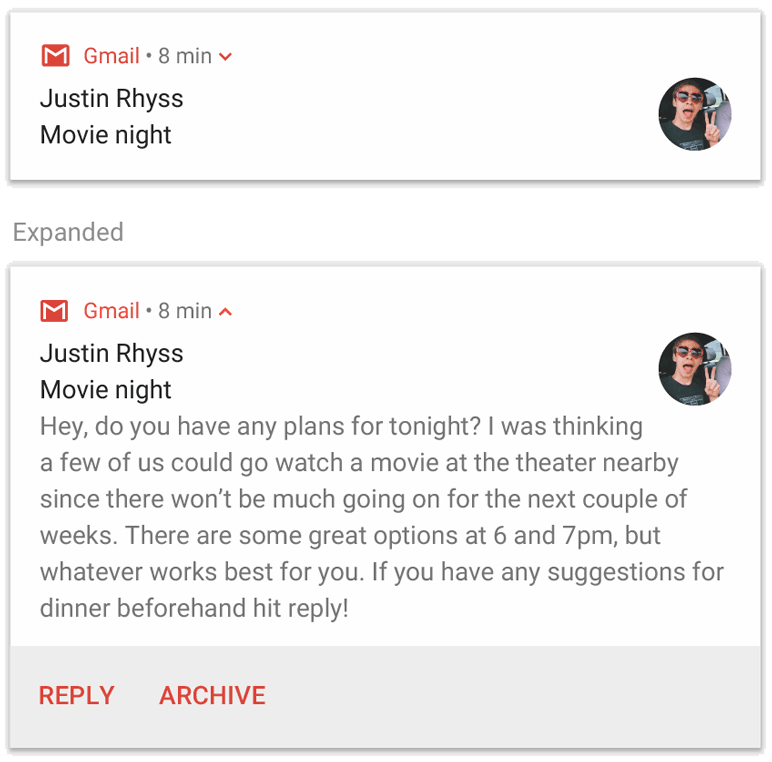
根據預設,通知的文字內容會遭到截斷,以配合一行。您可以建立可展開的通知來顯示其他資訊。

圖 2. 在收合和展開的表單中顯示可展開的通知。
如果想增加通知的長度,可以使用 setStyle() 新增樣式範本,啟用可展開的通知。例如,以下程式碼會建立較大的文字區域:
Kotlin
var builder = NotificationCompat.Builder(this, CHANNEL_ID)
        .setSmallIcon(R.drawable.notification_icon)
        .setContentTitle("My notification")
        .setContentText("Much longer text that cannot fit one line...")
        .setStyle(NotificationCompat.BigTextStyle()
                .bigText("Much longer text that cannot fit one line..."))
        .setPriority(NotificationCompat.PRIORITY_DEFAULT)
Java
NotificationCompat.Builder builder = new NotificationCompat.Builder(this, CHANNEL_ID)
        .setSmallIcon(R.drawable.notification_icon)
        .setContentTitle("My notification")
        .setContentText("Much longer text that cannot fit one line...")
        .setStyle(new NotificationCompat.BigTextStyle()
                .bigText("Much longer text that cannot fit one line..."))
        .setPriority(NotificationCompat.PRIORITY_DEFAULT);
如要進一步瞭解其他大型通知樣式 (包括如何新增圖片和媒體播放控制項),請參閱「建立可展開通知」。
建立頻道並設定重要性
在 Android 8.0 以上版本傳送通知之前,請將 NotificationChannel 的執行個體傳遞至 createNotificationChannel(),向系統註冊應用程式的通知管道。SDK_INT 版本的條件封鎖了下列程式碼:
Kotlin
private fun createNotificationChannel() {
    // Create the NotificationChannel, but only on API 26+ because
    // the NotificationChannel class is not in the Support Library.
    if (Build.VERSION.SDK_INT >= Build.VERSION_CODES.O) {
        val name = getString(R.string.channel_name)
        val descriptionText = getString(R.string.channel_description)
        val importance = NotificationManager.IMPORTANCE_DEFAULT
        val channel = NotificationChannel(CHANNEL_ID, name, importance).apply {
            description = descriptionText
        }
        // Register the channel with the system.
        val notificationManager: NotificationManager =
            getSystemService(Context.NOTIFICATION_SERVICE) as NotificationManager
        notificationManager.createNotificationChannel(channel)
    }
}
Java
private void createNotificationChannel() {
    // Create the NotificationChannel, but only on API 26+ because
    // the NotificationChannel class is not in the Support Library.
    if (Build.VERSION.SDK_INT >= Build.VERSION_CODES.O) {
        CharSequence name = getString(R.string.channel_name);
        String description = getString(R.string.channel_description);
        int importance = NotificationManager.IMPORTANCE_DEFAULT;
        NotificationChannel channel = new NotificationChannel(CHANNEL_ID, name, importance);
        channel.setDescription(description);
        // Register the channel with the system; you can't change the importance
        // or other notification behaviors after this.
        NotificationManager notificationManager = getSystemService(NotificationManager.class);
        notificationManager.createNotificationChannel(channel);
    }
}
由於您必須先建立通知管道,才能在 Android 8.0 及以上版本中發布任何通知,因此請在應用程式啟動時執行這段程式碼。可以放心重複呼叫此方法,因為建立現有的通知管道並不會執行任何作業。
NotificationChannel 建構函式需要 importance,且使用 NotificationManager 類別的其中一個常數。這個參數可決定如何干擾使用者,接收屬於此管道的通知。使用 setPriority() 設定「Priority」以支援 Android 7.1 以下版本,如上述範例所示。
雖然您必須設定通知重要性或優先順序 (如以下範例所示),但系統不保證您收到的快訊行為。在某些情況下,系統可能會根據其他因素變更重要性等級,且使用者隨時可以重新定義特定管道的重要性等級。
如要進一步瞭解不同層級代表的意義,請參閱通知重要性等級。
設定通知輕觸動作
每個通知都必須回應輕觸動作,通常是在應用程式中開啟與通知對應的活動。如要這麼做,請指定以 PendingIntent 物件定義的內容意圖,並傳遞至 setContentIntent()。
下列程式碼片段說明如何建立基本意圖,以在使用者輕觸通知時開啟活動:
Kotlin
// Create an explicit intent for an Activity in your app.
val intent = Intent(this, AlertDetails::class.java).apply {
    flags = Intent.FLAG_ACTIVITY_NEW_TASK or Intent.FLAG_ACTIVITY_CLEAR_TASK
}
val pendingIntent: PendingIntent = PendingIntent.getActivity(this, 0, intent, PendingIntent.FLAG_IMMUTABLE)

val builder = NotificationCompat.Builder(this, CHANNEL_ID)
        .setSmallIcon(R.drawable.notification_icon)
        .setContentTitle("My notification")
        .setContentText("Hello World!")
        .setPriority(NotificationCompat.PRIORITY_DEFAULT)
        // Set the intent that fires when the user taps the notification.
        .setContentIntent(pendingIntent)
        .setAutoCancel(true)
Java
// Create an explicit intent for an Activity in your app.
Intent intent = new Intent(this, AlertDetails.class);
intent.setFlags(Intent.FLAG_ACTIVITY_NEW_TASK | Intent.FLAG_ACTIVITY_CLEAR_TASK);
PendingIntent pendingIntent = PendingIntent.getActivity(this, 0, intent, PendingIntent.FLAG_IMMUTABLE);

NotificationCompat.Builder builder = new NotificationCompat.Builder(this, CHANNEL_ID)
        .setSmallIcon(R.drawable.notification_icon)
        .setContentTitle("My notification")
        .setContentText("Hello World!")
        .setPriority(NotificationCompat.PRIORITY_DEFAULT)
        // Set the intent that fires when the user taps the notification.
        .setContentIntent(pendingIntent)
        .setAutoCancel(true);
這個程式碼會呼叫 setAutoCancel(),並在使用者輕觸時自動移除通知。
上述範例中的 setFlags() 方法可在使用者透過通知開啟您的應用程式後,保留預期的導覽體驗。建議您根據要啟動的活動類型使用這項資訊,可以是下列其中一項:
專為回應通知而存在的活動。使用者正常使用應用程式期間,系統沒有理由前往該活動,因此活動會啟動新工作,而不是新增到應用程式現有的工作和返回堆疊。這是在上述範例中建立的意圖類型。
應用程式中一般應用程式流程中的活動。在此情況下,啟動活動會建立返回堆疊,藉此保留使用者對「返回」和「向上」按鈕的期望。
如要進一步瞭解其他設定通知意圖的方式,請參閱「透過通知啟動活動」。
顯示通知
如要顯示通知,請呼叫 NotificationManagerCompat.notify(),並向其傳遞通知的專屬 ID 和 NotificationCompat.Builder.build() 的結果。例如:
Kotlin
with(NotificationManagerCompat.from(this)) {
    if (ActivityCompat.checkSelfPermission(
            this@MainActivity,
            Manifest.permission.POST_NOTIFICATIONS
        ) != PackageManager.PERMISSION_GRANTED
    ) {
        // TODO: Consider calling
        // ActivityCompat#requestPermissions
        // here to request the missing permissions, and then overriding
        // public fun onRequestPermissionsResult(requestCode: Int, permissions: Array<out String>,
        //                                        grantResults: IntArray)
        // to handle the case where the user grants the permission. See the documentation
        // for ActivityCompat#requestPermissions for more details.

        return@with
    }
    // notificationId is a unique int for each notification that you must define.
    notify(NOTIFICATION_ID, builder.build())
}
Java
with(NotificationManagerCompat.from(this)) {
   if (ActivityCompat.checkSelfPermission(
           this@MainActivity,
           Manifest.permission.POST_NOTIFICATIONS
       ) != PackageManager.PERMISSION_GRANTED
   ) {
       // TODO: Consider calling
       // ActivityCompat#requestPermissions
       // here to request the missing permissions, and then overriding
       // public void onRequestPermissionsResult(int requestCode, String[] permissions,
       //                                        int[] grantResults)
       // to handle the case where the user grants the permission. See the documentation
       // for ActivityCompat#requestPermissions for more details.

       return
   }
   // notificationId is a unique int for each notification that you must define.
   notify(NOTIFICATION_ID, builder.build())
}
請儲存您傳遞至 NotificationManagerCompat.notify() 的通知 ID,因為在更新或移除通知時需要使用這個 ID。
此外,如要在搭載 Android 13 以上版本的裝置上測試基本通知,請手動開啟通知,或建立對話方塊以要求通知。
新增動作按鈕
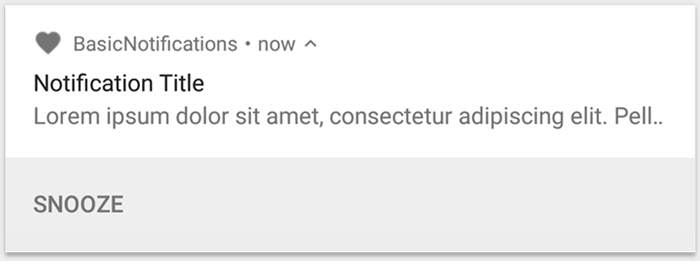
通知最多可提供三個動作按鈕,讓使用者能快速回應,例如延後提醒或回覆簡訊。但這些動作按鈕不得複製使用者輕觸通知時執行的動作。

圖 3. 有一個動作按鈕的通知。
如要新增動作按鈕,請將 PendingIntent 傳遞至 addAction() 方法。這就像設定通知的預設輕觸動作,除了啟動活動以外,您也可以執行其他操作,例如啟動 BroadcastReceiver 以在背景執行工作,避免該動作中斷已經開啟的應用程式。
例如,以下程式碼顯示如何將廣播傳送至特定接收器:
Kotlin
val ACTION_SNOOZE = "snooze"

val snoozeIntent = Intent(this, MyBroadcastReceiver::class.java).apply {
    action = ACTION_SNOOZE
    putExtra(EXTRA_NOTIFICATION_ID, 0)
}
val snoozePendingIntent: PendingIntent =
    PendingIntent.getBroadcast(this, 0, snoozeIntent, 0)
val builder = NotificationCompat.Builder(this, CHANNEL_ID)
        .setSmallIcon(R.drawable.notification_icon)
        .setContentTitle("My notification")
        .setContentText("Hello World!")
        .setPriority(NotificationCompat.PRIORITY_DEFAULT)
        .setContentIntent(pendingIntent)
        .addAction(R.drawable.ic_snooze, getString(R.string.snooze),
                snoozePendingIntent)
Java
String ACTION_SNOOZE = "snooze"

Intent snoozeIntent = new Intent(this, MyBroadcastReceiver.class);
snoozeIntent.setAction(ACTION_SNOOZE);
snoozeIntent.putExtra(EXTRA_NOTIFICATION_ID, 0);
PendingIntent snoozePendingIntent =
        PendingIntent.getBroadcast(this, 0, snoozeIntent, 0);

NotificationCompat.Builder builder = new NotificationCompat.Builder(this, CHANNEL_ID)
        .setSmallIcon(R.drawable.notification_icon)
        .setContentTitle("My notification")
        .setContentText("Hello World!")
        .setPriority(NotificationCompat.PRIORITY_DEFAULT)
        .setContentIntent(pendingIntent)
        .addAction(R.drawable.ic_snooze, getString(R.string.snooze),
                snoozePendingIntent);
如要進一步瞭解如何建構 BroadcastReceiver 來執行背景工作,請參閱「廣播總覽」。
如果您要嘗試使用媒體播放按鈕 (例如暫停和跳過曲目) 建構通知,請參閱這篇文章,瞭解如何使用媒體控制項建立通知。
新增直接回覆操作
Android 7.0 (API 級別 24) 推出的直接回覆動作可讓使用者直接在通知中輸入文字。即可將文字傳送至應用程式,無需開啟活動。舉例來說,您可以利用直接回覆動作,讓使用者透過通知回覆簡訊或更新工作清單。

圖 4. 輕觸「回覆」按鈕可開啟文字輸入內容。
直接回覆動作會在通知中顯示為額外的按鈕,可開啟文字輸入。使用者完成輸入後,系統會將文字回應附加至您為通知動作指定的意圖,並將意圖傳送至應用程式。
新增回覆按鈕
如要建立支援直接回覆的通知動作,請按照下列步驟操作:
- 建立可以新增至通知動作的
RemoteInput.Builder執行個體。此類別的建構函式接受系統做為文字輸入索引鍵使用的字串。您的應用程式之後會使用該金鑰擷取輸入文字。Kotlin
  // Key for the string that's delivered in the action's intent.
  private val KEY_TEXT_REPLY = "key_text_reply"
  var replyLabel: String = resources.getString(R.string.reply_label)
  var remoteInput: RemoteInput = RemoteInput.Builder(KEY_TEXT_REPLY).run {
      setLabel(replyLabel)
      build()
  }
Java
// Key for the string that's delivered in the action's intent. private static final String KEY_TEXT_REPLY = "key_text_reply"; String replyLabel = getResources().getString(R.string.reply_label); RemoteInput remoteInput = new RemoteInput.Builder(KEY_TEXT_REPLY) .setLabel(replyLabel) .build(); - 為回覆動作建立
PendingIntent。Kotlin
  // Build a PendingIntent for the reply action to trigger.
  var replyPendingIntent: PendingIntent =
      PendingIntent.getBroadcast(applicationContext,
          conversation.getConversationId(),
          getMessageReplyIntent(conversation.getConversationId()),
          PendingIntent.FLAG_UPDATE_CURRENT)
Java
// Build a PendingIntent for the reply action to trigger. PendingIntent replyPendingIntent = PendingIntent.getBroadcast(getApplicationContext(), conversation.getConversationId(), getMessageReplyIntent(conversation.getConversationId()), PendingIntent.FLAG_UPDATE_CURRENT); - 使用
addRemoteInput()將RemoteInput物件附加至動作。Kotlin
  // Create the reply action and add the remote input.
  var action: NotificationCompat.Action =
      NotificationCompat.Action.Builder(R.drawable.ic_reply_icon,
          getString(R.string.label), replyPendingIntent)
          .addRemoteInput(remoteInput)
          .build()
Java
// Create the reply action and add the remote input. NotificationCompat.Action action = new NotificationCompat.Action.Builder(R.drawable.ic_reply_icon, getString(R.string.label), replyPendingIntent) .addRemoteInput(remoteInput) .build(); - 將動作套用至通知並發出通知。
Kotlin
  // Build the notification and add the action.
  val newMessageNotification = Notification.Builder(context, CHANNEL_ID)
          .setSmallIcon(R.drawable.ic_message)
          .setContentTitle(getString(R.string.title))
          .setContentText(getString(R.string.content))
          .addAction(action)
          .build()

  // Issue the notification.
  with(NotificationManagerCompat.from(this)) {
      notificationManager.notify(notificationId, newMessageNotification)
  }
Java
  // Build the notification and add the action.
  Notification newMessageNotification = new Notification.Builder(context, CHANNEL_ID)
          .setSmallIcon(R.drawable.ic_message)
          .setContentTitle(getString(R.string.title))
          .setContentText(getString(R.string.content))
          .addAction(action)
          .build();

  // Issue the notification.
  NotificationManagerCompat notificationManager = NotificationManagerCompat.from(this);
  notificationManager.notify(notificationId, newMessageNotification);
系統會提示使用者在觸發通知動作時輸入回應,如圖 4 所示。
從回覆中擷取使用者輸入內容
如要從通知的回覆 UI 接收使用者輸入內容,請呼叫 RemoteInput.getResultsFromIntent(),並向 BroadcastReceiver 收到的 Intent 傳遞:
Kotlin
private fun getMessageText(intent: Intent): CharSequence? {
    return RemoteInput.getResultsFromIntent(intent)?.getCharSequence(KEY_TEXT_REPLY)
}
Java
private CharSequence getMessageText(Intent intent) {
    Bundle remoteInput = RemoteInput.getResultsFromIntent(intent);
    if (remoteInput != null) {
        return remoteInput.getCharSequence(KEY_TEXT_REPLY);
    }
    return null;
 }
處理文字後,請以相同的 ID 和標記 (如有使用) 呼叫 NotificationManagerCompat.notify() 來更新通知。您必須隱藏直接回覆 UI,並向使用者確認收到回覆並正確處理。
Kotlin
// Build a new notification, which informs the user that the system
// handled their interaction with the previous notification.
val repliedNotification = Notification.Builder(context, CHANNEL_ID)
        .setSmallIcon(R.drawable.ic_message)
        .setContentText(getString(R.string.replied))
        .build()

// Issue the new notification.
NotificationManagerCompat.from(this).apply {
    notificationManager.notify(notificationId, repliedNotification)
}
Java
// Build a new notification, which informs the user that the system
// handled their interaction with the previous notification.
Notification repliedNotification = new Notification.Builder(context, CHANNEL_ID)
        .setSmallIcon(R.drawable.ic_message)
        .setContentText(getString(R.string.replied))
        .build();

// Issue the new notification.
NotificationManagerCompat notificationManager = NotificationManagerCompat.from(this);
notificationManager.notify(notificationId, repliedNotification);
處理這則新通知時,請使用傳遞至接收端 onReceive() 方法的結構定義。
呼叫 setRemoteInputHistory(),將回覆附加到通知底部。不過,如果您正在建構訊息應用程式,請建立訊息樣式通知,並在對話中附加新訊息。
如需更多訊息應用程式通知的建議,請參閱「訊息應用程式的最佳做法」一節。
新增進度列
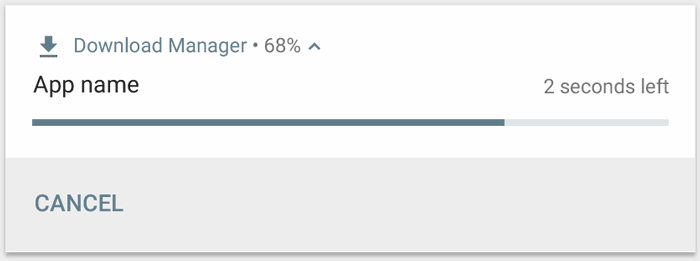
通知可包含動畫進度指標,向使用者顯示進行中作業的狀態。

圖 5. 作業期間的進度列。
如果您可以呼叫 setProgress(max, progress,
false),可以使用「確定」形式的指標 (如圖 5 所示)。第一個參數是「完整」值,例如 100。其次是完成多少最後一個表示這是確定的進度列。
作業繼續時,請使用 progress 的更新值持續呼叫 setProgress(max, progress,
false) 並重發通知,如以下範例所示。
Kotlin
val builder = NotificationCompat.Builder(this, CHANNEL_ID).apply {
    setContentTitle("Picture Download")
    setContentText("Download in progress")
    setSmallIcon(R.drawable.ic_notification)
    setPriority(NotificationCompat.PRIORITY_LOW)
}
val PROGRESS_MAX = 100
val PROGRESS_CURRENT = 0
NotificationManagerCompat.from(this).apply {
    // Issue the initial notification with zero progress.
    builder.setProgress(PROGRESS_MAX, PROGRESS_CURRENT, false)
    notify(notificationId, builder.build())

    // Do the job that tracks the progress here.
    // Usually, this is in a worker thread.
    // To show progress, update PROGRESS_CURRENT and update the notification with:
    // builder.setProgress(PROGRESS_MAX, PROGRESS_CURRENT, false);
    // notificationManager.notify(notificationId, builder.build());

    // When done, update the notification once more to remove the progress bar.
    builder.setContentText("Download complete")
            .setProgress(0, 0, false)
    notify(notificationId, builder.build())
}
Java
...
NotificationManagerCompat notificationManager = NotificationManagerCompat.from(this);
NotificationCompat.Builder builder = new NotificationCompat.Builder(this, CHANNEL_ID);
builder.setContentTitle("Picture Download")
        .setContentText("Download in progress")
        .setSmallIcon(R.drawable.ic_notification)
        .setPriority(NotificationCompat.PRIORITY_LOW);

// Issue the initial notification with zero progress.
int PROGRESS_MAX = 100;
int PROGRESS_CURRENT = 0;
builder.setProgress(PROGRESS_MAX, PROGRESS_CURRENT, false);
notificationManager.notify(notificationId, builder.build());

// Do the job that tracks the progress here.
// Usually, this is in a worker thread.
// To show progress, update PROGRESS_CURRENT and update the notification with:
// builder.setProgress(PROGRESS_MAX, PROGRESS_CURRENT, false);
// notificationManager.notify(notificationId, builder.build());

// When done, update the notification once more to remove the progress bar.
builder.setContentText("Download complete")
        .setProgress(0,0,false);
notificationManager.notify(notificationId, builder.build());
作業結束時,progress 必須等於 max。您可離開進度列顯示作業已完成或移除。無論是哪一種情況,請更新通知文字,顯示作業已完成。如要移除進度列,請呼叫 setProgress(0, 0, false)。
如要顯示未確定的進度列 (不表示完成百分比的長條),請呼叫 setProgress(0, 0, true)。結果是一個與上述進度列相同的指標,但它是不表示已完成的連續動畫。進度動畫會持續執行,直到您呼叫 setProgress(0, 0, false),然後更新通知以移除活動指標為止。
請記得變更通知文字,以表示作業已完成。
設定系統通用的類別
Android 會根據預先定義的系統通用類別,判斷當使用者啟用零打擾模式時,是否要幹擾使用者的特定通知。
如果您的通知屬於 NotificationCompat 中定義的其中一個通知類別 (例如 CATEGORY_ALARM、CATEGORY_REMINDER、CATEGORY_EVENT 或 CATEGORY_CALL),請將適當的類別傳遞至 setCategory() 進行宣告:
Kotlin
var builder = NotificationCompat.Builder(this, CHANNEL_ID)
        .setSmallIcon(R.drawable.notification_icon)
        .setContentTitle("My notification")
        .setContentText("Hello World!")
        .setPriority(NotificationCompat.PRIORITY_DEFAULT)
        .setCategory(NotificationCompat.CATEGORY_MESSAGE)
Java
NotificationCompat.Builder builder = new NotificationCompat.Builder(this, CHANNEL_ID)
        .setSmallIcon(R.drawable.notification_icon)
        .setContentTitle("My notification")
        .setContentText("Hello World!")
        .setPriority(NotificationCompat.PRIORITY_DEFAULT)
        .setCategory(NotificationCompat.CATEGORY_MESSAGE);
當裝置處於「零打擾」模式時,系統會使用該通知類別的相關資訊來做出決定。不過,您不需要設定整個系統的類別。只有在通知符合 NotificationCompat 所定義的其中一個類別時,才需要用做。
顯示緊急訊息
應用程式可能需要顯示緊急且具時效性的訊息,例如來電或響鈴的鬧鐘。在這種情況下,您可以將全螢幕意圖與通知建立關聯。
叫用通知時,系統會根據裝置的鎖定狀態,向使用者顯示下列其中一項:
- 如果使用者的裝置處於鎖定狀態,全螢幕活動會蓋住鎖定畫面。
- 如果使用者的裝置處於解鎖狀態,通知會在展開的表單中顯示,其中包含處理或關閉通知的選項。
下列程式碼片段說明如何將通知與全螢幕意圖建立關聯:
Kotlin
val fullScreenIntent = Intent(this, ImportantActivity::class.java)
val fullScreenPendingIntent = PendingIntent.getActivity(this, 0,
    fullScreenIntent, PendingIntent.FLAG_UPDATE_CURRENT)

var builder = NotificationCompat.Builder(this, CHANNEL_ID)
        .setSmallIcon(R.drawable.notification_icon)
        .setContentTitle("My notification")
        .setContentText("Hello World!")
        .setPriority(NotificationCompat.PRIORITY_DEFAULT)
        .setFullScreenIntent(fullScreenPendingIntent, true)
Java
Intent fullScreenIntent = new Intent(this, ImportantActivity.class);
PendingIntent fullScreenPendingIntent = PendingIntent.getActivity(this, 0,
        fullScreenIntent, PendingIntent.FLAG_UPDATE_CURRENT);

NotificationCompat.Builder builder = new NotificationCompat.Builder(this, CHANNEL_ID)
        .setSmallIcon(R.drawable.notification_icon)
        .setContentTitle("My notification")
        .setContentText("Hello World!")
        .setPriority(NotificationCompat.PRIORITY_DEFAULT)
        .setFullScreenIntent(fullScreenPendingIntent, true);
設定螢幕鎖定畫面的顯示設定
如要控管螢幕鎖定畫面上通知所顯示的詳細程度,請呼叫 setVisibility() 並指定下列其中一個值:
VISIBILITY_PUBLIC:螢幕鎖定畫面會顯示通知的完整內容。VISIBILITY_SECRET:螢幕鎖定畫面上不會顯示通知的一部分。VISIBILITY_PRIVATE:螢幕鎖定畫面上只會顯示通知圖示和內容標題等基本資訊。無法顯示通知的完整內容。
設定 VISIBILITY_PRIVATE 時,您也可以提供隱藏特定詳細資料的通知內容替代版本。舉例來說,簡訊應用程式可能會顯示「您有 3 則新簡訊」通知,但會隱藏訊息內容和傳送者。如要提供這類替代通知,請先照常使用 NotificationCompat.Builder 建立替代通知。接著,使用 setPublicVersion() 將替代通知附加到一般通知中。
請注意,使用者隨時都能控制是否要讓通知顯示在螢幕鎖定畫面上,也可以根據應用程式的通知管道控管通知。
更新通知
如要在發出通知後更新通知,請再次呼叫 NotificationManagerCompat.notify(),並向其傳遞先前使用的相同 ID。如果關閉上一則通知,系統會改為建立新的通知。
您可以選擇呼叫 setOnlyAlertOnce(),讓通知透過音效、震動或視覺線索幹擾使用者,但只會在通知首次出現時,不會提供後續的更新。
移除通知
通知會持續顯示,直到發生下列其中一種情況為止:
- 使用者關閉通知。
- 如果您在建立通知時呼叫
setAutoCancel(),使用者就會輕觸通知。 - 系統會針對特定通知 ID 呼叫
cancel()。這個方法也會刪除持續進行的通知。 - 您可以呼叫
cancelAll(),移除先前發出的所有通知。 - 在建立通知時使用
setTimeoutAfter()設定逾時,指定的時間長度會經過。如有需要,您可以在指定逾時時間長度前取消通知。
訊息應用程式的最佳做法
為訊息和即時通訊應用程式建立通知時,請考慮採用此處列出的最佳做法。
使用訊息樣式
從 Android 7.0 (API 級別 24) 開始,Android 提供訊息內容專用的通知樣式範本。使用 NotificationCompat.MessagingStyle 類別,即可變更通知上顯示的多個標籤,包括對話標題、其他訊息,以及通知的內容檢視畫面。
下列程式碼片段說明如何使用 MessagingStyle 類別自訂通知的樣式。
Kotlin
val user = Person.Builder()
    .setIcon(userIcon)
    .setName(userName)
    .build()

val notification = NotificationCompat.Builder(this, CHANNEL_ID)
    .setContentTitle("2 new messages with $sender")
    .setContentText(subject)
    .setSmallIcon(R.drawable.new_message)
    .setStyle(NotificationCompat.MessagingStyle(user)
        .addMessage(messages[1].getText(), messages[1].getTime(), messages[1].getPerson())
        .addMessage(messages[2].getText(), messages[2].getTime(), messages[2].getPerson())
    )
    .build()
Java
Person user = new Person.Builder()
    .setIcon(userIcon)
    .setName(userName)
    .build();

Notification notification = new NotificationCompat.Builder(this, CHANNEL_ID)
    .setContentTitle("2 new messages with " + sender)
    .setContentText(subject)
    .setSmallIcon(R.drawable.new_message)
    .setStyle(new NotificationCompat.MessagingStyle(user)
        .addMessage(messages[1].getText(), messages[1].getTime(), messages[1].getPerson())
        .addMessage(messages[2].getText(), messages[2].getTime(), messages[2].getPerson())
    )
    .build();
從 Android 9.0 (API 級別 28) 開始,應用程式也必須使用 Person 類別,才能以最佳方式呈現通知及其顯示圖片。
使用 NotificationCompat.MessagingStyle 時,請執行以下操作:
- 呼叫
MessagingStyle.setConversationTitle()可為超過兩位以上的群組通訊設定標題。理想的對話標題可以是群組通訊的名稱;如果沒有名稱,則可列出對話中的參與者清單。如果沒有這項資訊,系統會將訊息誤認為對話中最新訊息寄件者的一對一對話。 - 請使用
MessagingStyle.setData()方法加入圖片等媒體訊息,系統支援 image/* 模式的 MIME 類型。
使用直接回覆功能
「直接回覆」功能可讓使用者在郵件中以內嵌方式回覆訊息。
- 當使用者透過內嵌回覆動作回覆後,請使用
MessagingStyle.addMessage()更新MessagingStyle通知,不要撤銷或取消通知。如果不取消通知,使用者就能從通知傳送多次回覆。 - 如要讓內嵌回覆動作與 Wear OS 相容,請呼叫
Action.WearableExtender.setHintDisplayInlineAction(true)。 - 請使用
addHistoricMessage()方法在通知中加入歷史訊息,為直接回覆對話提供背景資訊。
啟用智慧回覆功能
- 如要啟用智慧回覆功能,請在回覆動作上呼叫
setAllowGeneratedResponses(true)。這樣一來,當通知橋接到 Wear OS 裝置時,使用者就能使用智慧回覆回應。智慧回覆回應是由完全可用的機器學習模型 (根據NotificationCompat.MessagingStyle通知提供的情境) 產生,系統不會將資料上傳至網際網路來產生回應。
新增通知中繼資料
- 指派通知中繼資料,讓系統在裝置位於
Do Not Disturb mode時如何處理應用程式通知。舉例來說,使用addPerson()或setCategory(Notification.CATEGORY_MESSAGE)方法覆寫「零打擾」模式。

