
바로가기는 사용자가 앱의 각 부분에 빠르게 액세스하도록 하여 특정 유형의 콘텐츠를 사용자에게 전달합니다.
바로가기로 콘텐츠를 전달하는 방법은 사용 사례와 바로가기의 컨텍스트가 앱 주도인지 사용자 주도인지에 따라 달라집니다. 정적 바로가기의 컨텍스트는 변경되지 않고 동적 바로가기의 컨텍스트는 계속 변경되지만 두 경우 모두 컨텍스트는 앱에서 주도합니다. 고정된 바로가기를 사용하는 것과 같이 사용자가 앱이 콘텐츠를 전달하는 방식을 선택하는 경우 컨텍스트는 사용자가 정의합니다. 다음 시나리오는 각 바로가기 유형의 사용 사례를 설명합니다.
- 정적 바로가기는 사용자가 앱과 상호작용하는 전체 기간에 걸쳐 일관된 구조를 사용하여 콘텐츠에 연결하는 앱에 가장 좋습니다. 런처가 대부분 한 번에 4개의 바로가기만 표시하므로 정적 바로가기는 사용자가 특정 방식으로 캘린더 또는 이메일을 보려는 경우와 같이 일관된 방식으로 일상적인 작업을 실행하는 데 유용합니다.
- 동적 바로가기는 컨텍스트에 민감한 앱의 작업에 사용됩니다. 컨텍스트 인식 바로가기는 사용자가 앱에서 하는 작업에 따라 맞춤설정됩니다. 예를 들어, 사용자가 게임을 시작할 때 현재 레벨부터 시작할 수 있는 게임을 빌드한다면 바로가기를 자주 업데이트해야 합니다. 동적 바로가기를 사용하면 사용자가 레벨을 통과할 때마다 바로가기를 업데이트할 수 있습니다.
- 고정된 바로가기는 사용자가 주도하는 특정 작업에 사용됩니다. 예를 들어 사용자가 특정 웹사이트를 런처에 고정하려고 할 수 있습니다. 이렇게 하면 사용자가 한 번에 웹사이트로 이동하는 등의 맞춤 작업을 브라우저의 기본 인스턴스를 사용하는 것보다 빠르게 실행할 수 있으므로 유용합니다.
정적 바로가기 만들기
정적 바로가기는 앱 내 일반 작업의 링크를 제공하며, 이 작업은 앱의 현재 버전이 제공되는 기간 동안 일관성을 유지해야 합니다. 정적 바로가기에 알맞은 옵션에는 보낸 메시지 보기, 알람 설정, 그날의 사용자 운동 활동 표시가 포함됩니다.
정적 바로가기를 만들려면 다음 단계를 따르세요.
- 앱의
AndroidManifest.xml파일에서 인텐트 필터가android.intent.action.MAIN작업과android.intent.category.LAUNCHER카테고리로 설정된 활동을 찾습니다. 앱의 바로가기가 정의된 리소스 파일을 참조하는 이 활동에
<meta-data>요소를 추가합니다.<manifest xmlns:android="http://schemas.android.com/apk/res/android" package="com.example.myapplication"> <application ... > <activity android:name="Main"> <intent-filter> <action android:name="android.intent.action.MAIN" /> <category android:name="android.intent.category.LAUNCHER" /> </intent-filter> <meta-data android:name="android.app.shortcuts" android:resource="@xml/shortcuts" /> </activity> </application> </manifest>res/xml/shortcuts.xml이라는 새 리소스 파일을 만듭니다.새 리소스 파일에서
<shortcuts>루트 요소가 포함된<shortcut>요소 목록을 추가합니다. 각<shortcut>요소에서 아이콘, 설명 라벨, 앱 내에서 실행하는 인텐트 등 정적 바로가기에 관한 정보를 포함합니다.<shortcuts xmlns:android="http://schemas.android.com/apk/res/android"> <shortcut android:shortcutId="compose" android:enabled="true" android:icon="@drawable/compose_icon" android:shortcutShortLabel="@string/compose_shortcut_short_label1" android:shortcutLongLabel="@string/compose_shortcut_long_label1" android:shortcutDisabledMessage="@string/compose_disabled_message1"> <intent android:action="android.intent.action.VIEW" android:targetPackage="com.example.myapplication" android:targetClass="com.example.myapplication.Main" /> <!-- If your shortcut is associated with multiple intents, include them here. The last intent in the list determines what the user sees when they launch this shortcut. --> <categories android:name="android.shortcut.conversation" /> <capability-binding android:key="actions.intent.CREATE_MESSAGE" /> </shortcut> <!-- Specify more shortcuts here. --> </shortcuts>
속성 값 맞춤설정
다음 목록에는 정적 바로가기 내의 여러 속성에 관한 설명이 포함되어 있습니다. android:shortcutId 및 android:shortcutShortLabel 값을 제공합니다. 다른 모든 값은 선택사항입니다.
android:shortcutId문자열 리터럴입니다. 바로가기에 작업을 실행할 때의 바로가기를 나타냅니다.
ShortcutManagerandroid:shortcutShortLabel바로가기의 목적을 설명하는 간결한 구문입니다. 가능하면 이 짧은 설명을 10자로 제한합니다.
자세한 내용은
setShortLabel()을 참고하세요.android:shortcutLongLabel바로가기의 목적을 설명하는 확장된 구문입니다. 공간이 충분하다면 런처가
android:shortcutShortLabel대신 이 값을 표시합니다. 가능하면 이 긴 설명을 25자로 제한합니다.자세한 내용은
setLongLabel()을 참고하세요.android:shortcutDisabledMessage사용자가 사용 중지된 바로가기를 실행하려고 할 때 지원되는 런처에 표시되는 메시지입니다. 메시지는 바로가기가 사용 중지된 이유를 사용자에게 설명해야 합니다.
android:enabled가true이면 이 속성 값은 아무런 영향을 미치지 않습니다.android:enabled사용자가 지원되는 런처에서 바로가기와 상호작용할 수 있는지 확인합니다.
android:enabled의 기본값은true입니다.false로 설정하는 경우 바로가기를 사용 중지하는 이유를 설명하는android:shortcutDisabledMessage를 설정합니다. 이러한 메시지를 제공할 필요가 없다고 생각되면 XML 파일에서 바로가기를 완전히 삭제합니다.android:icon런처가 사용자에게 바로가기를 표시할 때 사용하는 비트맵 또는 적응형 아이콘입니다. 이 값은 이미지 경로 또는 이미지가 포함된 리소스 파일일 수 있습니다. 가능하면 적응형 아이콘을 사용하여 성능과 일관성을 개선하세요.
내부 요소 구성
앱의 정적 바로가기를 나열하는 XML 파일은 다음
요소를 각 <shortcut> 요소 내부에서 지원합니다. 정의하는 각 정적 바로가기의 intent 내부 요소를 포함해야 합니다.
intent사용자가 바로가기를 선택할 때 시스템에서 실행하는 작업입니다. 이 인텐트는
android:action속성 값을 제공해야 합니다.단일 바로가기에 여러 인텐트를 제공할 수 있습니다. 자세한 내용은 여러 인텐트 및 활동, 인텐트 설정,
TaskStackBuilder클래스 참조를 읽어보세요.categories새로운 채팅 메시지 만들기와 같은 앱의 바로가기에서 실행하는 작업 유형의 그룹화를 제공합니다.
지원되는 바로가기 카테고리의 목록은
ShortcutInfo클래스 참조를 읽어보세요.capability-binding바로가기와 연결된 기능을 선언합니다.
이전 예에서 바로가기는
CREATE_MESSAGE에 관해 선언된 기능에 연결됩니다. 이는 앱 작업 내장 인텐트입니다. 이 기능 결합을 통해 사용자는 Google 어시스턴트로 음성 명령을 사용하여 바로가기를 호출할 수 있습니다.
동적 바로가기 만들기
동적 바로가기는 앱 내에서 컨텍스트에 민감한 특정 작업의 링크를 제공합니다. 이러한 작업은 앱이 사용되지 않을 때, 그리고 앱이 실행되는 동안에도 변경될 수 있습니다. 동적 바로가기의 좋은 사용 사례로는 특정 사람에게 전화 걸기, 특정 위치로 이동, 사용자의 마지막 저장 지점에서 게임 로드하기가 있습니다. 동적 바로가기를 사용하여 대화를 열 수도 있습니다.
ShortcutManagerCompat Jetpack 라이브러리는 앱에서 동적 바로가기를 관리할 수 있는
ShortcutManager API의 도우미입니다. ShortcutManagerCompat 라이브러리를 사용하면 상용구 코드를 줄이고 바로가기가 여러 Android 버전에서 일관되게 작동하도록 설정할 수 있습니다. 이
라이브러리는 Google 바로가기 통합 라이브러리를 사용하여 어시스턴트와 같은 Google 표시 경로에 표시되도록 동적 바로가기를 푸시하는 데도 필요합니다.
ShortcutManagerCompat API를 사용하면 앱에서 동적 바로가기를 사용하여 다음 작업을 할 수 있습니다.
- 푸시 및 업데이트:
pushDynamicShortcut()를 사용하여 동적 바로가기를 게시하고 업데이트합니다. 동일한 ID를 사용하는 동적 또는 고정된 바로가기가 이미 있는 경우 변경 가능한 바로가기가 각각 업데이트됩니다. - 삭제:
removeDynamicShortcuts()를 사용하여 동적 바로가기 설정을 삭제합니다.removeAllDynamicShortcuts()를 사용하여 동적 바로가기를 모두 삭제합니다.
바로가기에서 작업을 실행하는 방법에 관한 자세한 내용은 바로가기
관리와 ShortcutManagerCompat 참조를 읽어보세요.
다음은 동적 바로가기를 만들어 앱에 연결하는 예입니다.
val shortcut = ShortcutInfoCompat.Builder(context, "id1")
        .setShortLabel("Website")
        .setLongLabel("Open the website")
        .setIcon(IconCompat.createWithResource(context, R.drawable.icon_website))
        .setIntent(Intent(Intent.ACTION_VIEW,
                Uri.parse("https://www.mysite.example.com/")))
        .build()

ShortcutManagerCompat.pushDynamicShortcut(context, shortcut)
Google 바로가기 통합 라이브러리 추가
Google 바로가기 통합 라이브러리는 선택적인 Jetpack 라이브러리입니다. Google 바로가기 통합 라이브러리를 사용하면 런처와 같은 Android 표시 경로와 Google 표시 경로에 표시될 수 있는 동적 바로가기를 푸시할 수 있습니다. 이 라이브러리를 사용하면 사용자가 바로가기를 쉽게 발견하여 앱에서 특정 콘텐츠에 빠르게 액세스하거나 작업을 다시 재생할 수 있습니다.
이 라이브러리로 푸시된 동적 바로가기에는 바로가기 제한이 기기별로 시행되지 않습니다. 따라서 사용자가 앱에서 연결된 작업을 완료할 때마다 앱이 바로가기를 푸시할 수 있습니다. 이 방식으로 자주 사용되는 바로가기를 푸시하면 Google이 사용자의 사용 패턴을 파악하여 상황에 맞게 관련 바로가기를 추천할 수 있습니다.
예를 들어, 어시스턴트는 피트니스 추적 앱에서 푸시된 바로가기로부터 사용자가 보통 아침에 달리기를 한다는 사실을 학습하여, 사용자가 아침에 휴대전화를 들 때 '달리기 시작' 바로가기를 추천할 수 있습니다.
Google 바로가기 통합 라이브러리는 주소를 지정할 수 있는 기능은 제공하지 않습니다. 이 라이브러리를 앱에 추가하면 Google 표시 경로에서 ShortcutManagerCompat를 사용하여 앱이 푸시한 바로가기를 수집할 수 있습니다.
앱에서 이 라이브러리를 사용하려면 다음 단계를 따르세요.
gradle.properties파일을 업데이트하여 AndroidX 라이브러리를 지원합니다.android.useAndroidX=true # Automatically convert third-party libraries to use AndroidX android.enableJetifier=trueapp/build.gradle에서 Google 바로가기 통합 라이브러리 및ShortcutManagerCompat에 관한 종속 항목을 추가합니다.dependencies { implementation "androidx.core:core:1.6.0" implementation 'androidx.core:core-google-shortcuts:1.0.0' ... }
Android 프로젝트에 라이브러리 종속 항목을 추가했으면 앱이 ShortcutManagerCompat의 pushDynamicShortcut() 메서드를 사용하여 동적 바로가기를 푸시할 수 있습니다. 동적 바로가기는 런처와 연결된 Google 표시 경로에 표시될 수 있습니다.
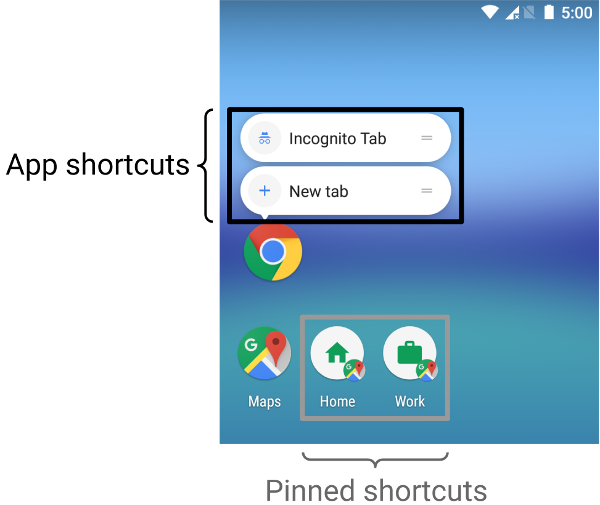
고정된 바로가기 만들기
Android 8.0 (API 수준 26) 이상에서 고정된 바로가기를 만들 수 있습니다. 정적 및 동적 바로가기와 달리 고정된 바로가기는 지원되는 런처에 별도의 아이콘으로 표시됩니다. 그림 1은 두 바로가기의 차이를 보여줍니다.
앱을 사용하여 지원되는 런처에 바로가기를 고정하려면 다음 단계를 완료하세요.
isRequestPinShortcutSupported()를 사용하여 기기의 기본 런처에서 인앱 바로가기 고정을 지원하는지 확인합니다.바로가기가 존재하는지에 따라 다음 두 가지 방법 중 하나로
ShortcutInfo객체를 만듭니다.- 바로가기가 있는 경우 기존 바로가기의 ID만 포함된
ShortcutInfo객체를 만듭니다. 시스템에서 바로가기와 관련된 기타 모든 정보를 자동으로 찾아서 고정합니다. - 새로운 바로가기를 고정하는 경우 새로운 바로가기의 ID, 인텐트 및 짧은 라벨이 포함된
ShortcutInfo객체를 만듭니다.
- 바로가기가 있는 경우 기존 바로가기의 ID만 포함된
바로가기를 기기의 런처에 고정합니다.
requestPinShortcut()이 프로세스 중에 바로가기가 성공적으로 고정된 경우에만 앱에 알리는PendingIntent객체를 전달할 수 있습니다.바로가기가 고정되고 나면 앱에서
updateShortcuts()메서드를 사용하여 바로가기의 콘텐츠를 업데이트할 수 있습니다. 자세한 내용은 바로가기 업데이트를 참고하세요.
다음 코드 스니펫은 고정된 바로가기를 만드는 방법을 보여줍니다.
val shortcutManager = getSystemService<ShortcutManager>()

if (shortcutManager!!.isRequestPinShortcutSupported) {
    // Enable the existing shortcut with the ID "my-shortcut".
    val pinShortcutInfo = ShortcutInfo.Builder(context, "my-shortcut").build()

    // Create the PendingIntent object only if your app needs to be notified
    // that the user let the shortcut be pinned. If the pinning operation fails,
    // your app isn't notified. Assume here that the app implements a method
    // called createShortcutResultIntent() that returns a broadcast intent.
    val pinnedShortcutCallbackIntent = shortcutManager.createShortcutResultIntent(pinShortcutInfo)

    // Configure the intent so that your app's broadcast receiver gets the
    // callback successfully. For details, see PendingIntent.getBroadcast().
    val successCallback = PendingIntent.getBroadcast(context, /* request code */ 0,
            pinnedShortcutCallbackIntent, /* flags */ 0)

    shortcutManager.requestPinShortcut(pinShortcutInfo,
            successCallback.intentSender)
}
맞춤 바로가기 활동 만들기
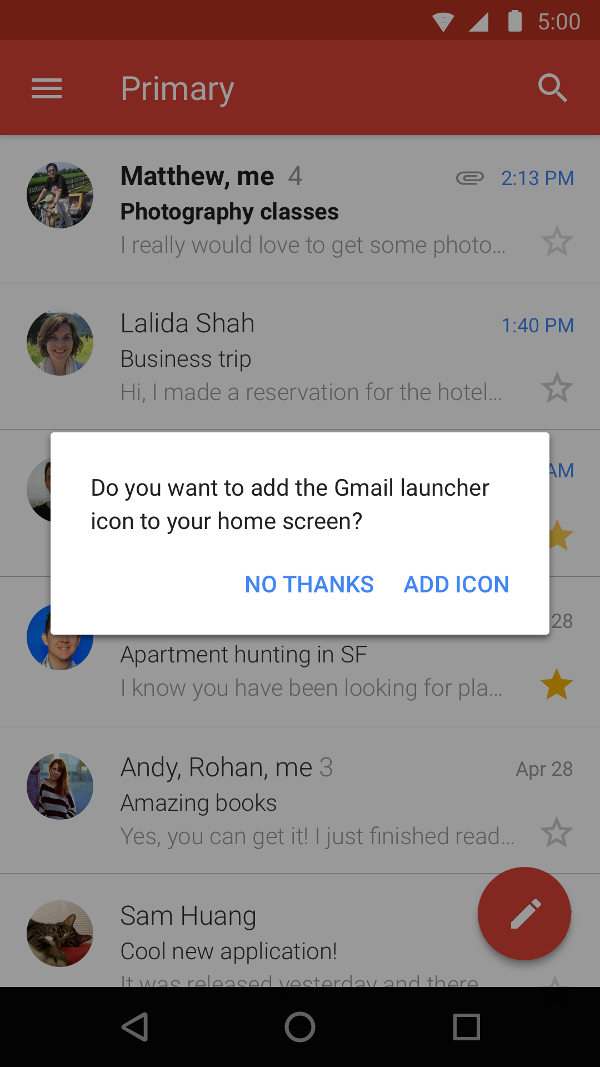
사용자가 맞춤 옵션과 확인 버튼이 있는 바로가기를 만드는 데 도움을 주는 특수 활동을 만들 수도 있습니다. 그림 2는 Gmail 앱에서 이러한 유형의 활동을 보여주는 예입니다.
앱의 매니페스트 파일에서 활동의
<intent-filter> 요소에 ACTION_CREATE_SHORTCUT을 추가합니다. 이 선언은 사용자가 바로가기를 만들려고 할 때 다음 동작을 설정합니다.
- 시스템에서 앱의 특수 활동을 시작합니다.
- 사용자가 바로가기 옵션을 설정합니다.
- 사용자가 확인 버튼을 선택합니다.
- 앱에서
createShortcutResultIntent()메서드를 사용하여 바로가기를 만듭니다. 이 메서드는 앱이 이전에 실행한 활동으로setResult()를 사용하여 다시 릴레이하는Intent를 반환합니다. - 앱은 맞춤설정된 바로가기를 만드는 데 사용된 활동에서
finish()를 호출합니다.
마찬가지로 앱은 설치 후 또는 처음 실행될 때 사용자에게 홈 화면에 고정된 바로가기를 추가하라는 메시지를 표시할 수 있습니다. 이 메서드는 사용자가 바로가기를 일상 워크플로의 하나로 만드는 데 도움을 주므로 효과적입니다.
바로가기 테스트
앱의 바로가기를 테스트하려면 바로가기를 지원하는 런처가 있는 기기에 앱을 설치하세요. 그후에 다음 작업을 실행합니다.
- 앱의 런처 아이콘을 길게 터치하여 앱에 정의한 바로가기를 표시합니다.
- 바로가기를 드래그하여 기기의 런처에 고정합니다.