เลย์เอาต์แบบสัมพัทธ์
จัดทุกอย่างให้เป็นระเบียบอยู่เสมอด้วยคอลเล็กชัน
บันทึกและจัดหมวดหมู่เนื้อหาตามค่ากำหนดของคุณ
ลองใช้วิธีการเขียน
Jetpack Compose เป็นชุดเครื่องมือ UI ที่แนะนำสำหรับ Android ดูวิธีใช้งานเลย์เอาต์ใน Compose
RelativeLayout
คือกลุ่มมุมมองที่แสดงการดูของเด็กในแบบสัมพัทธ์
ตำแหน่ง ตำแหน่งของแต่ละมุมมองสามารถระบุเป็นสัมพัทธ์กับองค์ประกอบข้างเคียง (เช่น
ซ้ายของหรือด้านล่างมุมมองอื่น) หรือในตำแหน่งที่สัมพันธ์กับพื้นที่ RelativeLayout
ระดับบนสุด (เช่น จัดชิดด้านล่าง ซ้าย หรือกึ่งกลาง)
หมายเหตุ
หากต้องการการสนับสนุนด้านเครื่องมือและประสิทธิภาพที่ดีขึ้น คุณควรสร้างเลย์เอาต์ด้วย ConstraintLayout แทน
RelativeLayout
เป็นยูทิลิตีที่ทรงพลังมากสำหรับการออกแบบอินเทอร์เฟซผู้ใช้
เนื่องจากสามารถกำจัดกลุ่มมุมมองที่ซ้อนกัน และทำให้ลำดับชั้นของเลย์เอาต์มีความคงที่ ซึ่งช่วยปรับปรุง
ด้านประสิทธิภาพ หากคุณพบว่าตนเองใช้กลุ่ม LinearLayout
ที่ซ้อนกันหลายกลุ่ม
คุณอาจแทนที่ด้วย RelativeLayout
เดียวได้
มุมมองการวางตำแหน่ง
RelativeLayout
ทำให้มุมมองย่อยสามารถระบุอันดับที่สัมพันธ์กับ
มุมมองหลักหรือมุมมองของกันและกัน (ระบุโดยรหัส) คุณสามารถจัดเรียงองค์ประกอบ 2 รายการด้วยเส้นขอบด้านขวา หรือ
ทำให้วิดีโอหนึ่งอยู่ใต้หน้าจออีกแบบหนึ่ง กึ่งกลางหน้าจอ กึ่งกลางซ้าย และอื่นๆ โดยค่าเริ่มต้น ผู้เผยแพร่โฆษณาย่อยทั้งหมด
มุมมองจะวาดที่ด้านซ้ายบนของเลย์เอาต์ คุณจึงต้องกำหนดตำแหน่งของแต่ละมุมมอง
โดยใช้คุณสมบัติการจัดวางที่หลากหลายจาก RelativeLayout.LayoutParams
พร็อพเพอร์ตี้ของเลย์เอาต์บางส่วนที่มีให้ดูใน RelativeLayout
รวมข้อมูลต่อไปนี้
android:layout_alignParentTop
- หาก
"true"
จะทำให้ขอบด้านบนของมุมมองนี้ตรงกับขอบด้านบนของระดับบนสุด
android:layout_centerVertical
- หากเป็น
"true"
ให้เด็กคนนี้อยู่กึ่งกลางในแนวตั้งภายในแนวตั้ง
android:layout_below
- จัดตำแหน่งขอบด้านบนของมุมมองนี้ใต้ข้อมูลพร็อพเพอร์ตี้ที่ระบุด้วยรหัสทรัพยากร
android:layout_toRightOf
- จัดตำแหน่งขอบด้านซ้ายของมุมมองนี้ทางด้านขวาของข้อมูลพร็อพเพอร์ตี้ที่ระบุด้วยรหัสทรัพยากร
นี่เป็นเพียงตัวอย่างบางส่วน แอตทริบิวต์เลย์เอาต์ทั้งหมดจะบันทึกไว้ที่ RelativeLayout.LayoutParams
ค่าสำหรับคุณสมบัติการจัดวางแต่ละรายการเป็นบูลีนสำหรับ
เปิดใช้ตำแหน่งเลย์เอาต์ที่สัมพันธ์กับ RelativeLayout
ระดับบนสุดหรือรหัสที่
อ้างอิงถึงมุมมองอื่นในการจัดวางที่ควรตำแหน่งของมุมมองนั้น
ในเลย์เอาต์ XML ของคุณ ทรัพยากร Dependency เทียบกับมุมมองอื่นๆ ในเลย์เอาต์จะประกาศในลำดับใดก็ได้
เช่น คุณสามารถประกาศว่า "view1" ให้อยู่ต่ำกว่า "มุมมอง 2" แม้ว่าจะเป็น "view2" เป็นอันสุดท้าย
มุมมองที่ประกาศในลำดับชั้น ตัวอย่างด้านล่างจะแสดงให้เห็นสถานการณ์ดังกล่าว
ตัวอย่าง
โดยจะเน้นแอตทริบิวต์แต่ละอย่างที่ควบคุมตำแหน่งสัมพัทธ์ของมุมมองแต่ละรายการ
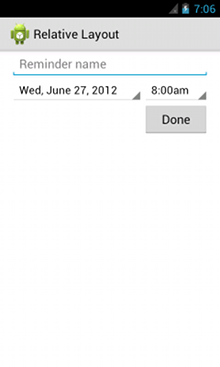
<?xml version="1.0" encoding="utf-8"?>
<RelativeLayout xmlns:android="http://schemas.android.com/apk/res/android"
android:layout_width="match_parent"
android:layout_height="match_parent"
android:paddingLeft="16dp"
android:paddingRight="16dp" >
<EditText
android:id="@+id/name"
android:layout_width="match_parent"
android:layout_height="wrap_content"
android:hint="@string/reminder" />
<Spinner
android:id="@+id/dates"
android:layout_width="0dp"
android:layout_height="wrap_content"
android:layout_below="@id/name"
android:layout_alignParentLeft="true"
android:layout_toLeftOf="@+id/times" />
<Spinner
android:id="@id/times"
android:layout_width="96dp"
android:layout_height="wrap_content"
android:layout_below="@id/name"
android:layout_alignParentRight="true" />
<Button
android:layout_width="96dp"
android:layout_height="wrap_content"
android:layout_below="@id/times"
android:layout_alignParentRight="true"
android:text="@string/done" />
</RelativeLayout>
โปรดดูรายละเอียดเกี่ยวกับแอตทริบิวต์เลย์เอาต์ทั้งหมดที่ใช้ได้สำหรับมุมมองย่อยแต่ละรายการของ RelativeLayout
ที่หัวข้อ RelativeLayout.LayoutParams
ตัวอย่างเนื้อหาและโค้ดในหน้าเว็บนี้ขึ้นอยู่กับใบอนุญาตที่อธิบายไว้ในใบอนุญาตการใช้เนื้อหา Java และ OpenJDK เป็นเครื่องหมายการค้าหรือเครื่องหมายการค้าจดทะเบียนของ Oracle และ/หรือบริษัทในเครือ
อัปเดตล่าสุด 2025-07-27 UTC
[[["เข้าใจง่าย","easyToUnderstand","thumb-up"],["แก้ปัญหาของฉันได้","solvedMyProblem","thumb-up"],["อื่นๆ","otherUp","thumb-up"]],[["ไม่มีข้อมูลที่ฉันต้องการ","missingTheInformationINeed","thumb-down"],["ซับซ้อนเกินไป/มีหลายขั้นตอนมากเกินไป","tooComplicatedTooManySteps","thumb-down"],["ล้าสมัย","outOfDate","thumb-down"],["ปัญหาเกี่ยวกับการแปล","translationIssue","thumb-down"],["ตัวอย่าง/ปัญหาเกี่ยวกับโค้ด","samplesCodeIssue","thumb-down"],["อื่นๆ","otherDown","thumb-down"]],["อัปเดตล่าสุด 2025-07-27 UTC"],[],[],null,["# Relative Layout\n\nTry the Compose way \nJetpack Compose is the recommended UI toolkit for Android. Learn how to work with layouts in Compose. \n[ConstraintLayout in Compose →](/jetpack/compose/layouts/constraintlayout) \n\n[RelativeLayout](/reference/android/widget/RelativeLayout) is a view group that displays child views in relative\npositions. The position of each view can be specified as relative to sibling elements (such as to\nthe left-of or below another view) or in positions relative to the parent [RelativeLayout](/reference/android/widget/RelativeLayout) area (such as aligned to the bottom, left or center).\n\n**Note:**\nFor better performance and tooling support, you should instead [build your layout with ConstraintLayout](/training/constraint-layout).\n\nA [RelativeLayout](/reference/android/widget/RelativeLayout) is a very powerful utility for designing a user interface\nbecause it can eliminate nested view groups and keep your layout hierarchy flat, which improves\nperformance. If you find yourself using several nested [LinearLayout](/reference/android/widget/LinearLayout) groups,\nyou may be able to replace them with a single [RelativeLayout](/reference/android/widget/RelativeLayout).\n\nPositioning Views\n-----------------\n\n[RelativeLayout](/reference/android/widget/RelativeLayout) lets child views specify their position relative to the\nparent view or to each other (specified by ID). So you can align two elements by right border, or\nmake one below another, centered in the screen, centered left, and so on. By default, all child\nviews are drawn at the top-left of the layout, so you must define the position of each view\nusing the various layout properties available from [RelativeLayout.LayoutParams](/reference/android/widget/RelativeLayout.LayoutParams).\n\nSome of the many layout properties available to views in a [RelativeLayout](/reference/android/widget/RelativeLayout)\ninclude:\n\n[`android:layout_alignParentTop`](/reference/android/widget/RelativeLayout.LayoutParams#attr_android:layout_alignParentTop)\n: If `\"true\"`, makes the top edge of this view match the top edge of the parent.\n\n[`android:layout_centerVertical`](/reference/android/widget/RelativeLayout.LayoutParams#attr_android:layout_centerVertical)\n: If `\"true\"`, centers this child vertically within its parent.\n\n[`android:layout_below`](/reference/android/widget/RelativeLayout.LayoutParams#attr_android:layout_below)\n: Positions the top edge of this view below the view specified with a resource ID.\n\n[`android:layout_toRightOf`](/reference/android/widget/RelativeLayout.LayoutParams#attr_android:layout_toRightOf)\n: Positions the left edge of this view to the right of the view specified with a resource ID.\n\nThese are just a few examples. All layout attributes are documented at [RelativeLayout.LayoutParams](/reference/android/widget/RelativeLayout.LayoutParams).\n\nThe value for each layout property is either a boolean to\nenable a layout position relative to the parent [RelativeLayout](/reference/android/widget/RelativeLayout) or an ID that\nreferences another view in the layout against which the view should be positioned.\n\nIn your XML layout, dependencies against other views in the layout can be declared in any order.\nFor example, you can declare that \"view1\" be positioned below \"view2\" even if \"view2\" is the last\nview declared in the hierarchy. The example below demonstrates such a scenario.\n\nExample\n-------\n\nEach of the attributes that control the relative position of each view are emphasized. \n\n```xml\n\u003c?xml version=\"1.0\" encoding=\"utf-8\"?\u003e\n\u003cRelativeLayout xmlns:android=\"http://schemas.android.com/apk/res/android\"\n android:layout_width=\"match_parent\"\n android:layout_height=\"match_parent\"\n android:paddingLeft=\"16dp\"\n android:paddingRight=\"16dp\" \u003e\n \u003cEditText\n android:id=\"@+id/name\"\n android:layout_width=\"match_parent\"\n android:layout_height=\"wrap_content\"\n android:hint=\"@string/reminder\" /\u003e\n \u003cSpinner\n android:id=\"@+id/dates\"\n android:layout_width=\"0dp\"\n android:layout_height=\"wrap_content\"\n android:layout_below=\"@id/name\"\n android:layout_alignParentLeft=\"true\"\n android:layout_toLeftOf=\"@+id/times\" /\u003e\n \u003cSpinner\n android:id=\"@id/times\"\n android:layout_width=\"96dp\"\n android:layout_height=\"wrap_content\"\n android:layout_below=\"@id/name\"\n android:layout_alignParentRight=\"true\" /\u003e\n \u003cButton\n android:layout_width=\"96dp\"\n android:layout_height=\"wrap_content\"\n android:layout_below=\"@id/times\"\n android:layout_alignParentRight=\"true\"\n android:text=\"@string/done\" /\u003e\n\u003c/RelativeLayout\u003e\n```\n\nFor details about all the layout attributes available to each child view of a [RelativeLayout](/reference/android/widget/RelativeLayout), see [RelativeLayout.LayoutParams](/reference/android/widget/RelativeLayout.LayoutParams)."]]