Trong phiên bản Android 11 trở lên, tính năng Điều khiển thiết bị truy cập nhanh cho phép người dùng xem và điều khiển nhanh các thiết bị bên ngoài như đèn, bộ điều nhiệt và camera tuỳ khả năng chi trả của người dùng trong 3 lượt tương tác từ trình khởi chạy mặc định. Nhà sản xuất thiết bị gốc sẽ chọn trình chạy mà họ sử dụng. Trang web tổng hợp thiết bị (chẳng hạn như Google Home) và ứng dụng của nhà cung cấp bên thứ ba có thể cung cấp thiết bị hiển thị trong không gian này. Trang này hướng dẫn bạn cách hiển thị các nút điều khiển thiết bị trong không gian này và liên kết các nút điều khiển đó với ứng dụng điều khiển.
Để thêm chế độ hỗ trợ này, hãy tạo và khai báo một ControlsProviderService. Tạo các chế độ điều khiển mà ứng dụng hỗ trợ dựa trên các loại chế độ điều khiển định sẵn, sau đó tạo kênh xuất bản cho các chế độ điều khiển này.
Giao diện người dùng
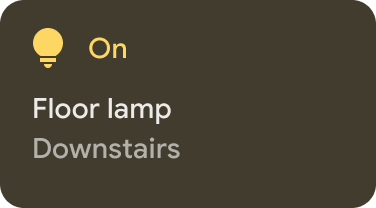
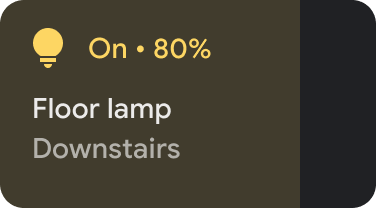
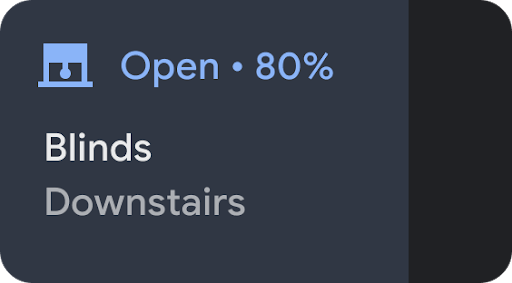
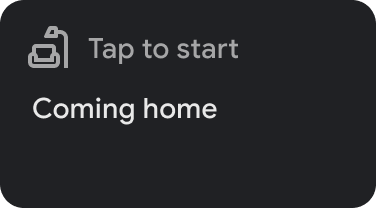
Các thiết bị hiển thị trong phần điều khiển thiết bị dưới dạng tiện ích mẫu. Có 5 tiện ích điều khiển thiết bị, như minh hoạ trong hình sau:
 |
 |
|
 |
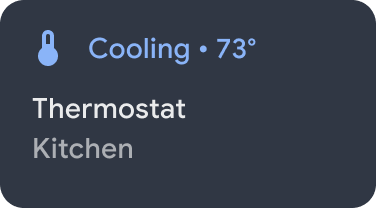 |
Khi chạm và giữ một tiện ích, bạn sẽ được chuyển đến ứng dụng để kiểm soát sâu hơn. Bạn có thể tuỳ chỉnh biểu tượng và màu sắc trên từng tiện ích, nhưng để có trải nghiệm người dùng tốt nhất, hãy sử dụng biểu tượng và màu sắc mặc định nếu bộ mặc định khớp với thiết bị.
Tạo dịch vụ
Phần này cho biết cách tạo ControlsProviderService.
Dịch vụ này báo cho giao diện người dùng hệ thống Android biết ứng dụng của bạn chứa các chế độ điều khiển thiết bị phải xuất hiện trong khu vực Điều khiển thiết bị của giao diện người dùng Android.
TrangControlsProviderService API giả định là đã làm quen với luồng phản hồi, như được xác định ở Dự án GitHub của Reactive Stream và triển khai trong Giao diện Luồng của Java 9.
API được xây dựng dựa trên các khái niệm sau:
- Nhà xuất bản: ứng dụng của bạn là nhà xuất bản.
- Người đăng ký: giao diện người dùng hệ thống là người đăng ký và có thể yêu cầu nhà xuất bản cung cấp một số chế độ kiểm soát.
- Gói thuê bao: khoảng thời gian mà nhà xuất bản có thể gửi các bản cập nhật cho giao diện người dùng Hệ thống. Nhà xuất bản hoặc người đăng ký đều có thể đóng cửa sổ này.
Khai báo dịch vụ
Ứng dụng phải khai báo một dịch vụ (chẳng hạn như MyCustomControlService) trong tệp kê khai ứng dụng.
Dịch vụ phải có một bộ lọc ý định cho ControlsProviderService. Bộ lọc này cho phép ứng dụng đóng góp các chế độ kiểm soát cho giao diện người dùng hệ thống.
Bạn cũng cần có một label xuất hiện trong các chế độ điều khiển trong giao diện người dùng hệ thống.
Ví dụ sau đây cho thấy cách khai báo một dịch vụ:
<service
    android:name="MyCustomControlService"
    android:label="My Custom Controls"
    android:permission="android.permission.BIND_CONTROLS"
    android:exported="true"
    >
    <intent-filter>
      <action android:name="android.service.controls.ControlsProviderService" />
    </intent-filter>
</service>
Tiếp theo, hãy tạo một tệp Kotlin mới tên là MyCustomControlService.kt và mở rộng tệp này thành ControlsProviderService():
Kotlin
    class MyCustomControlService : ControlsProviderService() {
        ...
    }
Java
    public class MyCustomJavaControlService extends ControlsProviderService {
        ...
    }
Chọn loại điều khiển chính xác
API này cung cấp phương thức trình tạo để tạo các tùy chọn điều khiển. Để điền trình tạo, hãy xác định thiết bị bạn muốn điều khiển và cách người dùng tương tác với thiết bị đó. Thực hiện các bước sau đây:
- Chọn loại thiết bị mà tùy chọn điều khiển đại diện. Lớp
DeviceTypeslà một bảng liệt kê tất cả các thiết bị được hỗ trợ. Loại này dùng để xác định biểu tượng và màu sắc cho thiết bị trong giao diện người dùng. - Xác định tên mà người dùng nhìn thấy, vị trí thiết bị (ví dụ: nhà bếp) và các thành phần văn bản khác trên giao diện người dùng liên quan đến chế độ điều khiển này.
- Chọn mẫu tốt nhất để hỗ trợ tương tác cho người dùng. Các tùy chọn điều khiển đã gán
ControlTemplatetừ ứng dụng. Mẫu này trực tiếp hiển thị trạng thái điều khiển cho người dùng cũng như các phương thức nhập có sẵn, tức làControlAction. Bảng sau đây trình bày một số mẫu có sẵn và thao tác các mẫu đó hỗ trợ:
| Mẫu | Hành động | Nội dung mô tả |
ControlTemplate.getNoTemplateObject()
|
None
|
Ứng dụng có thể sử dụng thông tin này để truyền đạt biện pháp kiểm soát nhưng người dùng không thể tương tác với nó. |
ToggleTemplate
|
BooleanAction
|
Biểu thị một nút điều khiển có thể chuyển đổi giữa trạng thái đang bật và đã tắt. Đối tượng BooleanAction chứa một trường thay đổi để biểu thị trạng thái mới được yêu cầu khi người dùng nhấn vào chế độ kiểm soát.
|
RangeTemplate
|
FloatAction
|
Biểu thị một tiện ích thanh trượt có các giá trị tối thiểu, tối đa và bước được chỉ định. Khi người dùng tương tác với thanh trượt, hãy gửi một đối tượng FloatAction mới trở lại ứng dụng kèm theo giá trị cập nhật.
|
ToggleRangeTemplate
|
BooleanAction, FloatAction
|
Mẫu này là kết hợp giữa ToggleTemplate và RangeTemplate. Tính năng này hỗ trợ các thao tác chạm cũng như thanh trượt, chẳng hạn như để điều khiển đèn có thể điều chỉnh độ sáng.
|
TemperatureControlTemplate
|
ModeAction, BooleanAction, FloatAction
|
Ngoài việc tổng hợp các thao tác trước đó, mẫu này còn cho phép người dùng đặt chế độ như sưởi ấm, làm mát, sưởi ấm/làm mát, thân thiện với môi trường hoặc tắt. |
StatelessTemplate
|
CommandAction
|
Dùng để chỉ ra một chức năng điều khiển có cảm ứng nhưng không thể xác định trạng thái của chức năng đó, chẳng hạn như TV hồng ngoại điều khiển từ xa. Bạn có thể sử dụng mẫu này để xác định một quy trình hoặc macro, tổng hợp các tùy chọn điều khiển và thay đổi trạng thái. |
Với thông tin này, bạn có thể tạo chế độ kiểm soát:
- Sử dụng lớp trình tạo
Control.StatelessBuilderkhi không xác định được trạng thái của tùy chọn điều khiển này. - Sử dụng lớp trình tạo
Control.StatefulBuilderkhi xác định được trạng thái của tùy chọn điều khiển này.
Ví dụ: để điều khiển một bóng đèn thông minh và một máy điều nhiệt, hãy thêm các hằng số sau vào MyCustomControlService:
Kotlin
    private const val LIGHT_ID = 1234
    private const val LIGHT_TITLE = "My fancy light"
    private const val LIGHT_TYPE = DeviceTypes.TYPE_LIGHT
    private const val THERMOSTAT_ID = 5678
    private const val THERMOSTAT_TITLE = "My fancy thermostat"
    private const val THERMOSTAT_TYPE = DeviceTypes.TYPE_THERMOSTAT

    class MyCustomControlService : ControlsProviderService() {
      ...
    }
Java
    public class MyCustomJavaControlService extends ControlsProviderService {

    private final int LIGHT_ID = 1337;
    private final String LIGHT_TITLE = "My fancy light";
    private final int LIGHT_TYPE = DeviceTypes.TYPE_LIGHT;
    private final int THERMOSTAT_ID = 1338;
    private final String THERMOSTAT_TITLE = "My fancy thermostat";
    private final int THERMOSTAT_TYPE = DeviceTypes.TYPE_THERMOSTAT;

    ...
    }
Tạo trình xuất bản cho các chế độ kiểm soát
Sau khi được tạo, chế độ kiểm soát này cần một nhà xuất bản. Nhà xuất bản sẽ thông báo cho giao diện người dùng hệ thống về tính khả dụng của tùy chọn điều khiển. Lớp ControlsProviderServicec ó hai phương thức mà nhà xuất bản phải viết hàm đè trong mã ứng dụng:
createPublisherForAllAvailable(): tạoPublishercho tất cả các bộ điều khiển có trong ứng dụng của bạn. Sử dụngControl.StatelessBuilder()để tạo các đối tượngControlcho nhà xuất bản này.createPublisherFor(): tạo mộtPublishercho danh sách các chế độ điều khiển nhất định, như được xác định bằng giá trị nhận dạng chuỗi của các chế độ điều khiển đó. Sử dụngControl.StatefulBuilderđể tạo các đối tượngControlnày, vì nhà xuất bản phải chỉ định một trạng thái cho mỗi chế độ kiểm soát.
Tạo trình xuất bản
Khi ứng dụng phát hành chế độ điều khiển trên giao diện người dùng của hệ thống lần đầu, ứng dụng sẽ không biết trạng thái của từng chế độ điều khiển. Việc nhận biết trạng thái có thể là một hoạt động tốn thời gian liên quan đến nhiều bước trong mạng của nhà cung cấp thiết bị. Sử dụng phương thức createPublisherForAllAvailable() để quảng cáo các tùy chọn điều khiển có sẵn cho hệ thống. Phương thức này sử dụng lớp trình tạo Control.StatelessBuilder vì không xác định được trạng thái của từng chế độ kiểm soát.
Sau khi các chế độ kiểm soát xuất hiện trong giao diện người dùng Android , người dùng có thể chọn các chế độ kiểm soát yêu thích.
Để sử dụng coroutine Kotlin để tạo ControlsProviderService, hãy thêm một phần phụ thuộc mới vào build.gradle:
Groovy
dependencies {
    implementation "org.jetbrains.kotlinx:kotlinx-coroutines-jdk9:1.6.4"
}
Kotlin
dependencies {
    implementation("org.jetbrains.kotlinx:kotlinx-coroutines-jdk9:1.6.4")
}
Sau khi đồng bộ hoá các tệp Gradle, hãy thêm đoạn mã sau vào Service để triển khai createPublisherForAllAvailable():
Kotlin
class MyCustomControlService : ControlsProviderService() { override fun createPublisherForAllAvailable(): Flow.Publisher= flowPublish { send(createStatelessControl(LIGHT_ID, LIGHT_TITLE, LIGHT_TYPE)) send(createStatelessControl(THERMOSTAT_ID, THERMOSTAT_TITLE, THERMOSTAT_TYPE)) } private fun createStatelessControl(id: Int, title: String, type: Int): Control { val intent = Intent(this, MainActivity::class.java) .putExtra(EXTRA_MESSAGE, title) .addFlags(Intent.FLAG_ACTIVITY_NEW_TASK) val action = PendingIntent.getActivity( this, id, intent, PendingIntent.FLAG_UPDATE_CURRENT or PendingIntent.FLAG_IMMUTABLE ) return Control.StatelessBuilder(id.toString(), action) .setTitle(title) .setDeviceType(type) .build() } override fun createPublisherFor(controlIds: List ): Flow.Publisher { TODO() } override fun performControlAction( controlId: String, action: ControlAction, consumer: Consumer ) { TODO() } }
Java
    public class MyCustomJavaControlService extends ControlsProviderService {

        private final int LIGHT_ID = 1337;
        private final String LIGHT_TITLE = "My fancy light";
        private final int LIGHT_TYPE = DeviceTypes.TYPE_LIGHT;
        private final int THERMOSTAT_ID = 1338;
        private final String THERMOSTAT_TITLE = "My fancy thermostat";
        private final int THERMOSTAT_TYPE = DeviceTypes.TYPE_THERMOSTAT;

        private boolean toggleState = false;
        private float rangeState = 18f;
        private final Map<String, ReplayProcessor> controlFlows = new HashMap<>();

        @NonNull
        @Override
        public Flow.Publisher createPublisherForAllAvailable() {
            List controls = new ArrayList<>();
            controls.add(createStatelessControl(LIGHT_ID, LIGHT_TITLE, LIGHT_TYPE));
            controls.add(createStatelessControl(THERMOSTAT_ID, THERMOSTAT_TITLE, THERMOSTAT_TYPE));
            return FlowAdapters.toFlowPublisher(Flowable.fromIterable(controls));
        }

        @NonNull
        @Override
        public Flow.Publisher createPublisherFor(@NonNull List controlIds) {
            ReplayProcessor updatePublisher = ReplayProcessor.create();

            controlIds.forEach(control -> {
                controlFlows.put(control, updatePublisher);
                updatePublisher.onNext(createLight());
                updatePublisher.onNext(createThermostat());
            });

            return FlowAdapters.toFlowPublisher(updatePublisher);
        }
    }
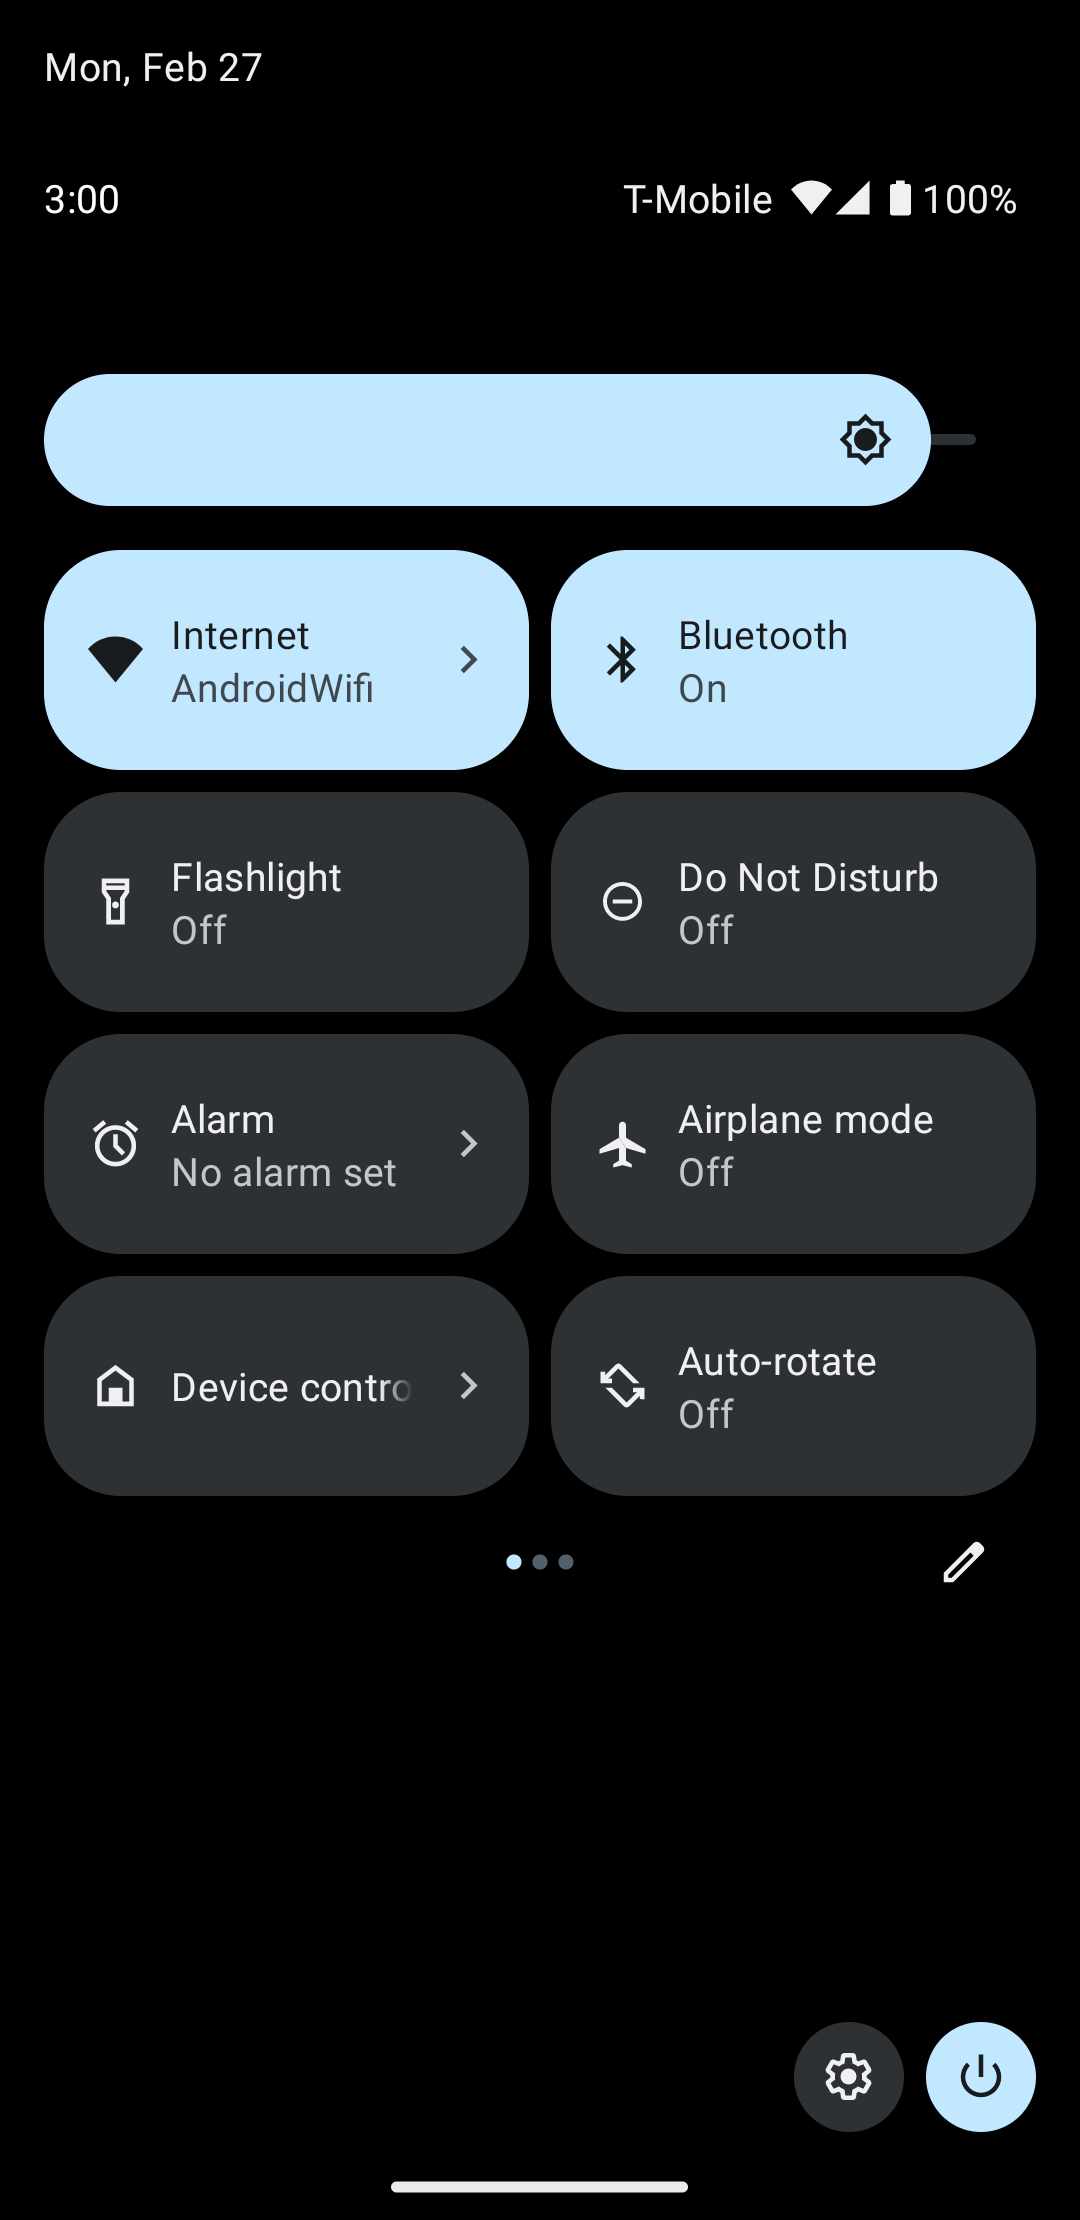
Vuốt trình đơn hệ thống xuống và tìm nút Chế độ điều khiển thiết bị, như minh hoạ trong hình 4:
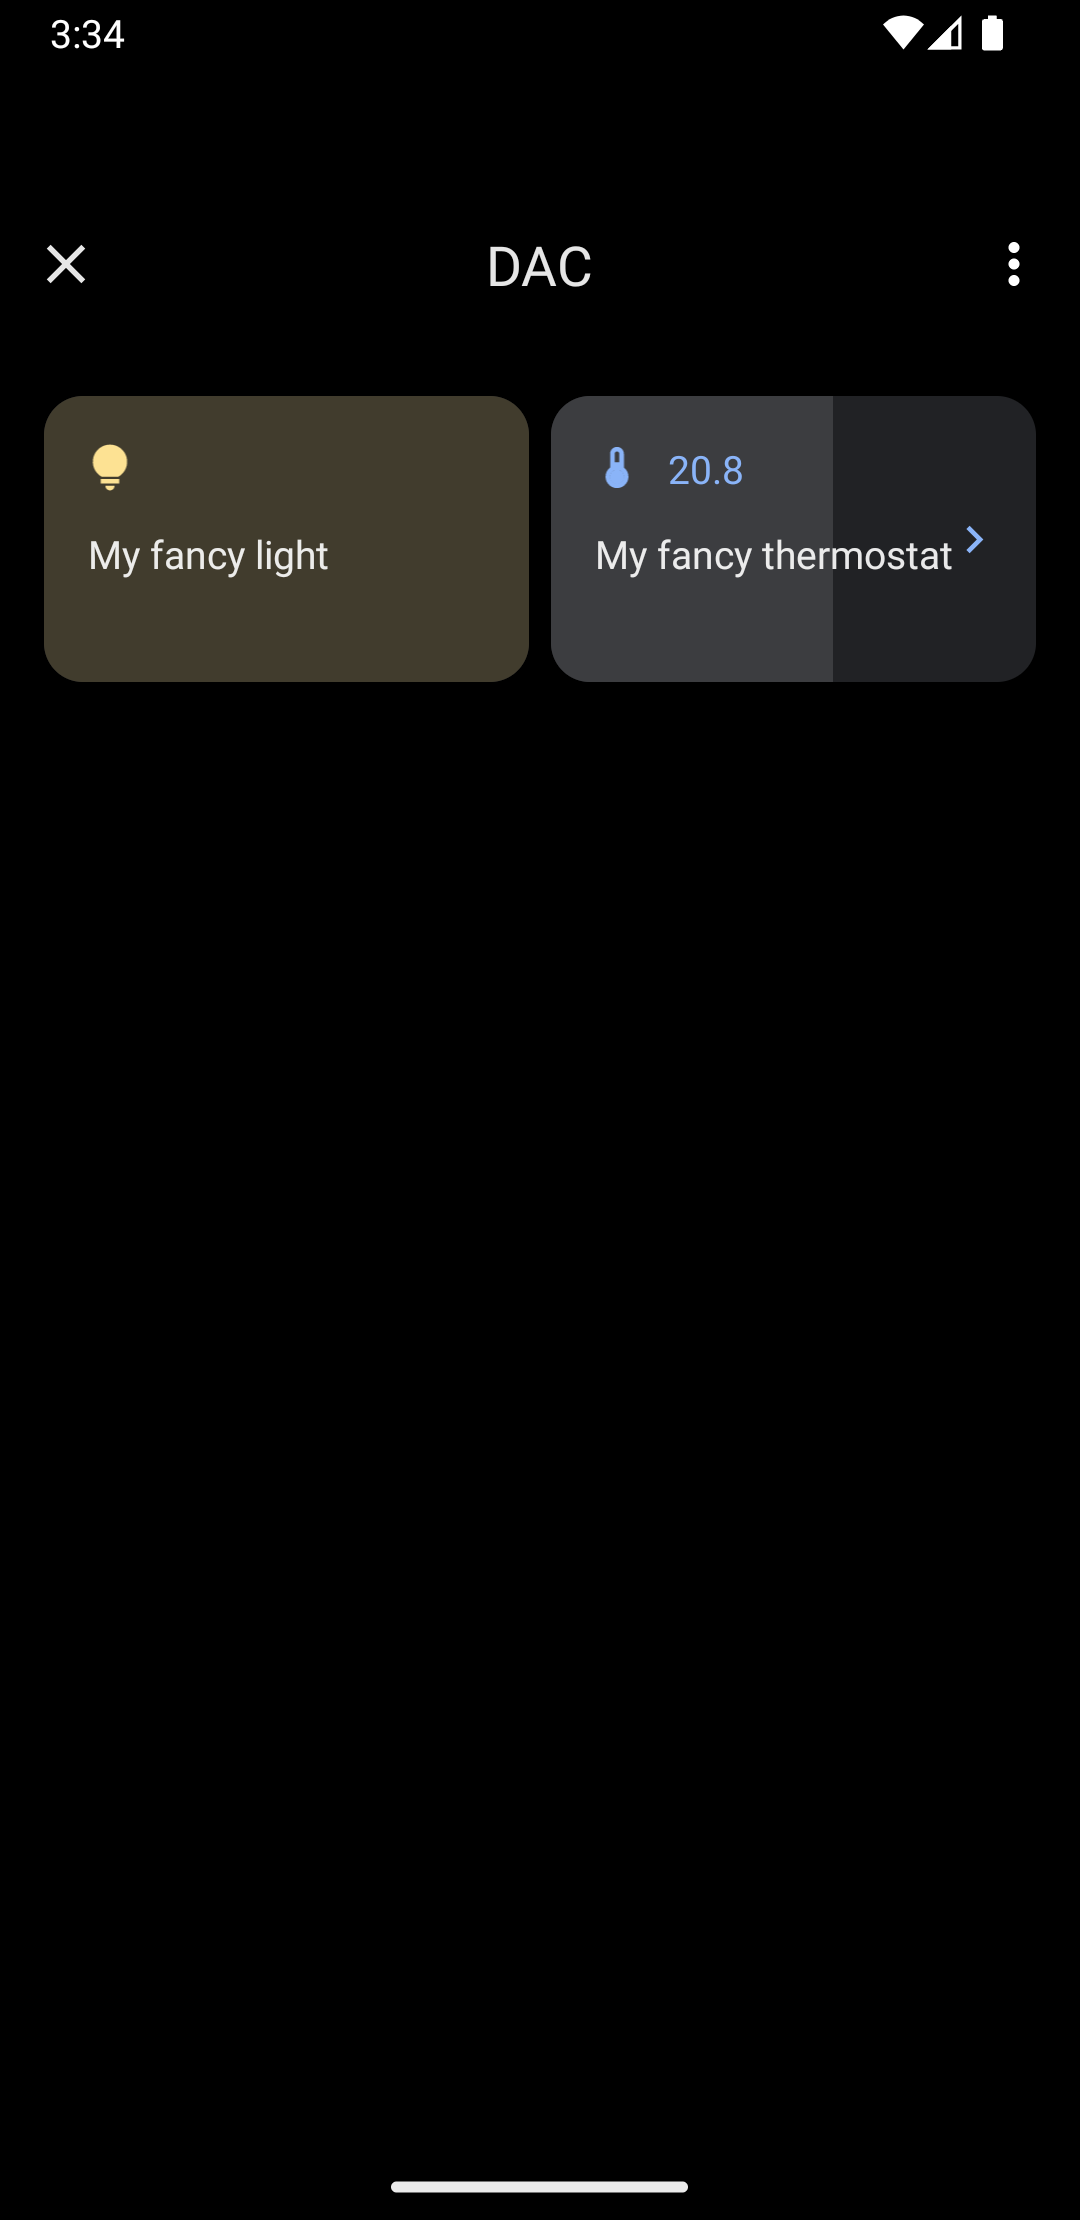
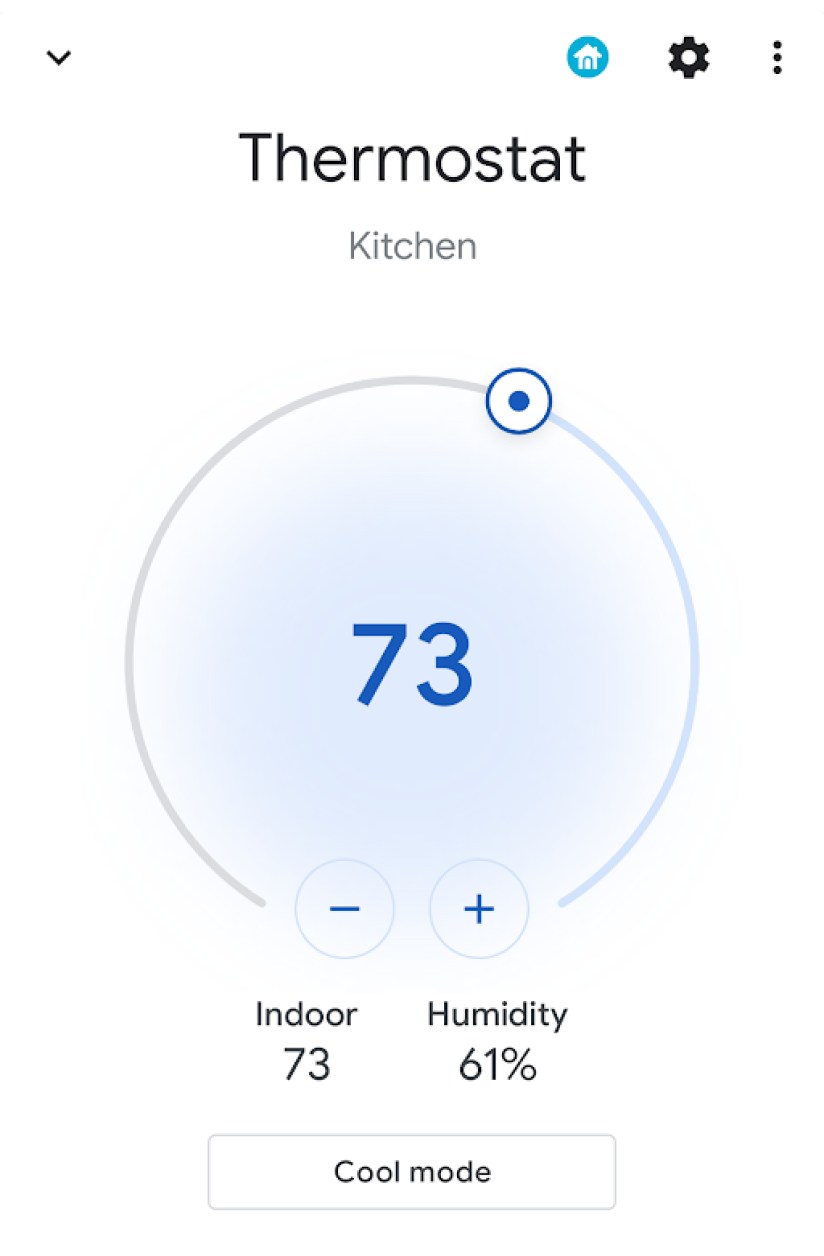
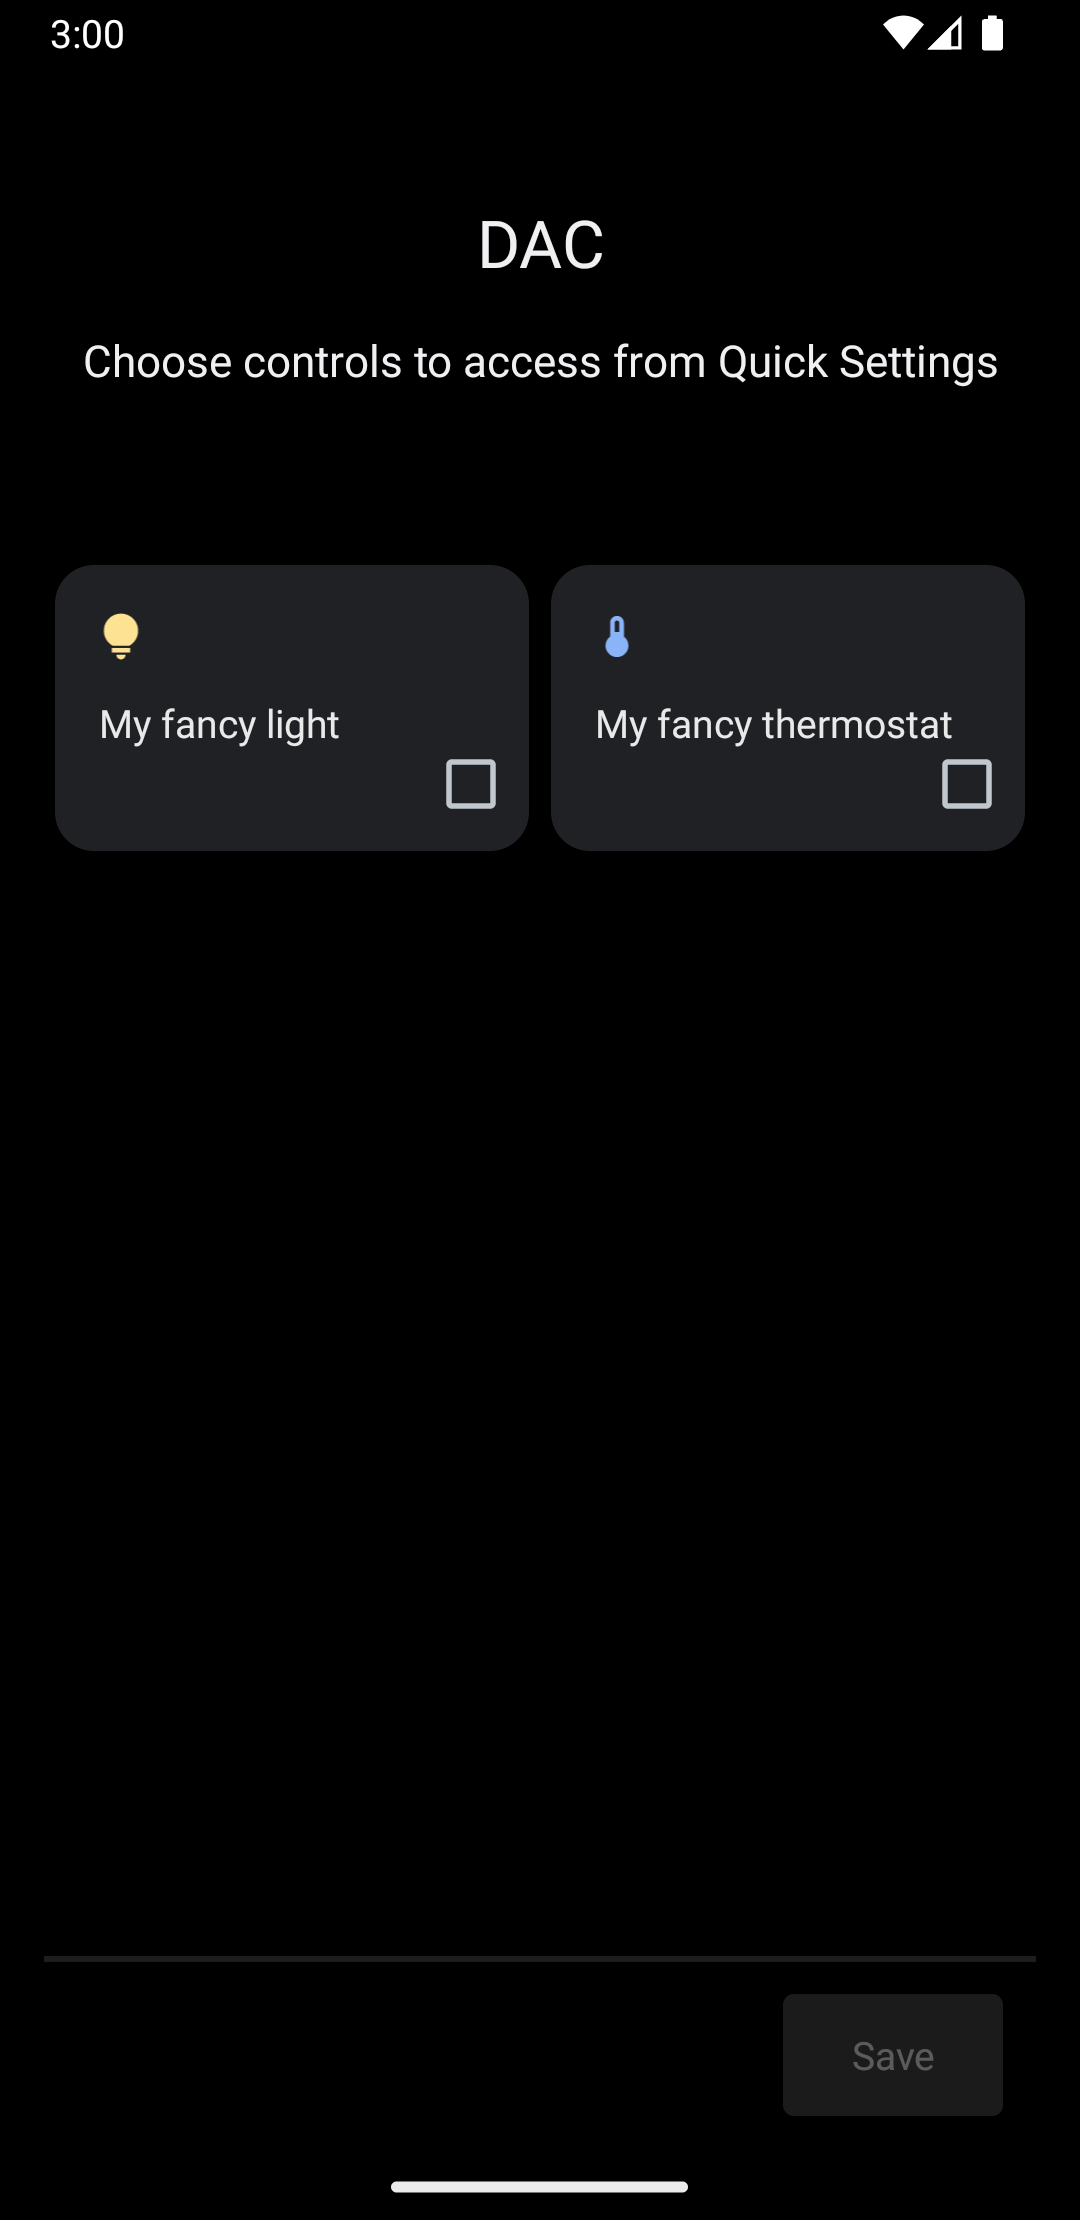
Khi nhấn vào Các chế độ điều khiển thiết bị, bạn sẽ chuyển đến màn hình thứ hai, nơi bạn có thể chọn ứng dụng của mình. Sau khi chọn ứng dụng, bạn sẽ thấy đoạn mã trước đó tạo một trình đơn hệ thống tuỳ chỉnh hiển thị các chế độ điều khiển mới của bạn như thế nào, như minh hoạ trong hình 5:
Bây giờ, hãy triển khai phương thức createPublisherFor(), thêm nội dung sau vào Service:
Kotlin
private val job = SupervisorJob() private val scope = CoroutineScope(Dispatchers.IO + job) private val controlFlows = mutableMapOf<String, MutableSharedFlow>() private var toggleState = false private var rangeState = 18f override fun createPublisherFor(controlIds: List ): Flow.Publisher { val flow = MutableSharedFlow (replay = 2, extraBufferCapacity = 2) controlIds.forEach { controlFlows[it] = flow } scope.launch { delay(1000) // Retrieving the toggle state. flow.tryEmit(createLight()) delay(1000) // Retrieving the range state. flow.tryEmit(createThermostat()) } return flow.asPublisher() } private fun createLight() = createStatefulControl( LIGHT_ID, LIGHT_TITLE, LIGHT_TYPE, toggleState, ToggleTemplate( LIGHT_ID.toString(), ControlButton( toggleState, toggleState.toString().uppercase(Locale.getDefault()) ) ) ) private fun createThermostat() = createStatefulControl( THERMOSTAT_ID, THERMOSTAT_TITLE, THERMOSTAT_TYPE, rangeState, RangeTemplate( THERMOSTAT_ID.toString(), 15f, 25f, rangeState, 0.1f, "%1.1f" ) ) private fun createStatefulControl(id: Int, title: String, type: Int, state: T, template: ControlTemplate): Control { val intent = Intent(this, MainActivity::class.java) .putExtra(EXTRA_MESSAGE, "$title $state") .addFlags(Intent.FLAG_ACTIVITY_NEW_TASK) val action = PendingIntent.getActivity( this, id, intent, PendingIntent.FLAG_UPDATE_CURRENT or PendingIntent.FLAG_IMMUTABLE ) return Control.StatefulBuilder(id.toString(), action) .setTitle(title) .setDeviceType(type) .setStatus(Control.STATUS_OK) .setControlTemplate(template) .build() } override fun onDestroy() { super.onDestroy() job.cancel() }
Java
@NonNull @Override public Flow.PublishercreatePublisherFor(@NonNull List controlIds) { ReplayProcessor updatePublisher = ReplayProcessor.create(); controlIds.forEach(control -> { controlFlows.put(control, updatePublisher); updatePublisher.onNext(createLight()); updatePublisher.onNext(createThermostat()); }); return FlowAdapters.toFlowPublisher(updatePublisher); } private Control createStatelessControl(int id, String title, int type) { Intent intent = new Intent(this, MainActivity.class) .putExtra(EXTRA_MESSAGE, title) .addFlags(Intent.FLAG_ACTIVITY_NEW_TASK); PendingIntent action = PendingIntent.getActivity( this, id, intent, PendingIntent.FLAG_UPDATE_CURRENT | PendingIntent.FLAG_IMMUTABLE ); return new Control.StatelessBuilder(id + "", action) .setTitle(title) .setDeviceType(type) .build(); } private Control createLight() { return createStatefulControl( LIGHT_ID, LIGHT_TITLE, LIGHT_TYPE, toggleState, new ToggleTemplate( LIGHT_ID + "", new ControlButton( toggleState, String.valueOf(toggleState).toUpperCase(Locale.getDefault()) ) ) ); } private Control createThermostat() { return createStatefulControl( THERMOSTAT_ID, THERMOSTAT_TITLE, THERMOSTAT_TYPE, rangeState, new RangeTemplate( THERMOSTAT_ID + "", 15f, 25f, rangeState, 0.1f, "%1.1f" ) ); } private Control createStatefulControl(int id, String title, int type, T state, ControlTemplate template) { Intent intent = new Intent(this, MainActivity.class) .putExtra(EXTRA_MESSAGE, "$title $state") .addFlags(Intent.FLAG_ACTIVITY_NEW_TASK); PendingIntent action = PendingIntent.getActivity( this, id, intent, PendingIntent.FLAG_UPDATE_CURRENT | PendingIntent.FLAG_IMMUTABLE ); return new Control.StatefulBuilder(id + "", action) .setTitle(title) .setDeviceType(type) .setStatus(Control.STATUS_OK) .setControlTemplate(template) .build(); }
Trong ví dụ này, phương thức createPublisherFor() chứa một phương thức triển khai giả về những việc mà ứng dụng của bạn phải làm: giao tiếp với thiết bị để truy xuất trạng thái của thiết bị và phát trạng thái đó cho hệ thống.
Phương thức createPublisherFor() sử dụng các coroutine và luồng Kotlin để đáp ứng API Reactive Streams bắt buộc bằng cách thực hiện những việc sau:
- Tạo
Flow. - Chờ một giây.
- Tạo và phát trạng thái của đèn thông minh.
- Chờ thêm một giây nữa.
- Tạo và phát trạng thái của máy điều nhiệt.
Xử lý thao tác
Phương thức performControlAction() cho biết thời điểm người dùng tương tác với một chế độ kiểm soát đã xuất bản. Loại ControlAction được gửi sẽ xác định hành động.
Thực hiện thao tác thích hợp cho chức năng điều khiển đã định, sau đó cập nhật trạng thái của thiết bị trong giao diện người dùng Android.
Để hoàn tất ví dụ, hãy thêm nội dung sau vào Service:
Kotlin
override fun performControlAction( controlId: String, action: ControlAction, consumer: Consumer) { controlFlows[controlId]?.let { flow -> when (controlId) { LIGHT_ID.toString() -> { consumer.accept(ControlAction.RESPONSE_OK) if (action is BooleanAction) toggleState = action.newState flow.tryEmit(createLight()) } THERMOSTAT_ID.toString() -> { consumer.accept(ControlAction.RESPONSE_OK) if (action is FloatAction) rangeState = action.newValue flow.tryEmit(createThermostat()) } else -> consumer.accept(ControlAction.RESPONSE_FAIL) } } ?: consumer.accept(ControlAction.RESPONSE_FAIL) }
Java
@Override public void performControlAction(@NonNull String controlId, @NonNull ControlAction action, @NonNull Consumerconsumer) { ReplayProcessor processor = controlFlows.get(controlId); if (processor == null) return; if (controlId.equals(LIGHT_ID + "")) { consumer.accept(ControlAction.RESPONSE_OK); if (action instanceof BooleanAction) toggleState = ((BooleanAction) action).getNewState(); processor.onNext(createLight()); } if (controlId.equals(THERMOSTAT_ID + "")) { consumer.accept(ControlAction.RESPONSE_OK); if (action instanceof FloatAction) rangeState = ((FloatAction) action).getNewValue() processor.onNext(createThermostat()); } }
Chạy ứng dụng, truy cập vào trình đơn Các chế độ điều khiển thiết bị và xem các chế độ điều khiển đèn cũng như máy điều nhiệt.