
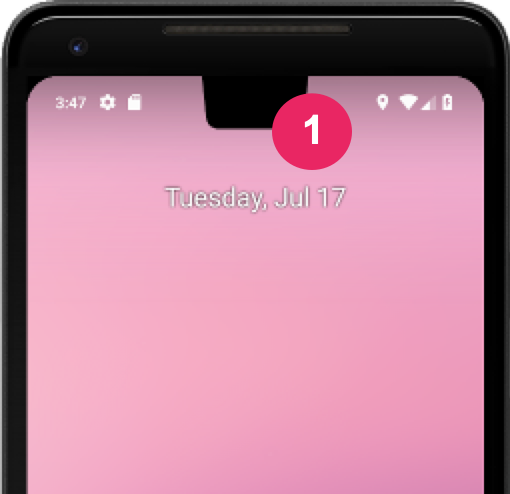
Wycięcie w ekranie to obszar na niektórych urządzeniach który wchodzi w powierzchnię wyświetlacza. Umożliwia to wyświetlanie treści bez ramki, a jednocześnie zapewnia miejsce na ważne czujniki z przodu urządzenia.
Android obsługuje wycięcia w ekranie na urządzeniach z Androidem 9 (poziom 28 interfejsu API) i nowszym. Producenci urządzeń mogą jednak obsługiwać wycięcia w ekranie również na urządzeniach z Androidem 8.1 lub starszym.
Z tego dokumentu dowiesz się, jak zaimplementować obsługę urządzeń z wycięciami, w tym jak pracować z obszarem wycięcia—czyli prostokątem bez ramki na powierzchni wyświetlacza, który zawiera wycięcie.
Wybieranie sposobu obsługi obszarów wycięcia przez aplikację
Jeśli nie chcesz, aby treści nakładały się na obszar wycięcia, wystarczy zwykle upewnić się, że nie nakładają się one na pasek stanu i pasek nawigacyjny. Jeśli renderujesz w obszarze wycięcia, użyj
WindowInsetsCompat.getDisplayCutout()
aby pobrać obiekt DisplayCutout
który zawiera bezpieczne wcięcia i ramkę ograniczającą dla każdego wycięcia. Te interfejsy API umożliwiają sprawdzenie, czy treści nakładają się na wycięcie, dzięki czemu możesz w razie potrzeby zmienić ich położenie.
Możesz też określić, czy treści są rozmieszczone za obszarem wycięcia. Atrybut układu okna
layoutInDisplayCutoutMode
określa, jak treści są rysowane w obszarze wycięcia.
Możesz ustawić layoutInDisplayCutoutMode na jedną z tych wartości:
LAYOUT_IN_DISPLAY_CUTOUT_MODE_DEFAULT: treści są renderowane w obszarze wycięcia, gdy wycięcie w ekranie znajduje się na pasku systemu. W przeciwnym razie okno nie nakłada się na wycięcie w ekranie. Na przykład treści mogą być wyświetlane w trybie letterbox, gdy są wyświetlane w trybie poziomym. Jeśli Twoja aplikacja jest kierowana na SDK 35, w przypadku okien niepływających jest to interpretowane jakoALWAYS.LAYOUT_IN_DISPLAY_CUTOUT_MODE_ALWAYS: treści zawsze mogą rozciągać się na obszary wycięcia. Jeśli Twoja aplikacja jest kierowana na SDK 35 i działa na urządzeniu z Androidem 15, jest to jedyny dozwolony tryb dla okien niepływających, który zapewnia wyświetlanie treści bez ramki.LAYOUT_IN_DISPLAY_CUTOUT_MODE_SHORT_EDGES: treści są renderowane w obszarze wycięcia zarówno w trybie pionowym, jak i poziomym. Nie używaj w przypadku okien pływających. Jeśli Twoja aplikacja jest kierowana na SDK 35, w przypadku okien niepływających jest to interpretowane jakoALWAYS.LAYOUT_IN_DISPLAY_CUTOUT_MODE_NEVER: treści nigdy nie są renderowane w obszarze wycięcia. Jeśli Twoja aplikacja jest kierowana na SDK 35, w przypadku okien niepływających jest to interpretowane jakoALWAYS.
Tryb wycięcia możesz ustawić programowo lub przez ustawienie a
stylu w aktywności. W tym przykładzie zdefiniowano styl, który stosuje atrybut LAYOUT_IN_DISPLAY_CUTOUT_MODE_SHORT_EDGES do aktywności.
<style name="ActivityTheme">
  <item name="android:windowLayoutInDisplayCutoutMode">
    shortEdges <!-- default, shortEdges, or never -->
  </item>
</style>
W kolejnych sekcjach opisujemy szczegółowo różne tryby wycięcia.
Działanie domyślne
Jeśli Twoja aplikacja jest kierowana na SDK 35 i działa na urządzeniu z Androidem 15,
LAYOUT_IN_DISPLAY_CUTOUT_MODE_ALWAYS jest domyślnym działaniem, a
LAYOUT_IN_DISPLAY_CUTOUT_MODE_DEFAULT jest interpretowane jako
LAYOUT_IN_DISPLAY_CUTOUT_MODE_ALWAYS w przypadku okien niepływających.
W przeciwnym razie domyślnym ustawieniem jest LAYOUT_IN_DISPLAY_CUTOUT_MODE_DEFAULT.
Renderowanie treści w obszarach wycięcia na krótkich krawędziach
Jeśli Twoja aplikacja jest kierowana na SDK 35 i działa na urządzeniu z Androidem 15, LAYOUT_IN_DISPLAY_CUTOUT_MODE_SHORT_EDGES jest interpretowane jako LAYOUT_IN_DISPLAY_CUTOUT_MODE_ALWAYS w przypadku okien niepływających.
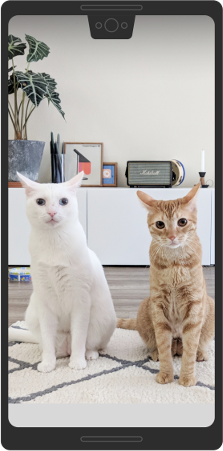
W przypadku LAYOUT_IN_DISPLAY_CUTOUT_MODE_SHORT_EDGES treści rozciągają się na obszar wycięcia na krótkiej krawędzi wyświetlacza zarówno w trybie pionowym, jak i poziomym, niezależnie od tego, czy paski systemu są ukryte czy widoczne. Gdy używasz tego trybu, upewnij się, że żadne ważne treści nie nakładają się na obszar wycięcia.
Ten obraz przedstawia przykład LAYOUT_IN_DISPLAY_CUTOUT_MODE_SHORT_EDGES na urządzeniu w trybie pionowym:
Ten obraz przedstawia przykład LAYOUT_IN_DISPLAY_CUTOUT_MODE_SHORT_EDGES na urządzeniu w trybie poziomym:
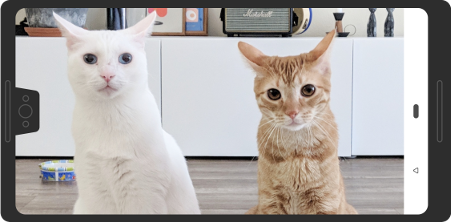
W tym trybie okno rozciąga się pod wycięcia na krótkiej krawędzi wyświetlacza zarówno w trybie pionowym, jak i poziomym, niezależnie od tego, czy okno ukrywa paski systemu.
Wycięcie w rogu jest uważane za wycięcie na krótkiej krawędzi:
Nigdy nie renderuj treści w obszarze wycięcia w ekranie
Jeśli Twoja aplikacja jest kierowana na SDK 35 i działa na urządzeniu z Androidem 15, LAYOUT_IN_DISPLAY_CUTOUT_MODE_NEVER jest interpretowane jako LAYOUT_IN_DISPLAY_CUTOUT_MODE_ALWAYS w przypadku okien niepływających.
W przypadku LAYOUT_IN_DISPLAY_CUTOUT_MODE_NEVER okno nigdy nie może nakładać się na obszar wycięcia.
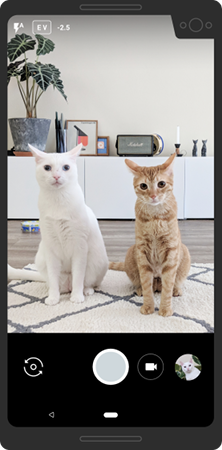
Oto przykład LAYOUT_IN_DISPLAY_CUTOUT_MODE_NEVER w trybie pionowym:
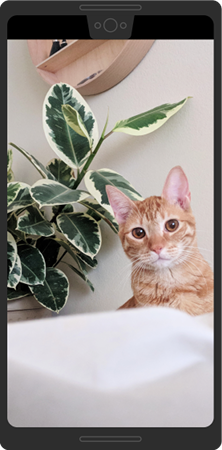
LAYOUT_IN_DISPLAY_CUTOUT_MODE_NEVER w trybie pionowym.
Oto przykład LAYOUT_IN_DISPLAY_CUTOUT_MODE_NEVER w trybie poziomym:

LAYOUT_IN_DISPLAY_CUTOUT_MODE_NEVER w trybie poziomym.
Sprawdzone metody obsługi wycięć w ekranie
Podczas pracy z wycięciami w ekranie pamiętaj o tych kwestiach:
- Zwróć uwagę na umiejscowienie najważniejszych elementów interfejsu. Nie dopuść do tego, aby obszar wycięcia zasłaniał ważne teksty, elementy sterujące lub inne informacje.
- Nie umieszczaj ani nie rozciągaj w obszarze wycięcia żadnych elementów interaktywnych, które wymagają precyzyjnego dotyku. Czułość ekranu w obszarze wycięcia może być mniejsza.
Jeśli to możliwe, użyj
WindowInsetsCompat, aby pobrać wysokość paska stanu i określić odpowiedni odstęp, który należy zastosować do treści. Unikaj kodowania na stałe wysokości paska stanu, ponieważ może to powodować nakładanie się lub ucinanie treści.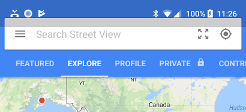
Rysunek 7. Użyj WindowInsetsCompat, aby uniknąć nakładania się lub ucinania treści.Użyj
View.getLocationInWindow(), aby określić, ile miejsca w oknie zajmuje Twoja aplikacja. Nie zakładaj, że aplikacja zajmuje całe okno, i nie używajView.getLocationOnScreen().Jeśli Twoja aplikacja musi przechodzić do trybu immersyjnego i z niego wychodzić, użyj trybów wycięcia
always,shortEdgeslubnever. Domyślne działanie wycięcia może powodować, że treści w aplikacji będą renderowane w obszarze wycięcia, gdy paski systemu są widoczne, ale nie w trybie immersyjnym. Powoduje to przesuwanie się treści w górę i w dół podczas przejść, jak pokazano w tym przykładzie.
Rysunek 8. Przykład przesuwania się treści w górę i w dół podczas przejść. W trybie immersyjnym uważaj na używanie współrzędnych okna i ekranu, ponieważ w trybie letterbox aplikacja nie zajmuje całego ekranu. Ze względu na tryb letterbox współrzędne od początku ekranu nie są takie same jak współrzędne od początku okna. W razie potrzeby możesz przekształcić współrzędne ekranu na współrzędne widoku za pomocą
getLocationOnScreen(). Ten obraz pokazuje, jak różnią się współrzędne, gdy treści są wyświetlane w trybie letterbox: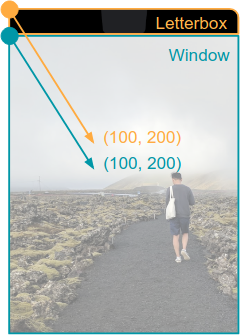
Rysunek 9. Współrzędne okna i ekranu, gdy treści są wyświetlane w trybie letterbox. Podczas obsługi
MotionEventużywajMotionEvent.getX()iMotionEvent.getY(), aby uniknąć podobnych problemów ze współrzędnymi. Nie używajMotionEvent.getRawX()aniMotionEvent.getRawY().
Testowanie renderowania treści
Przetestuj wszystkie ekrany i funkcje aplikacji. Jeśli to możliwe, przetestuj aplikację na urządzeniach z różnymi typami wycięć. Jeśli nie masz urządzenia z wycięciem, możesz symulować typowe konfiguracje wycięć na dowolnym urządzeniu lub emulatorze z Androidem 9 lub nowszym, wykonując te czynności:
- Włącz Opcje programisty.
- Na ekranie Opcje programisty przewiń w dół do sekcji Rysowanie i wybierz Symuluj wyświetlacz z wycięciem.
Wybierz typ wycięcia.
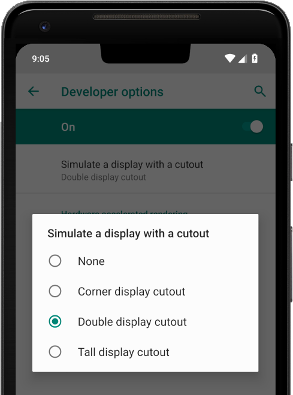
Rysunek 10. Opcje programisty do testowania renderowania treści.
Dodatkowe materiały
- LAYOUT_IN_DISPLAY_CUTOUT_MODE_ALWAYS
- LAYOUT_IN_DISPLAY_CUTOUT_MODE_NEVER
- LAYOUT_IN_DISPLAY_CUTOUT_MODE_SHORT_EDGES
- LAYOUT_IN_DISPLAY_CUTOUT_MODE_DEFAULT