
Fare spostare gli oggetti secondo un programma preimpostato, come il triangolo rotante, è utile per
ricevere un po' di attenzione, ma cosa succede se vuoi che gli utenti interagiscano con la tua grafica OpenGL ES?
Il segreto per rendere interattiva la tua applicazione OpenGL ES è espandere l'implementazione di
GLSurfaceView per eseguire l'override
onTouchEvent() per ascoltare eventi touch.
Questa lezione mostra come ascoltare gli eventi touch per consentire agli utenti di ruotare un oggetto OpenGL ES.
Configura un listener di tocchi
Per fare in modo che l'applicazione OpenGL ES risponda agli eventi touch, devi implementare il metodo
onTouchEvent() nel tuo
GLSurfaceView corso. L'implementazione di esempio riportata di seguito mostra come ascoltare
MotionEvent.ACTION_MOVE eventi e traducili in
un angolo di rotazione per una forma.
Kotlin
private const val TOUCH_SCALE_FACTOR: Float = 180.0f / 320f
...
private var previousX: Float = 0f
private var previousY: Float = 0f

override fun onTouchEvent(e: MotionEvent): Boolean {
    // MotionEvent reports input details from the touch screen
    // and other input controls. In this case, you are only
    // interested in events where the touch position changed.

    val x: Float = e.x
    val y: Float = e.y

    when (e.action) {
        MotionEvent.ACTION_MOVE -> {

            var dx: Float = x - previousX
            var dy: Float = y - previousY

            // reverse direction of rotation above the mid-line
            if (y > height / 2) {
                dx *= -1
            }

            // reverse direction of rotation to left of the mid-line
            if (x < width / 2) {
                dy *= -1
            }

            renderer.angle += (dx + dy) * TOUCH_SCALE_FACTOR
            requestRender()
        }
    }

    previousX = x
    previousY = y
    return true
}
Java
private final float TOUCH_SCALE_FACTOR = 180.0f / 320;
private float previousX;
private float previousY;

@Override
public boolean onTouchEvent(MotionEvent e) {
    // MotionEvent reports input details from the touch screen
    // and other input controls. In this case, you are only
    // interested in events where the touch position changed.

    float x = e.getX();
    float y = e.getY();

    switch (e.getAction()) {
        case MotionEvent.ACTION_MOVE:

            float dx = x - previousX;
            float dy = y - previousY;

            // reverse direction of rotation above the mid-line
            if (y > getHeight() / 2) {
              dx = dx * -1 ;
            }

            // reverse direction of rotation to left of the mid-line
            if (x < getWidth() / 2) {
              dy = dy * -1 ;
            }

            renderer.setAngle(
                    renderer.getAngle() +
                    ((dx + dy) * TOUCH_SCALE_FACTOR));
            requestRender();
    }

    previousX = x;
    previousY = y;
    return true;
}
Tieni presente che dopo aver calcolato l'angolo di rotazione, questo metodo chiama
requestRender() per indicare
renderer che sia il momento di eseguire il rendering del frame. Questo approccio è quello più efficace nell'esempio,
perché non occorre ridisegnare il frame a meno che non vi sia un cambiamento nella rotazione. Tuttavia,
non ha alcun impatto sull'efficienza, a meno che non richiedi al renderer di ridisegno solo quando
i dati cambiano utilizzando l'setRenderMode()
, quindi assicurati che sia rimosso il commento da questa riga nel renderer:
Kotlin
class MyGlSurfaceView(context: Context) : GLSurfaceView(context) {

    init {
        // Render the view only when there is a change in the drawing data
        renderMode = GLSurfaceView.RENDERMODE_WHEN_DIRTY
    }
}
Java
public MyGLSurfaceView(Context context) {
    ...
    // Render the view only when there is a change in the drawing data
    setRenderMode(GLSurfaceView.RENDERMODE_WHEN_DIRTY);
}
Esposizione dell'angolo di rotazione
Il codice di esempio riportato sopra richiede di esporre l'angolo di rotazione tramite il renderer
l'aggiunta di un membro pubblico. Poiché il codice del renderer è in esecuzione su un thread separato da quello dell'utente principale
thread di interfaccia dell'applicazione, devi dichiarare questa variabile pubblica come volatile.
Ecco il codice per dichiarare la variabile ed esporre la coppia getter e setter:
Kotlin
class MyGLRenderer4 : GLSurfaceView.Renderer {

    @Volatile
    var angle: Float = 0f
}
Java
public class MyGLRenderer implements GLSurfaceView.Renderer {
    ...

    public volatile float mAngle;

    public float getAngle() {
        return mAngle;
    }

    public void setAngle(float angle) {
        mAngle = angle;
    }
}
Applica rotazione
Per applicare la rotazione generata dall'input tocco, commenta il codice che genera un angolo e aggiungi una variabile contenente l'angolo generato dall'input tocco:
Kotlin
override fun onDrawFrame(gl: GL10) {
    ...
    val scratch = FloatArray(16)

    // Create a rotation for the triangle
    // long time = SystemClock.uptimeMillis() % 4000L;
    // float angle = 0.090f * ((int) time);
    Matrix.setRotateM(rotationMatrix, 0, angle, 0f, 0f, -1.0f)

    // Combine the rotation matrix with the projection and camera view
    // Note that the mvpMatrix factor *must be first* in order
    // for the matrix multiplication product to be correct.
    Matrix.multiplyMM(scratch, 0, mvpMatrix, 0, rotationMatrix, 0)

    // Draw triangle
    triangle.draw(scratch)
}
Java
public void onDrawFrame(GL10 gl) {
    ...
    float[] scratch = new float[16];

    // Create a rotation for the triangle
    // long time = SystemClock.uptimeMillis() % 4000L;
    // float angle = 0.090f * ((int) time);
    Matrix.setRotateM(rotationMatrix, 0, mAngle, 0, 0, -1.0f);

    // Combine the rotation matrix with the projection and camera view
    // Note that the vPMatrix factor *must be first* in order
    // for the matrix multiplication product to be correct.
    Matrix.multiplyMM(scratch, 0, vPMatrix, 0, rotationMatrix, 0);

    // Draw triangle
    mTriangle.draw(scratch);
}
Una volta completati i passaggi descritti sopra, esegui il programma e trascina il dito sul schermo per ruotare il triangolo:
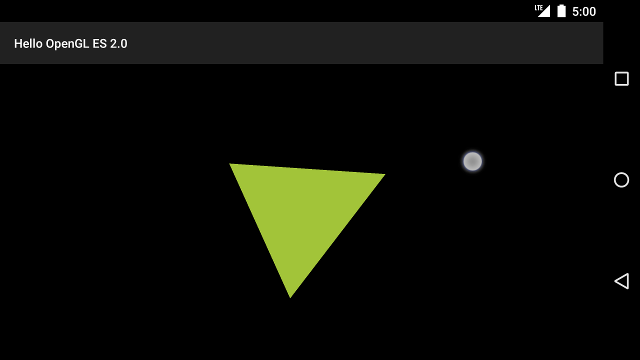
Figura 1. Triangolo ruotato con input tocco (il cerchio mostra il tocco posizione).