

นอกจากฟังก์ชันที่ประกอบกันได้ Canvas แล้ว Compose ยังมีกราฟิกที่มีประโยชน์หลายอย่าง
Modifiers ซึ่งช่วยในการวาดเนื้อหาที่กำหนดเอง ตัวแก้ไขเหล่านี้มีประโยชน์
เนื่องจากนำไปใช้กับ Composable ใดก็ได้
เครื่องแก้ไขการวาด
คำสั่งวาดทั้งหมดจะดำเนินการด้วยตัวแก้ไขการวาดใน Compose ตัวแก้ไขการวาดภาพหลักๆ ใน Compose มี 3 อย่างดังนี้
ตัวแก้ไขพื้นฐานสำหรับการวาดคือ drawWithContent ซึ่งคุณสามารถกำหนด
ลำดับการวาดของ Composable และคำสั่งการวาดที่ออกภายใน
ตัวแก้ไขได้ drawBehind เป็น Wrapper ที่สะดวกสำหรับ drawWithContent ซึ่งมี
ลำดับการวาดที่ตั้งค่าเป็นด้านหลังเนื้อหาของ Composable drawWithCache
เรียกใช้ onDrawBehind หรือ onDrawWithContent ภายใน - และมี
กลไกสำหรับการแคชออบเจ็กต์ที่สร้างขึ้นในฟังก์ชันเหล่านั้น
Modifier.drawWithContent: เลือกการวาด
Modifier.drawWithContent ช่วยให้คุณ
ดำเนินการDrawScopeก่อนหรือหลังเนื้อหาของ
Composable ได้ อย่าลืมเรียกใช้ drawContent เพื่อแสดงผลเนื้อหาจริงของ
Composable ตัวแก้ไขนี้ช่วยให้คุณกำหนดลำดับการดำเนินการได้ หากต้องการให้ระบบวาดเนื้อหาก่อนหรือหลังการดำเนินการวาดที่กำหนดเอง
ตัวอย่างเช่น หากต้องการแสดงการไล่ระดับสีแบบรัศมีเหนือเนื้อหาเพื่อ สร้างเอฟเฟกต์รูปร่างของไฟฉายบน UI คุณสามารถทำดังนี้
var pointerOffset by remember { mutableStateOf(Offset(0f, 0f)) } Column( modifier = Modifier .fillMaxSize() .pointerInput("dragging") { detectDragGestures { change, dragAmount -> pointerOffset += dragAmount } } .onSizeChanged { pointerOffset = Offset(it.width / 2f, it.height / 2f) } .drawWithContent { drawContent() // draws a fully black area with a small keyhole at pointerOffset that’ll show part of the UI. drawRect( Brush.radialGradient( listOf(Color.Transparent, Color.Black), center = pointerOffset, radius = 100.dp.toPx(), ) ) } ) { // Your composables here }
Modifier.drawBehind: การวาดด้านหลัง Composable
Modifier.drawBehind ช่วยให้คุณดำเนินการDrawScopeที่อยู่เบื้องหลังเนื้อหาที่เขียนได้ซึ่งวาดบนหน้าจอ หากดูการติดตั้งใช้งาน Canvas คุณอาจสังเกตเห็นว่า Modifier.drawBehind เป็นเพียง Wrapper ที่สะดวก
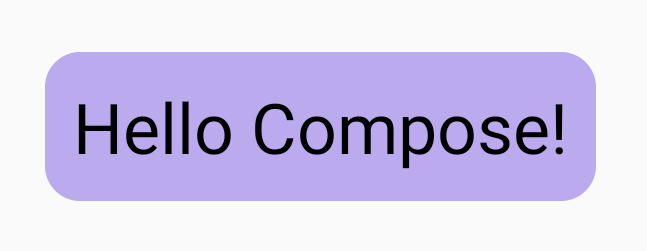
วิธีวาดสี่เหลี่ยมผืนผ้ามุมมนด้านหลัง Text
Text( "Hello Compose!", modifier = Modifier .drawBehind { drawRoundRect( Color(0xFFBBAAEE), cornerRadius = CornerRadius(10.dp.toPx()) ) } .padding(4.dp) )
ซึ่งจะให้ผลลัพธ์ต่อไปนี้
Modifier.drawWithCache: การวาดและแคชออบเจ็กต์การวาด
Modifier.drawWithCache จะแคชออบเจ็กต์
ที่สร้างไว้ภายใน ระบบจะแคชออบเจ็กต์ตราบใดที่ขนาด
ของพื้นที่วาดภาพยังคงเท่าเดิม หรือออบเจ็กต์สถานะใดๆ ที่อ่านยังไม่
เปลี่ยนแปลง ตัวแก้ไขนี้มีประโยชน์ในการปรับปรุงประสิทธิภาพของการเรียกใช้การวาด เนื่องจากไม่จำเป็นต้องจัดสรรออบเจ็กต์ใหม่ (เช่น Brush, Shader, Path ฯลฯ)
ที่สร้างขึ้นในการวาด
หรือจะแคชออบเจ็กต์โดยใช้ remember นอก
ตัวแก้ไขก็ได้ อย่างไรก็ตาม คุณอาจทำเช่นนี้ไม่ได้เสมอไปเนื่องจากคุณอาจไม่มีสิทธิ์เข้าถึง
การเรียบเรียง การใช้ drawWithCache อาจมีประสิทธิภาพมากกว่าหากใช้
ออบเจ็กต์สำหรับการวาดเท่านั้น
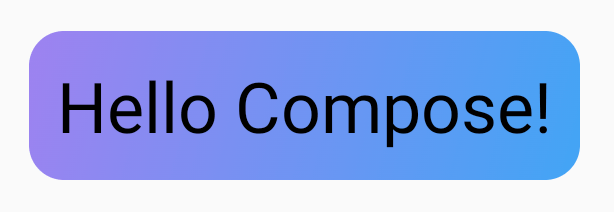
เช่น หากคุณสร้าง Brush เพื่อวาดการไล่ระดับสีด้านหลัง Text โดยใช้
drawWithCache จะแคชออบเจ็กต์ Brush จนกว่าขนาดของพื้นที่วาด
จะเปลี่ยนแปลง
Text( "Hello Compose!", modifier = Modifier .drawWithCache { val brush = Brush.linearGradient( listOf( Color(0xFF9E82F0), Color(0xFF42A5F5) ) ) onDrawBehind { drawRoundRect( brush, cornerRadius = CornerRadius(10.dp.toPx()) ) } } )
ตัวปรับแต่งกราฟิก
Modifier.graphicsLayer: ใช้การเปลี่ยนรูปแบบกับ Composable
Modifier.graphicsLayer
เป็นตัวแก้ไขที่ทำให้เนื้อหาของ Composable วาดลงในเลเยอร์การวาด
เลเยอร์มีฟังก์ชันที่แตกต่างกันเล็กน้อย เช่น
- การแยกคำสั่งวาดภาพ (คล้ายกับ
RenderNode) ไปป์ไลน์การแสดงผลสามารถออกคำสั่งวาดภาพที่บันทึกไว้เป็นส่วนหนึ่งของเลเยอร์อีกครั้งได้อย่างมีประสิทธิภาพโดยไม่ต้องเรียกใช้โค้ดแอปพลิเคชันอีกครั้ง - การเปลี่ยนรูปแบบที่มีผลกับคำสั่งการวาดทั้งหมดที่อยู่ในเลเยอร์
- การแปลงเป็นภาพแรสเตอร์สำหรับความสามารถในการคอมโพสิต เมื่อแรสเตอร์เลเยอร์ ระบบจะดำเนินการตาม วิธีการวาดและบันทึกเอาต์พุตลงในบัฟเฟอร์ นอกหน้าจอ การคอมโพสิตบัฟเฟอร์ดังกล่าวสำหรับเฟรมต่อๆ ไปจะเร็วกว่า การดำเนินการตามคำสั่งแต่ละรายการ แต่จะทำงานเป็นบิตแมปเมื่อ ใช้การเปลี่ยนรูปแบบ เช่น การปรับขนาดหรือการหมุน
การแปลงโฉม
Modifier.graphicsLayer จะแยกคำสั่งการวาด
เช่น ใช้การเปลี่ยนรูปแบบต่างๆ ได้โดยใช้
Modifier.graphicsLayer โดยสามารถเคลื่อนไหวหรือแก้ไขได้โดยไม่ต้อง
เรียกใช้ Lambda การวาดซ้ำ
Modifier.graphicsLayer ไม่ได้เปลี่ยนขนาดหรือตำแหน่งที่วัดได้ของ
Composable เนื่องจากมีผลเฉพาะในระยะการวาด ซึ่งหมายความว่า Composable อาจซ้อนทับกับ Composable อื่นๆ หากวาดอยู่นอกขอบเขตเลย์เอาต์
คุณใช้ตัวดัดแปลงนี้กับการเปลี่ยนรูปแบบต่อไปนี้ได้
ขยาย - เพิ่มขนาด
scaleX และ scaleY จะขยายหรือย่อเนื้อหาในแนวนอนหรือแนวตั้งตามลำดับ
ค่า 1.0f หมายถึงไม่มีการเปลี่ยนแปลงสเกล ส่วนค่า 0.5f หมายถึงครึ่งหนึ่งของมิติข้อมูล
Image( painter = painterResource(id = R.drawable.sunset), contentDescription = "Sunset", modifier = Modifier .graphicsLayer { this.scaleX = 1.2f this.scaleY = 0.8f } )
Translation
translationX และ translationY สามารถเปลี่ยนได้ด้วย graphicsLayer
translationX จะย้าย Composable ไปทางซ้ายหรือขวา translationY เลื่อน
Composable ขึ้นหรือลง
Image( painter = painterResource(id = R.drawable.sunset), contentDescription = "Sunset", modifier = Modifier .graphicsLayer { this.translationX = 100.dp.toPx() this.translationY = 10.dp.toPx() } )
การหมุน
ตั้งค่า rotationX เพื่อหมุนในแนวนอน rotationY เพื่อหมุนในแนวตั้ง และ
rotationZ เพื่อหมุนบนแกน Z (การหมุนมาตรฐาน) ค่านี้ระบุเป็นองศา (0-360)
Image( painter = painterResource(id = R.drawable.sunset), contentDescription = "Sunset", modifier = Modifier .graphicsLayer { this.rotationX = 90f this.rotationY = 275f this.rotationZ = 180f } )
ต้นทาง
ระบุ transformOrigin ได้ จากนั้นจะใช้เป็นจุดเริ่มต้น
ของการเปลี่ยนรูปแบบ ตัวอย่างทั้งหมดที่ผ่านมาใช้
TransformOrigin.Center ซึ่งอยู่ที่ (0.5f, 0.5f) หากคุณระบุต้นทางที่
(0f, 0f) การเปลี่ยนรูปแบบจะเริ่มจากมุมซ้ายบนของ
Composable
หากเปลี่ยนต้นทางด้วยrotationZการแปลง คุณจะเห็นว่า
รายการหมุนรอบด้านซ้ายบนของ Composable ดังนี้
Image( painter = painterResource(id = R.drawable.sunset), contentDescription = "Sunset", modifier = Modifier .graphicsLayer { this.transformOrigin = TransformOrigin(0f, 0f) this.rotationX = 90f this.rotationY = 275f this.rotationZ = 180f } )
ตัดและปรับรูปร่าง
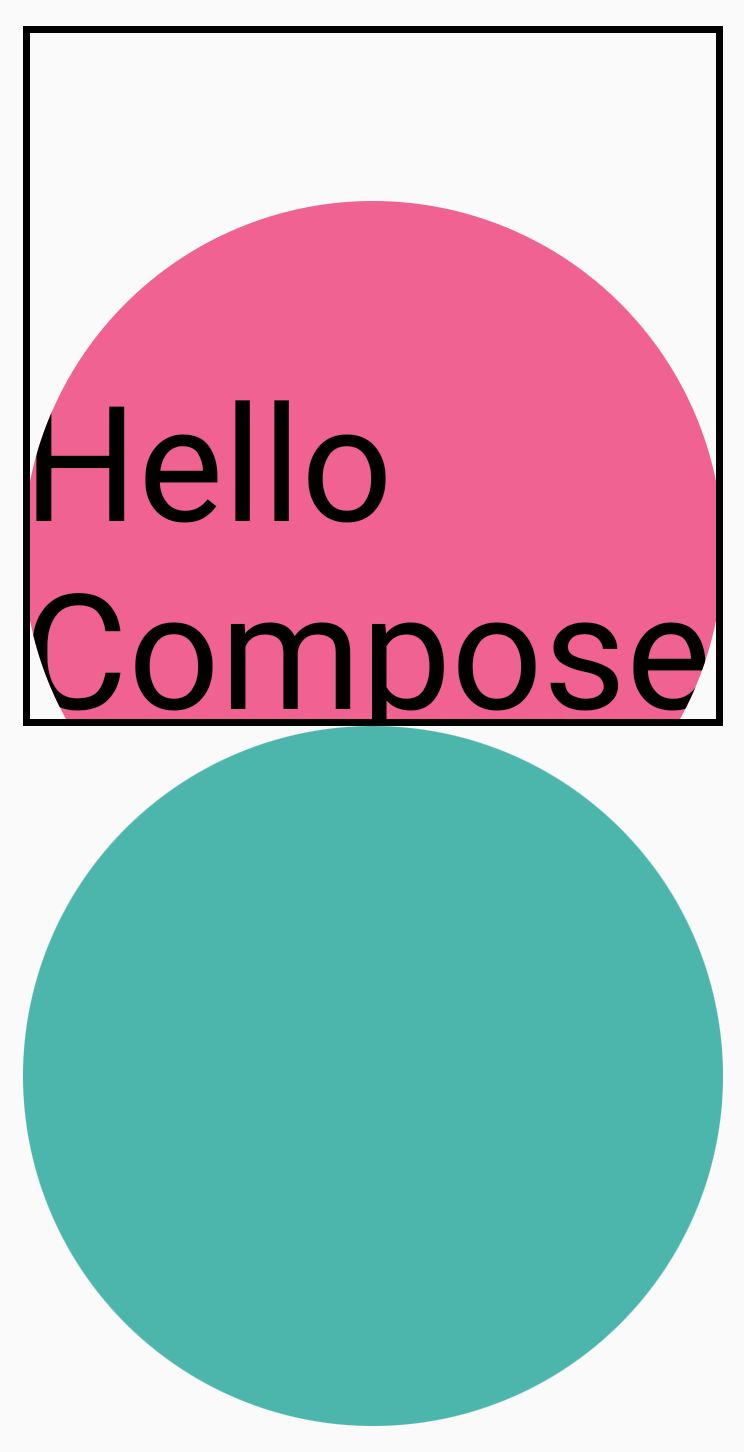
รูปร่างจะระบุเส้นขอบที่เนื้อหาจะคลิปเมื่อ clip = true ใน
ตัวอย่างนี้ เราตั้งค่ากล่อง 2 กล่องให้มีคลิป 2 คลิปที่แตกต่างกัน โดยคลิปหนึ่งใช้
graphicsLayerตัวแปรคลิป และอีกคลิปหนึ่งใช้ Wrapper ที่สะดวก
Modifier.clip
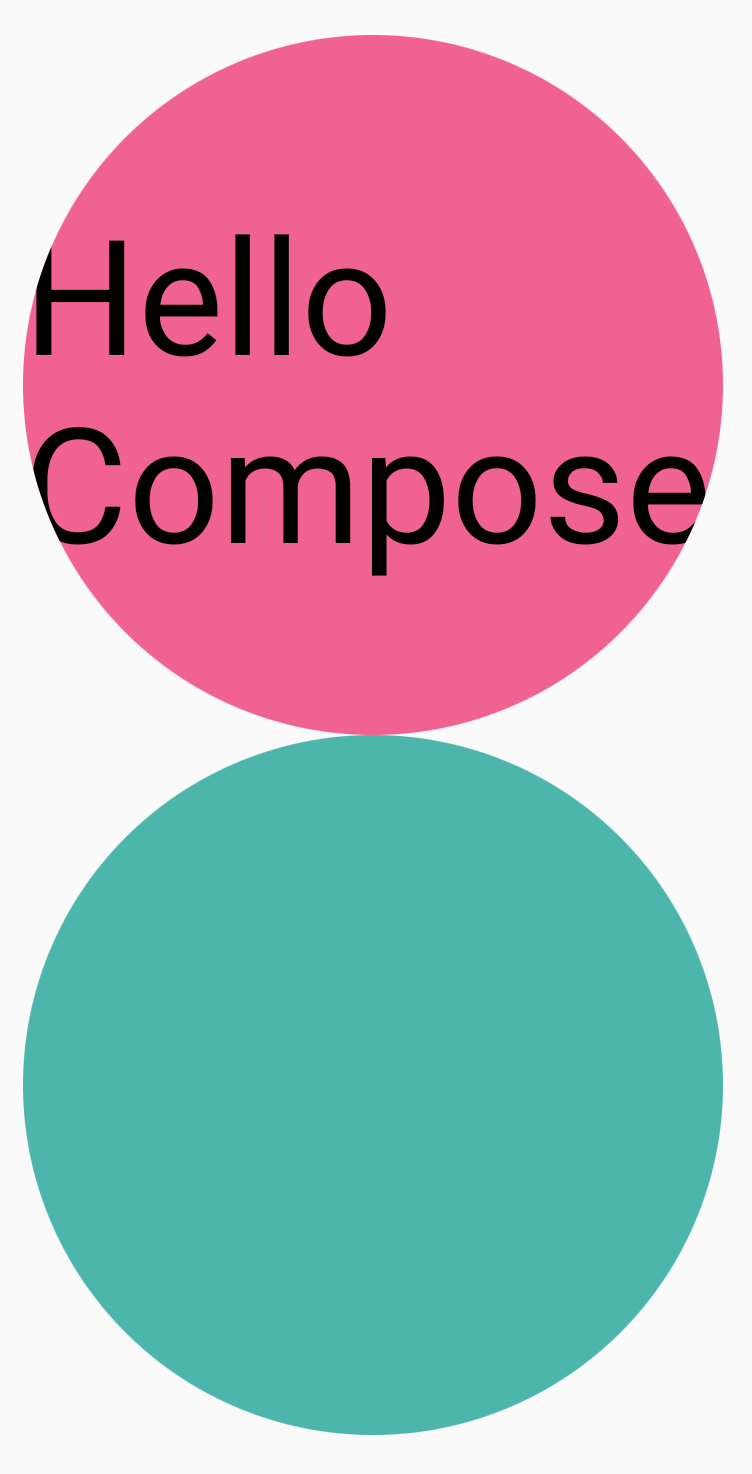
Column(modifier = Modifier.padding(16.dp)) { Box( modifier = Modifier .size(200.dp) .graphicsLayer { clip = true shape = CircleShape } .background(Color(0xFFF06292)) ) { Text( "Hello Compose", style = TextStyle(color = Color.Black, fontSize = 46.sp), modifier = Modifier.align(Alignment.Center) ) } Box( modifier = Modifier .size(200.dp) .clip(CircleShape) .background(Color(0xFF4DB6AC)) ) }
เนื้อหาของกล่องแรก (ข้อความที่ระบุว่า "สวัสดี Compose") จะถูกครอบตัดให้เป็นรูปวงกลม ดังนี้
จากนั้นหากใช้ translationY กับวงกลมสีชมพูบนสุด คุณจะเห็นว่าขอบเขต
ของ Composable ยังคงเหมือนเดิม แต่วงกลมจะวาดอยู่ใต้วงกลมด้านล่าง (และอยู่นอกขอบเขตของวงกลม)
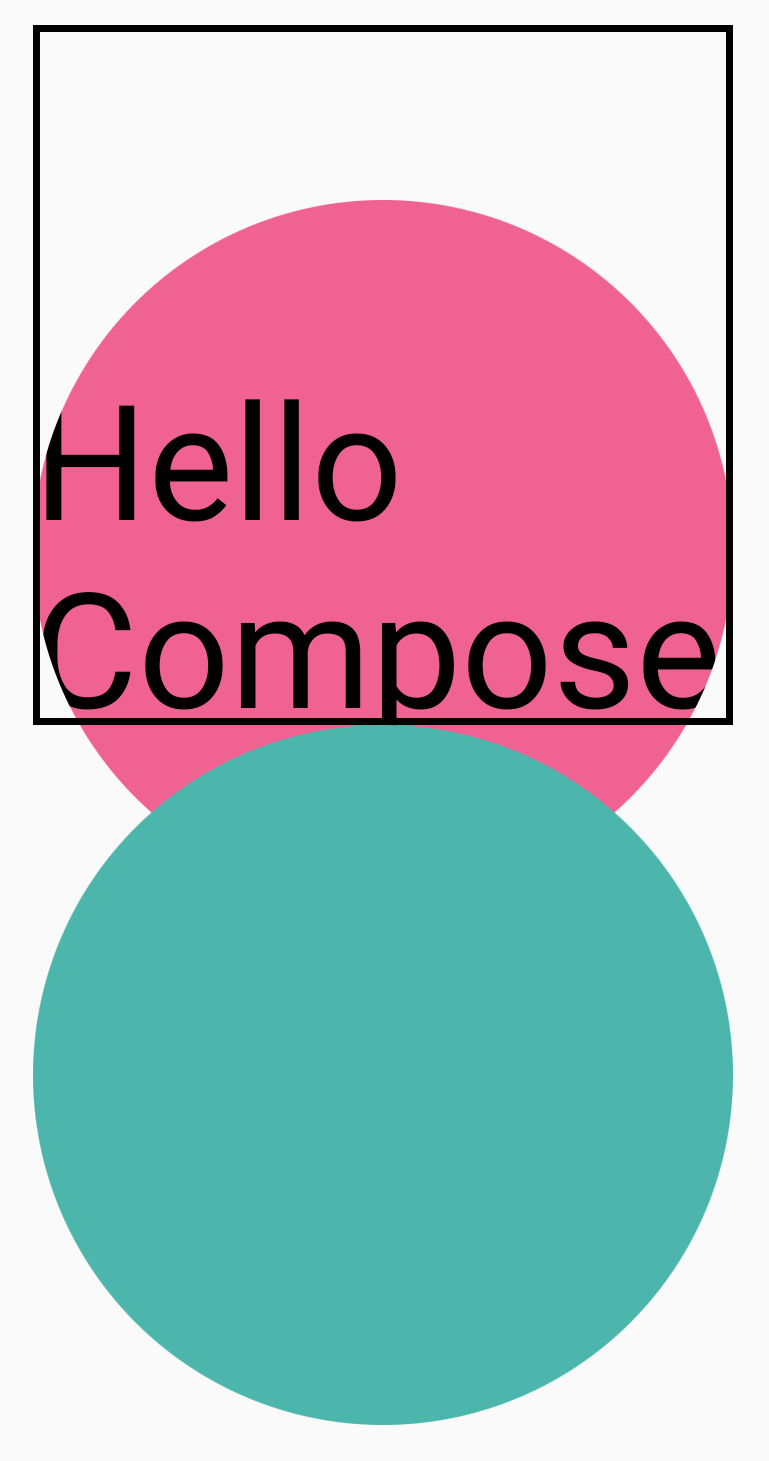
หากต้องการคลิป Composable ไปยังภูมิภาคที่วาด คุณสามารถเพิ่ม
Modifier.clip(RectangleShape) ที่จุดเริ่มต้นของเชนตัวแก้ไขได้ เนื้อหา
จะยังคงอยู่ภายในขอบเขตเดิม
Column(modifier = Modifier.padding(16.dp)) { Box( modifier = Modifier .clip(RectangleShape) .size(200.dp) .border(2.dp, Color.Black) .graphicsLayer { clip = true shape = CircleShape translationY = 50.dp.toPx() } .background(Color(0xFFF06292)) ) { Text( "Hello Compose", style = TextStyle(color = Color.Black, fontSize = 46.sp), modifier = Modifier.align(Alignment.Center) ) } Box( modifier = Modifier .size(200.dp) .clip(RoundedCornerShape(500.dp)) .background(Color(0xFF4DB6AC)) ) }
อัลฟ่า
Modifier.graphicsLayer ใช้เพื่อตั้งค่า alpha (ความทึบแสง) สำหรับทั้งเลเยอร์ได้ 1.0f ทึบแสงสนิทและ 0.0f มองไม่เห็น
Image( painter = painterResource(id = R.drawable.sunset), contentDescription = "clock", modifier = Modifier .graphicsLayer { this.alpha = 0.5f } )

กลยุทธ์การคอมโพสิต
การทำงานกับอัลฟ่าและความโปร่งใสไม่ได้ตรงไปตรงมาเสมอไปเหมือนกับการ
เปลี่ยนค่าอัลฟ่าเพียงค่าเดียว นอกเหนือจากการเปลี่ยนอัลฟ่าแล้ว คุณยังมีตัวเลือกในการตั้งค่า CompositingStrategy ใน graphicsLayer ด้วย CompositingStrategy จะกำหนดวิธีรวม (ประกอบ) เนื้อหาของ Composable กับเนื้อหาอื่นๆ
ที่วาดบนหน้าจออยู่แล้ว
กลยุทธ์ต่างๆ มีดังนี้
อัตโนมัติ (ค่าเริ่มต้น)
กลยุทธ์การคอมโพสิตจะกำหนดโดยพารามิเตอร์ที่เหลือของ graphicsLayer
โดยจะแสดงผลเลเยอร์ลงในบัฟเฟอร์นอกหน้าจอหากค่าอัลฟ่าน้อยกว่า 1.0f หรือมีการตั้งค่า RenderEffect เมื่อใดก็ตามที่ค่าอัลฟ่าน้อยกว่า 1f ระบบจะสร้างเลเยอร์การรวมโดยอัตโนมัติเพื่อแสดงเนื้อหา แล้ววาดบัฟเฟอร์นอกหน้าจอนี้ไปยังปลายทางด้วยค่าอัลฟ่าที่สอดคล้องกัน การตั้งค่า
RenderEffect หรือการเลื่อนเกินจะแสดงเนื้อหาในบัฟเฟอร์นอกหน้าจอเสมอ ไม่ว่าCompositingStrategy จะตั้งค่าเป็นอะไรก็ตาม
นอกหน้าจอ
เนื้อหาของ Composable จะได้รับการแรสเตอร์เป็นเท็กซ์เจอร์หรือบิตแมปนอกหน้าจอเสมอก่อนที่จะแสดงผลไปยังปลายทาง ซึ่งมีประโยชน์สำหรับการ
ใช้การดำเนินการ BlendMode เพื่อมาสก์เนื้อหา และเพื่อประสิทธิภาพเมื่อ
แสดงผลชุดคำสั่งวาดที่ซับซ้อน
ตัวอย่างการใช้ CompositingStrategy.Offscreen คือการใช้ร่วมกับ BlendModes
ในตัวอย่างต่อไปนี้ สมมติว่าคุณต้องการนำบางส่วนของ Image
Composable ออกโดยการออกคำสั่งวาดที่ใช้ BlendMode.Clear หากคุณไม่ได้ตั้งค่า compositingStrategy เป็น CompositingStrategy.Offscreen
BlendMode จะโต้ตอบกับเนื้อหาเบื้องหลังทั้งหมด
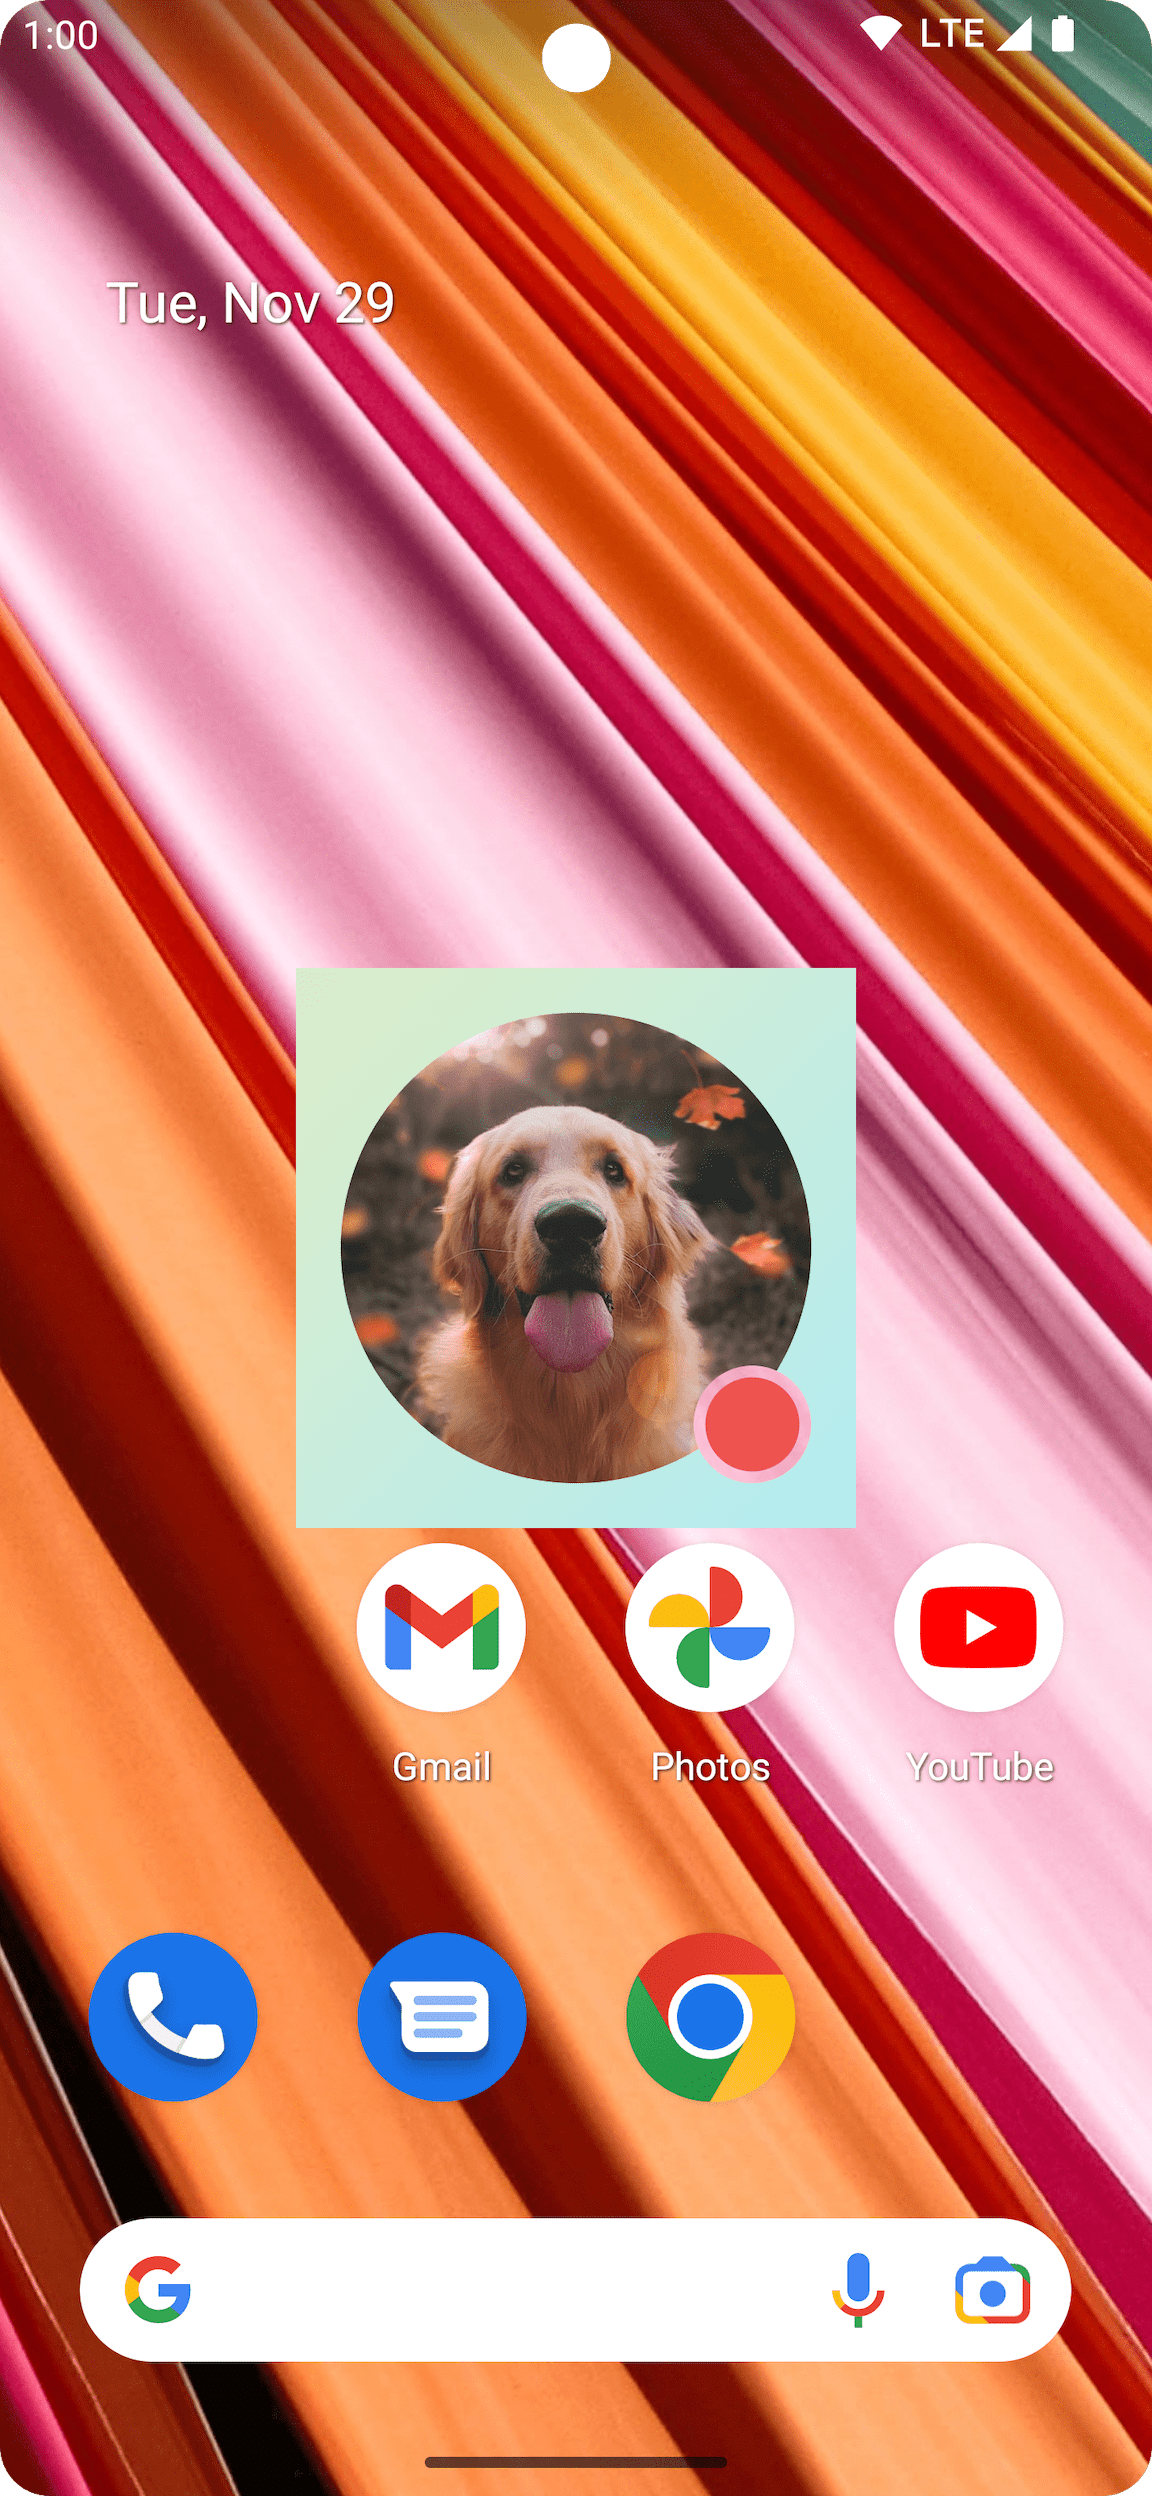
Image( painter = painterResource(id = R.drawable.dog), contentDescription = "Dog", contentScale = ContentScale.Crop, modifier = Modifier .size(120.dp) .aspectRatio(1f) .background( Brush.linearGradient( listOf( Color(0xFFC5E1A5), Color(0xFF80DEEA) ) ) ) .padding(8.dp) .graphicsLayer { compositingStrategy = CompositingStrategy.Offscreen } .drawWithCache { val path = Path() path.addOval( Rect( topLeft = Offset.Zero, bottomRight = Offset(size.width, size.height) ) ) onDrawWithContent { clipPath(path) { // this draws the actual image - if you don't call drawContent, it wont // render anything this@onDrawWithContent.drawContent() } val dotSize = size.width / 8f // Clip a white border for the content drawCircle( Color.Black, radius = dotSize, center = Offset( x = size.width - dotSize, y = size.height - dotSize ), blendMode = BlendMode.Clear ) // draw the red circle indication drawCircle( Color(0xFFEF5350), radius = dotSize * 0.8f, center = Offset( x = size.width - dotSize, y = size.height - dotSize ) ) } } )
การตั้งค่า CompositingStrategy เป็น Offscreen จะสร้างเท็กซ์เจอร์นอกหน้าจอ
เพื่อเรียกใช้คำสั่ง (ใช้ BlendMode กับ
เนื้อหาของคอมโพสเซเบิลนี้เท่านั้น) จากนั้นจะแสดงผลทับสิ่งที่แสดงผลบนหน้าจออยู่แล้ว โดยไม่ส่งผลกระทบต่อเนื้อหาที่วาดไว้ก่อนหน้า

หากคุณไม่ได้ใช้ CompositingStrategy.Offscreen ผลลัพธ์ของการใช้
BlendMode.Clear จะล้างพิกเซลทั้งหมดในปลายทาง ไม่ว่า
จะมีการตั้งค่าอะไรไว้แล้วก็ตาม ซึ่งจะทำให้บัฟเฟอร์การแสดงผลของหน้าต่าง (สีดำ)
มองเห็นได้ BlendModes หลายรายการที่เกี่ยวข้องกับอัลฟ่าจะไม่ทำงานตามที่คาดไว้หากไม่มีบัฟเฟอร์นอกหน้าจอ สังเกตวงแหวนสีดำรอบวงกลมสีแดงซึ่งเป็นตัวบ่งชี้

เพื่อทำความเข้าใจเพิ่มเติม หากแอปมีพื้นหลังหน้าต่างโปร่งแสงและคุณไม่ได้ใช้ CompositingStrategy.Offscreen BlendMode จะโต้ตอบกับทั้งแอป โดยจะล้างพิกเซลทั้งหมดเพื่อแสดงแอปหรือวอลเปเปอร์ที่อยู่ด้านล่าง ดังตัวอย่างนี้
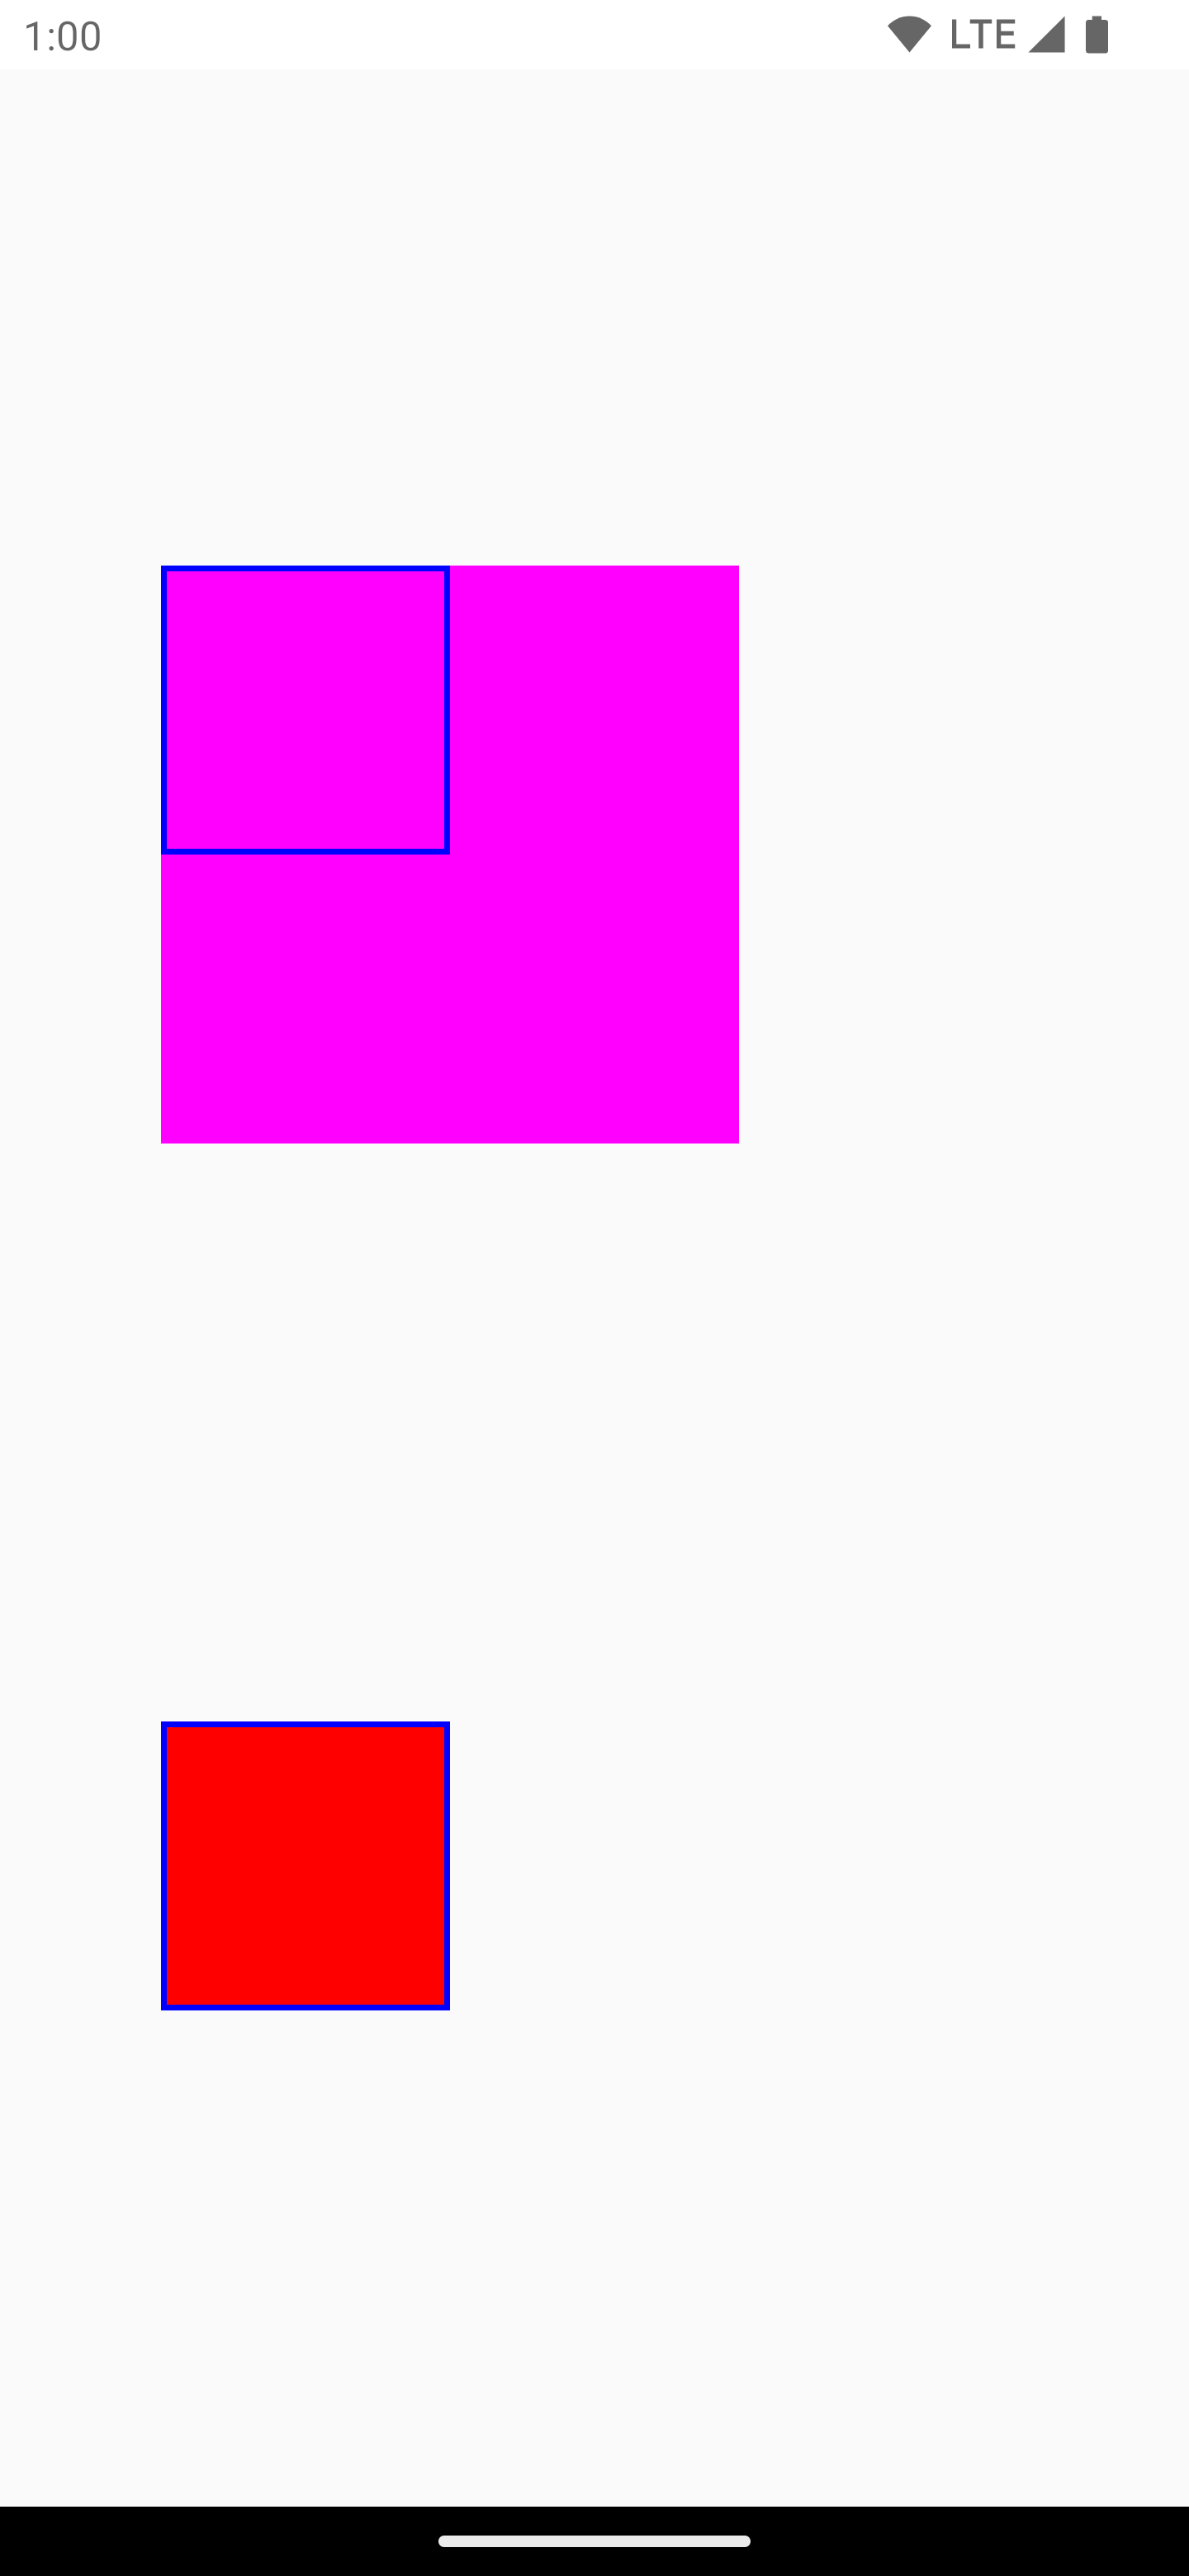
โปรดทราบว่าเมื่อใช้ CompositingStrategy.Offscreen ระบบจะสร้างเท็กซ์เจอร์นอกหน้าจอ
ที่มีขนาดเท่ากับพื้นที่วาดภาพและแสดงผลกลับบน
หน้าจอ คำสั่งวาดภาพใดๆ ที่ทำด้วยกลยุทธ์นี้จะถูก
ตัดไปยังภูมิภาคนี้โดยค่าเริ่มต้น ข้อมูลโค้ดต่อไปนี้แสดงความแตกต่าง
เมื่อเปลี่ยนไปใช้เท็กซ์เจอร์นอกหน้าจอ
@Composable fun CompositingStrategyExamples() { Column( modifier = Modifier .fillMaxSize() .wrapContentSize(Alignment.Center) ) { // Does not clip content even with a graphics layer usage here. By default, graphicsLayer // does not allocate + rasterize content into a separate layer but instead is used // for isolation. That is draw invalidations made outside of this graphicsLayer will not // re-record the drawing instructions in this composable as they have not changed Canvas( modifier = Modifier .graphicsLayer() .size(100.dp) // Note size of 100 dp here .border(2.dp, color = Color.Blue) ) { // ... and drawing a size of 200 dp here outside the bounds drawRect(color = Color.Magenta, size = Size(200.dp.toPx(), 200.dp.toPx())) } Spacer(modifier = Modifier.size(300.dp)) /* Clips content as alpha usage here creates an offscreen buffer to rasterize content into first then draws to the original destination */ Canvas( modifier = Modifier // force to an offscreen buffer .graphicsLayer(compositingStrategy = CompositingStrategy.Offscreen) .size(100.dp) // Note size of 100 dp here .border(2.dp, color = Color.Blue) ) { /* ... and drawing a size of 200 dp. However, because of the CompositingStrategy.Offscreen usage above, the content gets clipped */ drawRect(color = Color.Red, size = Size(200.dp.toPx(), 200.dp.toPx())) } } }
ModulateAlpha
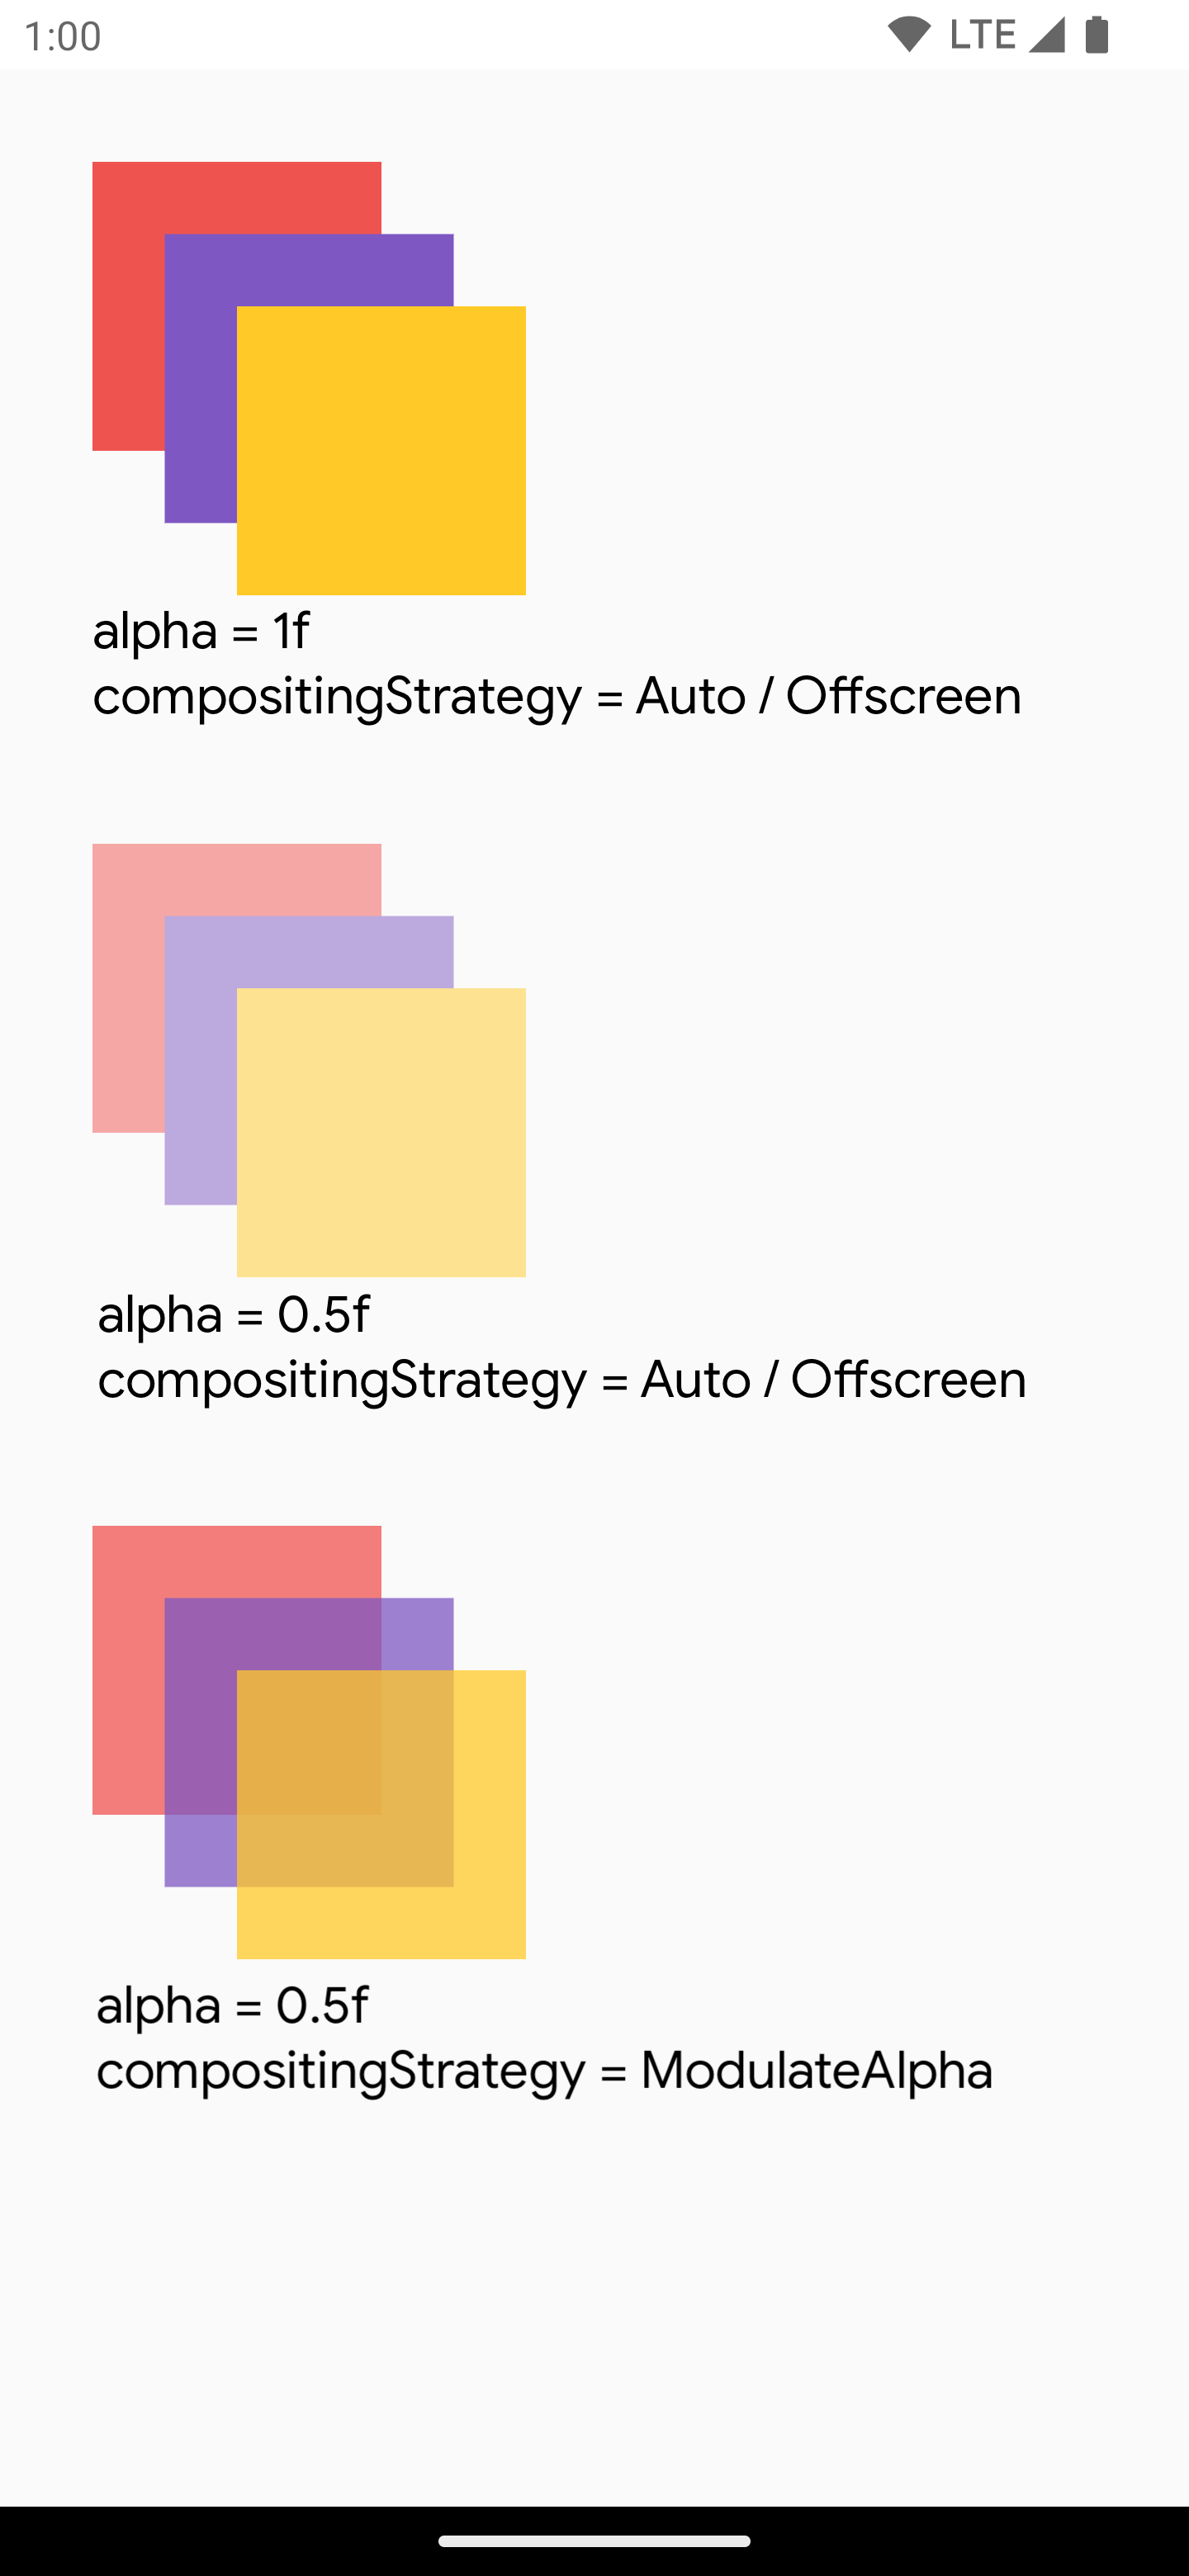
กลยุทธ์การเรียบเรียงนี้จะปรับค่าอัลฟ่าสำหรับคำสั่งวาดภาพแต่ละรายการ
ที่บันทึกไว้ใน graphicsLayer โดยจะไม่สร้างบัฟเฟอร์นอกหน้าจอสำหรับอัลฟ่าที่น้อยกว่า 1.0f เว้นแต่จะมีการตั้งค่า RenderEffect จึงอาจมีประสิทธิภาพมากกว่าสำหรับการแสดงผลอัลฟ่า อย่างไรก็ตาม อาจให้ผลลัพธ์ที่แตกต่างกันสำหรับเนื้อหาที่ซ้ำซ้อน สำหรับกรณีการใช้งานที่ทราบล่วงหน้าว่าเนื้อหาไม่ทับซ้อนกัน ค่านี้จะให้ประสิทธิภาพที่ดีกว่า CompositingStrategy.Auto ที่มีค่าอัลฟ่าน้อยกว่า 1
ตัวอย่างต่อไปนี้แสดงกลยุทธ์การจัดองค์ประกอบต่างๆ โดยใช้ค่าอัลฟ่าที่แตกต่างกันกับส่วนต่างๆ ของ Composable และใช้Modulateกลยุทธ์
@Preview @Composable fun CompositingStrategy_ModulateAlpha() { Column( modifier = Modifier .fillMaxSize() .padding(32.dp) ) { // Base drawing, no alpha applied Canvas( modifier = Modifier.size(200.dp) ) { drawSquares() } Spacer(modifier = Modifier.size(36.dp)) // Alpha 0.5f applied to whole composable Canvas( modifier = Modifier .size(200.dp) .graphicsLayer { alpha = 0.5f } ) { drawSquares() } Spacer(modifier = Modifier.size(36.dp)) // 0.75f alpha applied to each draw call when using ModulateAlpha Canvas( modifier = Modifier .size(200.dp) .graphicsLayer { compositingStrategy = CompositingStrategy.ModulateAlpha alpha = 0.75f } ) { drawSquares() } } } private fun DrawScope.drawSquares() { val size = Size(100.dp.toPx(), 100.dp.toPx()) drawRect(color = Red, size = size) drawRect( color = Purple, size = size, topLeft = Offset(size.width / 4f, size.height / 4f) ) drawRect( color = Yellow, size = size, topLeft = Offset(size.width / 4f * 2f, size.height / 4f * 2f) ) } val Purple = Color(0xFF7E57C2) val Yellow = Color(0xFFFFCA28) val Red = Color(0xFFEF5350)
เขียนเนื้อหาของ Composable ลงในบิตแมป
Use Case ทั่วไปคือการสร้าง Bitmap จาก Composable หากต้องการคัดลอกเนื้อหาของ Composable ไปยัง Bitmap ให้สร้าง GraphicsLayer โดยใช้
rememberGraphicsLayer()
เปลี่ยนเส้นทางคำสั่งวาดไปยังเลเยอร์ใหม่โดยใช้ drawWithContent() และ
graphicsLayer.record{} จากนั้นวาดเลเยอร์ใน Canvas ที่มองเห็นได้โดยใช้
drawLayer
val coroutineScope = rememberCoroutineScope() val graphicsLayer = rememberGraphicsLayer() Box( modifier = Modifier .drawWithContent { // call record to capture the content in the graphics layer graphicsLayer.record { // draw the contents of the composable into the graphics layer this@drawWithContent.drawContent() } // draw the graphics layer on the visible canvas drawLayer(graphicsLayer) } .clickable { coroutineScope.launch { val bitmap = graphicsLayer.toImageBitmap() // do something with the newly acquired bitmap } } .background(Color.White) ) { Text("Hello Android", fontSize = 26.sp) }
คุณสามารถบันทึกบิตแมปไปยังดิสก์และแชร์ได้ ดูรายละเอียดเพิ่มเติมได้ที่ตัวอย่างโค้ดแบบเต็ม โปรดตรวจสอบสิทธิ์ในอุปกรณ์ก่อนที่จะพยายาม บันทึกลงในดิสก์
ตัวแก้ไขการวาดที่กำหนดเอง
หากต้องการสร้างตัวแก้ไขที่กำหนดเอง ให้ใช้DrawModifierอินเทอร์เฟซ ซึ่งจะให้สิทธิ์เข้าถึง ContentDrawScope แก่คุณ ซึ่งเหมือนกับที่แสดงเมื่อใช้ Modifier.drawWithContent() จากนั้นคุณจะแยกการดำเนินการวาดภาพทั่วไปไปยังตัวแก้ไขการวาดภาพที่กำหนดเองเพื่อล้างโค้ดและจัดเตรียม Wrapper ที่สะดวกได้ เช่น Modifier.background() เป็น DrawModifier ที่สะดวก
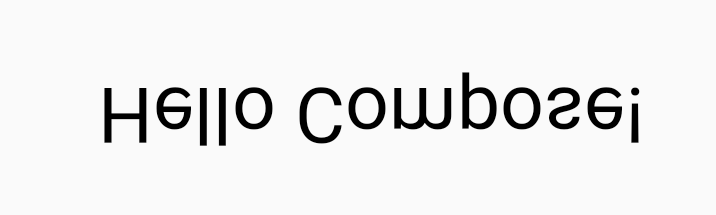
ตัวอย่างเช่น หากต้องการใช้ Modifier ที่พลิกเนื้อหาในแนวตั้ง
คุณสามารถสร้างได้ดังนี้
class FlippedModifier : DrawModifier { override fun ContentDrawScope.draw() { scale(1f, -1f) { this@draw.drawContent() } } } fun Modifier.flipped() = this.then(FlippedModifier())
จากนั้นใช้ตัวแก้ไขที่พลิกแล้วนี้กับ Text
Text( "Hello Compose!", modifier = Modifier .flipped() )
แหล่งข้อมูลเพิ่มเติม
ดูตัวอย่างเพิ่มเติมที่ใช้ graphicsLayer และการวาดที่กำหนดเองได้ในแหล่งข้อมูลต่อไปนี้
แนะนำสำหรับคุณ
- หมายเหตุ: ข้อความลิงก์จะแสดงเมื่อ JavaScript ปิดอยู่
- กราฟิกใน Compose
- ปรับแต่งรูปภาพ {:#customize-image}
- Kotlin สำหรับ Jetpack Compose