
从 Android 8.0(API 级别 26)开始,所有通知都必须分配到相应的渠道。对于每个渠道,您可以设置应用于其中的所有通知的视觉和听觉行为。用户可以更改这些设置,并确定您应用中的哪些通知渠道可以具有干扰性或应该可见。
请观看以下视频,简要了解 Android 8.0 中的渠道和其他通知功能。
您可以在系统设置中找到每个应用的通知渠道的用户设置(如图 1 所示)。
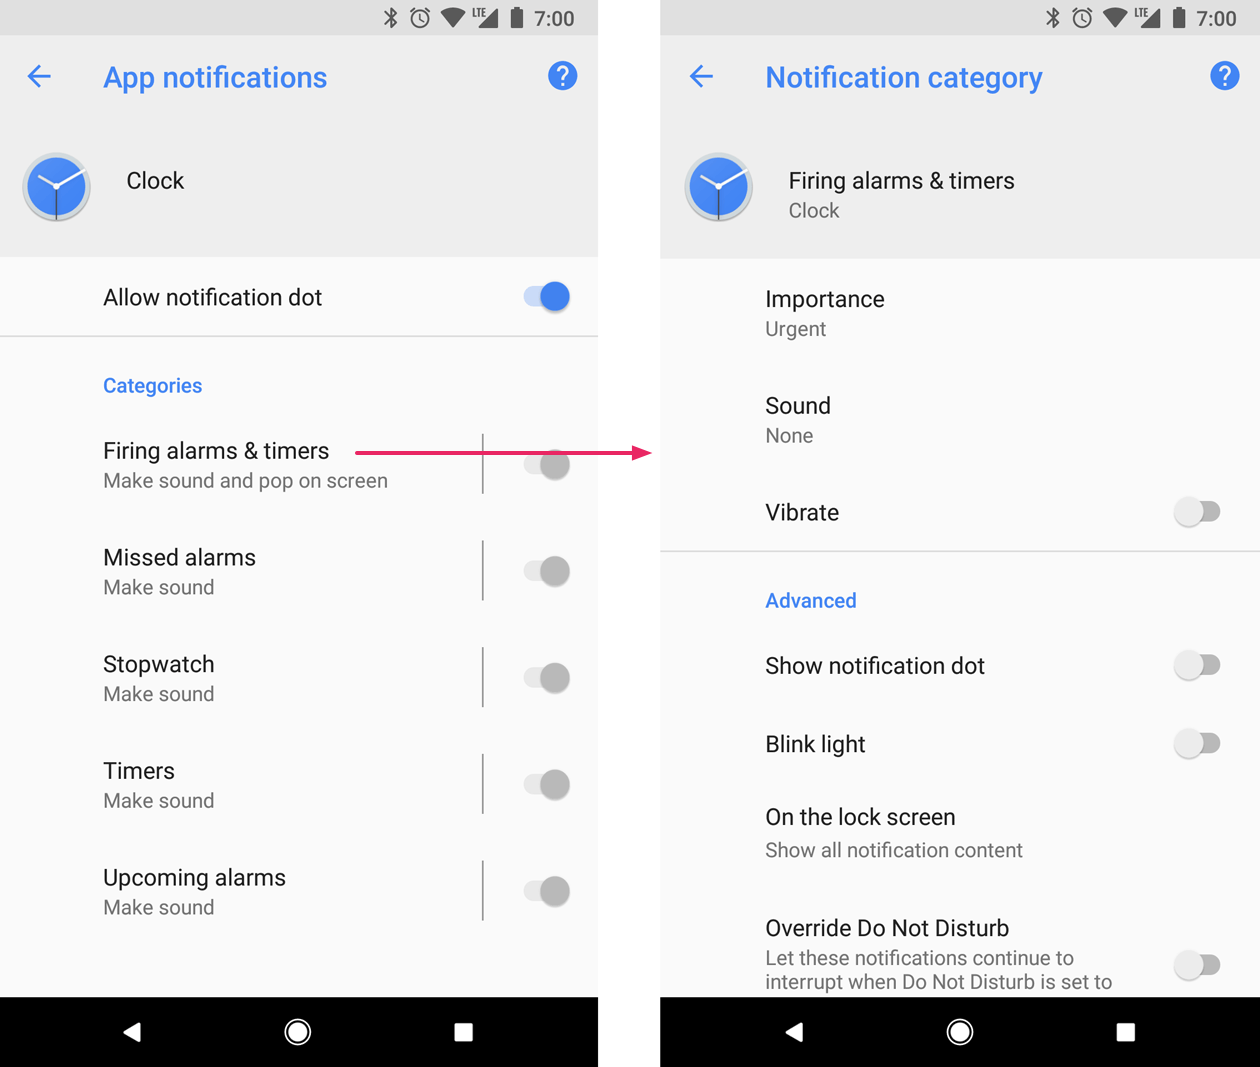
图 1. 时钟应用的通知设置及其一个渠道的通知设置。
创建通知渠道后,您无法更改通知行为。此时,用户拥有完全控制权。不过,您仍然可以更改渠道的名称和说明。
为需要发送的每种类型的通知创建一个渠道。您还可以创建通知渠道来反映用户做出的选择。例如,您可以为用户在短信应用中创建的每个会话组设置不同的通知渠道。
如果您以 Android 8.0(API 级别 26)或更高版本为目标平台,则必须实现一个或多个通知渠道。如果您的 targetSdkVersion 设置为 25 或更低级别,那么当您的应用在搭载 Android 8.0(API 级别 26)或更高版本的设备上运行时,其行为方式与在搭载 Android 7.1(API 级别 25)或更低版本的设备上相同。
创建通知渠道
如需创建通知渠道,请按以下步骤操作:
构建一个具有唯一频道 ID、 用户可见名称和重要性级别的
NotificationChannel对象。(可选)使用
setDescription()指定用户在系统设置中看到的说明 。注册通知渠道,方法是将该渠道传递给
createNotificationChannel()。
以下示例展示了如何创建和注册通知渠道:
if (Build.VERSION.SDK_INT >= Build.VERSION_CODES.O) { // Create the NotificationChannel. val importance = NotificationManager.IMPORTANCE_DEFAULT val mChannel = NotificationChannel(CHANNEL_ID, name, importance) mChannel.description = descriptionText // Register the channel with the system. You can't change the importance // or other notification behaviors after this. val notificationManager = context.getSystemService(NotificationManager::class.java) notificationManager?.createNotificationChannel(mChannel) }
重新创建采用其原始值的现有通知渠道不会执行任何操作,因此可以放心地在启动应用时调用此代码。
默认情况下,发布到给定渠道的所有通知都使用由
重要性级别定义的视觉和
听觉行为,例如NotificationManagerCompat或IMPORTANCE_DEFAULT
IMPORTANCE_HIGH。如需详细了解
重要性级别,请参阅下一部分。
如果您希望进一步自定义渠道的默认通知行为,
可以在 NotificationChannel 上调用 enableLights()、setLightColor() 和 setVibrationPattern() 等方法。请注意,创建渠道后,您无法更改这些设置,并且用户对这些行为是否处于活动状态拥有最终控制权。
您还可以通过
调用 createNotificationChannels()在一次操作中创建多个通知渠道。
设置重要性级别
渠道重要性会影响在渠道中发布的所有通知的干扰级别。在 NotificationChannel 构造函数中指定渠道重要性,可以使用从
IMPORTANCE_NONE(0) 到
IMPORTANCE_HIGH(4) 的五个重要性级别之一。
如需支持搭载 Android 7.1(API 级别 25)或更低版本的设备,您还必须
使用 NotificationCompat 类中的优先级常量针对每条通知
调用 setPriority()。
重要性 (NotificationManager.IMPORTANCE_*) 和优先级 (NotificationCompat.PRIORITY_*) 常量会映射到用户可见的重要性选项,如下表所示。
| 用户可见的重要性级别 | 重要性(Android 8.0 及更高版本) | 优先级(Android 7.1 及更低版本) |
|---|---|---|
| 紧急 发出提示音,并以浮动通知的形式显示。 |
IMPORTANCE_HIGH |
PRIORITY_HIGH 或 PRIORITY_MAX |
| 高 发出提示音。 |
IMPORTANCE_DEFAULT |
PRIORITY_DEFAULT |
| 中 不发出提示音。 |
IMPORTANCE_LOW |
PRIORITY_LOW |
| 低 不发出提示音,且不会在状态栏中显示。 |
IMPORTANCE_MIN |
PRIORITY_MIN |
| 无 不发出提示音,且不会在状态栏或通知栏中显示。 |
IMPORTANCE_NONE |
N/A |
无论重要性级别如何,所有通知都会在非干扰系统 界面位置显示,例如,显示在抽屉式通知栏中,以及在启动器图标上作为 标志显示,不过,您可以 修改通知标志的外观。
将渠道提交至 NotificationManager 后,您便无法更改
重要性级别。不过,用户可以随时更改其对您应用渠道的偏好设置。
如需了解如何选择适当的优先级,请参阅通知设计指南中的“优先级 ”部分。
读取通知渠道设置
用户可以修改通知渠道的设置,其中包括振动和提醒提示音等行为。如果您想了解用户对您的通知渠道所应用的设置,请按以下步骤操作:
通过调用
getNotificationChannel()或getNotificationChannels()获取NotificationChannel对象。查询特定渠道设置,例如
getVibrationPattern()、getSound()和getImportance()。
如果您检测到某个渠道设置,并且认为该设置会妨碍应用的预期行为,则可以建议用户更改该设置,并提供用于打开渠道设置的操作,如下一部分所示。
打开通知渠道设置
创建通知渠道后,您便无法以编程方式更改通知渠道的视觉和听觉行为。只有用户可以通过系统设置更改渠道行为。为了让用户快速访问这些通知设置,请在应用的设置界面中添加一个用于打开这些系统设置的项。
您可以通过一个使用 ACTION_CHANNEL_NOTIFICATION_SETTINGS
操作的
Intent打开通知渠道的系统设置。
例如,以下示例代码展示了如何将用户重定向到通知渠道的设置:
val intent = Intent(Settings.ACTION_CHANNEL_NOTIFICATION_SETTINGS).apply { putExtra(Settings.EXTRA_APP_PACKAGE, context.packageName) putExtra(Settings.EXTRA_CHANNEL_ID, CHANNEL_ID) } Button(onClick = { context.startActivity(intent) }) { Text("Open Channel Settings") }
请注意,该 intent 需要两个提取项,分别用于指定您应用的软件包名称(也称为应用 ID)和要修改的渠道。
删除通知渠道
您可以通过调用
deleteNotificationChannel()删除通知渠道。
以下示例代码演示了如何完成此过程:
val notificationManager = ContextCompat.getSystemService<NotificationManager>(context, NotificationManager::class.java) notificationManager?.deleteNotificationChannel(channelId)
创建通知渠道分组
如果您希望进一步整理您的渠道在设置界面中的外观,则可以创建渠道分组。当您的应用支持多个用户账号时,强烈建议您这么做,因为这么做可以为每个账号各创建一个通知渠道分组。渠道分组有助于用户区分和控制具有相同名称的多个通知渠道。
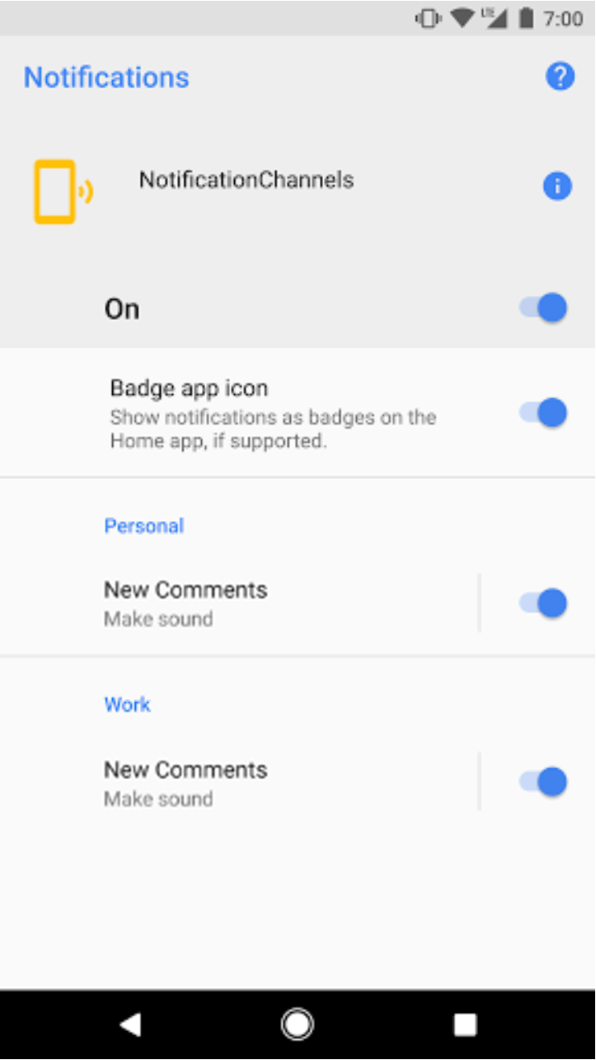
图 2. 包含个人帐号和工作帐号分组的通知渠道设置。
例如,社交网络应用可能包含对个人帐号和工作帐号的支持。在这种情况下,每个帐号可能都需要具有相同功能和名称的多个通知渠道,如下所示:
具有两个渠道的个人账号:
新评论
帖子推荐
具有两个渠道的企业帐号:
新评论
帖子推荐
整理每个账号的通知渠道并对其分组可以确保用户能够区分它们。
每个通知渠道分组都需要一个在您的软件包内独一无二的 ID,以及一个用户可见名称。以下代码段演示了如何创建通知渠道分组。
fun createNotificationChannelGroup(context: Context, groupId: String, groupName: String) { val notificationManager = ContextCompat.getSystemService(context, NotificationManager::class.java) notificationManager?.createNotificationChannelGroup(NotificationChannelGroup(groupId, groupName)) }
创建新分组后,您可以调用
setGroup()
将新的 NotificationChannel 对象与该分组相关联。
将渠道提交至通知管理器后,您便无法更改通知渠道和分组之间的关联。