การทำให้วัตถุเคลื่อนที่ตามโปรแกรมที่กำหนดไว้ล่วงหน้า เช่น สามเหลี่ยมหมุนนั้นมีประโยชน์สำหรับ
ก็ได้รับความสนใจอยู่บ้าง แต่หากคุณต้องการให้ผู้ใช้โต้ตอบกับกราฟิก OpenGL ES
กุญแจสำคัญที่จะทำให้แอปพลิเคชัน OpenGL ES ของคุณเป็นแบบอินเทอร์แอ็กทีฟคือการขยายการใช้งาน
GLSurfaceView เพื่อลบล้าง
onTouchEvent()เพื่อฟังเหตุการณ์การแตะ
บทเรียนนี้แสดงวิธีฟังเหตุการณ์การแตะเพื่อให้ผู้ใช้หมุนออบเจ็กต์ OpenGL ES ได้
ตั้งค่า Listener แบบสัมผัส
หากต้องการให้แอปพลิเคชัน OpenGL ES ตอบสนองต่อเหตุการณ์การแตะ คุณต้องติดตั้ง
onTouchEvent() เมธอดใน
ชั้นเรียนGLSurfaceView ตัวอย่างการใช้งานด้านล่างแสดงวิธีการตรวจสอบ
MotionEvent.ACTION_MOVE กิจกรรมและแปลเป็นภาษา
มุมการหมุนของรูปร่าง
Kotlin
private const val TOUCH_SCALE_FACTOR: Float = 180.0f / 320f
...
private var previousX: Float = 0f
private var previousY: Float = 0f

override fun onTouchEvent(e: MotionEvent): Boolean {
    // MotionEvent reports input details from the touch screen
    // and other input controls. In this case, you are only
    // interested in events where the touch position changed.

    val x: Float = e.x
    val y: Float = e.y

    when (e.action) {
        MotionEvent.ACTION_MOVE -> {

            var dx: Float = x - previousX
            var dy: Float = y - previousY

            // reverse direction of rotation above the mid-line
            if (y > height / 2) {
                dx *= -1
            }

            // reverse direction of rotation to left of the mid-line
            if (x < width / 2) {
                dy *= -1
            }

            renderer.angle += (dx + dy) * TOUCH_SCALE_FACTOR
            requestRender()
        }
    }

    previousX = x
    previousY = y
    return true
}
Java
private final float TOUCH_SCALE_FACTOR = 180.0f / 320;
private float previousX;
private float previousY;

@Override
public boolean onTouchEvent(MotionEvent e) {
    // MotionEvent reports input details from the touch screen
    // and other input controls. In this case, you are only
    // interested in events where the touch position changed.

    float x = e.getX();
    float y = e.getY();

    switch (e.getAction()) {
        case MotionEvent.ACTION_MOVE:

            float dx = x - previousX;
            float dy = y - previousY;

            // reverse direction of rotation above the mid-line
            if (y > getHeight() / 2) {
              dx = dx * -1 ;
            }

            // reverse direction of rotation to left of the mid-line
            if (x < getWidth() / 2) {
              dy = dy * -1 ;
            }

            renderer.setAngle(
                    renderer.getAngle() +
                    ((dx + dy) * TOUCH_SCALE_FACTOR));
            requestRender();
    }

    previousX = x;
    previousY = y;
    return true;
}
โปรดสังเกตว่าหลังจากคำนวณมุมการหมุน เมธอดนี้จะเรียกใช้
requestRender()เพื่อบอก
โหมดแสดงภาพของโหมด
ถึงเวลาแสดงผลเฟรมแล้ว วิธีการนี้จะมีประสิทธิภาพมากที่สุดในตัวอย่างนี้
เพราะไม่จำเป็นต้องวาดเฟรมใหม่ เว้นแต่จะมีการเปลี่ยนแปลงการหมุน อย่างไรก็ตาม
ไม่มีผลกระทบต่อประสิทธิภาพ เว้นแต่ว่าคุณจะขอให้โหมดแสดงภาพวาดใหม่เมื่อ
ข้อมูลเปลี่ยนแปลงโดยใช้ setRenderMode()
ดังนั้น โปรดตรวจสอบว่าบรรทัดนี้ไม่มีความคิดเห็นแสดงอยู่ในโหมดแสดงภาพ
Kotlin
class MyGlSurfaceView(context: Context) : GLSurfaceView(context) {

    init {
        // Render the view only when there is a change in the drawing data
        renderMode = GLSurfaceView.RENDERMODE_WHEN_DIRTY
    }
}
Java
public MyGLSurfaceView(Context context) {
    ...
    // Render the view only when there is a change in the drawing data
    setRenderMode(GLSurfaceView.RENDERMODE_WHEN_DIRTY);
}
แสดงมุมการหมุน
โค้ดตัวอย่างด้านบนกำหนดให้คุณต้องแสดงมุมการหมุนผ่านโหมดแสดงภาพโดย
การเพิ่มสมาชิกสาธารณะ เนื่องจากโค้ดตัวแสดงผลกำลังทำงานในเทรดแยกต่างหากจากผู้ใช้หลัก
เทรดอินเทอร์เฟซของแอปพลิเคชันของคุณ คุณต้องประกาศตัวแปรสาธารณะนี้เป็น volatile
โค้ดสำหรับประกาศตัวแปรและเปิดเผยคู่ Getter และ Setter มีดังนี้
Kotlin
class MyGLRenderer4 : GLSurfaceView.Renderer {

    @Volatile
    var angle: Float = 0f
}
Java
public class MyGLRenderer implements GLSurfaceView.Renderer {
    ...

    public volatile float mAngle;

    public float getAngle() {
        return mAngle;
    }

    public void setAngle(float angle) {
        mAngle = angle;
    }
}
ใช้การหมุน
หากต้องการใช้การหมุนที่สร้างโดยการป้อนข้อมูลด้วยการสัมผัส ให้แสดงความคิดเห็นเกี่ยวกับโค้ดที่สร้างมุมและ เพิ่มตัวแปรที่มีมุมที่สร้างขึ้นสำหรับการป้อนข้อมูลด้วยการสัมผัส:
Kotlin
override fun onDrawFrame(gl: GL10) {
    ...
    val scratch = FloatArray(16)

    // Create a rotation for the triangle
    // long time = SystemClock.uptimeMillis() % 4000L;
    // float angle = 0.090f * ((int) time);
    Matrix.setRotateM(rotationMatrix, 0, angle, 0f, 0f, -1.0f)

    // Combine the rotation matrix with the projection and camera view
    // Note that the mvpMatrix factor *must be first* in order
    // for the matrix multiplication product to be correct.
    Matrix.multiplyMM(scratch, 0, mvpMatrix, 0, rotationMatrix, 0)

    // Draw triangle
    triangle.draw(scratch)
}
Java
public void onDrawFrame(GL10 gl) {
    ...
    float[] scratch = new float[16];

    // Create a rotation for the triangle
    // long time = SystemClock.uptimeMillis() % 4000L;
    // float angle = 0.090f * ((int) time);
    Matrix.setRotateM(rotationMatrix, 0, mAngle, 0, 0, -1.0f);

    // Combine the rotation matrix with the projection and camera view
    // Note that the vPMatrix factor *must be first* in order
    // for the matrix multiplication product to be correct.
    Matrix.multiplyMM(scratch, 0, vPMatrix, 0, rotationMatrix, 0);

    // Draw triangle
    mTriangle.draw(scratch);
}
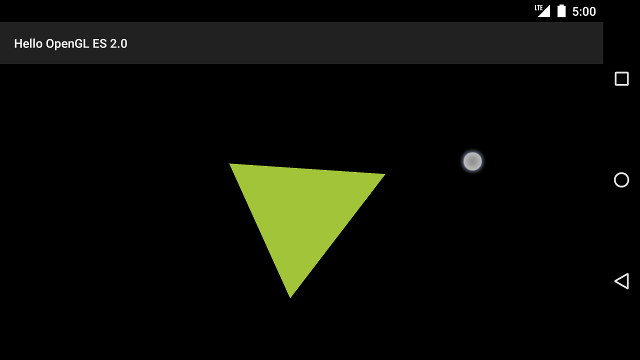
เมื่อคุณทำตามขั้นตอนที่อธิบายไว้ข้างต้นเสร็จเรียบร้อยแล้ว ให้เรียกใช้โปรแกรมแล้วลากนิ้วไปบน เพื่อหมุนรูปสามเหลี่ยม

รูปที่ 1 รูปสามเหลี่ยมหมุนเมื่อมีการป้อนข้อมูลด้วยการสัมผัส (วงกลมแสดงการแตะ ตำแหน่ง)

