เมื่อกำหนดเป้าหมายเป็น SDK 35 ขึ้นไปในอุปกรณ์ที่ใช้ Android 15 ขึ้นไป แอปจะแสดงแบบไร้ขอบ หน้าต่างจะครอบคลุมความกว้างและความสูงทั้งหมด ของจอแสดงผลโดยการวาดด้านหลังแถบระบบ แถบระบบประกอบด้วยแถบสถานะ แถบคำบรรยาย และแถบนำทาง
แอปจำนวนมากมีแถบแอปด้านบน แถบแอปด้านบนควรขยายไปจนถึงขอบด้านบนของ หน้าจอและแสดงอยู่ด้านหลังแถบสถานะ แถบแอปด้านบนจะ ย่อให้มีความสูงเท่ากับแถบสถานะเมื่อเนื้อหาเลื่อนได้
นอกจากนี้ แอปจำนวนมากยังมีแถบแอปด้านล่างหรือแถบนำทางด้านล่างด้วย แถบเหล่านี้ควรขยายไปจนถึงขอบด้านล่างของหน้าจอและแสดงอยู่ด้านหลังแถบนำทางด้วย มิฉะนั้น แอปควรแสดงเนื้อหาที่เลื่อนได้ด้านหลังแถบนำทาง
เมื่อติดตั้งใช้งานเลย์เอาต์แบบขอบจรดขอบในแอป โปรดคำนึงถึงสิ่งต่อไปนี้
- เปิดใช้การแสดงผลแบบไร้ขอบ
- ใช้เลย์เอาต์ที่ปรับเปลี่ยนตามพื้นที่เพื่อเพิ่มประสิทธิภาพประสบการณ์ของผู้ใช้ ในอุปกรณ์รูปแบบต่างๆ
- จัดการการทับซ้อนของภาพ
- พิจารณาแสดงเลเยอร์กึ่งโปร่งแสงด้านหลังแถบระบบ
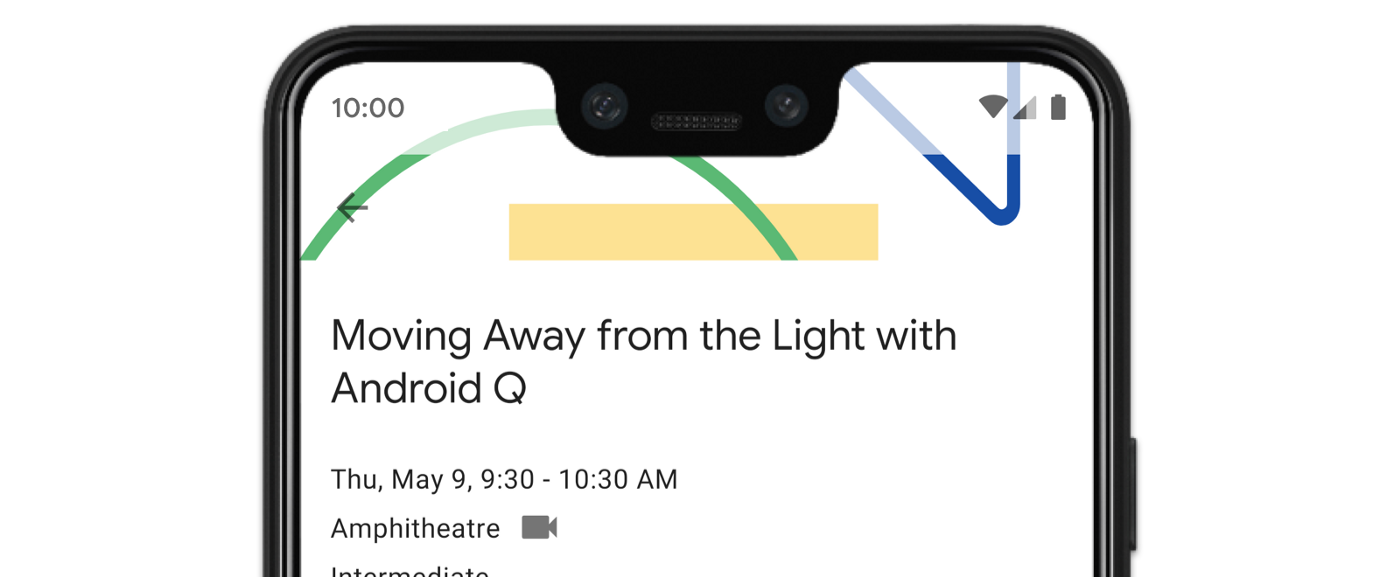
เปิดใช้การแสดงผลแบบไร้ขอบ
หากแอปกำหนดเป้าหมายเป็น SDK 35 ขึ้นไป ระบบจะเปิดใช้การแสดงผลแบบไร้ขอบโดยอัตโนมัติสำหรับอุปกรณ์ Android 15 ขึ้นไป
หากต้องการเปิดใช้การแสดงผลแบบขอบจรดขอบใน Android เวอร์ชันก่อนหน้า ให้เรียกใช้
enableEdgeToEdge ใน onCreate ของ Activity ด้วยตนเอง
Kotlin
 override fun onCreate(savedInstanceState: Bundle?) {
         super.onCreate(savedInstanceState)
         WindowCompat.enableEdgeToEdge(window)
        ...
      }
Java
 @Override
      protected void onCreate(@Nullable Bundle savedInstanceState) {
        super.onCreate(savedInstanceState);
        WindowCompat.enableEdgeToEdge(getWindow());
        ...
      }
โดยค่าเริ่มต้น enableEdgeToEdge() จะทำให้แถบของระบบโปร่งใส ยกเว้นใน
โหมดการนำทางด้วยปุ่ม 3 ปุ่มที่แถบสถานะจะมีเลเยอร์กึ่งโปร่งใส
สีของไอคอนระบบและขอบมืดจะได้รับการปรับตามธีมสว่างหรือมืดของระบบ
หากต้องการเปิดใช้การแสดงผลแบบไร้ขอบในแอปโดยไม่ต้องใช้ฟังก์ชัน
enableEdgeToEdge() โปรดดูตั้งค่าการแสดงผลแบบไร้ขอบด้วยตนเอง
จัดการการซ้อนทับโดยใช้ Inset
มุมมองบางอย่างของแอปอาจวาดอยู่ด้านหลังแถบระบบ ดังที่แสดงในรูปที่ 3
คุณสามารถจัดการการทับซ้อนได้โดยการตอบสนองต่อ Insets ซึ่งจะระบุส่วนต่างๆ ของ หน้าจอที่ตัดกับ UI ของระบบ เช่น แถบนำทางหรือแถบสถานะ การตัดกันอาจหมายถึงการแสดงเหนือเนื้อหา แต่ก็อาจแจ้งให้แอปทราบเกี่ยวกับท่าทางสัมผัสของระบบด้วย
ประเภทการแทรกที่ใช้กับการแสดงแอปแบบไร้ขอบมีดังนี้
ระยะขอบของแถบระบบ: เหมาะที่สุดสำหรับมุมมองที่แตะได้และต้องไม่ ถูกแถบระบบบดบังภาพ
ขอบของรอยบากบนจอแสดงผล: สำหรับพื้นที่ที่อาจมีรอยบากบนหน้าจอ เนื่องจากรูปร่างของอุปกรณ์
ระยะขอบของท่าทางสัมผัสของระบบ: สำหรับพื้นที่การนำทางด้วยท่าทางสัมผัสที่ระบบใช้ ซึ่งมีความสำคัญเหนือกว่าแอปของคุณ
ระยะขอบของแถบระบบ
การแทรกแถบระบบเป็นประเภทการแทรกที่ใช้กันมากที่สุด โดยแสดงถึง พื้นที่ที่ UI ของระบบแสดงในแกน Z เหนือแอปของคุณ ซึ่งเหมาะที่สุด สำหรับการย้ายหรือเพิ่มระยะขอบให้กับมุมมองในแอปที่แตะได้และต้องไม่ ถูกแถบของระบบบดบัง
ตัวอย่างเช่น ปุ่มการทำงานแบบลอย (FAB) ในรูปที่ 3 ถูกแถบนำทางบดบังบางส่วน
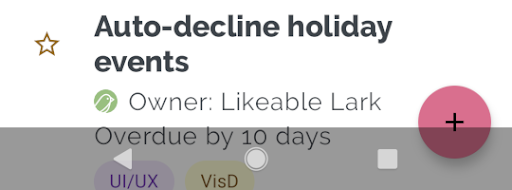
หากต้องการหลีกเลี่ยงการซ้อนทับกันของภาพในโหมดท่าทางสัมผัสหรือโหมดปุ่ม คุณ
สามารถเพิ่มขอบของมุมมองได้โดยใช้
getInsets(int)
กับ
WindowInsetsCompat.Type.systemBars()
ตัวอย่างโค้ดต่อไปนี้แสดงวิธีติดตั้งใช้งานระยะขอบของแถบระบบ
Kotlin
ViewCompat.setOnApplyWindowInsetsListener(fab) { v, windowInsets ->
  val insets = windowInsets.getInsets(WindowInsetsCompat.Type.systemBars())
  // Apply the insets as a margin to the view. This solution sets
  // only the bottom, left, and right dimensions, but you can apply whichever
  // insets are appropriate to your layout. You can also update the view padding
  // if that's more appropriate.
  v.updateLayoutParams<MarginLayoutParams> {
      leftMargin = insets.left
      bottomMargin = insets.bottom
      rightMargin = insets.right
  }

  // Return CONSUMED if you don't want the window insets to keep passing
  // down to descendant views.
  WindowInsetsCompat.CONSUMED
}
Java
ViewCompat.setOnApplyWindowInsetsListener(fab, (v, windowInsets) -> {
  Insets insets = windowInsets.getInsets(WindowInsetsCompat.Type.systemBars());
  // Apply the insets as a margin to the view. This solution sets only the
  // bottom, left, and right dimensions, but you can apply whichever insets are
  // appropriate to your layout. You can also update the view padding if that's
  // more appropriate.
  MarginLayoutParams mlp = (MarginLayoutParams) v.getLayoutParams();
  mlp.leftMargin = insets.left;
  mlp.bottomMargin = insets.bottom;
  mlp.rightMargin = insets.right;
  v.setLayoutParams(mlp);

  // Return CONSUMED if you don't want the window insets to keep passing
  // down to descendant views.
    return WindowInsetsCompat.CONSUMED;
});
หากใช้โซลูชันนี้กับตัวอย่างที่แสดงในรูปที่ 3 จะไม่มีการซ้อนทับกันของภาพในโหมดปุ่ม ดังที่แสดงในรูปที่ 4
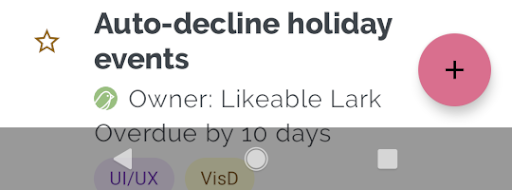
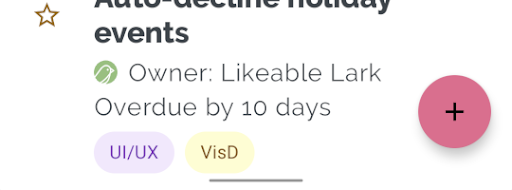
โหมดการไปยังส่วนต่างๆ ด้วยท่าทางสัมผัสก็เช่นกัน ดังที่แสดงในรูปที่ 5
ระยะขอบของคัตเอาท์ดิสเพลย์
อุปกรณ์บางรุ่นมีรอยบากบนจอแสดงผล โดยปกติ รูเจาะจะอยู่ที่ด้านบนของหน้าจอและรวมอยู่ในแถบสถานะ เมื่อหน้าจออุปกรณ์อยู่ในโหมดแนวนอน รอยบากอาจอยู่ที่ขอบแนวตั้ง คุณควรใช้ระยะขอบเพื่อหลีกเลี่ยงรอยบากบนจอแสดงผล ทั้งนี้ขึ้นอยู่กับเนื้อหาที่แอปแสดงบนหน้าจอ เนื่องจากโดยค่าเริ่มต้น แอปจะวาดในรอยบากบนจอแสดงผล
เช่น หน้าจอแอปจำนวนมากแสดงรายการไอเทม อย่าปิดบังรายการในลิสต์ ด้วยรอยบากของจอแสดงผลหรือแถบระบบ
Kotlin
ViewCompat.setOnApplyWindowInsetsListener(binding.recyclerView) { v, insets ->
  val bars = insets.getInsets(
    WindowInsetsCompat.Type.systemBars()
      or WindowInsetsCompat.Type.displayCutout()
  )
  v.updatePadding(
    left = bars.left,
    top = bars.top,
    right = bars.right,
    bottom = bars.bottom,
  )
  WindowInsetsCompat.CONSUMED
}
Java
ViewCompat.setOnApplyWindowInsetsListener(mBinding.recyclerView, (v, insets) -> {
  Insets bars = insets.getInsets(
    WindowInsetsCompat.Type.systemBars()
    | WindowInsetsCompat.Type.displayCutout()
  );
  v.setPadding(bars.left, bars.top, bars.right, bars.bottom);
  return WindowInsetsCompat.CONSUMED;
});
กำหนดค่าของ WindowInsetsCompat โดยใช้ตรรกะ or ของ
แถบระบบและประเภทรอยบากของจอแสดงผล
ตั้งค่า clipToPadding เป็น RecyclerView เพื่อให้ระยะขอบเลื่อนไปพร้อมกับ
รายการ ซึ่งจะช่วยให้รายการอยู่ด้านหลังแถบระบบเมื่อผู้ใช้เลื่อน ดังที่แสดงในตัวอย่างต่อไปนี้
<androidx.recyclerview.widget.RecyclerView
    android:id="@+id/recycler_view"
    android:layout_width="match_parent"
    android:layout_height="match_parent"
    android:clipToPadding="false"
    app:layoutManager="androidx.recyclerview.widget.LinearLayoutManager" />
ระยะขอบของท่าทางสัมผัสของระบบ
ระยะขอบของท่าทางสัมผัสของระบบแสดงถึงพื้นที่ของหน้าต่างที่ท่าทางสัมผัสของระบบ มีความสำคัญเหนือกว่าแอปของคุณ พื้นที่เหล่านี้จะแสดงเป็นสีส้มในรูปที่ 6
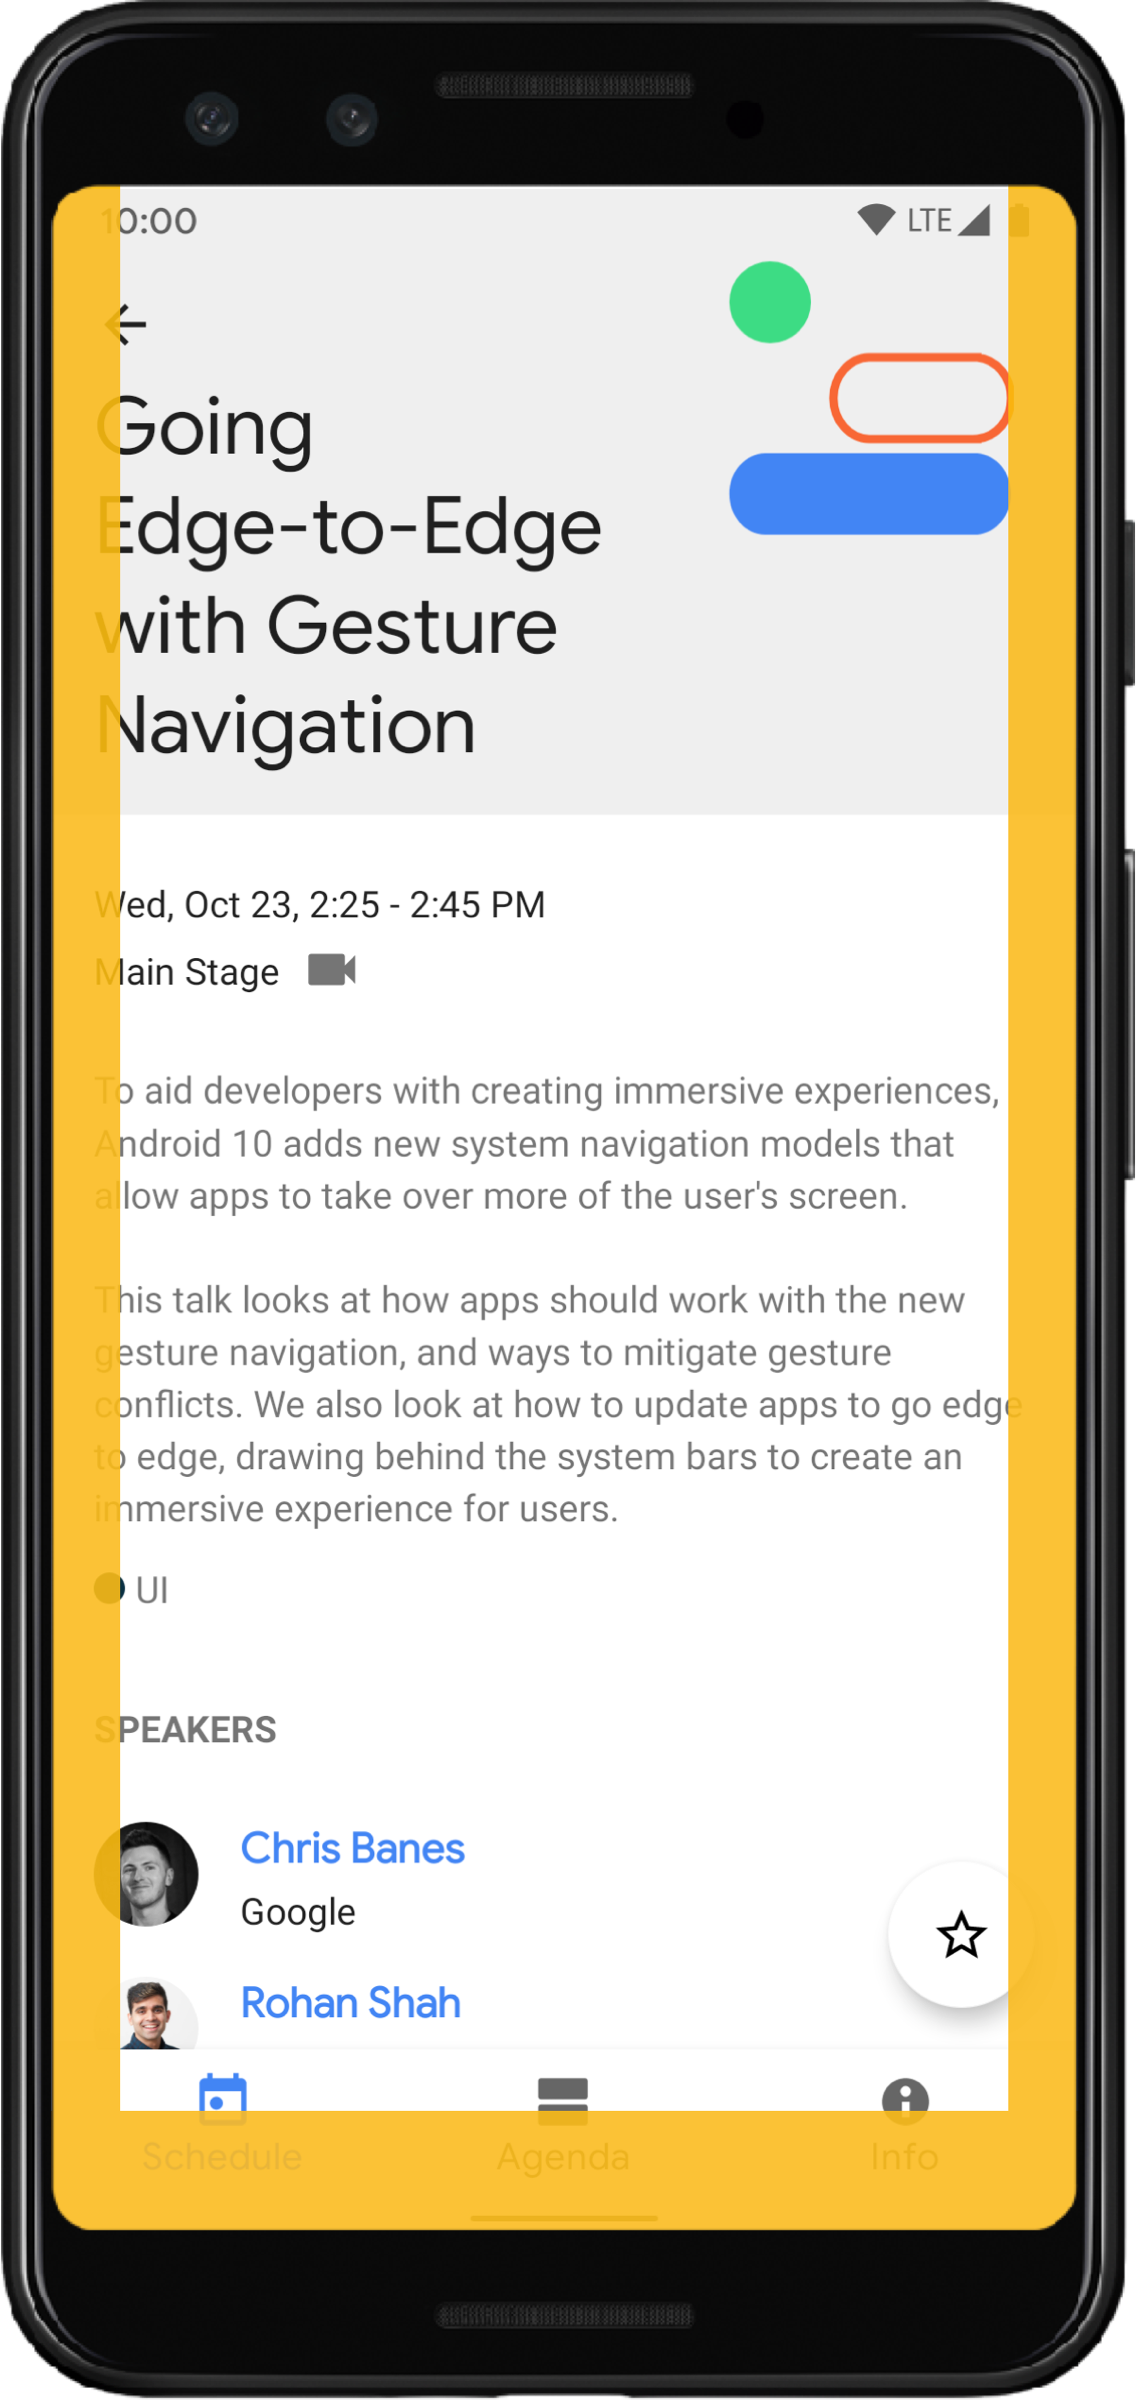
เช่นเดียวกับระยะขอบแถบระบบ คุณสามารถหลีกเลี่ยงการทับซ้อนของระยะขอบท่าทางสัมผัสของระบบ
ได้โดยใช้
getInsets(int)
กับ
WindowInsetsCompat.Type.systemGestures()
ใช้ระยะขอบเหล่านี้เพื่อย้ายหรือเว้นระยะห่างจากขอบสำหรับมุมมองที่ปัดได้ กรณีการใช้งานที่พบบ่อย ได้แก่ ชีตด้านล่าง
การปัดในเกม และแถบภาพหมุนที่ใช้ ViewPager2
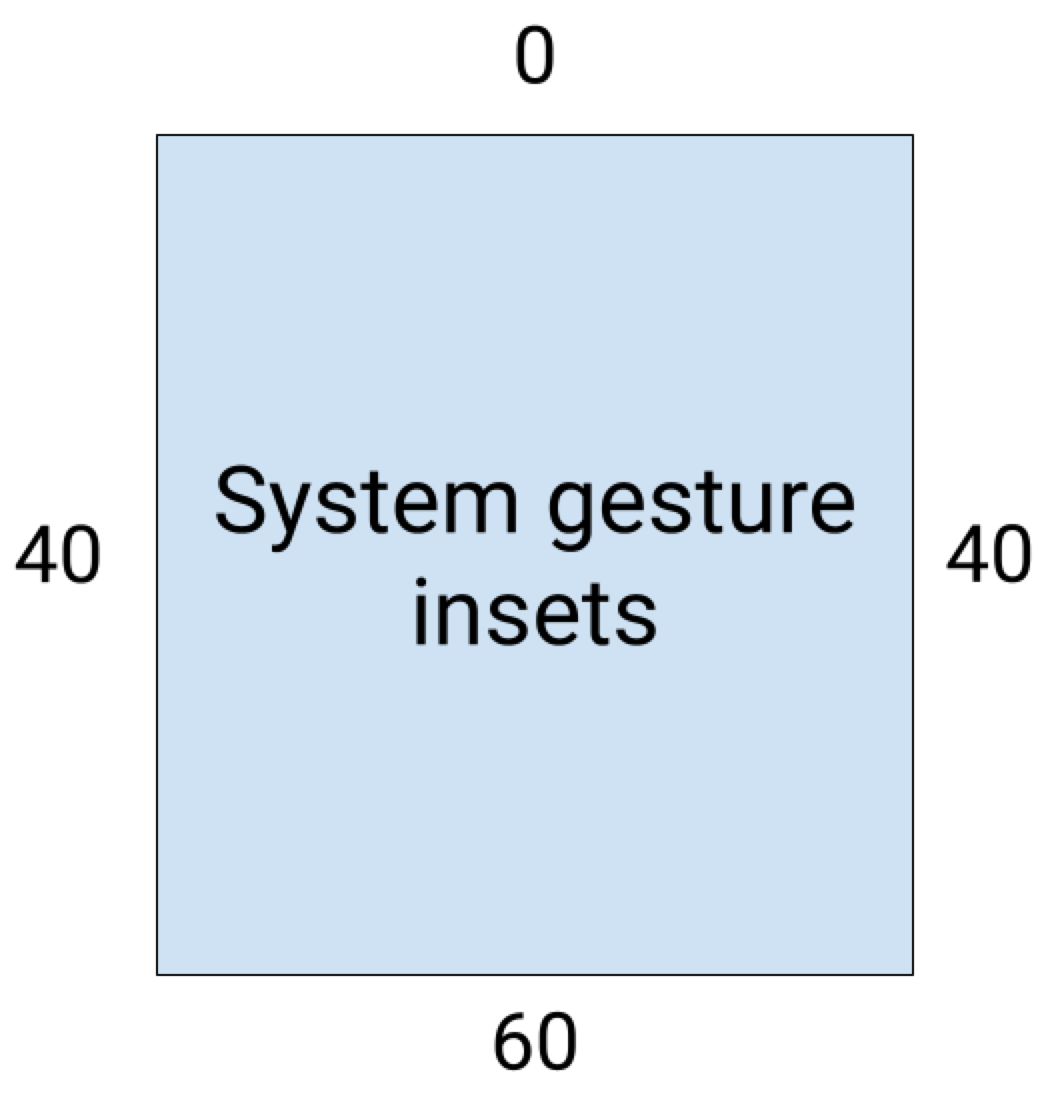
ใน Android 10 ขึ้นไป ส่วนที่เว้นไว้สำหรับท่าทางสัมผัสของระบบจะมีส่วนที่เว้นไว้ด้านล่างสำหรับท่าทางสัมผัสหน้าแรก และส่วนที่เว้นไว้ด้านซ้ายและขวาสำหรับท่าทางสัมผัสย้อนกลับ
ตัวอย่างโค้ดต่อไปนี้แสดงวิธีใช้การแทรกของท่าทางสัมผัสของระบบ
Kotlin
ViewCompat.setOnApplyWindowInsetsListener(view) { view, windowInsets ->
    val insets = windowInsets.getInsets(WindowInsetsCompat.Type.systemGestures())
    // Apply the insets as padding to the view. Here, set all the dimensions
    // as appropriate to your layout. You can also update the view's margin if
    // more appropriate.
    view.updatePadding(insets.left, insets.top, insets.right, insets.bottom)

    // Return CONSUMED if you don't want the window insets to keep passing down
    // to descendant views.
    WindowInsetsCompat.CONSUMED
}
Java
ViewCompat.setOnApplyWindowInsetsListener(view, (v, windowInsets) -> {
    Insets insets = windowInsets.getInsets(WindowInsetsCompat.Type.systemGestures());
    // Apply the insets as padding to the view. Here, set all the dimensions
    // as appropriate to your layout. You can also update the view's margin if
    // more appropriate.
    view.setPadding(insets.left, insets.top, insets.right, insets.bottom);

    // Return CONSUMED if you don't want the window insets to keep passing down
    // to descendant views.
    return WindowInsetsCompat.CONSUMED;
});
คอมโพเนนต์เนื้อหา
คอมโพเนนต์ Material ของ Android
(com.google.android.material) ที่อิงตาม View จำนวนมากจะจัดการ Inset โดยอัตโนมัติ ซึ่งรวมถึง
BottomAppBar
BottomNavigationView
NavigationRailView
และ NavigationView
อย่างไรก็ตาม AppBarLayout
จะไม่จัดการการแทรกโดยอัตโนมัติ เพิ่ม
android:fitsSystemWindows="true"
เพื่อจัดการระยะขอบด้านบน
อ่านวิธีจัดการระยะขอบด้วยคอมโพเนนต์ Material ใน Compose
การส่งการแทรกที่เข้ากันได้แบบย้อนหลัง
หากต้องการหยุดการส่ง Inset ไปยังมุมมองของเด็กและหลีกเลี่ยงการเว้นวรรคมากเกินไป คุณสามารถ
ใช้ Inset โดยใช้ค่าคงที่
WindowInsetsCompat.CONSUMED
ได้ อย่างไรก็ตาม ในอุปกรณ์ที่ใช้ Android 10 (API ระดับ 29 และต่ำกว่า) ระบบจะไม่ส่ง Inset ไปยังองค์ประกอบที่อยู่ติดกันหลังจากเรียกใช้
WindowInsetsCompat.CONSUMED ซึ่งอาจทำให้เกิดการซ้อนทับกันโดยไม่ตั้งใจ
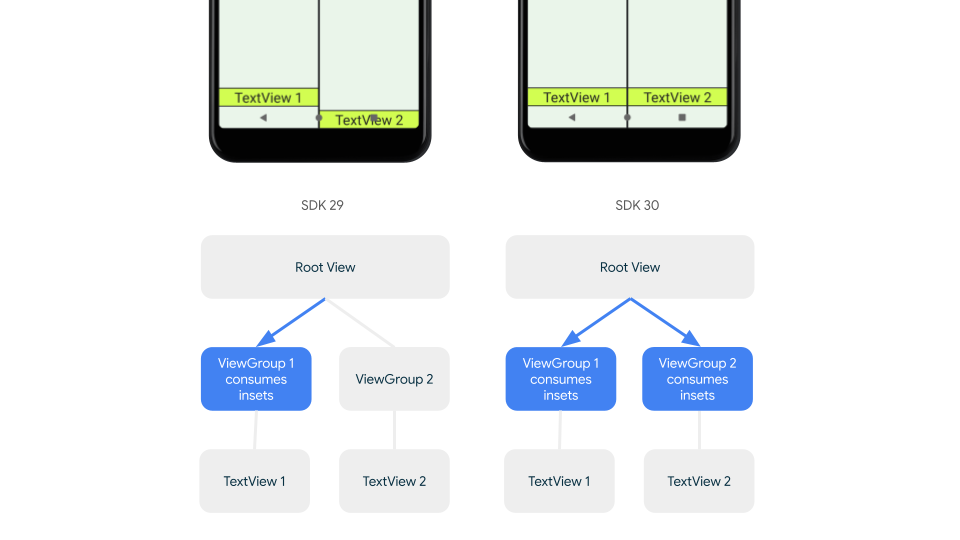
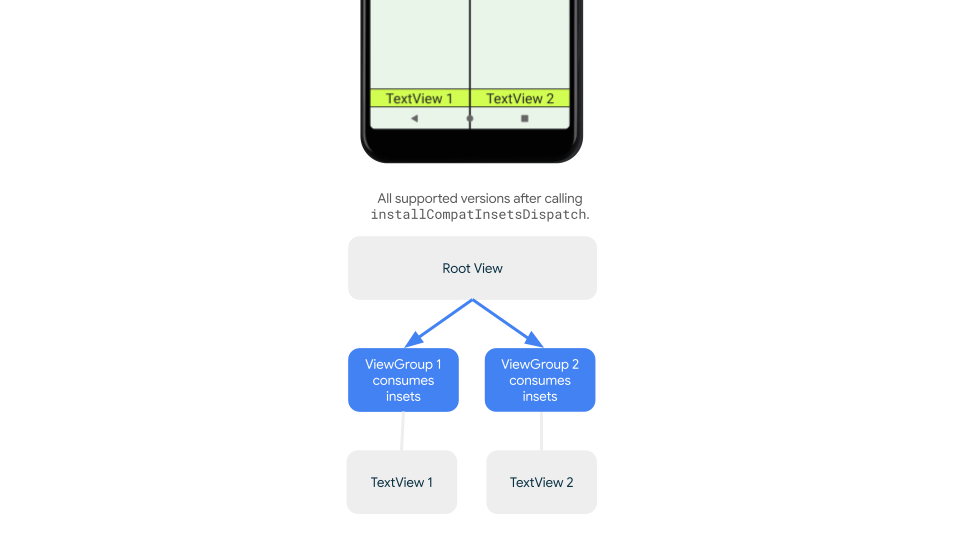
หากต้องการยืนยันว่ามีการส่ง Inset ไปยังองค์ประกอบร่วมสำหรับ Android ทุกเวอร์ชันที่รองรับ ให้ใช้ ViewGroupCompat#installCompatInsetsDispatch ก่อนใช้ Inset ซึ่งมีให้ใช้งานใน AndroidX Core และ Core-ktx 1.16.0-alpha01 ขึ้นไป
Kotlin
// Use the i.d. assigned to your layout's root view, e.g. R.id.main
val rootView = findViewById(R.id.main)
// Call before consuming insets
ViewGroupCompat.installCompatInsetsDispatch(rootView)
Java
// Use the i.d. assigned to your layout's root view, e.g. R.id.main
LinearLayout rootView = findViewById(R.id.main);
// Call before consuming insets
ViewGroupCompat.installCompatInsetsDispatch(rootView);
โหมดใหญ่พิเศษ
เนื้อหาบางอย่างจะให้ประสบการณ์การใช้งานที่ดีที่สุดเมื่อดูแบบเต็มหน้าจอ ซึ่งจะช่วยให้ผู้ใช้ได้รับประสบการณ์ที่สมจริงยิ่งขึ้น คุณซ่อนแถบระบบและโหมดสมจริงได้โดยใช้ไลบรารี
WindowInsetsController
และ
WindowInsetsControllerCompat
Kotlin
val windowInsetsController =
      WindowCompat.getInsetsController(window, window.decorView)

// Hide the system bars.
windowInsetsController.hide(Type.systemBars())

// Show the system bars.
windowInsetsController.show(Type.systemBars())
Java
Window window = getWindow();
WindowInsetsControllerCompat windowInsetsController =
      WindowCompat.getInsetsController(window, window.getDecorView());
if (windowInsetsController == null) {
    return;
  }
// Hide the system bars.
windowInsetsController.hide(WindowInsetsCompat.Type.systemBars());

// Show the system bars.
windowInsetsController.show(WindowInsetsCompat.Type.systemBars());
ดูข้อมูลเพิ่มเติมเกี่ยวกับการใช้ฟีเจอร์นี้ได้ที่ซ่อนแถบระบบสำหรับโหมดสมจริง
ไอคอนแถบระบบ
การเรียกใช้ enableEdgeToEdge จะช่วยให้สีของไอคอนแถบระบบอัปเดตเมื่อธีมของอุปกรณ์มีการเปลี่ยนแปลง
ขณะที่ขยายจากขอบหนึ่งไปอีกขอบหนึ่ง คุณอาจต้องอัปเดตสีไอคอนแถบระบบด้วยตนเองเพื่อให้ตัดกับพื้นหลังของแอป เช่น หากต้องการสร้างไอคอนแถบสถานะสีอ่อน ให้ทำดังนี้
Kotlin
WindowCompat.getInsetsController(window, window.decorView)
    .isAppearanceLightStatusBars = false
Java
WindowCompat.getInsetsController(window, window.getDecorView())
    .setAppearanceLightStatusBars(false);
การป้องกันแถบระบบ
เมื่อแอปกำหนดเป้าหมายเป็น SDK 35 ขึ้นไป ระบบจะบังคับใช้การแสดงผลแบบขอบต่อขอบ
แถบสถานะของระบบและแถบการนำทางด้วยท่าทางสัมผัสจะโปร่งใส แต่
แถบการนำทางแบบ 3 ปุ่มจะโปร่งแสง เรียกใช้ enableEdgeToEdge เพื่อให้เข้ากันได้แบบย้อนหลัง
อย่างไรก็ตาม ค่าเริ่มต้นของระบบอาจใช้ไม่ได้กับ Use Case บางอย่าง โปรดดูคำแนะนำการออกแบบแถบระบบของ Android และการออกแบบแบบขอบจรดขอบเพื่อ พิจารณาว่าจะใช้แถบระบบแบบโปร่งใสหรือแบบกึ่งโปร่งใส
สร้างแถบระบบแบบโปร่งใส
สร้างแถบสถานะแบบโปร่งใสโดยกำหนดเป้าหมายเป็น Android 15 (SDK 35) ขึ้นไป หรือโดย
เรียกใช้ enableEdgeToEdge() ด้วยอาร์กิวเมนต์เริ่มต้นสำหรับเวอร์ชันก่อนหน้า
สร้างแถบนำทางด้วยท่าทางสัมผัสแบบโปร่งใสโดยกำหนดเป้าหมายเป็น Android 15 ขึ้นไป หรือ
โดยเรียกใช้ enableEdgeToEdge() ด้วยอาร์กิวเมนต์เริ่มต้นสำหรับเวอร์ชันก่อนหน้า สำหรับ
แถบนำทางแบบ 3 ปุ่ม ให้ตั้งค่า Window.setNavigationBarContrastEnforced
เป็น false มิฉะนั้นจะมีการใช้เลเยอร์กึ่งโปร่งใส
สร้างแถบระบบแบบโปร่งแสง
หากต้องการสร้างแถบสถานะโปร่งแสง ให้ทำดังนี้
- อัปเดตทรัพยากร Dependency ของ
androidx-coreเป็น 1.16.0-beta01 ขึ้นไป - ห่อเลย์เอาต์ XML ใน
androidx.core.view.insets.ProtectionLayoutและ กำหนดรหัส - เข้าถึง
ProtectionLayoutโดยอัตโนมัติเพื่อตั้งค่าการป้องกัน โดยระบุ ด้านข้างและGradientProtectionสำหรับแถบสถานะ
<androidx.core.view.insets.ProtectionLayout xmlns:android="http://schemas.android.com/apk/res/android" android:id="@+id/list_protection" android:layout_width="match_parent" android:layout_height="match_parent"> <ScrollView android:id="@+id/item_list" android:clipToPadding="false" android:layout_width="match_parent" android:layout_height="match_parent"> <!--items--> </ScrollView> </androidx.core.view.insets.ProtectionLayout>
findViewById<ProtectionLayout>(R.id.list_protection) .setProtections( listOf( GradientProtection( WindowInsetsCompat.Side.TOP, // Ideally, this is the pane's background color paneBackgroundColor ) ) )
ตรวจสอบว่า ColorInt ที่ส่งไปยัง GradientProtection ตรงกับเนื้อหา
พื้นหลัง ตัวอย่างเช่น เลย์เอาต์รายการ-รายละเอียดที่แสดงบนอุปกรณ์พับได้อาจมี GradientProtections ที่แตกต่างกันของสีต่างๆ สำหรับแผงรายการและแผงรายละเอียด
อย่าสร้างแถบนำทางด้วยท่าทางสัมผัสแบบโปร่งแสง หากต้องการสร้างแถบนำทางแบบ 3 ปุ่มที่โปร่งแสง ให้ทำอย่างใดอย่างหนึ่งต่อไปนี้
- หากมีเลย์เอาต์ที่อยู่ใน
ProtectionViewอยู่แล้ว คุณจะส่งColorProtectionหรือGradientProtectionเพิ่มเติมไปยังเมธอดsetProtectionsได้ ก่อนดำเนินการดังกล่าว โปรดตรวจสอบว่าwindow.isNavigationBarContrastEnforced = false - มิเช่นนั้น ให้ตั้งค่า
window.isNavigationBarContrastEnforced = trueหากแอปของคุณ เรียกใช้enableEdgeToEdge, window.isNavigationBarContrastEnforced = trueเป็น ค่าเริ่มต้น
เคล็ดลับอื่นๆ
เคล็ดลับเพิ่มเติมเมื่อจัดการ Inset
ทำให้เนื้อหาที่เลื่อนได้แสดงแบบไร้ขอบ
ตรวจสอบว่าแถบระบบใน RecyclerView หรือ NestedScrollView ไม่ได้บดบังรายการสุดท้ายในลิสต์โดยการจัดการ Inset และตั้งค่า clipToPadding เป็น false
วิดีโอต่อไปนี้แสดง RecyclerView ที่ปิดใช้ (ซ้าย) และเปิดใช้ (ขวา) จอแสดงผลแบบขอบจรดขอบ
ดูตัวอย่างโค้ดในส่วนสร้างรายการแบบไดนามิกด้วย RecyclerView
ทำให้กล่องโต้ตอบแบบเต็มหน้าจอเป็นแบบไร้ขอบ
หากต้องการให้กล่องโต้ตอบแบบเต็มหน้าจอแสดงแบบขอบจรดขอบ ให้เรียกใช้ enableEdgeToEdge ในกล่องโต้ตอบ
Kotlin
class MyAlertDialogFragment : DialogFragment() {
    override fun onStart(){
        super.onStart()
        dialog?.window?.let { WindowCompat.enableEdgeToEdge(it) }
    }
    ...
}
Java
public class MyAlertDialogFragment extends DialogFragment {
    @Override
    public void onStart() {
        super.onStart();
        Dialog dialog = getDialog();
        if (dialog != null) {
            Window window = dialog.getWindow();
            if (window != null) {
                WindowCompat.enableEdgeToEdge(window);
            }
        }
    }
    ...
}
แหล่งข้อมูลเพิ่มเติม
ดูข้อมูลเพิ่มเติมเกี่ยวกับการแสดงผลแบบขอบจรดขอบได้ในการอ้างอิงต่อไปนี้
บล็อก
- เคล็ดลับการจัดการ Insets สำหรับการบังคับใช้แบบขอบจรดขอบของ Android 15
- WindowInsets - ผู้ฟังเลย์เอาต์
การออกแบบ
เอกสารอื่นๆ
วิดีโอ


