
Android 12부터
SplashScreen API를 사용하면 실행 시 앱 내 모션, 앱 아이콘을 보여주는
스플래시 화면, 앱 자체로의 전환을 비롯한 애니메이션으로
앱을 실행할 수 있습니다. A SplashScreen은
Window이므로
Activity를 포함합니다.
스플래시 화면 환경은 앱을 출시할 때마다 표준 디자인 요소를 제공하지만 맞춤설정도 가능하므로 앱이 고유한 브랜딩을 유지할 수 있습니다.
SplashScreen 플랫폼 API를 사용하는 것 외에도
SplashScreen
compat 라이브러리를 사용할 수 있습니다.SplashScreen
스플래시 화면 작동 방식
사용자가 앱을 실행할 때 앱 프로세스가 실행되지 않거나 (콜드
스타트) Activity가
만들어지지 않은 상태 (웜 스타트)라면
다음 이벤트가 발생합니다.
시스템은 개발자가 정의한 테마와 애니메이션을 사용하여 스플래시 화면을 표시합니다.
앱이 준비되면 스플래시 화면이 닫히고 앱이 표시됩니다.
스플래시 화면은 핫 스타트 중에 표시되지 않습니다.
스플래시 화면의 요소와 메커니즘
스플래시 화면의 요소는 Android 매니페스트 파일의 XML 리소스 파일로 정의됩니다. 각 요소에는 밝은 모드와 어두운 모드 버전이 있습니다.
스플래시 화면의 맞춤설정 가능한 요소는 앱 아이콘, 아이콘 배경, 창 배경으로 구성됩니다.
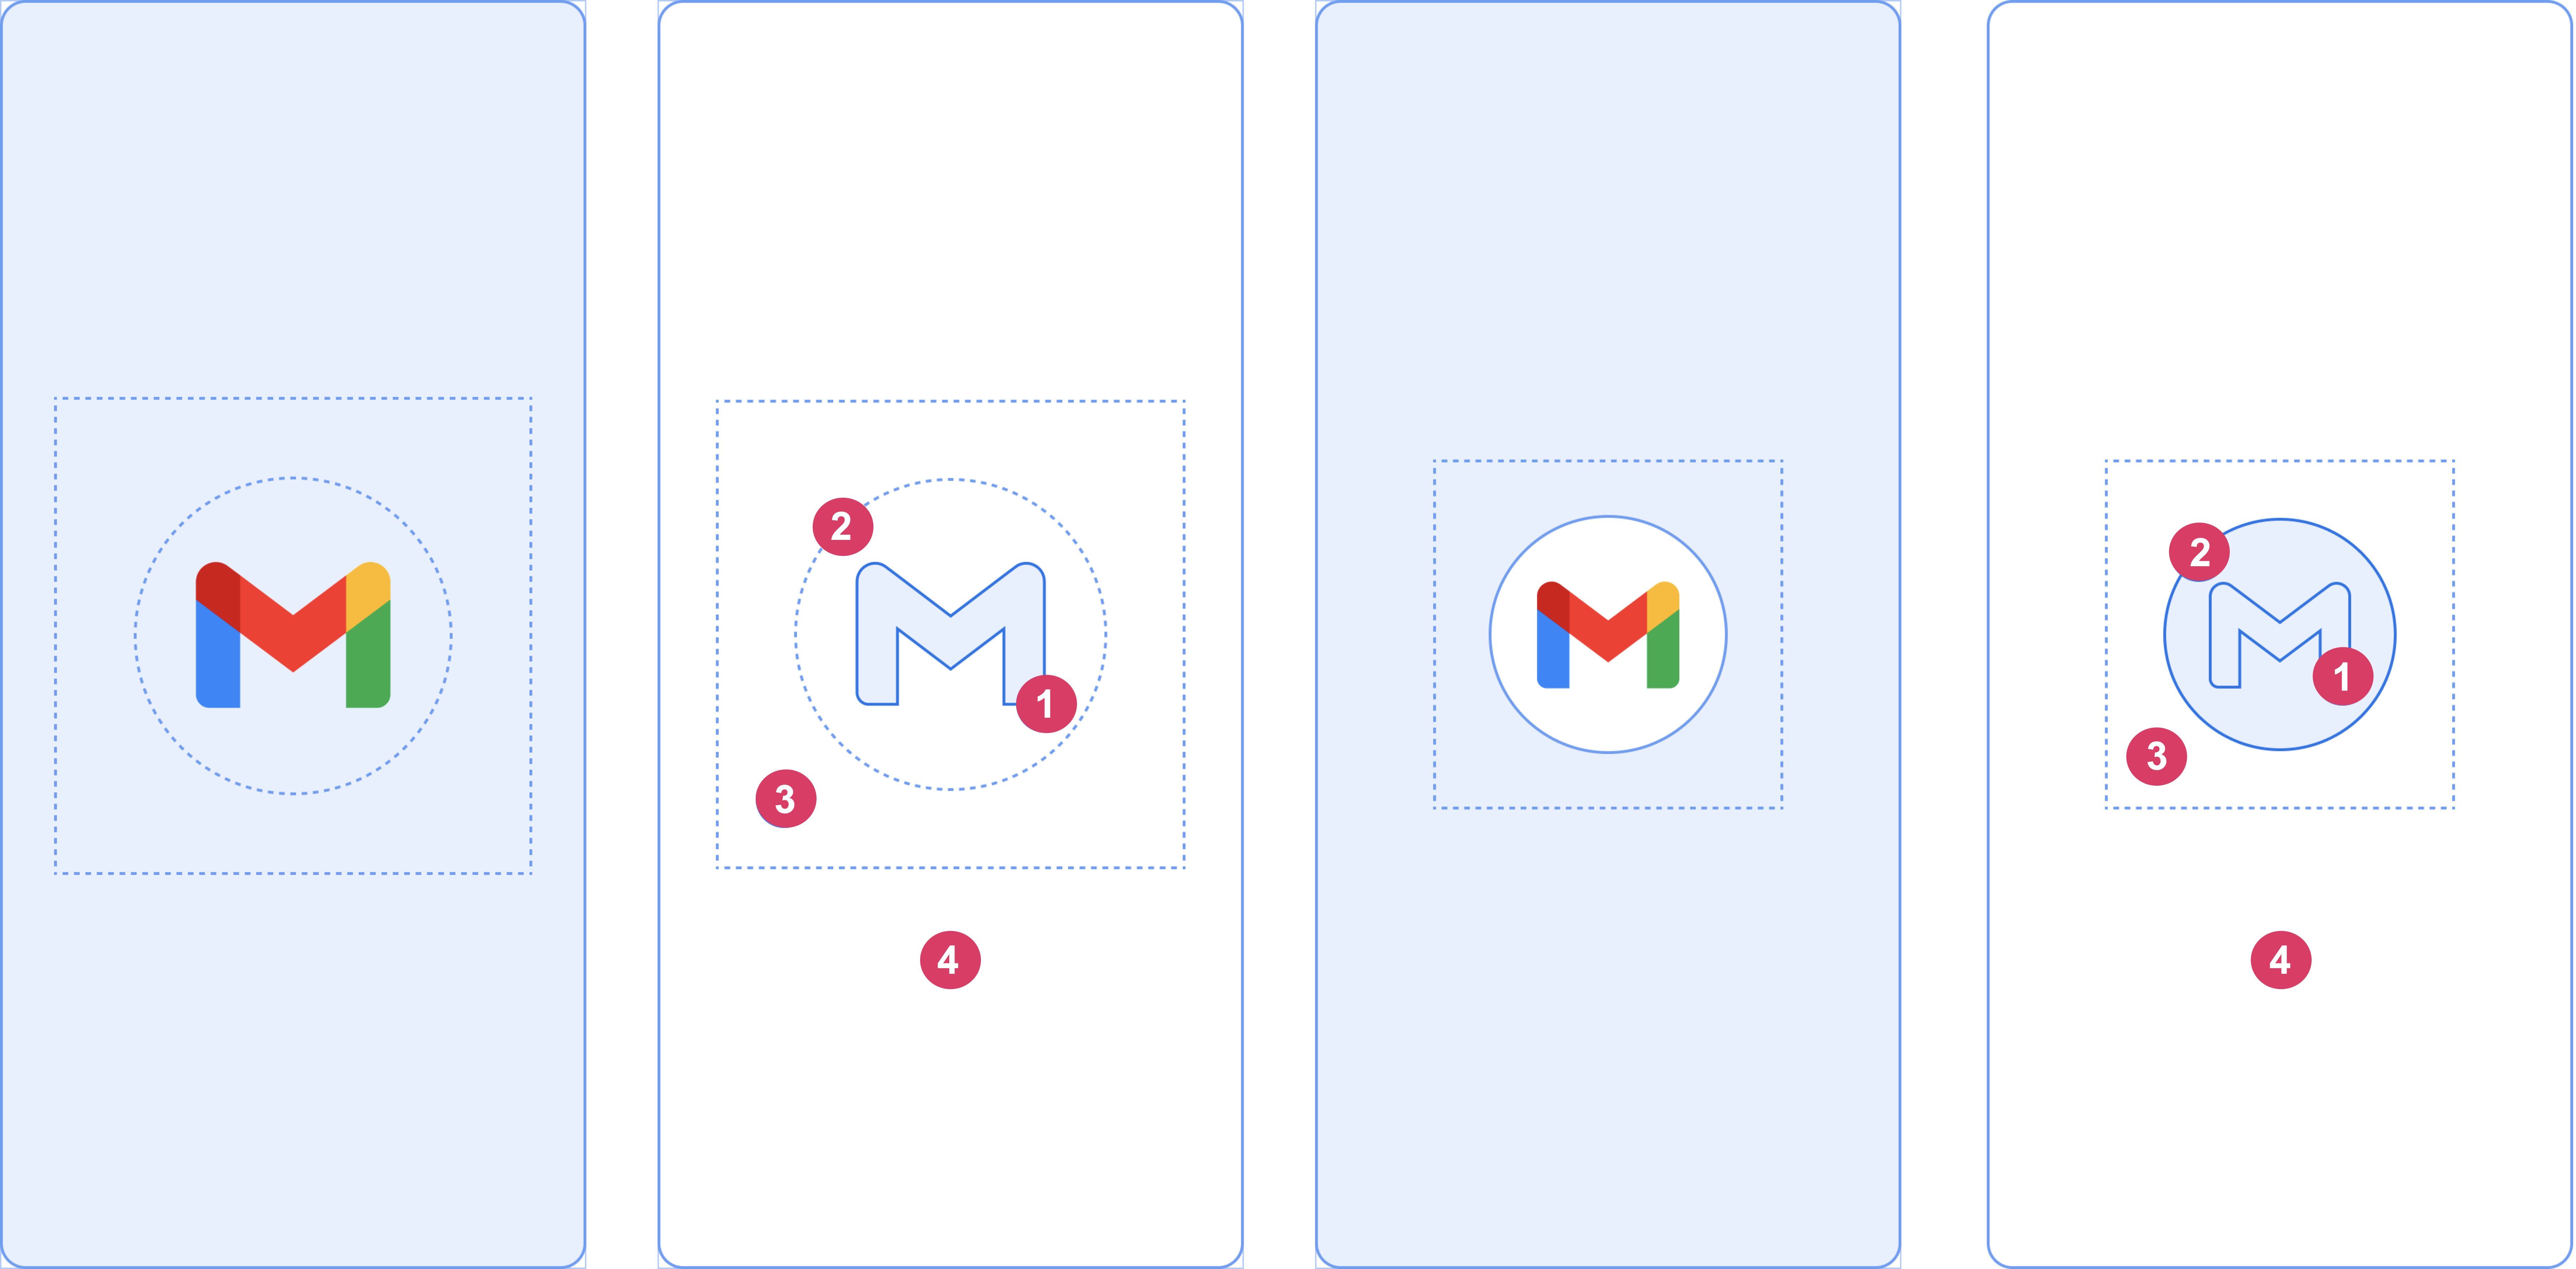
그림 2에 표시된 다음 요소를 살펴보세요.
1 앱 아이콘은 벡터 드로어블이어야 합니다. 정적이거나 애니메이션일 수 있습니다. 애니메이션의 지속 시간은 무제한일 수 있지만 1,000밀리초를 초과하지 않는 것이 좋습니다. 런처 아이콘이 기본값입니다.
2 아이콘 배경 은 선택사항이며 아이콘과 창 배경 사이에 대비가 더 필요한 경우 유용합니다. 적응형 아이콘을 사용하면 창 배경과 대비가 충분한 경우 배경이 표시됩니다.
3 적응형 아이콘과 마찬가지로 전경의 1/3이 마스크 처리됩니다.
4 창 배경 은 단일 불투명 색상으로 구성됩니다. 창 배경이 설정되어 있고 단색인 경우 속성이 설정되어 있지 않으면 기본적으로 사용됩니다.
스플래시 화면 크기
스플래시 화면 아이콘은 적응형 아이콘과 동일한 사양을 사용하며 다음과 같습니다.
- 브랜드 이미지: 200×80dp여야 합니다.
- 아이콘 배경이 있는 앱 아이콘: 240×240dp여야 하며 지름이 160dp인 원 안에 맞아야 합니다.
- 아이콘 배경이 없는 앱 아이콘: 288×288dp여야 하며 지름이 192dp인 원 안에 맞아야 합니다.
예를 들어 이미지의 전체 크기가 300×300dp인 경우 아이콘은 지름이 200dp인 원 안에 맞아야 합니다. 원 밖에 있는 모든 항목은 보이지 않게 됩니다 (마스크 처리됨).
스플래시 화면 애니메이션 및 실행 시퀀스
콜드 스타트 시 앱을 실행하면 지연 시간이 추가되는 경우가 많습니다. 스플래시 화면에 애니메이션 아이콘을 추가하면 미적으로 보기 좋고 더 우수한 환경을 제공할 수 있습니다. 사용자 연구에 따르면 애니메이션을 볼 때 인식되는 시작 시간이 더 짧습니다.
스플래시 화면 애니메이션은 그림 4와 같이 실행 시퀀스 구성요소 내에 삽입됩니다.
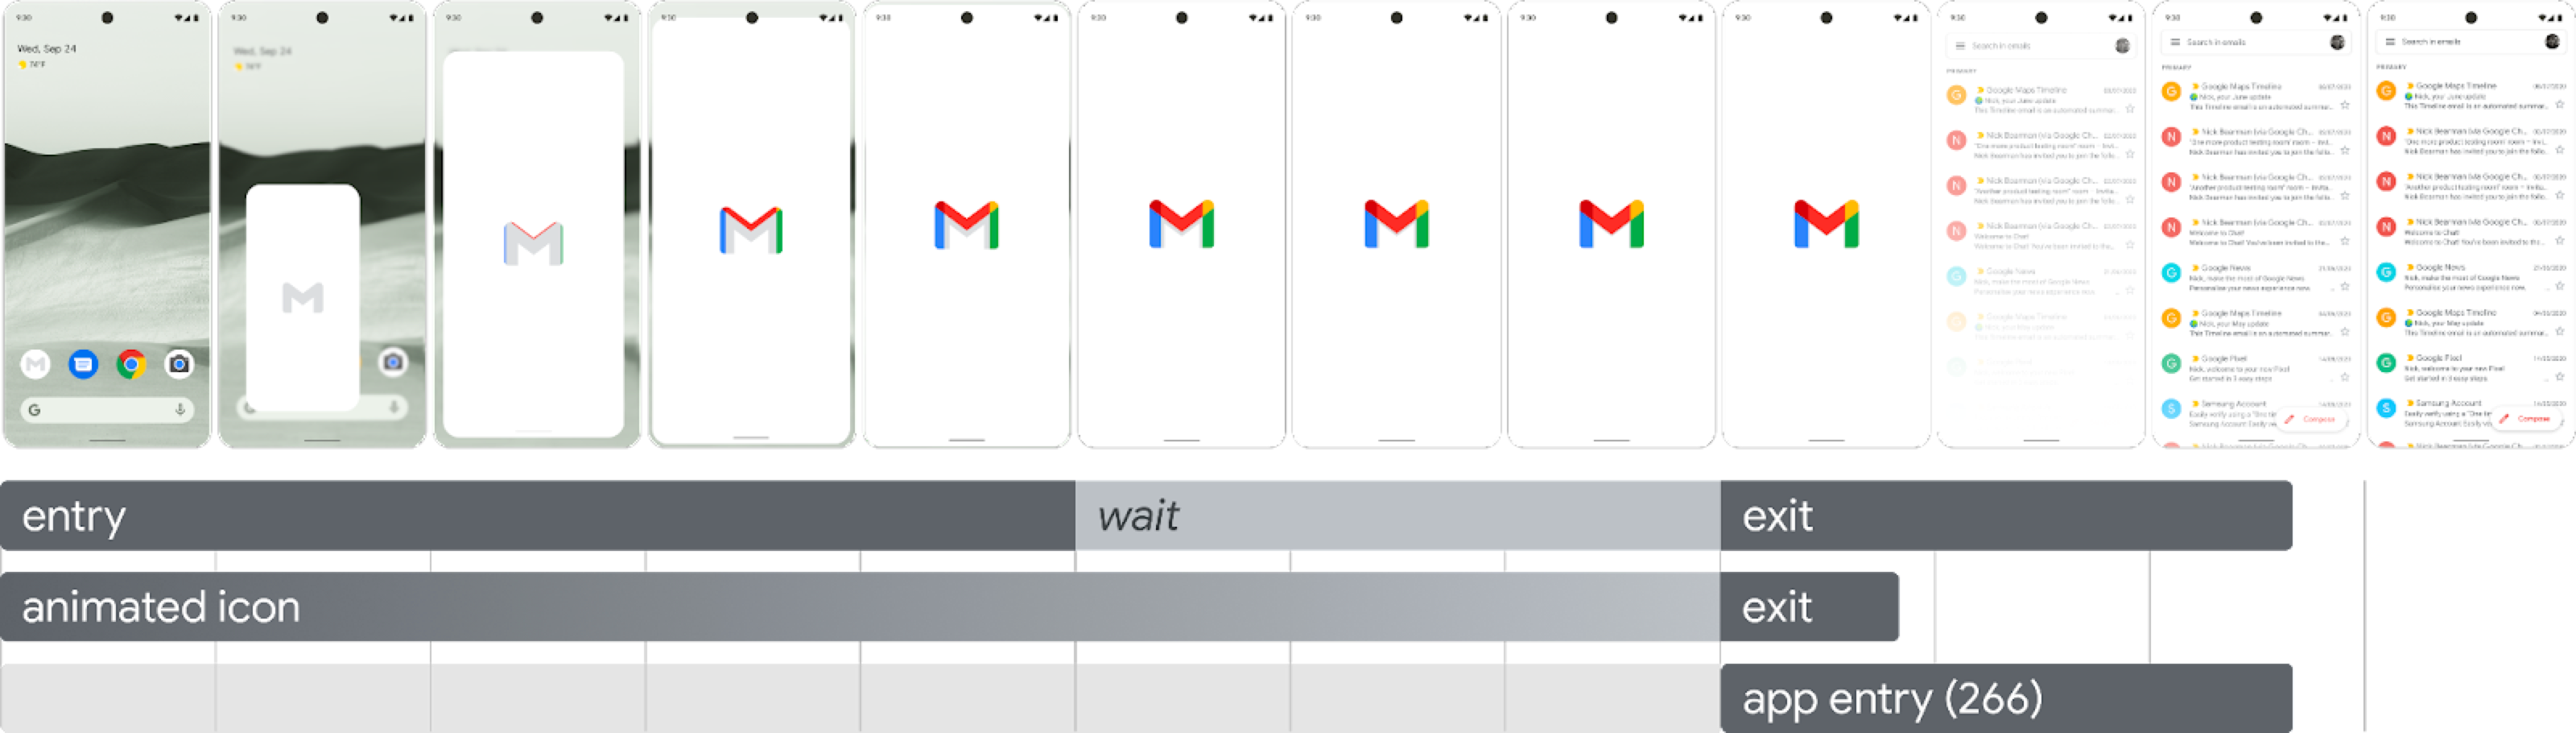
들어가기 애니메이션: 스플래시 화면의 시스템 뷰로 구성됩니다. 시스템에서 제어하고 맞춤설정할 수 없습니다.
스플래시 화면 (시퀀스의 '대기' 부분에 표시됨): 스플래시 화면을 맞춤설정하여 자체 로고 애니메이션과 브랜딩을 제공할 수 있습니다. 제대로 작동하려면 이 페이지에 설명된 요구사항 을 충족해야 합니다.
나가기 애니메이션: 스플래시 화면을 숨기는 애니메이션으로 구성됩니다. 맞춤설정하려면 맞춤설정하려면
SplashScreenView및 아이콘을 사용하세요. 변환, 불투명도, 색상 설정을 사용하여 어떤 애니메이션이든 실행할 수 있습니다. 이 경우 애니메이션이 완료될 때 스플래시 화면을 수동으로 삭제합니다.
아이콘 애니메이션을 실행할 때 앱 실행은 앱이 더 빨리 준비되는 경우 시퀀스를 건너뛸 수 있는 옵션을 제공합니다. 앱이 onResume()을 트리거하거나 스플래시 화면이 자동으로 타임아웃되므로 모션을 편안하게 건너뛸 수 있는지 확인하세요. 스플래시 화면은 시각적 관점에서 앱이 안정적인 경우에만 onResume()으로 닫아야 하므로 추가 스피너가 필요하지 않습니다. 불완전한 인터페이스를 도입하면 사용자에게 불편함을 줄 수 있으며 예측 불가능하거나 세련되지 않은 인상을 줄 수 있습니다.
스플래시 화면 애니메이션 요구사항
스플래시 화면은 다음 사양을 준수해야 합니다.
투명도 없이 단일 창 배경 색상을 설정합니다. 주간 및 야간 모드는
SplashScreencompat 라이브러리를 통해 지원됩니다.애니메이션 아이콘이 다음 사양을 충족하는지 확인합니다.
- 형식: 아이콘은 AnimatedVectorDrawable (AVD) XML이어야 합니다.
- 크기: AVD 아이콘은 다음과 같이 적응형 아이콘 크기의 4배여야 합니다.
- 아이콘 영역은 432dp여야 합니다. 즉, 마스크 처리되지 않은 적응형 아이콘의 108dp 영역의 4배입니다.
- 이미지의 안쪽 2/3은 런처 아이콘에 표시되며 288dp여야 합니다. 즉, 적응형 아이콘의 안쪽 마스크 처리된 영역을 구성하는 72dp의 4배입니다.
- 지속 시간: 휴대전화에서는 1,000ms를 초과하지 않는 것이 좋습니다. 지연된 시작을 사용할 수 있지만 166ms를 초과할 수 없습니다. 앱 시작 시간이 1,000ms보다 길면 루핑 애니메이션을 고려하세요.
앱이 첫 프레임을 그릴 때 발생하는 스플래시 화면을 닫는 적절한 시간을 설정합니다. 스플래시 화면을 화면에 더 오래 표시 섹션에 설명된 대로 이를 추가로 맞춤설정할 수 있습니다.
스플래시 화면 리소스
예시 스타터 키트를 다운로드하세요. 애니메이션을 만들고, 형식을 지정하고, AVD로 내보내는 방법을 보여줍니다. 이 패키지에는 다음 도구가 포함되어 있습니다.
- 애니메이션의 Adobe After Effects 프로젝트 파일
- 최종 내보낸 AVD XML 파일
- 애니메이션의 GIF 예시
이러한 파일을 다운로드하면 Google 서비스 약관에 동의하는 것으로 간주됩니다.
Google 개인정보처리방침에 이 서비스의 데이터 처리 방식이 설명되어 있습니다.
앱의 스플래시 화면 맞춤설정
기본적으로 SplashScreen은 windowBackground가 단일 색상인 경우 테마의 windowBackground를 사용합니다. 스플래시 화면을 맞춤설정하려면 앱 테마에 속성을 추가하세요.
다음 중 하나를 실행하여 앱의 스플래시 화면을 맞춤설정할 수 있습니다.
테마 속성을 설정하여 모양을 변경합니다.
화면에 더 오래 표시합니다.
스플래시 화면 닫기 애니메이션을 맞춤설정합니다.
시작하기
Core SplashScreen 라이브러리는 API 23부터 모든 기기에서 Android 12 스플래시 화면을 지원합니다. 프로젝트에 추가하려면 build.gradle 파일에 다음 스니펫을 추가하세요.
Groovy
dependencies {
    implementation "androidx.core:core-splashscreen:1.0.0"
}
Kotlin
dependencies {
    implementation("androidx.core:core-splashscreen:1.0.0")
}
스플래시 화면 테마를 설정하여 모양 변경
Activity 테마에서 다음 속성을 지정하여 앱의 스플래시 화면을 맞춤설정할 수 있습니다. android:windowBackground와 같은 속성을 사용하는 기존 스플래시 화면 구현이 이미 있다면 Android 12 이상의 대체 리소스 파일을 제공하는 것이 좋습니다.
windowSplashScreenBackground를 사용하여 특정 단색으로 배경을 채웁니다.<item name="android:windowSplashScreenBackground">@color/...</item>windowSplashScreenAnimatedIcon을 사용하여 시작 창 중앙의 아이콘을 대체합니다.Android 12 (API 수준 32)를 타겟팅하는 앱의 경우에만 다음을 실행합니다.
객체가
AnimationDrawable및AnimatedVectorDrawable을 통해 애니메이션 가능하고 드로어블이라면 시작 창을 표시하는 동안 애니메이션이 재생되도록windowSplashScreenAnimationDuration을(를) 설정합니다. 지속 시간이AnimatedVectorDrawable에서 직접 추론되므로 Android 13에서는 이 과정이 필요하지 않습니다.<item name="android:windowSplashScreenAnimatedIcon">@drawable/...</item>windowSplashScreenAnimationDuration을 사용하여 스플래시 화면 아이콘 애니메이션의 지속 시간을 나타냅니다. 이 설정을 사용해도 스플래시 화면이 표시되는 실제 시간은 영향을 받지 않지만, 스플래시 화면 종료 애니메이션을 맞춤설정할 때 지속 시간을 가져올 수 있습니다.SplashScreenView.getIconAnimationDuration자세한 내용은 스플래시 화면을 화면에 더 오래 표시 섹션을 참고하세요.<item name="android:windowSplashScreenAnimationDuration">1000</item>windowSplashScreenIconBackgroundColor을 사용하여 스플래시 화면 아이콘 뒤의 배경을 설정합니다. 창 배경과 아이콘 사이에 대비가 충분하지 않은 경우에 유용합니다.<item name="android:windowSplashScreenIconBackgroundColor">@color/...</item>windowSplashScreenBrandingImage를 사용하여 스플래시 화면 하단에 표시할 이미지를 설정할 수 있습니다. 그러나 디자인 가이드라인에서는 브랜드 이미지 사용을 권장하지 않습니다.<item name="android:windowSplashScreenBrandingImage">@drawable/...</item>windowSplashScreenBehavior를 사용하여 Android 13 이상에서 앱이 항상 스플래시 화면에 아이콘을 표시할지 여부를 지정할 수 있습니다. 기본값은 0이며, 실행 활동이splashScreenStyle을SPLASH_SCREEN_STYLE_ICON으로 설정하는 경우 스플래시 화면에 아이콘을 표시하거나 실행 활동이 스타일을 지정하지 않는 경우 시스템 동작을 따릅니다. 빈 스플래시 화면을 표시하지 않고 항상 애니메이션 아이콘을 표시하려면 이 값을icon_preferred로 설정하세요.<item name="android:windowSplashScreenBehavior">icon_preferred</item>
스플래시 화면을 화면에 더 오래 표시
스플래시 화면은 앱이 첫 프레임을 그리는 즉시 닫힙니다. 로컬 디스크에서 인앱 설정을 비동기적으로 로드하는 것과 같은 소량의 데이터를 로드해야 한다면
ViewTreeObserver.OnPreDrawListener
를 사용하여 첫 프레임을 그릴 앱을 정지할 수 있습니다.
시작 활동이 그리기 전에 완료되는 경우(예: 콘텐츠 뷰를 설정하지 않고 onResume 전에 종료하는 경우) 사전 그리기 리스너가 필요하지 않습니다.
Kotlin
// Create a new event for the activity.
override fun onCreate(savedInstanceState: Bundle?) {
    super.onCreate(savedInstanceState)
    // Set the layout for the content view.
    setContentView(R.layout.main_activity)

    // Set up an OnPreDrawListener to the root view.
    val content: View = findViewById(android.R.id.content)
    content.viewTreeObserver.addOnPreDrawListener(
        object : ViewTreeObserver.OnPreDrawListener {
            override fun onPreDraw(): Boolean {
                // Check whether the initial data is ready.
                return if (viewModel.isReady) {
                    // The content is ready. Start drawing.
                    content.viewTreeObserver.removeOnPreDrawListener(this)
                    true
                } else {
                    // The content isn't ready. Suspend.
                    false
                }
            }
        }
    )
}
자바
// Create a new event for the activity.
@Override
protected void onCreate(@Nullable Bundle savedInstanceState) {
    super.onCreate(savedInstanceState);
    // Set the layout for the content view.
    setContentView(R.layout.main_activity);

    // Set up an OnPreDrawListener to the root view.
    final View content = findViewById(android.R.id.content);
    content.getViewTreeObserver().addOnPreDrawListener(
            new ViewTreeObserver.OnPreDrawListener() {
                @Override
                public boolean onPreDraw() {
                    // Check whether the initial data is ready.
                    if (mViewModel.isReady()) {
                        // The content is ready. Start drawing.
                        content.getViewTreeObserver().removeOnPreDrawListener(this);
                        return true;
                    } else {
                        // The content isn't ready. Suspend.
                        return false;
                    }
                }
            });
}
스플래시 화면 닫기 애니메이션 맞춤설정
Activity.getSplashScreen()을 통해 스플래시 화면의 애니메이션을 추가로 맞춤설정할 수 있습니다.
Kotlin
override fun onCreate(savedInstanceState: Bundle?) {
    super.onCreate(savedInstanceState)
    // ...

    // Add a callback that's called when the splash screen is animating to the
    // app content.
    splashScreen.setOnExitAnimationListener { splashScreenView ->
        // Create your custom animation.
        val slideUp = ObjectAnimator.ofFloat(
            splashScreenView,
            View.TRANSLATION_Y,
            0f,
            -splashScreenView.height.toFloat()
        )
        slideUp.interpolator = AnticipateInterpolator()
        slideUp.duration = 200L

        // Call SplashScreenView.remove at the end of your custom animation.
        slideUp.doOnEnd { splashScreenView.remove() }

        // Run your animation.
        slideUp.start()
    }
}
Java
@Override
protected void onCreate(@Nullable Bundle savedInstanceState) {
    super.onCreate(savedInstanceState);
    // ...

    // Add a callback that's called when the splash screen is animating to the
    // app content.
    getSplashScreen().setOnExitAnimationListener(splashScreenView -> {
        final ObjectAnimator slideUp = ObjectAnimator.ofFloat(
                splashScreenView,
                View.TRANSLATION_Y,
                0f,
                -splashScreenView.getHeight()
        );
        slideUp.setInterpolator(new AnticipateInterpolator());
        slideUp.setDuration(200L);

        // Call SplashScreenView.remove at the end of your custom animation.
        slideUp.addListener(new AnimatorListenerAdapter() {
            @Override
            public void onAnimationEnd(Animator animation) {
                splashScreenView.remove();
            }
        });

        // Run your animation.
        slideUp.start();
    });
}
이 콜백이 시작되면 스플래시 화면의
애니메이션 벡터 드로어블
이 시작됩니다. 앱 실행 시간에 따라 드로어블은 애니메이션 중간에 있을 수 있습니다.
SplashScreenView.getIconAnimationStart
를 사용하여 애니메이션이 시작된 시점을 알 수 있습니다. 다음과 같이 아이콘 애니메이션의 남은 시간을 계산할 수 있습니다.
Kotlin
// Get the duration of the animated vector drawable.
val animationDuration = splashScreenView.iconAnimationDuration
// Get the start time of the animation.
val animationStart = splashScreenView.iconAnimationStart
// Calculate the remaining duration of the animation.
val remainingDuration = if (animationDuration != null && animationStart != null) {
    (animationDuration - Duration.between(animationStart, Instant.now()))
        .toMillis()
        .coerceAtLeast(0L)
} else {
    0L
}
Java
// Get the duration of the animated vector drawable.
Duration animationDuration = splashScreenView.getIconAnimationDuration();
// Get the start time of the animation.
Instant animationStart = splashScreenView.getIconAnimationStart();
// Calculate the remaining duration of the animation.
long remainingDuration;
if (animationDuration != null && animationStart != null) {
    remainingDuration = animationDuration.minus(
            Duration.between(animationStart, Instant.now())
    ).toMillis();
    remainingDuration = Math.max(remainingDuration, 0L);
} else {
    remainingDuration = 0L;
}
추가 리소스
- 기존 스플래시 화면 구현을 Android 12 이상으로 이전
- Now in Android 앱, 스플래시 화면의 실제 구현을 보여주는